

Balcony Carrot Growing Hack: Imagine plucking fresh, sweet carrots right from your own balcony, even if you live in a tiny apartment! Sounds like a dream, right? Well, it doesn’t have to be! For centuries, humans have cultivated carrots, tracing their origins back to Afghanistan. These vibrant root vegetables weren’t always orange, either! They came in shades of purple, white, and yellow before Dutch growers popularized the orange variety we know and love today.
But let’s face it, not everyone has a sprawling garden to dedicate to growing these crunchy delights. That’s where this DIY article comes in! I’m going to share a simple, effective, and space-saving balcony carrot growing hack that will have you harvesting your own homegrown carrots in no time. Forget those bland, store-bought carrots – you deserve the satisfaction of nurturing your own food, and I’m here to show you how easy it can be. This trick is perfect for urban dwellers, apartment residents, or anyone with limited outdoor space who craves the taste of fresh, homegrown produce. So, grab your gardening gloves, and let’s get started!
Balcony Carrot Growing: From Seed to Snack in Small Spaces
Hey there, fellow balcony gardeners! Dreaming of fresh, crunchy carrots but short on space? I’ve got you covered! I’m going to walk you through my tried-and-true method for growing delicious carrots right on your balcony. It’s easier than you think, and the reward of homegrown carrots is totally worth it.
Choosing the Right Carrot Variety and Container
Before we get our hands dirty, let’s talk about the essentials: carrot varieties and containers. Not all carrots are created equal, especially when it comes to container gardening.
* Variety is Key: Opt for shorter, rounder carrot varieties like ‘Thumbelina,’ ‘Paris Market,’ or ‘Little Finger.’ These guys don’t need as much depth as longer varieties like ‘Nantes’ or ‘Danvers.’ Trust me, you’ll save yourself a lot of frustration (and stunted carrots!) by choosing wisely.
* Container Size Matters: Carrots need room to grow downwards. I recommend a container that’s at least 12 inches deep, but 18 inches is even better. The wider the container, the more carrots you can grow! Think large pots, window boxes, or even repurposed storage bins (just make sure they have drainage holes!).
* Drainage is Non-Negotiable: Carrots hate soggy feet! Ensure your container has plenty of drainage holes. If you’re using a repurposed container, drill some holes in the bottom. You can also add a layer of gravel or broken pottery at the bottom of the container to improve drainage.
* Material Considerations: Plastic, terracotta, or even fabric pots work well. I personally prefer terracotta because it allows the soil to breathe, but plastic is more lightweight and retains moisture better. Fabric pots are great for air pruning the roots, which encourages healthier growth.
Preparing Your Carrot-Friendly Soil
Carrots are picky about their soil. They need loose, well-draining soil that’s free of rocks and clumps. Rocky soil can cause your carrots to fork or become misshapen.
* The Perfect Mix: I like to use a mix of equal parts potting soil, compost, and sand or perlite. The potting soil provides nutrients, the compost adds organic matter, and the sand or perlite improves drainage.
* Avoid Heavy Clay Soil: Clay soil is a carrot’s worst nightmare. It’s dense, poorly draining, and can compact around the roots, leading to stunted growth. If you have clay soil, amend it heavily with compost and other organic matter before planting.
* Sifting is Your Friend: Before filling your container, sift the soil mixture to remove any large rocks, clumps, or debris. This will ensure that your carrots have plenty of room to grow straight and true.
* pH Balance: Carrots prefer a slightly acidic soil pH of around 6.0 to 6.8. You can test your soil pH with a home testing kit and amend it accordingly.
Planting Your Carrot Seeds
Now for the fun part: planting! Carrot seeds are tiny, so it’s important to handle them carefully.
1. Moisten the Soil: Before planting, thoroughly moisten the soil in your container. This will help the seeds germinate and prevent them from being washed away when you water.
2. Sow Seeds Sparsely: Sprinkle the carrot seeds thinly over the surface of the soil. I know it’s tempting to plant them close together, but trust me, you’ll have to thin them out later anyway.
3. Cover Lightly: Gently cover the seeds with a thin layer (about ¼ inch) of soil. You can also use vermiculite, which helps retain moisture and prevents the soil from crusting over.
4. Water Gently: Water the soil gently with a watering can or spray bottle. Avoid using a strong stream of water, which can dislodge the seeds.
5. Label Your Container: Don’t forget to label your container with the date and variety of carrots you planted. This will help you keep track of your progress.
Caring for Your Growing Carrots
Once your carrots are planted, it’s important to provide them with the right care to ensure a bountiful harvest.
* Watering: Keep the soil consistently moist, but not soggy. Water deeply whenever the top inch of soil feels dry to the touch. Avoid overhead watering, which can promote fungal diseases.
* Sunlight: Carrots need at least 6 hours of sunlight per day. Place your container in a sunny spot on your balcony. If you don’t have enough sunlight, you can supplement with grow lights.
* Thinning: This is crucial! Once the seedlings are a few inches tall, thin them out so that they are about 1-2 inches apart. This will give them enough room to grow to their full size. Don’t just pull them out; gently snip them off at the soil line to avoid disturbing the roots of the remaining carrots.
* Fertilizing: Carrots are light feeders, but they will benefit from occasional fertilization. Use a balanced fertilizer (like 10-10-10) diluted to half strength. Fertilize every 2-3 weeks.
* Weeding: Keep your container free of weeds, which can compete with your carrots for nutrients and water. Gently pull out any weeds that appear.
* Pest Control: Carrots are relatively pest-resistant, but they can be susceptible to carrot rust flies and aphids. Inspect your plants regularly for signs of pests and take action if necessary. You can use insecticidal soap or neem oil to control these pests.
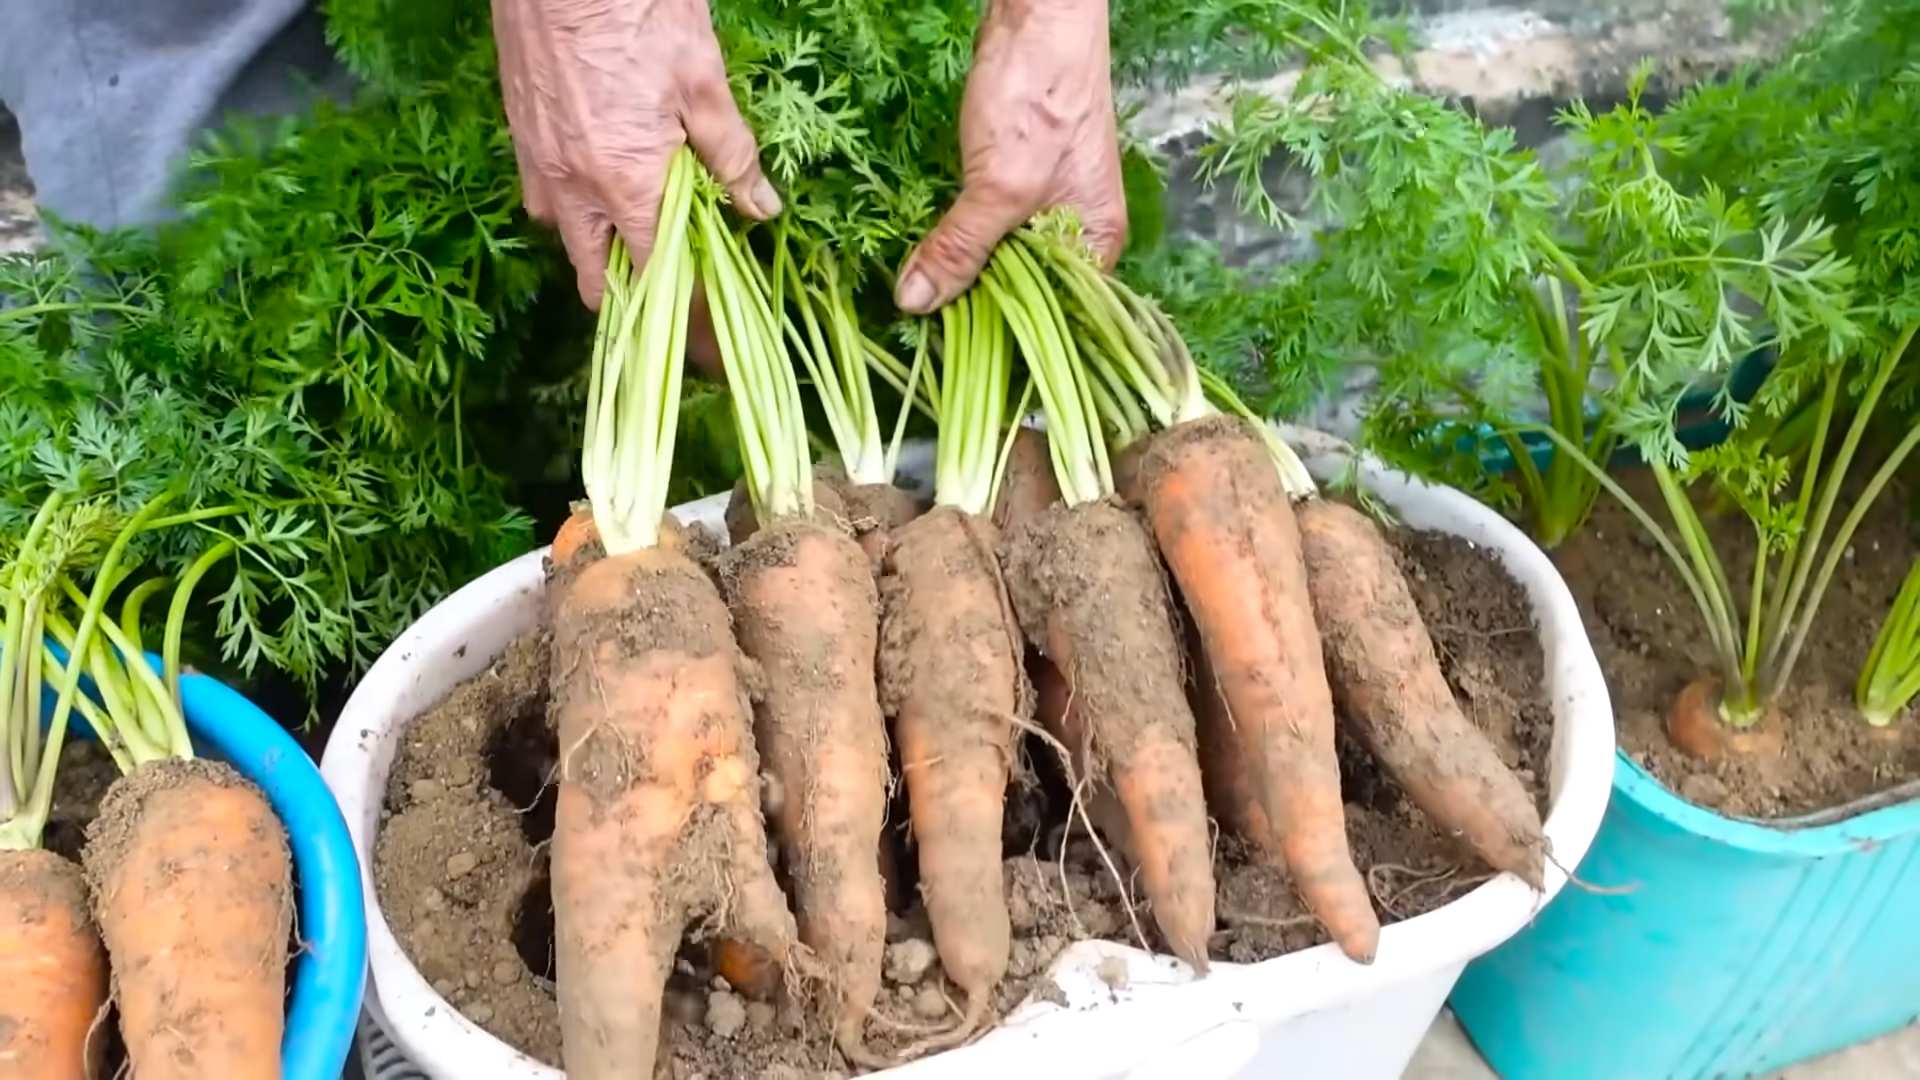
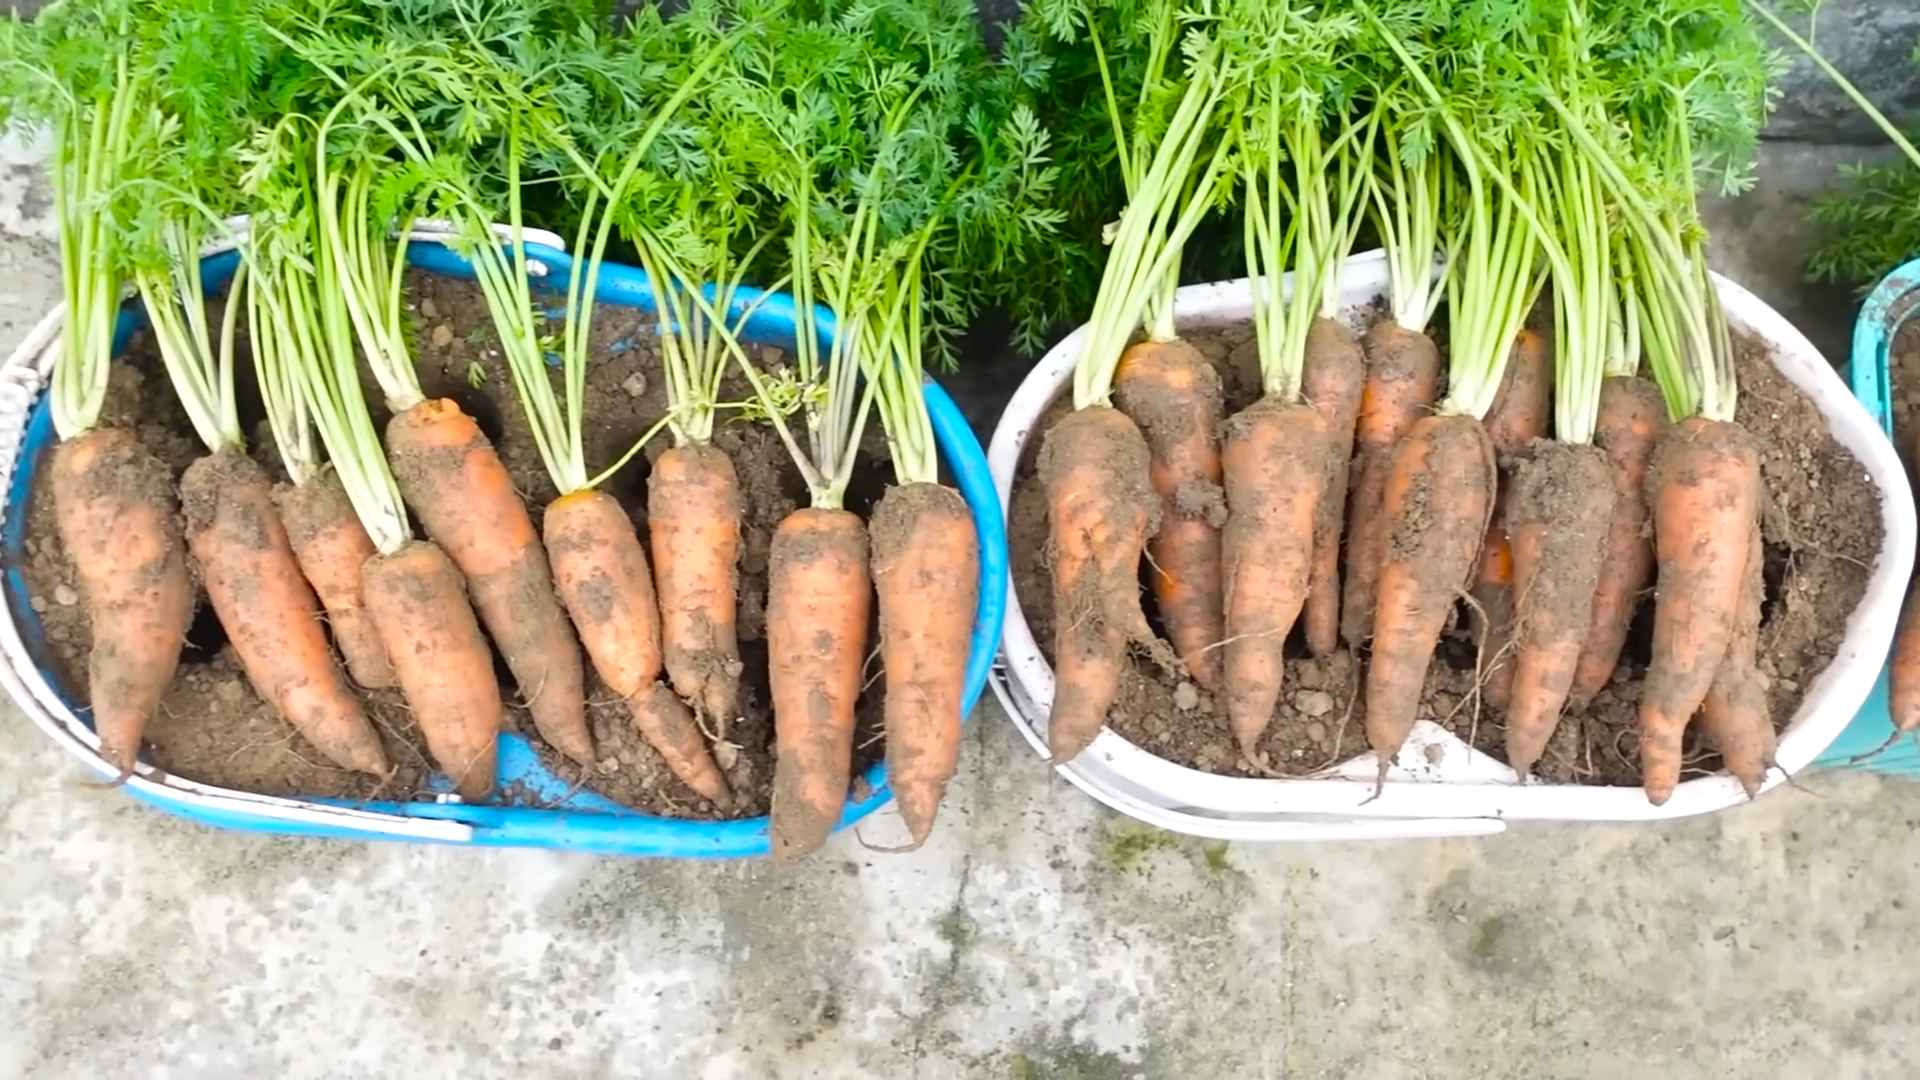
Harvesting Your Homegrown Carrots
The moment you’ve been waiting for! Harvesting your own carrots is incredibly satisfying.
1. Check the Maturity Date: Carrot varieties have different maturity dates, so check the seed packet to see when your carrots should be ready to harvest.
2. Look for Size and Color: Carrots are typically ready to harvest when they reach the desired size and color. You can gently brush away some of the soil around the top of the carrot to check its size.
3. Loosen the Soil: Before pulling the carrots, loosen the soil around them with a trowel or garden fork. This will make it easier to pull them out without breaking them.
4. Gently Pull: Grasp the carrot at the base of the greens and gently pull it straight up. If the carrot is stuck, try wiggling it back and forth to loosen it.
5. Enjoy Your Harvest: Wash your carrots thoroughly and enjoy them fresh from the garden! They’ll taste so much better than store-bought carrots.
Troubleshooting Common Carrot Growing Problems
Even with the best care, you might encounter some problems along the way. Here are a few common issues and how to fix them:
* Forked Carrots: This is usually caused by rocky soil or compacted soil. Make sure your soil is loose and free of rocks.
* Stunted Growth: This can be caused by a variety of factors, including poor soil, lack of sunlight, or overcrowding. Make sure your carrots have the right conditions to thrive.
* Bitter Taste: This can be caused by hot weather or inconsistent watering. Try to keep the soil consistently moist and provide shade during the hottest part of the day.
* Pest Infestations: Keep an eye out for pests and take action if necessary. Insecticidal soap and neem oil are effective treatments for many common carrot pests.
Extra Tips for Balcony Carrot Success
Here are a few extra tips to help you grow the best carrots possible on your balcony:
* Succession Planting: Plant a new batch of carrot seeds every few weeks to ensure a continuous harvest throughout the growing season.
* Companion Planting: Plant carrots alongside other vegetables and herbs that can benefit them. Good companions for carrots include onions, garlic, rosemary, and sage.
* Mulching: Apply a layer of mulch around your carrot plants to help retain moisture, suppress weeds, and regulate soil temperature.
* Rotate Your Crops: Avoid planting carrots in the same container year after year. This can help prevent soilborne diseases and pests.
* Have Fun! Gardening should be enjoyable. Don’t be afraid to experiment and try new things.
Growing carrots on your balcony is a rewarding experience. With a little bit of planning and care, you can enjoy fresh, delicious carrots all season long. Happy gardening!
Conclusion
So, there you have it! This balcony carrot growing hack is more than just a gardening tip; it’s a gateway to fresh, homegrown goodness, even if you’re limited to a small outdoor space. We’ve shown you how to transform your balcony into a miniature carrot farm, bypassing the need for a sprawling garden and embracing the joy of cultivating your own food.
Why is this a must-try? Because it’s accessible, affordable, and incredibly rewarding. Imagine the satisfaction of harvesting vibrant, sweet carrots that you nurtured from seed to table, all within the confines of your balcony. It’s a fantastic way to connect with nature, reduce your reliance on store-bought produce, and add a touch of green to your urban environment. Plus, it’s a fantastic project for families, teaching children about the wonders of gardening and the importance of healthy eating.
But the beauty of this balcony carrot growing hack lies in its adaptability. Feel free to experiment with different carrot varieties. Nantes carrots are a classic choice, known for their sweetness and uniform shape, but don’t be afraid to try Chantenay carrots, which are shorter and stouter, or even colorful varieties like purple or yellow carrots for a visual treat.
Consider companion planting to enhance your carrot crop. Marigolds can deter nematodes, while onions and garlic can repel carrot root flies. These natural pest control methods will help you keep your carrots healthy and thriving without the need for harsh chemicals.
Another variation to explore is the type of container you use. While we’ve suggested specific sizes, you can adapt based on your available space and aesthetic preferences. Just ensure the container is deep enough to accommodate the carrot roots. You can even get creative with repurposed containers like old buckets or storage bins, as long as they have drainage holes.
Don’t forget the importance of proper watering and fertilization. Carrots need consistent moisture, but avoid overwatering, which can lead to root rot. A balanced fertilizer, applied according to package instructions, will provide the essential nutrients for healthy growth.
We are confident that this balcony carrot growing hack will empower you to grow delicious carrots, regardless of your gardening experience. It’s a simple, effective, and enjoyable way to bring the bounty of the garden to your balcony.
Now, it’s your turn! We wholeheartedly encourage you to give this DIY trick a try. Plant those seeds, nurture those seedlings, and watch your balcony transform into a thriving carrot patch. And most importantly, share your experience with us! We’d love to hear about your successes, challenges, and any variations you’ve discovered. Post photos of your balcony carrot garden on social media using [Your Hashtag Here] and let’s inspire others to embrace the joy of balcony gardening. Let’s cultivate a community of balcony gardeners, sharing tips, tricks, and the delicious rewards of our homegrown harvests. Happy growing!
Frequently Asked Questions (FAQ)
What kind of soil is best for growing carrots in containers on a balcony?
The ideal soil for container-grown carrots is a loose, well-draining potting mix. Avoid heavy clay soils, as they can hinder root development and result in misshapen carrots. Look for a potting mix specifically formulated for vegetables, or create your own by combining equal parts of peat moss, perlite, and compost. The key is to ensure the soil is light and airy, allowing the carrot roots to easily penetrate and expand. Adding some sand can also improve drainage. Remember, healthy soil equals healthy carrots!
How often should I water my balcony carrots?
Carrots need consistent moisture to thrive, but overwatering can lead to root rot. Water your carrots deeply whenever the top inch of soil feels dry to the touch. The frequency of watering will depend on factors such as the weather, the size of your container, and the type of potting mix you’re using. In hot, sunny weather, you may need to water daily, while in cooler, cloudier conditions, watering every other day may suffice. A good rule of thumb is to check the soil moisture regularly and adjust your watering schedule accordingly. Ensure your container has adequate drainage to prevent water from pooling at the bottom.
How much sunlight do balcony carrots need?
Carrots require at least six hours of direct sunlight per day to grow properly. Choose a location on your balcony that receives ample sunlight throughout the day. If your balcony is partially shaded, try to position your carrot containers in the sunniest spot. If you’re struggling to provide enough natural light, you can supplement with grow lights. Position the grow lights a few inches above the carrot seedlings and adjust the height as they grow. Remember, sunlight is essential for photosynthesis, the process by which plants convert light energy into food.
What fertilizer should I use for my balcony carrots?
A balanced fertilizer is best for carrots. Look for a fertilizer with an NPK ratio (nitrogen, phosphorus, potassium) of 5-10-10 or 10-10-10. Nitrogen promotes leafy growth, phosphorus supports root development, and potassium enhances overall plant health. Apply the fertilizer according to the package instructions, typically every two to three weeks. You can also use organic fertilizers such as compost tea or fish emulsion. These natural fertilizers provide essential nutrients while improving soil health. Avoid over-fertilizing, as this can lead to excessive leafy growth at the expense of root development.
How do I prevent pests from attacking my balcony carrots?
Several pests can attack carrots, including carrot root flies, aphids, and nematodes. To prevent pest infestations, practice good gardening hygiene. Remove any weeds or debris from around your carrot containers, as these can harbor pests. Companion planting can also help deter pests. Marigolds, onions, and garlic are known to repel common carrot pests. You can also use insect netting to protect your carrots from flying insects. If you notice signs of pest infestation, such as damaged leaves or stunted growth, treat your carrots with an organic insecticide such as neem oil or insecticidal soap.
When is the best time to harvest my balcony carrots?
Carrots are typically ready to harvest 60-80 days after planting, depending on the variety. Check the seed packet for specific harvesting instructions. You can tell when carrots are ready to harvest by their size and color. Gently pull back the soil around the base of the carrot to check its diameter. Carrots are typically harvested when they are about 1-2 inches in diameter. To harvest, gently loosen the soil around the carrot and pull it straight up. If the soil is dry, water it beforehand to make harvesting easier.
Can I grow carrots in the same container year after year?
While it’s possible to reuse containers, it’s generally recommended to refresh the soil each year. Over time, the soil can become depleted of nutrients and may harbor pests or diseases. Before replanting, remove the old soil and replace it with fresh potting mix. You can also amend the old soil with compost or other organic matter to improve its fertility. Cleaning the container with a mild bleach solution can also help prevent the spread of diseases. Crop rotation, even in containers, can help maintain soil health and prevent pest and disease problems.
What if my carrots are small or misshapen?
Several factors can contribute to small or misshapen carrots. Insufficient sunlight, poor soil drainage, overcrowding, and pest infestations are common culprits. Ensure your carrots are receiving at least six hours of direct sunlight per day. Use a loose, well-draining potting mix and avoid overwatering. Thin out your carrot seedlings to provide adequate spacing for root development. Protect your carrots from pests with companion planting or organic insecticides. If your carrots are still small or misshapen, consider amending the soil with compost or other organic matter to improve its fertility.
Can I grow carrots on a balcony in winter?
In many regions, you can grow carrots on a balcony in winter, provided you take certain precautions. Carrots are relatively cold-hardy and can tolerate light frosts. However, they will need protection from freezing temperatures. You can move your carrot containers to a sheltered location, such as a covered balcony or a greenhouse. You can also wrap the containers with burlap or bubble wrap to insulate the roots. If temperatures are expected to drop below freezing, you may need to bring your carrot containers indoors. Choose a variety that is known to be cold hardy.


Leave a Comment