

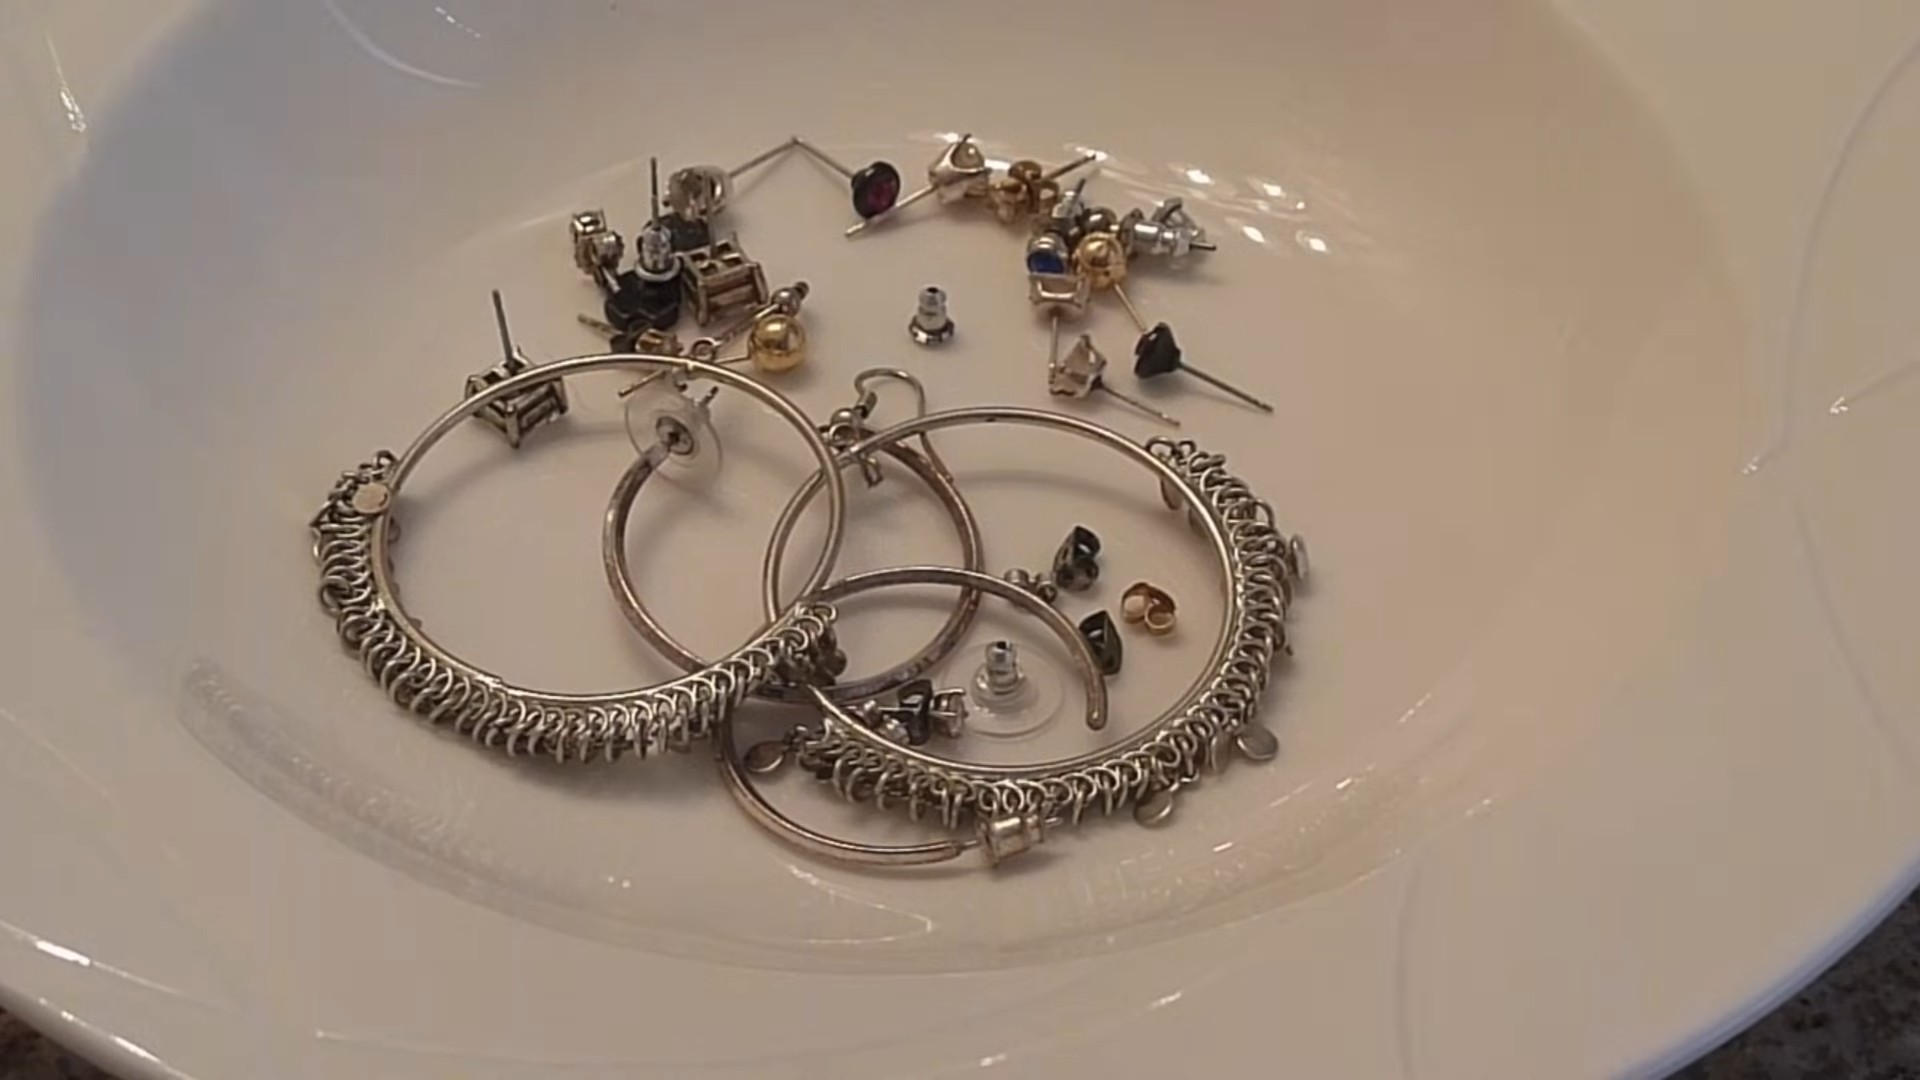
Clean Jewelry with Toothpaste: Sounds a little unconventional, right? I know, I know, you’re probably thinking, “Toothpaste? On my precious jewels?” But trust me, this simple DIY trick is a game-changer when it comes to restoring the sparkle and shine to your favorite pieces. For centuries, people have sought ways to keep their jewelry looking its best, from using specialized cleaning solutions to employing age-old polishing techniques. But what if I told you the secret to dazzling jewelry was already sitting in your bathroom cabinet?
Let’s face it, life happens. Our jewelry accumulates dirt, oils, and grime from everyday wear, dulling its brilliance. Professional cleaning can be expensive and time-consuming. That’s where this amazing hack comes in. Learning how to clean jewelry with toothpaste is not only incredibly easy and affordable, but it’s also surprisingly effective. I’m going to show you how to safely and effectively use this common household item to bring back the luster to your gold, silver, and even some gemstone jewelry. Get ready to be amazed at how a little bit of toothpaste can make your jewelry look brand new again!

DIY Jewelry Cleaning with Toothpaste: Sparkle Like New!
Hey everyone! I’m so excited to share this super easy and effective way to clean your jewelry using something you probably already have in your bathroom: toothpaste! I know, it sounds a little weird, but trust me, it works wonders. This method is perfect for cleaning silver, gold, and even some gemstones (but always test a small, inconspicuous area first!). Let’s get started!
What You’ll Need:
* Soft-bristled toothbrush: An old toothbrush is perfect for this! Make sure it’s clean and the bristles are soft to avoid scratching your jewelry.
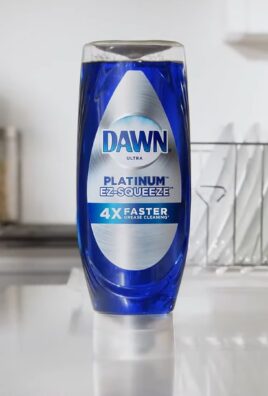
* Toothpaste: Plain, white toothpaste is best. Avoid gel toothpastes, whitening toothpastes with abrasive particles, or those with added colors, as these can potentially damage delicate jewelry.
* Warm water: For rinsing.
* Soft cloth: A microfiber cloth is ideal for drying and polishing.
* Small bowl: To hold the warm water.
* Optional: Cotton swabs for cleaning intricate details.
Choosing the Right Toothpaste: A Word of Caution
Before we dive in, it’s really important to choose the right toothpaste. As I mentioned, you want a plain, white, non-gel toothpaste. The reason is that gel toothpastes often contain ingredients that aren’t ideal for cleaning metals, and whitening toothpastes can be too abrasive. Abrasive toothpastes can actually scratch the surface of your jewelry, especially softer metals like gold and silver. So, stick to the basics!
Step-by-Step Cleaning Guide
Okay, now for the fun part! Here’s how to clean your jewelry with toothpaste:
1. Prepare Your Workspace: Lay down a clean towel or cloth on your work surface to protect it and prevent your jewelry from rolling away. Gather all your supplies within easy reach.
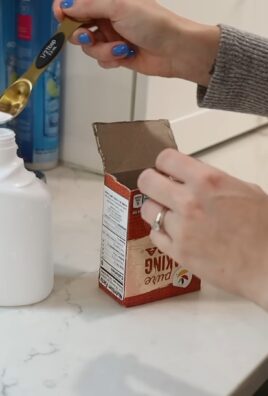
2. Wet the Toothbrush: Lightly dampen your soft-bristled toothbrush with warm water. You don’t want it soaking wet, just slightly moist.
3. Apply Toothpaste: Squeeze a small amount of toothpaste onto the toothbrush. A pea-sized amount is usually enough for one or two pieces of jewelry. You can always add more if needed.
4. Gently Scrub: Gently scrub your jewelry with the toothpaste-covered toothbrush. Use small, circular motions to reach all the nooks and crannies. Be especially careful around gemstones or delicate settings. Don’t apply too much pressure, let the toothpaste do the work.
5. Focus on Tarnished Areas: Pay extra attention to areas that are heavily tarnished or dirty. You might need to scrub these areas a little longer. For really stubborn tarnish, you can let the toothpaste sit on the jewelry for a minute or two before scrubbing.
6. Clean Intricate Details: For jewelry with intricate details or hard-to-reach areas, use a cotton swab dipped in toothpaste. This will allow you to get into those tiny spaces and remove any dirt or grime.
7. Rinse Thoroughly: Once you’ve scrubbed your jewelry, rinse it thoroughly under warm running water. Make sure to remove all traces of toothpaste. Any leftover toothpaste can dry and leave a dull residue.
8. Dry and Polish: Use a soft, clean cloth to dry your jewelry completely. A microfiber cloth is ideal for polishing and removing any water spots. Gently buff the jewelry to restore its shine.
9. Inspect and Repeat (If Necessary): Take a close look at your jewelry to see if there are any areas that need further cleaning. If so, repeat the process.
Cleaning Different Types of Jewelry
While this method is generally safe for most jewelry, there are a few things to keep in mind depending on the type of jewelry you’re cleaning.
Cleaning Silver Jewelry
Silver is prone to tarnishing, so you might need to clean it more frequently. The toothpaste method works great for removing tarnish from silver jewelry. Just be sure to use a non-abrasive toothpaste and a soft-bristled toothbrush to avoid scratching the surface.
Cleaning Gold Jewelry
Gold is a relatively soft metal, so it’s important to be gentle when cleaning it. Use a soft-bristled toothbrush and avoid using too much pressure. This method is perfect for removing dirt and grime from gold jewelry and restoring its shine.
Cleaning Diamond Jewelry
Diamonds are pretty durable, but the settings that hold them in place can be delicate. Be careful when cleaning around the settings and avoid using too much pressure. The toothpaste method can help remove dirt and oil from diamonds, making them sparkle like new.
Cleaning Gemstone Jewelry
Some gemstones are more delicate than others, so it’s important to be cautious when cleaning them. Avoid using this method on porous gemstones like opals, pearls, or turquoise, as the toothpaste can damage them. For other gemstones, test a small, inconspicuous area first to make sure the toothpaste doesn’t cause any discoloration or damage.
Dealing with Stubborn Tarnish
Sometimes, you might encounter stubborn tarnish that’s difficult to remove with just toothpaste and a toothbrush. In these cases, you can try a few different things:
* Soak the Jewelry: Before scrubbing, soak the jewelry in warm water with a small amount of mild dish soap for about 15-20 minutes. This can help loosen the tarnish and make it easier to remove.
* Make a Paste: Mix the toothpaste with a little bit of baking soda to create a more abrasive paste. Be very careful when using this paste, as it can scratch delicate jewelry. Test it on a small, inconspicuous area first.
* Use a Silver Polishing Cloth: For heavily tarnished silver jewelry, you might need to use a silver polishing cloth after cleaning with toothpaste. These cloths are specially designed to remove tarnish and restore shine.
Preventing Tarnish in the Future
Once you’ve cleaned your jewelry, you’ll want to take steps to prevent it from tarnishing again. Here are a few tips:
* Store Your Jewelry Properly: Store your jewelry in a dry, airtight container or bag. This will help protect it from moisture and air, which can cause tarnish.
* Remove Your Jewelry Before Showering or Swimming: Water, soap, and chlorine can all damage your jewelry and cause it to tarnish.
* Avoid Contact with Chemicals: Perfume, lotion, and other chemicals can also damage your jewelry. Apply these products before putting on your jewelry.
* Clean Your Jewelry Regularly: Regular cleaning will help prevent tarnish from building up in the first place.
Important Considerations and Safety Tips
* Always test on a small, inconspicuous area first: Before cleaning your entire piece of jewelry, test the toothpaste on a small, hidden area to make sure it doesn’t cause any damage or discoloration.
* Be gentle: Avoid using too much pressure when scrubbing your jewelry, especially if it’s delicate.
* Rinse thoroughly: Make sure to rinse all traces of toothpaste from your jewelry to prevent any residue from drying and dulling the shine.
* Don’t use this method on porous gemstones: As mentioned earlier, avoid using this method on porous gemstones like opals, pearls, or turquoise.
* If in doubt, consult a professional: If you’re unsure about how to clean a particular piece of jewelry, it’s always best to consult a professional jeweler.
My Personal Experience and Results
I’ve been using this method for years to clean my jewelry, and I’ve always been amazed at the results. It’s so easy and convenient, and it really does make my jewelry sparkle like new. I especially love using it to clean my silver earrings and necklaces, which tend to tarnish quickly.
I hope you found this guide helpful! Give it a try and let me know how it works for you. Happy cleaning!
Conclusion
So, there you have it! Unveiling the secret to sparkling jewelry without harsh chemicals or expensive trips to the jeweler. This simple, yet incredibly effective, DIY jewelry cleaning trick using toothpaste is a game-changer for anyone who wants to keep their precious pieces looking their absolute best. We’ve shown you how easy it is to restore the brilliance of your jewelry using an item you likely already have in your bathroom.
Why is this a must-try? Because it’s gentle, affordable, and delivers noticeable results. Think about it: no more worrying about damaging delicate stones or intricate settings with abrasive cleaners. No more shelling out a fortune for professional cleaning services when you can achieve similar results at home in just a few minutes. This method is particularly effective for removing tarnish and grime buildup, restoring the original shine and luster of your jewelry.
But the beauty of this DIY jewelry cleaning method lies in its adaptability. While we’ve focused on using regular, non-gel toothpaste, you can experiment with different types to see what works best for your specific jewelry. For instance, some people find that whitening toothpaste provides an extra boost of shine, while others prefer a sensitive toothpaste for more delicate pieces. Just remember to avoid toothpastes with abrasive particles, as these could scratch softer metals and gemstones.
Consider these variations to personalize your cleaning routine:
* For heavily tarnished silver: Create a paste of toothpaste and baking soda for extra cleaning power. Apply gently and rinse thoroughly.
* For intricate designs: Use a soft-bristled toothbrush to reach those hard-to-clean areas.
* For gemstones: Be extra cautious with porous gemstones like pearls and opals. Use a very gentle touch and avoid prolonged exposure to toothpaste.
We are confident that once you try this DIY jewelry cleaning trick, you’ll be amazed by the results. It’s a simple, effective, and budget-friendly way to keep your jewelry looking its best. It’s time to ditch the expensive cleaners and embrace the power of toothpaste!
Now, we want to hear from you! Have you tried cleaning your jewelry with toothpaste before? What were your results? Do you have any tips or variations to share? We encourage you to give this DIY jewelry cleaning method a try and share your experience in the comments below. Let’s build a community of sparkling jewelry enthusiasts! Your feedback will not only help others but also inspire us to explore even more innovative and effective cleaning solutions. Don’t be shy – let us know how this simple trick transformed your jewelry collection! We are eager to learn from your experiences and continue to refine this method for optimal results. So, grab your toothpaste, gather your jewelry, and get ready to be amazed!
FAQ
Q: Is it safe to clean all types of jewelry with toothpaste?
A: While toothpaste is generally safe for most jewelry, it’s essential to exercise caution with certain materials. Avoid using toothpaste on soft or porous gemstones like pearls, opals, emeralds, and turquoise, as it can damage their surface. Also, be careful with plated jewelry, as the abrasive nature of some toothpastes can wear away the plating over time. Solid gold, silver, platinum, and durable gemstones like diamonds, sapphires, and rubies are generally safe to clean with toothpaste, but always test a small, inconspicuous area first.
Q: What kind of toothpaste should I use for cleaning jewelry?
A: The best type of toothpaste to use is a plain, non-gel toothpaste without abrasive particles. Avoid toothpastes that contain whitening agents, baking soda, or charcoal, as these can be too harsh for some jewelry. A gentle, fluoride-based toothpaste is usually the safest option. Always check the ingredients list to ensure there are no harsh abrasives that could scratch your jewelry.
Q: How often should I clean my jewelry with toothpaste?
A: The frequency of cleaning depends on how often you wear your jewelry and how much exposure it has to dirt, oils, and other substances. For jewelry that you wear daily, cleaning it once a month is usually sufficient. For pieces that you only wear occasionally, cleaning them every few months should be enough. However, if you notice that your jewelry is becoming dull or tarnished, you can clean it more frequently.
Q: Can I use an electric toothbrush to clean my jewelry with toothpaste?
A: While an electric toothbrush might seem like a good idea for cleaning jewelry, it’s generally not recommended. The vibrations and bristles of an electric toothbrush can be too harsh for delicate jewelry and gemstones. It’s best to use a soft-bristled toothbrush and gently scrub the jewelry by hand.
Q: What should I do if my jewelry has stubborn tarnish that toothpaste can’t remove?
A: If toothpaste alone isn’t enough to remove stubborn tarnish, you can try creating a paste of toothpaste and baking soda. Apply the paste to the tarnished areas and gently scrub with a soft-bristled toothbrush. Rinse thoroughly with water and dry with a soft cloth. For heavily tarnished silver, you may need to repeat this process several times. If the tarnish persists, consider seeking professional cleaning services.
Q: How do I properly dry my jewelry after cleaning it with toothpaste?
A: After rinsing your jewelry with water, gently pat it dry with a soft, lint-free cloth. Avoid using paper towels, as they can scratch the surface of your jewelry. For intricate designs, you can use a hairdryer on a low, cool setting to dry hard-to-reach areas. Make sure your jewelry is completely dry before storing it to prevent tarnish and corrosion.
Q: Can I use this method to clean costume jewelry?
A: Cleaning costume jewelry with toothpaste requires extra caution. Costume jewelry is often made with inexpensive metals and coatings that can be easily damaged by abrasive cleaners. If you choose to clean costume jewelry with toothpaste, use a very gentle touch and avoid prolonged exposure. Test a small, inconspicuous area first to ensure that the toothpaste doesn’t damage the finish. It’s often safer to clean costume jewelry with a mild soap and water solution.
Q: How should I store my jewelry after cleaning it?
A: Proper storage is essential for preventing tarnish and keeping your jewelry looking its best. Store your jewelry in a cool, dry place, away from direct sunlight and humidity. Individual jewelry pouches or boxes are ideal for preventing scratches and tangling. You can also place anti-tarnish strips in your jewelry box to absorb moisture and prevent tarnish. Avoid storing your jewelry in the bathroom, as the humidity can accelerate tarnish.
Leave a Comment