

Growing Native Shallots at Home can seem daunting, but trust me, it’s more rewarding than you might think! Have you ever dreamed of snipping fresh, flavorful shallots right from your backyard, adding that perfect zing to your favorite dishes? Well, stop dreaming and start planting! This DIY guide is your key to unlocking a world of culinary possibilities, all starting with a humble shallot.
Shallots, with their delicate onion-garlic flavor, have been cultivated for centuries, tracing back to ancient civilizations in Asia. They’ve been prized for their medicinal properties and culinary versatility. In many cultures, shallots symbolize prosperity and good health, often used in traditional recipes passed down through generations. I think that’s pretty neat!
But why bother growing native shallots at home when you can just buy them at the store? Simple: freshness, flavor, and control! Store-bought shallots can sometimes lack the vibrant taste of homegrown ones. Plus, by growing your own, you know exactly what’s going into them – no harmful pesticides or chemicals. This DIY project empowers you to cultivate a sustainable and delicious addition to your kitchen, and I’m here to guide you every step of the way. Let’s get our hands dirty and unlock the secrets to a bountiful shallot harvest!
Growing Native Shallots at Home: A DIY Guide
Alright, shallot lovers! If you’re anything like me, you adore the subtle, sweet flavor of shallots in your cooking. And what’s better than using shallots you’ve grown yourself? It’s surprisingly easy, and I’m going to walk you through the whole process of growing native shallots right in your backyard (or even in containers!). Let’s get started!
Choosing Your Shallots and Preparing for Planting
Before we get our hands dirty, we need to talk about selecting the right shallots and getting everything ready. This is a crucial step, so pay close attention!
* Selecting Native Shallots: The key here is to find shallots that are specifically adapted to your local climate. Look for varieties labeled as “native” or “heirloom” to your region. These will be more resilient and productive. You can usually find these at local nurseries, farmers’ markets, or online seed suppliers specializing in heirloom varieties. Avoid supermarket shallots, as they may be treated to prevent sprouting.
* Timing is Everything: The best time to plant shallots is in the fall (September-November) in most regions. This allows them to establish roots before winter and get a head start in the spring. If you live in a colder climate with harsh winters, you can also plant them in early spring (March-April) as soon as the ground is workable.
* Soil Preparation: Shallots thrive in well-drained, fertile soil. Before planting, amend your soil with plenty of organic matter, such as compost or well-rotted manure. This will improve drainage, provide nutrients, and help retain moisture. Aim for a slightly acidic to neutral soil pH (around 6.0-7.0). You can test your soil pH with a simple soil testing kit from your local garden center.
* Sunlight Requirements: Shallots need at least 6 hours of sunlight per day to grow well. Choose a planting location that receives plenty of sunshine.
* Choosing a Planting Location: Select a spot in your garden that is well-drained and receives full sun. If you’re planting in containers, make sure they have drainage holes.
Planting Your Shallots
Now for the fun part – getting those shallots in the ground!
1. Prepare the Soil: Loosen the soil to a depth of about 12 inches using a garden fork or tiller. Remove any rocks, weeds, or debris. Incorporate compost or well-rotted manure into the soil. I usually add about 2-3 inches of compost to my planting area.
2. Separate the Shallot Bulbs: Gently separate the shallot bulbs into individual cloves. Each clove will grow into a new shallot plant. Be careful not to damage the cloves during separation.
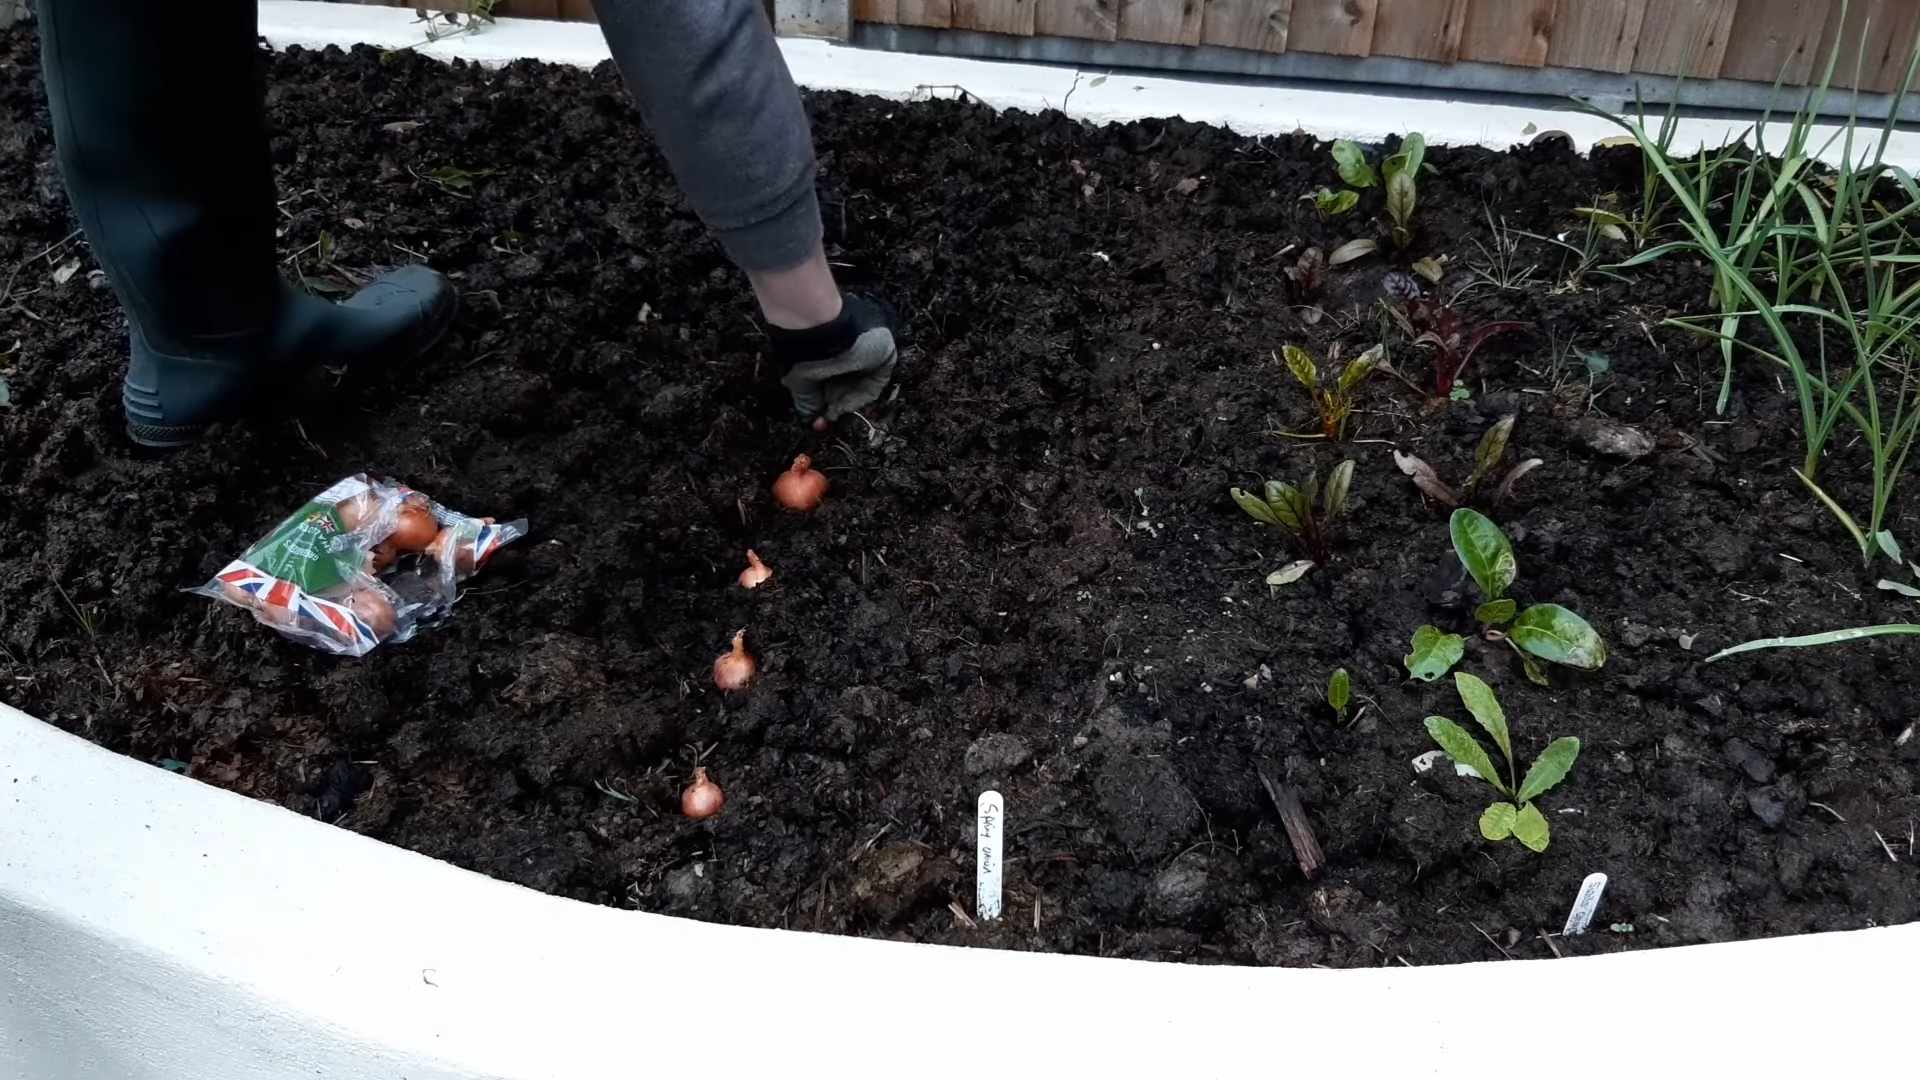
3. Plant the Cloves: Plant the shallot cloves about 6-8 inches apart in rows that are 12-18 inches apart. Plant them pointed end up, about 1-2 inches deep. The tip of the clove should be just below the soil surface.
4. Water Thoroughly: After planting, water the shallots thoroughly to settle the soil around the cloves.
5. Mulch (Optional): Apply a layer of mulch around the shallots to help retain moisture, suppress weeds, and regulate soil temperature. Straw, shredded leaves, or wood chips work well. I prefer straw because it breaks down nicely and adds organic matter to the soil.
Caring for Your Shallots
Once your shallots are planted, they need regular care to thrive. Here’s what you need to do:
* Watering: Water your shallots regularly, especially during dry periods. Keep the soil consistently moist, but not waterlogged. Overwatering can lead to bulb rot. A good rule of thumb is to water when the top inch of soil feels dry to the touch.
* Weeding: Keep the planting area free of weeds. Weeds compete with shallots for nutrients and water. Hand-pull weeds regularly or use a hoe to cultivate the soil. Be careful not to damage the shallot bulbs when weeding.
* Fertilizing: Shallots benefit from regular fertilization. Apply a balanced fertilizer (such as 10-10-10) every 4-6 weeks during the growing season. You can also use organic fertilizers, such as compost tea or fish emulsion. Follow the instructions on the fertilizer label.
* Pest and Disease Control: Shallots are generally resistant to pests and diseases, but they can be susceptible to onion maggots, thrips, and fungal diseases. Inspect your plants regularly for signs of pests or diseases. If you notice any problems, take action immediately. You can use insecticidal soap or neem oil to control pests. For fungal diseases, use a fungicide. Always follow the instructions on the product label.
* Scaping (Optional): Some gardeners choose to remove the flower stalks (scapes) that appear on shallots in the spring. This can encourage bulb development, but it’s not essential. The scapes are also edible and have a mild onion flavor. You can sauté them, add them to salads, or use them in other dishes.
Harvesting Your Shallots
The moment we’ve all been waiting for – harvesting!
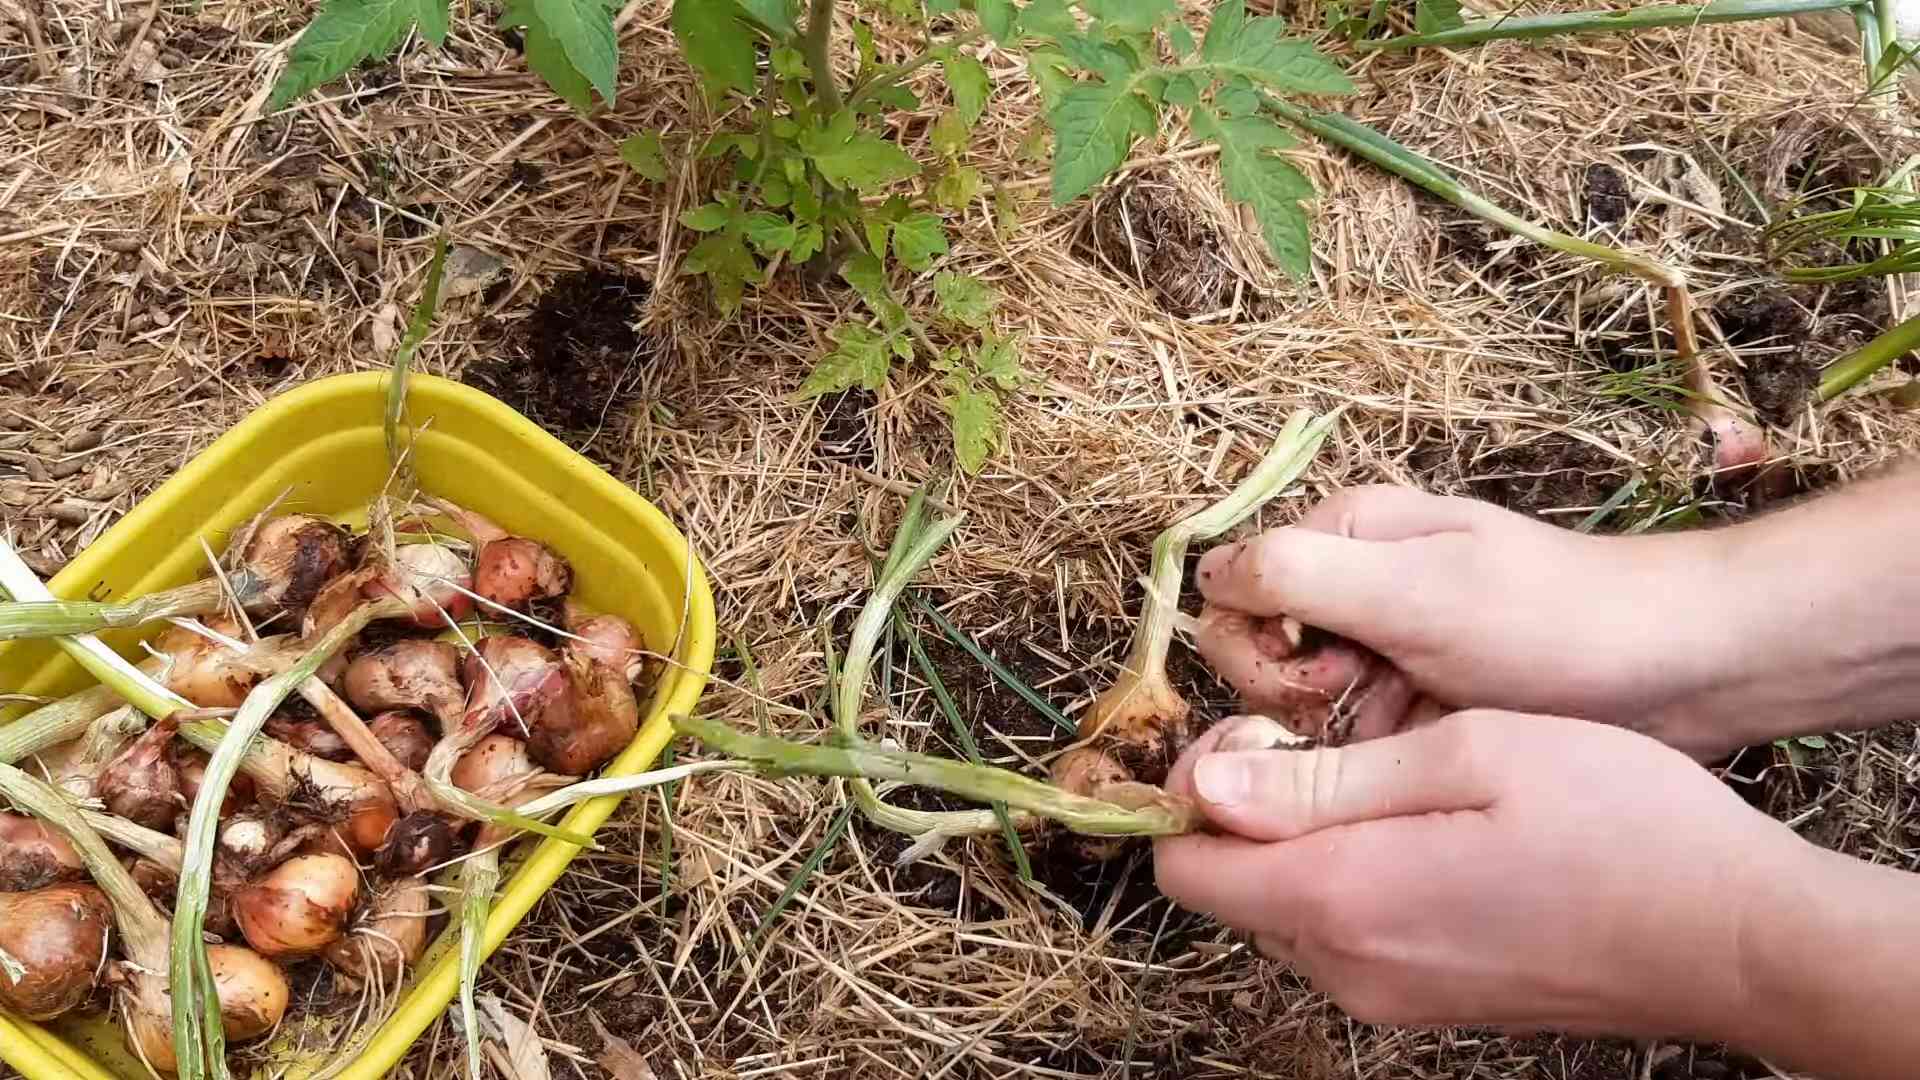
1. When to Harvest: Shallots are typically ready to harvest in late summer or early fall, about 90-120 days after planting. The leaves will start to turn yellow and brown, and the bulbs will be plump and firm.
2. How to Harvest: Gently loosen the soil around the shallots with a garden fork or trowel. Carefully lift the bulbs from the soil.
3. Curing: After harvesting, cure the shallots for 2-3 weeks in a warm, dry, well-ventilated place. This will help them to dry out and prevent rot. Spread the shallots out in a single layer on a screen or rack.
4. Storing: Store cured shallots in a cool, dry, dark place. They should keep for several months. You can store them in mesh bags or baskets. Avoid storing them in the refrigerator, as this can cause them to sprout.
Growing Shallots in Containers
Don’t have a garden? No problem! You can easily grow shallots in containers.
* Choosing a Container: Select a container that is at least 8 inches deep and 8 inches wide. Make sure it has drainage holes.
* Potting Mix: Use a high-quality potting mix that is well-draining. Avoid using garden soil, as it can become compacted in containers.
* Planting: Plant the shallot cloves as described above, spacing them about 4-6 inches apart.
* Care: Water and fertilize your container-grown shallots as described above.
* Location: Place the container in a sunny location that receives at least 6 hours of sunlight per day.
Troubleshooting
Even with the best care, you might encounter some problems. Here are a few common issues and how to deal with them:
* Bulb Rot: This is usually caused by overwatering or poor drainage. Make sure your soil is well-draining and avoid overwatering. If you notice bulb rot, remove the affected plants immediately to prevent the spread of the disease.
* Onion Maggots: These pests can damage shallot bulbs. Use row covers to prevent onion maggots from laying their eggs on your plants. You can also use diatomaceous earth to control onion maggots.
* Thrips: These tiny insects can suck the sap from shallot leaves. Use insecticidal soap or neem oil to control thrips.
* Yellowing Leaves: This can be caused by a variety of factors, including nutrient deficiencies, pests, or diseases. Check your plants carefully for signs of pests or diseases. Fertilize your plants regularly to prevent nutrient deficiencies.
Enjoying Your Harvest
Now that you’ve harvested your shallots, it’s time to enjoy them! Shallots can be used in a variety of dishes. They’re delicious sautéed, roasted, or used in sauces and dressings. I love using them in my homemade vinaigrettes and stir-fries. You can also pickle them for a tangy treat.
Here are a few of my favorite ways to use shallots:
* Shallot Vinaigrette: Mince a shallot and whisk it together with olive oil, vinegar, Dijon mustard, and a pinch of salt and pepper.
* Roasted Shallots: Toss shallots with olive oil, salt, and pepper and roast them in the oven until they’re tender and caramelized.
* Shallot Butter: Sauté minced shallots in butter until they’re soft and golden brown. Use this butter to top grilled meats, vegetables, or pasta.
* French Onion Soup: Shallots add a wonderful depth of flavor to classic French onion soup.
Saving Shallots for Next Year
If you want to grow shallots again next year, you can save some of your harvested bulbs for planting.
Conclusion
So, there you have it! Growing native shallots at home isn’t just a gardening project; it’s an investment in flavor, sustainability, and a deeper connection to your food. Forget those bland, imported shallots you find at the grocery store. Imagine the burst of fresh, nuanced flavor that homegrown native shallots will bring to your cooking. From delicate vinaigrettes to hearty stews, the possibilities are endless.
This DIY trick is a must-try for several compelling reasons. First, you’re gaining access to a superior product. Native shallots, often adapted to your local climate, boast a richer, more complex flavor profile than commercially grown varieties. Second, you’re reducing your carbon footprint by sourcing your food locally – right from your own backyard! Third, you’re experiencing the immense satisfaction of nurturing something from bulb to table. There’s a unique joy in harvesting your own ingredients and knowing exactly where they came from.
But the benefits don’t stop there. Growing your own shallots allows you to control the growing conditions, ensuring they are free from harmful pesticides and herbicides. You can tailor the soil and watering schedule to optimize their growth and flavor. Plus, shallots are incredibly versatile in the kitchen. They can be used in countless dishes, adding a subtle oniony sweetness that elevates any recipe.
Ready to take your culinary creations to the next level?
Don’t be afraid to experiment with different varieties of native shallots to find your favorite. Some popular options include the French Grey shallot, known for its delicate flavor, and the Dutch Yellow shallot, prized for its storage capabilities. You can also try planting shallots in different locations in your garden to see how sunlight and soil conditions affect their growth.
Consider companion planting your shallots with herbs like rosemary or thyme, which can help deter pests and improve their flavor. You can also intercrop them with other vegetables like carrots or beets to maximize space in your garden.
And if you’re feeling adventurous, try pickling your shallots for a tangy and delicious condiment. Or, caramelize them slowly in butter for a sweet and savory topping for burgers or sandwiches.
We encourage you to embrace this DIY trick and experience the joy of growing your own native shallots. It’s a rewarding and sustainable way to enhance your cooking and connect with nature.
Share your experience!
We’d love to hear about your adventures in growing native shallots at home. Share your tips, tricks, and favorite recipes in the comments below. Let’s build a community of passionate gardeners and food lovers who are committed to growing their own delicious and sustainable food. Don’t forget to tag us in your social media posts using #HomegrownShallots and #DIYGardening. We can’t wait to see what you create!
Frequently Asked Questions (FAQ)
What exactly are native shallots, and how are they different from regular shallots?
Native shallots refer to shallot varieties that are either indigenous to a specific region or have been cultivated in that region for a long time, adapting to the local climate and soil conditions. This adaptation often results in a more robust flavor and better resistance to local pests and diseases compared to commercially grown, non-native varieties. Regular shallots, on the other hand, are typically mass-produced and may lack the nuanced flavor and resilience of native types. The term “native” can also refer to shallots grown from seed, rather than bulbs, which is a less common but increasingly popular method. These seed-grown shallots are often more vigorous and produce larger bulbs.
When is the best time to plant native shallots?
The ideal planting time for native shallots depends on your climate. In general, you should plant them in the fall (September-November) for a summer harvest or in early spring (February-April) for a fall harvest. Fall planting is often preferred as it allows the shallots to establish roots before winter, resulting in a larger and earlier harvest. However, if you live in an area with harsh winters, spring planting may be a better option to avoid frost damage. Check your local agricultural extension office for specific recommendations for your region.
What kind of soil do native shallots need?
Native shallots thrive in well-drained, fertile soil with a pH between 6.0 and 7.0. Amend your soil with compost or well-rotted manure before planting to improve drainage and fertility. Avoid heavy clay soils, as they can retain too much moisture and cause the bulbs to rot. If you have clay soil, consider planting your shallots in raised beds or containers. Adding sand or other drainage materials can also help improve the soil structure.
How far apart should I plant native shallots?
Plant shallot bulbs 6-8 inches apart in rows that are 12-18 inches apart. This spacing allows the bulbs enough room to grow and prevents overcrowding, which can lead to smaller bulbs and increased disease risk. When planting, make sure the pointed end of the bulb is facing upwards and the top of the bulb is just below the soil surface.
How much water do native shallots need?
Native shallots need consistent moisture, especially during bulb formation. Water deeply once or twice a week, depending on the weather conditions. Avoid overwatering, as this can lead to bulb rot. A good rule of thumb is to water when the top inch of soil feels dry to the touch. Mulching around the plants can help retain moisture and suppress weeds.
What are some common pests and diseases that affect native shallots, and how can I prevent them?
Common pests that affect native shallots include onion thrips, onion maggots, and nematodes. Diseases include downy mildew, white rot, and pink root. To prevent these problems, practice crop rotation, use disease-free planting material, and maintain good soil drainage. Companion planting with herbs like rosemary or thyme can also help deter pests. If you notice signs of pests or diseases, treat them promptly with appropriate organic or chemical controls.
How do I know when my native shallots are ready to harvest?
Native shallots are typically ready to harvest when the tops begin to yellow and fall over. This usually occurs in late summer or early fall, depending on when you planted them. Gently dig up the bulbs and allow them to cure in a warm, dry place for a week or two before storing them. Curing helps to harden the outer layers of the bulbs, which improves their storage life.
How should I store my harvested native shallots?
Store cured native shallots in a cool, dry, and well-ventilated place. A mesh bag or basket is ideal for storage. Avoid storing them in the refrigerator, as this can cause them to sprout. Properly stored shallots can last for several months. Check them periodically for signs of spoilage and discard any that are soft or moldy.
Can I grow native shallots in containers?
Yes, native shallots can be successfully grown in containers. Choose a container that is at least 8 inches deep and wide, and fill it with a well-draining potting mix. Plant the bulbs as you would in the garden, spacing them 4-6 inches apart. Water regularly and fertilize every few weeks with a balanced fertilizer. Place the container in a sunny location that receives at least 6 hours of sunlight per day.
Can I save some of my native shallots to plant next year?
Absolutely! Save some of your best bulbs to plant next year. Choose healthy, disease-free bulbs and store them in a cool, dry place until planting time. This is a great way to ensure a continuous supply of homegrown native shallots. You can also allow some of your shallots to flower and collect the seeds for planting, although this method is less common and may result in variations in the offspring.
Leave a Comment