

Grow Birds Eye Chili, and unlock a world of fiery flavor right in your own backyard! Have you ever dreamt of adding a zesty kick to your meals with chilies you’ve nurtured from tiny seedlings? Well, dream no more! This DIY guide is your passport to cultivating these potent little peppers, even if you’re a complete beginner.
Chili peppers, including the Birds Eye variety, boast a rich history, tracing back to South America where they were domesticated thousands of years ago. They’ve since become a staple in cuisines worldwide, adding heat and depth to dishes from Thailand to Mexico. But beyond their culinary appeal, growing your own chilies offers a unique connection to nature and a sense of accomplishment that’s hard to beat.
Why should you embark on this chili-growing adventure? Because store-bought chilies simply can’t compare to the vibrant flavor and freshness of homegrown ones. Plus, you’ll have complete control over the growing process, ensuring your chilies are free from harmful pesticides. Imagine the satisfaction of harvesting your own Birds Eye Chilies and knowing exactly where they came from! I’m here to guide you through every step, from selecting the right seeds to harvesting your fiery bounty. Let’s get started and grow Birds Eye Chili together!
Growing Birds Eye Chili: A Spicy DIY Adventure!
Okay, chili lovers, buckle up! We’re about to embark on a fiery journey to grow our very own Birds Eye Chili peppers. These little guys pack a serious punch, and there’s nothing quite like the satisfaction of harvesting your own homegrown heat. I’m going to walk you through everything you need to know, from seed to sizzling sauce.
What You’ll Need
Before we dive in, let’s gather our supplies. This is a pretty straightforward project, but having everything ready will make the process much smoother.
* Birds Eye Chili Seeds: Obviously! Make sure you get them from a reputable source to ensure good germination rates.
* Seed Starting Tray or Small Pots: These will be our nurseries for the baby chili plants.
* Seed Starting Mix: This is a light, well-draining soil mix specifically designed for seedlings. Don’t use regular garden soil!
* Larger Pots (at least 5 gallons): Once the seedlings are big enough, they’ll need a bigger home.
* Potting Mix: A good quality potting mix for mature plants. Again, drainage is key.
* Watering Can or Spray Bottle: For gentle watering.
* Grow Lights (optional but recommended): Especially if you’re starting seeds indoors during the colder months.
* Fertilizer: A balanced fertilizer for chili peppers. Look for one with a higher phosphorus content to encourage flowering and fruiting.
* Gardening Gloves: To protect your hands (especially when handling the mature plants – some people are sensitive to chili oils).
* Small Shovel or Trowel: For transplanting.
* Pest Control (optional): Neem oil or insecticidal soap, just in case.
* A Sunny Spot: Chili peppers need lots of sunshine!
Phase 1: Starting Your Seeds
This is where the magic begins! Getting your seeds to germinate successfully is crucial.
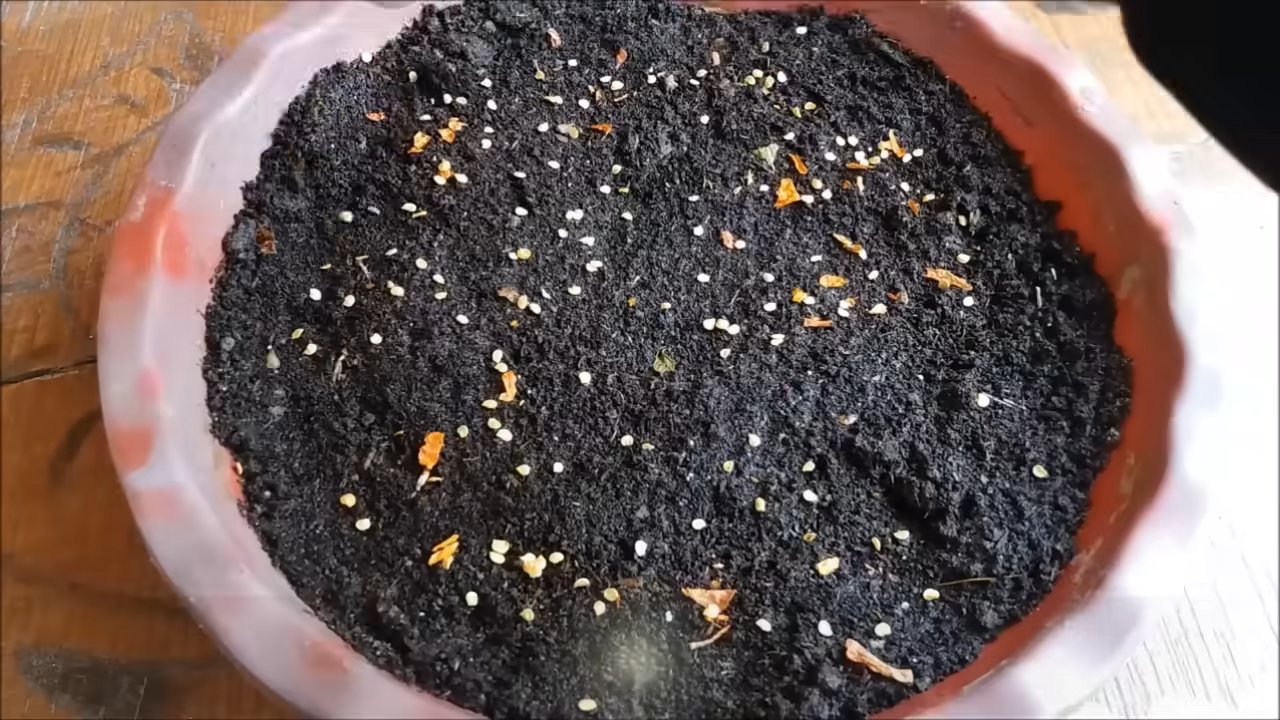
1. Prepare Your Seed Starting Tray/Pots: Fill your seed starting tray or small pots with the seed starting mix. Gently pat it down, but don’t compact it too much.
2. Sow the Seeds: Make a small indentation (about ¼ inch deep) in the center of each cell or pot. Place one or two seeds in each indentation. I usually do two, just in case one doesn’t germinate.
3. Cover the Seeds: Gently cover the seeds with the seed starting mix.
4. Water Thoroughly: Use a spray bottle or watering can with a gentle nozzle to thoroughly moisten the soil. You want it damp, but not soggy.
5. Create a Humid Environment: Cover the seed starting tray with a clear plastic lid or plastic wrap to create a humid environment. This helps with germination.
6. Provide Warmth: Chili seeds germinate best in warm temperatures (around 75-85°F or 24-29°C). You can use a heat mat underneath the tray to maintain the ideal temperature.
7. Provide Light (After Germination): Once the seedlings emerge (usually within 7-14 days), remove the plastic cover and place them under grow lights or in a very sunny windowsill. If using a windowsill, rotate the tray regularly to prevent the seedlings from leaning towards the light.
8. Water Regularly: Keep the soil consistently moist, but not waterlogged. Check the soil moisture daily and water when the top inch feels dry.
Phase 2: Nurturing Your Seedlings
Now that you have tiny chili plants, it’s time to give them some TLC.
1. Thinning (If Necessary): If you planted two seeds per cell/pot and both germinated, you’ll need to thin them out. Choose the stronger seedling and carefully snip off the weaker one at the base with scissors. This prevents overcrowding and ensures the remaining seedling has enough space and nutrients.
2. Watering: Continue to water regularly, allowing the top inch of soil to dry out between waterings.
3. Fertilizing: Once the seedlings have their first set of true leaves (the leaves that look like miniature versions of the adult leaves, not the initial seed leaves), you can start fertilizing them with a diluted balanced fertilizer. Follow the instructions on the fertilizer package. I usually start with half the recommended dose.
4. Hardening Off: Before transplanting your seedlings outdoors, you need to “harden them off.” This gradually acclimates them to the outdoor environment. Start by placing the seedlings outdoors in a sheltered location for an hour or two each day, gradually increasing the amount of time they spend outside over the course of a week or two. This will help them adjust to the sun, wind, and temperature changes.
Phase 3: Transplanting and Growing to Maturity
The big move! This is where your chili plants get to stretch their roots and really take off.
1. Choose the Right Time: Transplant your seedlings outdoors after the last frost has passed and the soil has warmed up. Birds Eye Chili peppers thrive in warm weather.
2. Prepare Your Pots: Fill your larger pots (at least 5 gallons) with a good quality potting mix.
3. Transplant Carefully: Gently remove the seedlings from their seed starting tray or pots. Be careful not to damage the roots.
4. Planting Depth: Plant the seedlings at the same depth they were growing in their previous containers.
5. Water Thoroughly: Water the transplanted seedlings thoroughly.
6. Provide Sunlight: Place the pots in a location that receives at least 6-8 hours of direct sunlight per day.
7. Fertilizing: Continue to fertilize your chili plants regularly with a balanced fertilizer, following the instructions on the package. You can switch to a fertilizer with a higher phosphorus content to encourage flowering and fruiting.
8. Watering: Water regularly, allowing the top inch of soil to dry out between waterings. Avoid overwatering, as this can lead to root rot.
9. Pest Control: Keep an eye out for pests such as aphids, whiteflies, and spider mites. If you notice any pests, treat them with neem oil or insecticidal soap.
10. Support (Optional): As your chili plants grow, they may need some support to prevent them from falling over. You can use stakes or tomato cages to provide support.
Phase 4: Harvesting Your Fiery Bounty
The moment we’ve all been waiting for!
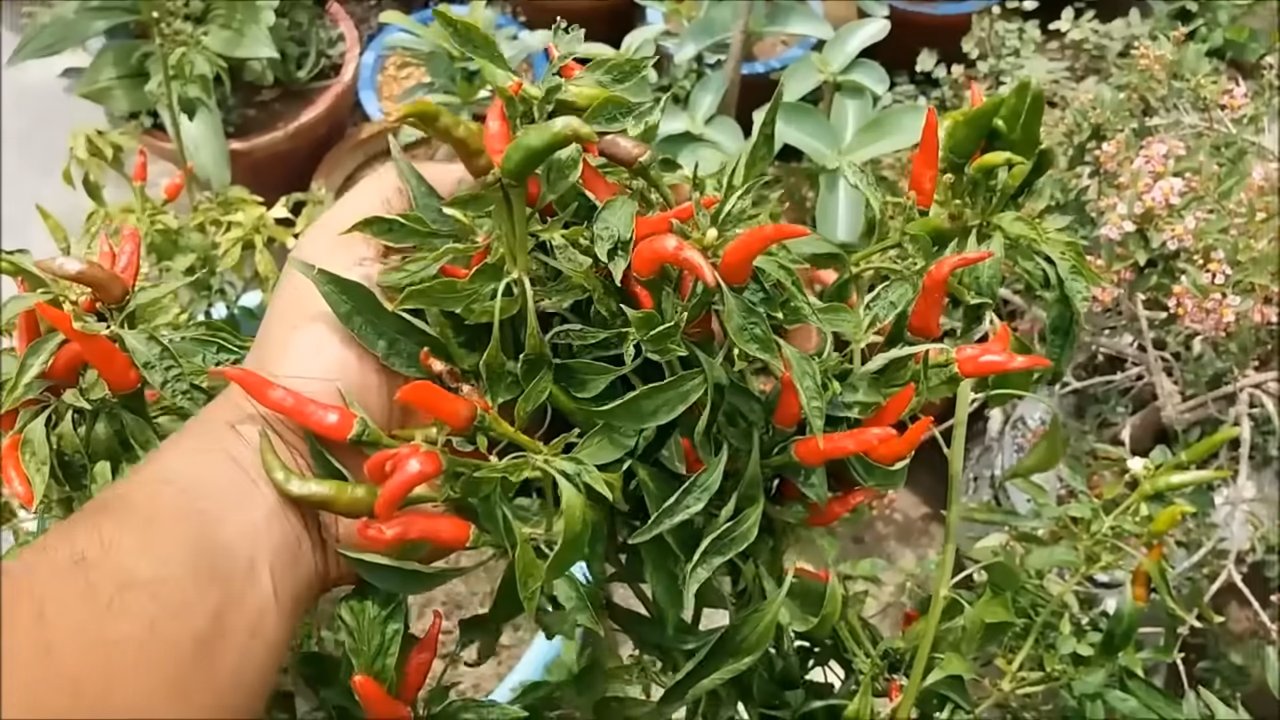
1. When to Harvest: Birds Eye Chili peppers are typically ready to harvest when they turn red and are firm to the touch. They can also be harvested when they are green, but they will be less spicy.
2. How to Harvest: Use scissors or pruning shears to cut the peppers from the plant. Be careful not to damage the plant.
3. Handling with Care: Remember, these are hot peppers! Wear gloves when harvesting and handling them to avoid skin irritation. Avoid touching your eyes or face after handling the peppers.
4. Storage: Freshly harvested Birds Eye Chili peppers can be stored in the refrigerator for up to a week. You can also dry them, freeze them, or pickle them for longer storage.
Troubleshooting Tips
Even with the best planning, things can sometimes go awry. Here are a few common problems and how to fix them:
* Seedlings Not Germinating: Make sure the soil is warm enough and consistently moist. Check the expiration date on your seeds.
* Leggy Seedlings: This means your seedlings aren’t getting enough light. Move them closer to the grow lights or to a sunnier location.
* Yellowing Leaves: This could be a sign of overwatering, underwatering, or nutrient deficiency. Check the soil moisture and adjust your watering schedule accordingly. Fertilize with a balanced fertilizer.
* Pest Infestation: Treat with neem oil or insecticidal soap.
* Lack of Fruit: Make sure your plants are getting enough sunlight and fertilizer. Pollinate the flowers by hand if necessary (gently brush the pollen from one flower to another with a small paintbrush).
Extra Tips for Super Spicy Success!
* Soil pH: Birds Eye Chili peppers prefer a slightly acidic soil pH (around 6.0-6.8). You can test your soil pH with a soil testing kit.
* Watering Time: Water your chili plants in the morning to allow the foliage to dry out during the day. This helps prevent fungal diseases.
* Pruning: Pruning your chili plants can encourage bushier growth and more fruit production.
* Companion Planting: Plant basil, oregano, or marigolds near your chili peppers to deter pests.
* Experiment! Don’t be afraid to try different varieties of chili peppers and different growing techniques. The best way to learn is by doing!
Growing Birds Eye Chili peppers is a rewarding experience. With a little patience and
Conclusion
So, there you have it! Growing your own Birds Eye Chili plants is not just a rewarding experience, it’s a gateway to unlocking a world of culinary possibilities and adding a fiery kick to your dishes straight from your own garden. We’ve walked you through the process, from seed to harvest, and hopefully demystified any concerns you might have had about cultivating these potent peppers.
Why is this DIY trick a must-try? Because it puts you in control. You know exactly what goes into nurturing your plants, avoiding harmful pesticides and ensuring the freshest, most flavorful chilies possible. Store-bought chilies, while convenient, often lack the vibrancy and intense heat that homegrown varieties possess. Plus, there’s an undeniable satisfaction in harvesting something you’ve nurtured from a tiny seed. Imagine the look on your friends’ faces when you tell them the incredible heat in your homemade salsa comes from chilies you grew yourself!
But the benefits extend beyond bragging rights. Growing your own Birds Eye Chili is also a sustainable choice. You’re reducing your carbon footprint by eliminating the transportation and packaging associated with commercially grown produce. And let’s not forget the economic advantages. While there’s an initial investment in seeds and supplies, the long-term yield from even a few plants can significantly reduce your grocery bill.
Feeling adventurous? Consider these variations to personalize your Birds Eye Chili growing experience:
* **Hydroponics:** For those with limited space or a desire for faster growth, hydroponic systems offer a soil-free alternative.
* **Container Gardening:** Perfect for balconies or patios, container gardening allows you to move your plants to optimal sunlight locations. Experiment with different pot sizes and materials to find what works best for your climate.
* **Companion Planting:** Enhance your chili plants’ health and productivity by planting them alongside beneficial companions like basil, tomatoes, or carrots. These plants can deter pests and improve soil quality.
* **Different Varieties:** While we’ve focused on Birds Eye Chili, don’t be afraid to explore other chili varieties with varying heat levels and flavor profiles. Scotch Bonnets, Habaneros, or even milder Jalapeños can be grown alongside your Birds Eye Chilies for a diverse harvest.
Ultimately, the best way to discover the joys of growing Birds Eye Chili is to simply dive in and try it. Don’t be intimidated by the process. Start small, be patient, and learn from your mistakes. The rewards – a bountiful harvest of fiery chilies and the satisfaction of growing your own food – are well worth the effort.
We encourage you to embark on this exciting gardening adventure. Share your experiences with us! Post photos of your chili plants, tell us about your successes and challenges, and let us know how you’re using your homegrown chilies in your favorite recipes. Together, we can create a community of passionate chili growers and inspire others to discover the joys of homegrown heat. So, grab some seeds, get your hands dirty, and prepare to experience the incredible flavor and satisfaction of growing your own Birds Eye Chili.
Frequently Asked Questions (FAQ)
What is the ideal climate for growing Birds Eye Chili?
Birds Eye Chili plants thrive in warm, sunny climates. They require temperatures between 70°F and 90°F (21°C and 32°C) for optimal growth. They are sensitive to frost, so if you live in a region with cold winters, it’s best to grow them in containers that can be brought indoors during the colder months. Consistent warmth and sunlight are key to a successful harvest. If you live in a cooler climate, consider using a greenhouse or cold frame to extend the growing season.
How often should I water my Birds Eye Chili plants?
Watering frequency depends on several factors, including the climate, soil type, and size of the plant. Generally, you should water your Birds Eye Chili plants when the top inch of soil feels dry to the touch. Avoid overwatering, as this can lead to root rot. Ensure that your pots have adequate drainage to prevent water from pooling at the bottom. During hot, dry periods, you may need to water more frequently. A good rule of thumb is to water deeply but infrequently, allowing the soil to dry out slightly between waterings.
What type of soil is best for Birds Eye Chili plants?
Birds Eye Chili plants prefer well-draining, fertile soil with a slightly acidic to neutral pH (around 6.0 to 7.0). A good potting mix for chili plants should contain a blend of peat moss, perlite, and vermiculite. You can also amend your garden soil with compost or well-rotted manure to improve its fertility and drainage. Avoid heavy clay soils, as they can retain too much moisture and suffocate the roots. Proper soil preparation is crucial for healthy plant growth and abundant chili production.
How much sunlight do Birds Eye Chili plants need?
Birds Eye Chili plants require at least 6-8 hours of direct sunlight per day. Insufficient sunlight can result in leggy growth, reduced flowering, and smaller chili yields. Choose a sunny location in your garden or on your balcony to place your plants. If you’re growing them indoors, position them near a south-facing window or use grow lights to supplement natural sunlight. Rotate your plants regularly to ensure that all sides receive adequate light.
When should I harvest my Birds Eye Chilies?
Birds Eye Chilies are typically ready to harvest about 80-100 days after planting. The chilies will turn from green to red when they are fully ripe. You can harvest them at any stage of ripeness, but the flavor and heat will be more intense when they are fully red. Use scissors or pruning shears to cut the chilies from the plant, leaving a small stem attached. Handle the chilies with care, as they can be quite hot.
How can I protect my Birds Eye Chili plants from pests and diseases?
Regularly inspect your plants for signs of pests or diseases. Common pests that affect chili plants include aphids, spider mites, and whiteflies. You can control these pests with insecticidal soap, neem oil, or by introducing beneficial insects like ladybugs. Diseases like powdery mildew and fungal infections can be prevented by ensuring good air circulation and avoiding overwatering. Remove any infected leaves or stems promptly to prevent the spread of disease. Consider using organic fungicides if necessary.
Can I grow Birds Eye Chili plants indoors?
Yes, you can successfully grow Birds Eye Chili plants indoors, provided you meet their basic requirements for sunlight, warmth, and water. Choose a sunny location near a south-facing window or use grow lights to supplement natural sunlight. Use a well-draining potting mix and ensure that your pots have drainage holes. Water regularly, allowing the soil to dry out slightly between waterings. Monitor your plants for pests and diseases, and take appropriate action if necessary. With proper care, you can enjoy a bountiful harvest of chilies even in an indoor environment.
How hot are Birds Eye Chilies?
Birds Eye Chilies are known for their intense heat. They typically rank between 50,000 and 100,000 Scoville Heat Units (SHU) on the Scoville scale, which measures the pungency of chili peppers. This makes them significantly hotter than Jalapeños, which typically range from 2,500 to 8,000 SHU. Use caution when handling and consuming Birds Eye Chilies, and start with small amounts to gauge your tolerance.
How do I store my harvested Birds Eye Chilies?
There are several ways to store your harvested Birds Eye Chilies. You can dry them by stringing them together and hanging them in a well-ventilated area. You can also freeze them whole or chopped. Another option is to pickle them in vinegar or brine. Dried chilies can be stored in an airtight container for several months. Frozen chilies will retain their flavor and heat for up to a year. Pickled chilies can be stored in the refrigerator for several weeks.
What are some uses for Birds Eye Chilies?
Birds Eye Chilies are a versatile ingredient that can be used in a variety of dishes. They can be added to curries, stir-fries, sauces, and salsas to add heat and flavor. They can also be used to make chili oil or chili flakes. Use them sparingly, as they are quite potent. Experiment with different recipes and find your favorite ways to incorporate these fiery chilies into your cooking.
Leave a Comment