

Grow Bitter Gourd Easily, even if you think you don’t have a green thumb! Have you ever dreamt of harvesting your own vibrant, knobbly bitter gourds, bursting with potential for delicious and healthy meals? I know I have! For centuries, this fascinating vegetable, also known as karela, has been a staple in Asian and African cuisines, celebrated not only for its unique flavor but also for its impressive medicinal properties. From traditional Ayurvedic practices to modern culinary creations, the bitter gourd holds a special place.
But let’s be honest, growing bitter gourd can sometimes feel like a daunting task. Many gardeners struggle with germination, pest control, and getting those beautiful, elongated fruits to actually, well, *grow*! That’s where this DIY guide comes in. I’m going to share some simple yet effective tricks and hacks that will help you grow bitter gourd easily, even in a small space or with limited gardening experience.
Imagine the satisfaction of serving a home-cooked meal featuring your own homegrown bitter gourd, knowing exactly where it came from and how it was nurtured. No more relying on store-bought produce with questionable origins! This guide will empower you to cultivate your own thriving bitter gourd patch, providing you with a sustainable source of this nutritious and flavorful vegetable. So, grab your gardening gloves, and let’s get started!
Grow Bitter Gourd Like a Pro: My Foolproof DIY Guide
Hey there, fellow gardening enthusiasts! I’m so excited to share my tried-and-true method for growing bitter gourd – also known as bitter melon or karela – right in your own backyard (or even on your balcony!). I know, I know, the name might sound intimidating, but trust me, with a little patience and the right techniques, you can harvest a bounty of these nutritious and surprisingly versatile veggies. I’ve been growing bitter gourd for years, and I’ve learned a few tricks along the way that I’m eager to pass on to you. So, grab your gardening gloves, and let’s get started!
Choosing the Right Variety and Starting Seeds
Before we dive into the nitty-gritty, let’s talk about selecting the right bitter gourd variety for your climate and preferences. There are several types available, varying in size, shape, and bitterness. Some popular choices include:
* Long Green Varieties: These are known for their elongated shape and relatively mild bitterness. They’re a great option for beginners.
* Short, Round Varieties: These tend to be more bitter but are often preferred in certain cuisines.
* Hybrid Varieties: These are bred for improved disease resistance and higher yields.
Once you’ve chosen your variety, it’s time to start the seeds. I always recommend starting seeds indoors, especially if you live in an area with a shorter growing season. This gives your plants a head start and ensures a better harvest.
Here’s how I do it:
1. Soak the Seeds: To improve germination, I soak the bitter gourd seeds in warm water for 24 hours. This helps soften the hard outer shell and encourages sprouting.
2. Prepare Seed Trays or Pots: I use seed starting trays or small pots filled with a well-draining seed starting mix. You can find these at most garden centers.
3. Sow the Seeds: I plant the seeds about ½ inch deep in the soil. I usually plant two seeds per cell or pot to increase the chances of germination.
4. Water Gently: I water the soil gently to avoid disturbing the seeds. I use a spray bottle to mist the surface.
5. Provide Warmth and Light: Bitter gourd seeds need warmth to germinate. I place the seed trays or pots in a warm location, such as on top of a refrigerator or near a sunny window. If you don’t have a naturally warm spot, you can use a heat mat designed for seed starting. I also make sure they get plenty of light, either natural sunlight or from a grow light.
6. Wait for Germination: Germination usually takes about 7-14 days. Keep the soil consistently moist but not waterlogged.
Preparing the Garden Bed and Transplanting Seedlings
While your seeds are germinating, it’s time to prepare the garden bed. Bitter gourd plants need plenty of sunlight, well-draining soil, and a sturdy trellis to climb on.
Here’s what I do to get my garden bed ready:
1. Choose a Sunny Location: Select a spot in your garden that receives at least 6-8 hours of direct sunlight per day.
2. Improve the Soil: Bitter gourd plants thrive in well-draining soil that is rich in organic matter. I amend the soil with compost, aged manure, or other organic materials to improve its fertility and drainage. I usually dig in about 2-3 inches of compost.
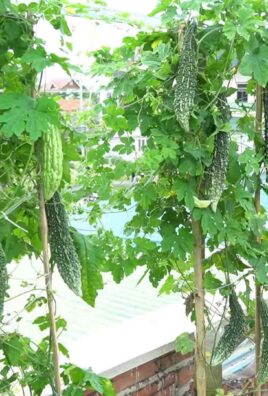
3. Install a Trellis: Bitter gourd vines can grow quite long, so they need a strong trellis to support their weight. You can use a wooden trellis, a metal fence, or even a sturdy bamboo structure. I prefer a trellis that is at least 6-8 feet tall. Make sure it’s securely anchored in the ground.
4. Prepare the Planting Holes: Once the seedlings have developed a few sets of true leaves (usually after about 3-4 weeks), they’re ready to be transplanted into the garden. I dig planting holes that are slightly larger than the root balls of the seedlings. Space the holes about 2-3 feet apart.
5. Transplant Carefully: Gently remove the seedlings from their trays or pots, being careful not to damage the roots. Place each seedling in a planting hole and backfill with soil. Water thoroughly after transplanting.
Caring for Your Bitter Gourd Plants
Once your bitter gourd plants are in the ground, it’s important to provide them with the care they need to thrive. This includes regular watering, fertilizing, and pest control.
Here’s my care routine:
1. Water Regularly: Bitter gourd plants need consistent moisture, especially during hot, dry weather. I water them deeply whenever the top inch of soil feels dry to the touch. Avoid overwatering, as this can lead to root rot.
2. Fertilize Regularly: To encourage healthy growth and abundant fruit production, I fertilize my bitter gourd plants every 2-3 weeks with a balanced fertilizer. You can use a liquid fertilizer or a slow-release granular fertilizer. Follow the instructions on the fertilizer package. I like to use a fertilizer that is high in phosphorus and potassium, as these nutrients are essential for flowering and fruiting.
3. Train the Vines: As the bitter gourd vines grow, I train them to climb the trellis. I gently guide the vines and tie them to the trellis with soft twine or plant ties. This helps to keep the vines organized and prevents them from sprawling on the ground.
4. Pest and Disease Control: Bitter gourd plants can be susceptible to certain pests and diseases, such as aphids, spider mites, and powdery mildew. I regularly inspect my plants for signs of infestation or disease. If I spot any problems, I treat them promptly with organic pest control methods, such as insecticidal soap or neem oil. For powdery mildew, I use a fungicide specifically designed for vegetables.
5. Weed Control: Keep the garden bed free of weeds, as they can compete with the bitter gourd plants for nutrients and water. I regularly weed the garden bed by hand or with a hoe. I also apply a layer of mulch around the plants to help suppress weed growth and retain moisture in the soil.
Harvesting and Enjoying Your Bitter Gourd
The moment you’ve been waiting for! Bitter gourd fruits are typically ready to harvest about 2-3 months after planting. The fruits should be firm, green, and slightly immature. If you wait too long, they will turn yellow and become more bitter.
Here’s how I harvest my bitter gourd:
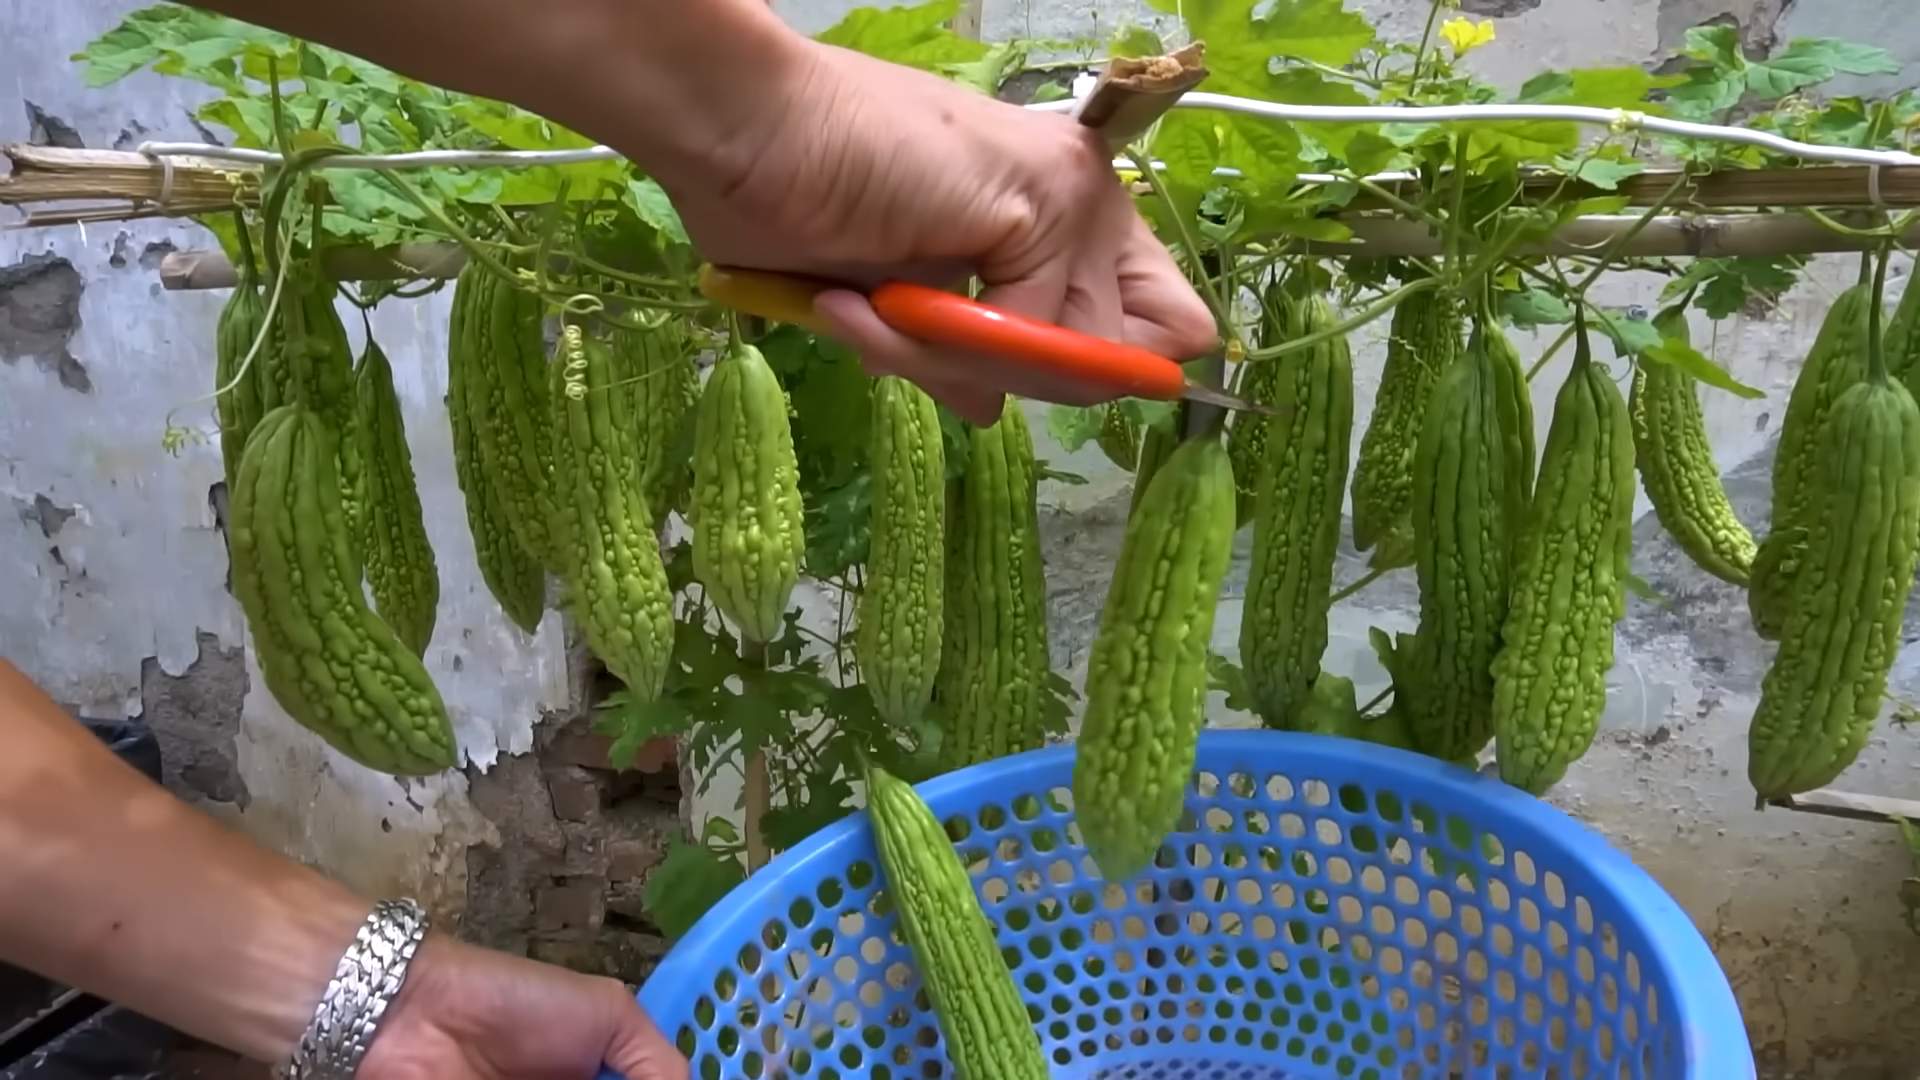
1. Use Pruning Shears: I use sharp pruning shears to cut the fruits from the vine. I cut the stem about 1-2 inches above the fruit.
2. Harvest Regularly: I harvest the fruits regularly to encourage continued production. The more you harvest, the more the plant will produce.
3. Store Properly: Bitter gourd fruits can be stored in the refrigerator for up to a week. I wrap them in a paper towel and place them in a plastic bag to prevent them from drying out.
Now, for the best part – enjoying your homegrown bitter gourd! I know the name might scare some people, but trust me, with the right preparation, bitter gourd can be a delicious and healthy addition to your diet.
Here are a few of my favorite ways to enjoy bitter gourd:
* Stir-fries: Bitter gourd is a popular ingredient in stir-fries. I slice it thinly and stir-fry it with other vegetables, such as onions, peppers, and garlic.
* Curries: Bitter gourd can also be used in curries. I add it to curries with potatoes, lentils, or other vegetables.
* Juice: Bitter gourd juice is a popular health drink. I blend it with other fruits and vegetables, such as apples, carrots, and ginger, to make it more palatable.
* Stuffed Bitter Gourd: This is a classic dish where the bitter gourd is hollowed out and stuffed with a mixture of spices, lentils, and vegetables. It’s then cooked until tender.
Troubleshooting Common Problems
Even with the best care, you might encounter some problems while growing bitter gourd. Here are a few common issues and how I deal with them:
* Poor Germination: If your seeds aren’t germinating, make sure they’re getting enough warmth and moisture. You can also try scarifying the seeds by gently rubbing them with sandpaper before soaking them.
* Yellowing Leaves: Yellowing leaves can be a sign of nutrient deficiency. Fertilize your plants with a balanced fertilizer to provide them with the nutrients they need.
* Lack of Fruit Production: If your plants are not producing fruit, it could be due to a lack of pollination. Bitter gourd plants are pollinated by insects, so make sure there are plenty of pollinators in your garden. You can also hand-pollinate the flowers by transferring pollen from the male flowers to the female flowers with a small brush.
* Pest Infestations: Regularly inspect your plants for pests and treat them promptly with organic pest control methods.
*
Conclusion
So, there you have it! Growing bitter gourd doesn’t have to be a daunting task. This simple, yet effective DIY trick unlocks the potential for a bountiful harvest, even if you’re a beginner gardener. We’ve shown you how to create the ideal environment for your bitter gourd vines to thrive, leading to healthier plants and a significantly increased yield.
Why is this a must-try? Because it addresses the core needs of bitter gourd plants: consistent moisture, proper drainage, and support for vertical growth. By implementing this method, you’re not just planting seeds; you’re creating a mini-ecosystem tailored to their specific requirements. Forget struggling with stunted growth and disappointing harvests. This DIY approach empowers you to take control and witness the incredible potential of your garden.
But don’t stop there! Feel free to experiment with variations to suit your specific needs and climate. For example, if you live in a particularly hot and dry area, consider adding a layer of mulch around the base of the plants to further retain moisture. You could also incorporate companion planting strategies, such as planting beans or peas nearby to fix nitrogen in the soil, naturally boosting the growth of your bitter gourd. Another variation could involve using different types of climbing structures. While we suggested a simple trellis, you could also use arches, fences, or even repurposed materials like old ladders to provide support. The possibilities are endless!
Remember, the key to successful gardening is observation and adaptation. Pay close attention to your plants, monitor their growth, and adjust your approach as needed. Don’t be afraid to tweak the DIY trick to better suit your local conditions and your personal preferences.
We are confident that this DIY trick will revolutionize your bitter gourd growing experience. It’s cost-effective, environmentally friendly, and, most importantly, it works! Imagine the satisfaction of harvesting your own fresh, homegrown bitter gourd, knowing that you played an active role in nurturing its growth. Think of the delicious and healthy meals you can create with your abundant harvest.
Now, it’s your turn to put this knowledge into action. Gather your materials, prepare your garden, and embark on this exciting journey of growing bitter gourd. We encourage you to try this DIY trick and witness the difference it makes.
And most importantly, we want to hear about your experience! Share your successes, your challenges, and any variations you’ve tried in the comments section below. Let’s create a community of passionate gardeners, sharing our knowledge and inspiring each other to grow the best bitter gourd possible. Your insights could be invaluable to other readers, helping them overcome obstacles and achieve their own gardening goals.
So, what are you waiting for? Get your hands dirty and start growing! We’re excited to see the amazing results you achieve. Happy gardening! Remember, with a little effort and this simple DIY trick, you’ll be enjoying a bountiful harvest of delicious and nutritious bitter gourd in no time. This method is truly the best way to grow bitter gourd easily and efficiently.
Frequently Asked Questions (FAQ)
Q: What type of soil is best for growing bitter gourd?
A: Bitter gourd thrives in well-drained, fertile soil that is rich in organic matter. A slightly acidic to neutral pH (between 6.0 and 7.0) is ideal. Before planting, amend your soil with compost, well-rotted manure, or other organic materials to improve its structure, drainage, and nutrient content. If your soil is heavy clay, consider adding sand or perlite to improve drainage. A soil test can help you determine the specific nutrient deficiencies and pH levels of your soil, allowing you to make targeted amendments for optimal growth.
Q: How often should I water my bitter gourd plants?
A: Bitter gourd plants require consistent moisture, especially during hot and dry periods. Water deeply and regularly, aiming to keep the soil consistently moist but not waterlogged. The frequency of watering will depend on your climate, soil type, and the age of the plants. Generally, watering 2-3 times per week is sufficient, but you may need to water more frequently during heat waves or if your soil drains quickly. Check the soil moisture level regularly by inserting your finger into the soil a few inches deep. If the soil feels dry to the touch, it’s time to water. Avoid overhead watering, as this can increase the risk of fungal diseases. Instead, water at the base of the plants, using a soaker hose or drip irrigation system.
Q: How much sunlight do bitter gourd plants need?
A: Bitter gourd plants need at least 6-8 hours of direct sunlight per day to thrive. Choose a planting location that receives ample sunlight throughout the day. If you live in a particularly hot climate, providing some afternoon shade can help prevent the plants from getting scorched. Insufficient sunlight can lead to stunted growth, reduced flowering, and smaller fruits.
Q: When is the best time to plant bitter gourd?
A: Bitter gourd is a warm-season crop and should be planted after the last frost when the soil has warmed up to at least 65°F (18°C). In most regions, this is typically in late spring or early summer. You can start seeds indoors 4-6 weeks before the last frost to get a head start on the growing season. Transplant seedlings outdoors once the weather is consistently warm and the risk of frost has passed.
Q: How do I prevent pests and diseases from affecting my bitter gourd plants?
A: Bitter gourd plants can be susceptible to various pests and diseases, including aphids, squash bugs, powdery mildew, and downy mildew. To prevent these problems, practice good garden hygiene, such as removing weeds and debris from around the plants. Regularly inspect your plants for signs of pests or diseases and take action promptly. Organic pest control methods, such as insecticidal soap, neem oil, and diatomaceous earth, can be effective for controlling many common pests. For fungal diseases, ensure good air circulation around the plants and avoid overhead watering. Copper-based fungicides can also be used to prevent and control fungal diseases. Companion planting with beneficial herbs and flowers can also help attract beneficial insects that prey on pests.
Q: How long does it take for bitter gourd to mature?
A: Bitter gourd typically takes 60-90 days to mature after planting. The exact time will depend on the variety, climate, and growing conditions. You can harvest bitter gourd when the fruits are still green and slightly immature. Overripe fruits will turn yellow or orange and become bitter. Harvest regularly to encourage continued production.
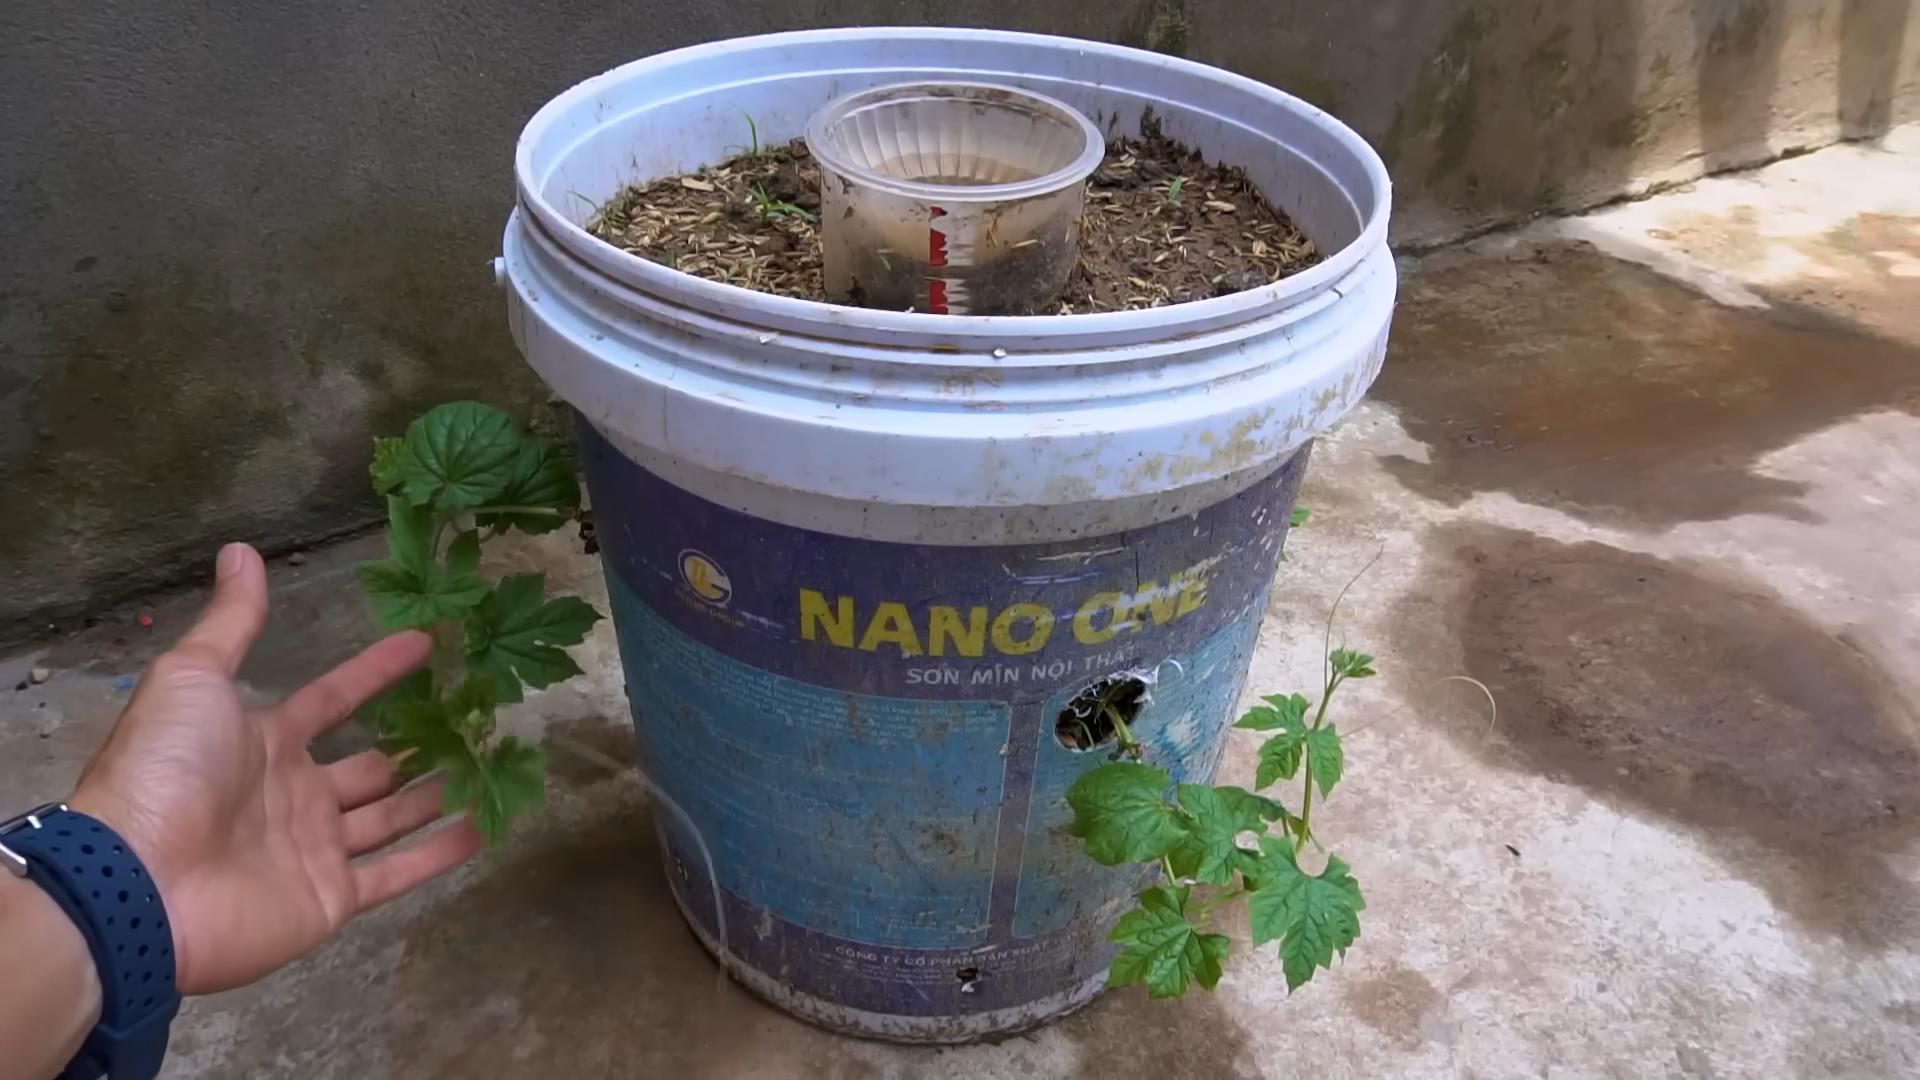
Q: Can I grow bitter gourd in containers?
A: Yes, bitter gourd can be grown in containers, but you will need to choose a large container (at least 15-20 gallons) to accommodate the plant’s extensive root system. Use a well-draining potting mix and provide a trellis or other support for the vines to climb. Container-grown plants may require more frequent watering and fertilization than those grown in the ground.
Q: How do I encourage more fruit production on my bitter gourd plants?
A: To encourage more fruit production, ensure that your plants are receiving adequate sunlight, water, and nutrients. Fertilize regularly with a balanced fertilizer or a fertilizer specifically formulated for fruiting vegetables. Prune the vines to remove excess foliage and promote air circulation. Hand-pollination may be necessary if you are not seeing enough fruit set. Use a small paintbrush to transfer pollen from the male flowers to the female flowers.
Q: Is bitter gourd good for my health?
A: Yes, bitter gourd is a highly nutritious vegetable that is packed with vitamins, minerals, and antioxidants. It is known for its potential health benefits, including regulating blood sugar levels, boosting the immune system, and promoting weight loss. It is a good source of vitamin C, vitamin A, potassium, and fiber. While it has a distinct bitter taste, it can be incorporated into a variety of dishes, such as stir-fries, curries, and soups.

Leave a Comment