

Home gardening tricks and DIY projects can transform your outdoor space into a vibrant, productive oasis, even if you’re a complete beginner! Have you ever dreamed of strolling into your backyard and harvesting fresh, organic vegetables for dinner? Well, stop dreaming and start doing! This article is packed with easy-to-follow DIY hacks and clever tricks that will help you maximize your garden’s potential, save money, and enjoy the satisfaction of growing your own food.
Gardening, in its essence, is an age-old practice, deeply rooted in human history. From the ancient Hanging Gardens of Babylon to the meticulously crafted gardens of Kyoto, cultivating plants has always been a source of sustenance, beauty, and spiritual connection. Today, as we become increasingly aware of the importance of sustainable living and healthy eating, home gardening tricks and DIY projects are experiencing a resurgence in popularity.
Let’s face it, store-bought produce can be expensive and often lacks the flavor and nutrients of homegrown vegetables. Plus, there’s something incredibly rewarding about nurturing a plant from seed to harvest. That’s where these DIY tricks come in! I’m going to share simple, cost-effective solutions to common gardening challenges, from pest control to soil improvement. Get ready to unleash your inner gardener and create a thriving, beautiful space you’ll love!
Grow Your Own Broccoli: A Beginner’s Guide to Home Cultivation
Hey there, fellow gardening enthusiasts! I’m so excited to share my tried-and-true method for growing broccoli right in your own backyard. Forget those expensive grocery store prices – with a little patience and these simple steps, you’ll be harvesting delicious, healthy broccoli in no time. Let’s get started!
Choosing the Right Broccoli Variety
First things first, you need to pick the right broccoli variety for your climate and growing season. Here are a few of my favorites:
* ‘Waltham 29’: This is a classic, reliable variety that’s known for its good flavor and heat tolerance. It’s a great choice for beginners.
* ‘DiCicco’: This variety produces smaller, more numerous heads, making it perfect for smaller gardens or if you want a continuous harvest.
* ‘Green Magic’: If you’re looking for early maturity, ‘Green Magic’ is your go-to. It produces uniform, dark green heads relatively quickly.
* ‘ ক্যালিব্রেস : এটি একটি ক্লাসিক, নির্ভরযোগ্য জাত যা এর ভাল স্বাদ এবং তাপ সহনশীলতার জন্য পরিচিত। এটি নতুনদের জন্য একটি দুর্দান্ত পছন্দ।
Getting Started: Planting Your Broccoli
Broccoli is a cool-season crop, which means it thrives in cooler temperatures. I usually start my broccoli seeds indoors about 6-8 weeks before the last expected frost.
Materials You’ll Need:
* Broccoli seeds (of your chosen variety)
* Seed starting trays or small pots
* Seed starting mix
* Watering can or spray bottle
* Grow lights (optional, but highly recommended)
* Heating mat (optional, but helpful for germination)
Step-by-Step Instructions:
1. Prepare Your Seed Starting Trays: Fill your seed starting trays or pots with seed starting mix. Gently pat the soil down to remove any air pockets.
2. Sow the Seeds: Make a small indentation (about ¼ inch deep) in the center of each cell or pot. Place 2-3 broccoli seeds in each indentation. This ensures that at least one seed will germinate.
3. Cover the Seeds: Gently cover the seeds with a thin layer of seed starting mix.
4. Water Thoroughly: Use a watering can or spray bottle to thoroughly moisten the soil. Be careful not to overwater, as this can lead to damping off (a fungal disease that can kill seedlings).
5. Provide Warmth and Light: Place the seed starting trays on a heating mat (if using) and under grow lights. Broccoli seeds germinate best in temperatures between 65-75°F (18-24°C). If you don’t have grow lights, place the trays in a sunny window, but be sure to rotate them regularly to prevent the seedlings from leaning towards the light.
6. Maintain Moisture: Keep the soil consistently moist, but not soggy. Check the soil moisture daily and water as needed.
7. Thin the Seedlings: Once the seedlings have emerged and have their first true leaves (the second set of leaves), thin them to one seedling per cell or pot. Choose the strongest, healthiest-looking seedling and snip off the others at the soil line with scissors. Don’t pull them out, as this can disturb the roots of the remaining seedling.
Transplanting Your Broccoli Seedlings
After about 6-8 weeks, your broccoli seedlings should be ready to transplant into your garden. They should have several sets of true leaves and be about 4-6 inches tall.
Preparing Your Garden Bed:
Broccoli needs well-drained soil that is rich in organic matter. I like to amend my garden soil with compost or well-rotted manure before planting.
* Choose a Sunny Location: Broccoli needs at least 6 hours of sunlight per day.
* Test Your Soil: A soil test can help you determine the pH and nutrient levels of your soil. Broccoli prefers a soil pH between 6.0 and 7.0.
* Amend the Soil: Add compost or well-rotted manure to the soil to improve drainage and fertility.
* Prepare the Planting Holes: Dig holes that are slightly larger than the root balls of your seedlings. Space the holes about 18-24 inches apart.
Transplanting Instructions:
1. Harden Off the Seedlings: Before transplanting, you need to harden off the seedlings. This means gradually exposing them to outdoor conditions over a period of 7-10 days. Start by placing the trays outdoors in a sheltered location for a few hours each day, gradually increasing the amount of time they spend outdoors. This will help them adjust to the sun, wind, and temperature changes.
2. Carefully Remove the Seedlings: Gently remove the seedlings from their trays or pots. Be careful not to damage the roots. If the roots are tightly bound, gently loosen them with your fingers.
3. Plant the Seedlings: Place the seedlings in the prepared planting holes. The top of the root ball should be level with the soil surface.
4. Fill the Holes: Fill the holes with soil and gently pat it down around the seedlings.
5. Water Thoroughly: Water the seedlings thoroughly after planting.
6. Mulch: Apply a layer of mulch around the plants to help retain moisture, suppress weeds, and regulate soil temperature. I like to use straw or shredded leaves.
Caring for Your Broccoli Plants
Once your broccoli plants are in the ground, it’s important to provide them with proper care to ensure a healthy and bountiful harvest.
Watering:
Broccoli needs consistent moisture, especially during head formation. Water deeply and regularly, especially during dry spells. Aim for about 1-1.5 inches of water per week.
Fertilizing:
Broccoli is a heavy feeder, so it needs regular fertilization. I like to use a balanced fertilizer (such as 10-10-10) every 2-3 weeks. You can also side-dress the plants with compost or well-rotted manure.
Weeding:
Keep the garden bed free of weeds, as they can compete with the broccoli plants for nutrients and water. Hand-pull weeds regularly or use a hoe to cultivate the soil.
Pest and Disease Control:
Broccoli is susceptible to a few common pests and diseases. Here are a few things to watch out for:
* Cabbage Worms: These green caterpillars can devour broccoli leaves. Hand-pick them off the plants or use a biological insecticide like Bacillus thuringiensis (Bt).
* Aphids: These small, sap-sucking insects can weaken broccoli plants. Spray them off with a strong stream of water or use insecticidal soap.
* Clubroot: This fungal disease causes swollen, distorted roots. To prevent clubroot, plant broccoli in well-drained soil and avoid planting it in the same location year after year.
* Downy Mildew: This fungal disease causes yellow spots on the leaves. To prevent downy mildew, provide good air circulation and avoid overhead watering.
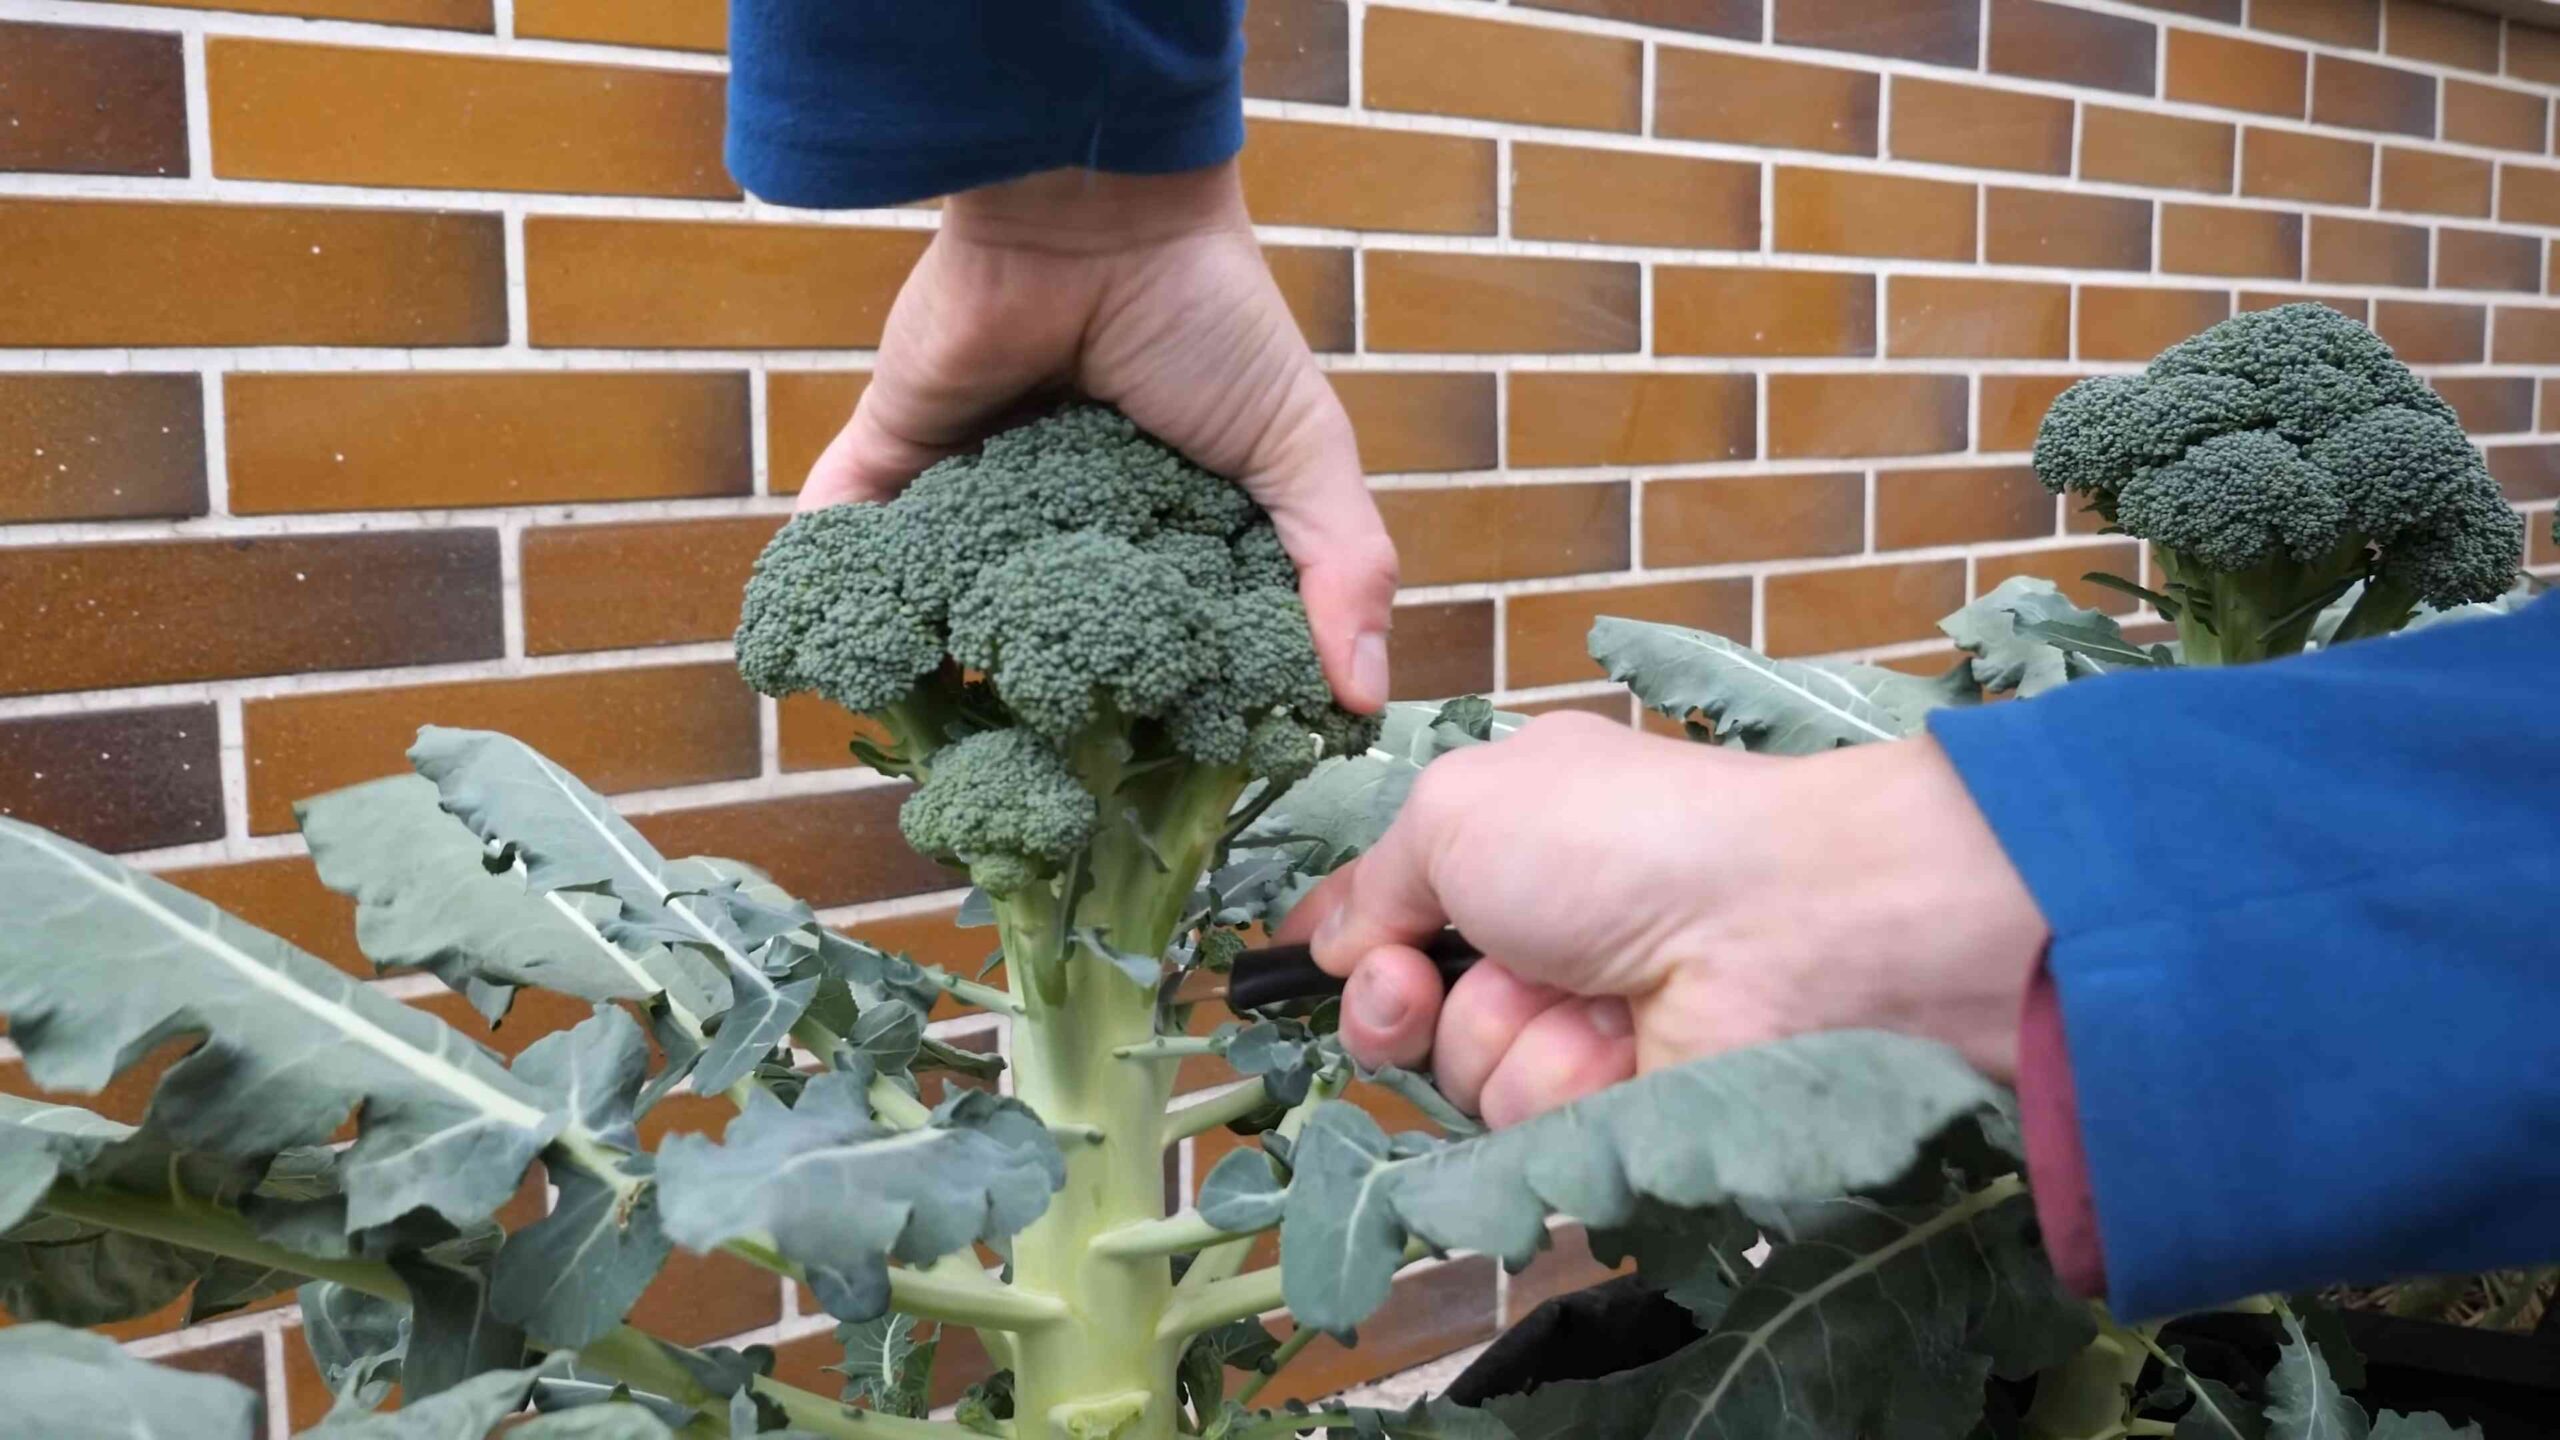
Harvesting Your Broccoli
The moment you’ve been waiting for! Broccoli is ready to harvest when the heads are firm, tight, and dark green. The individual florets should be tightly closed.
Harvesting Tips:
* Use a Sharp Knife: Cut the main head off the plant with a sharp knife, leaving about 4-6 inches of stem.
* Harvest in the Morning: Harvest broccoli in the morning, when the heads are cool and crisp.
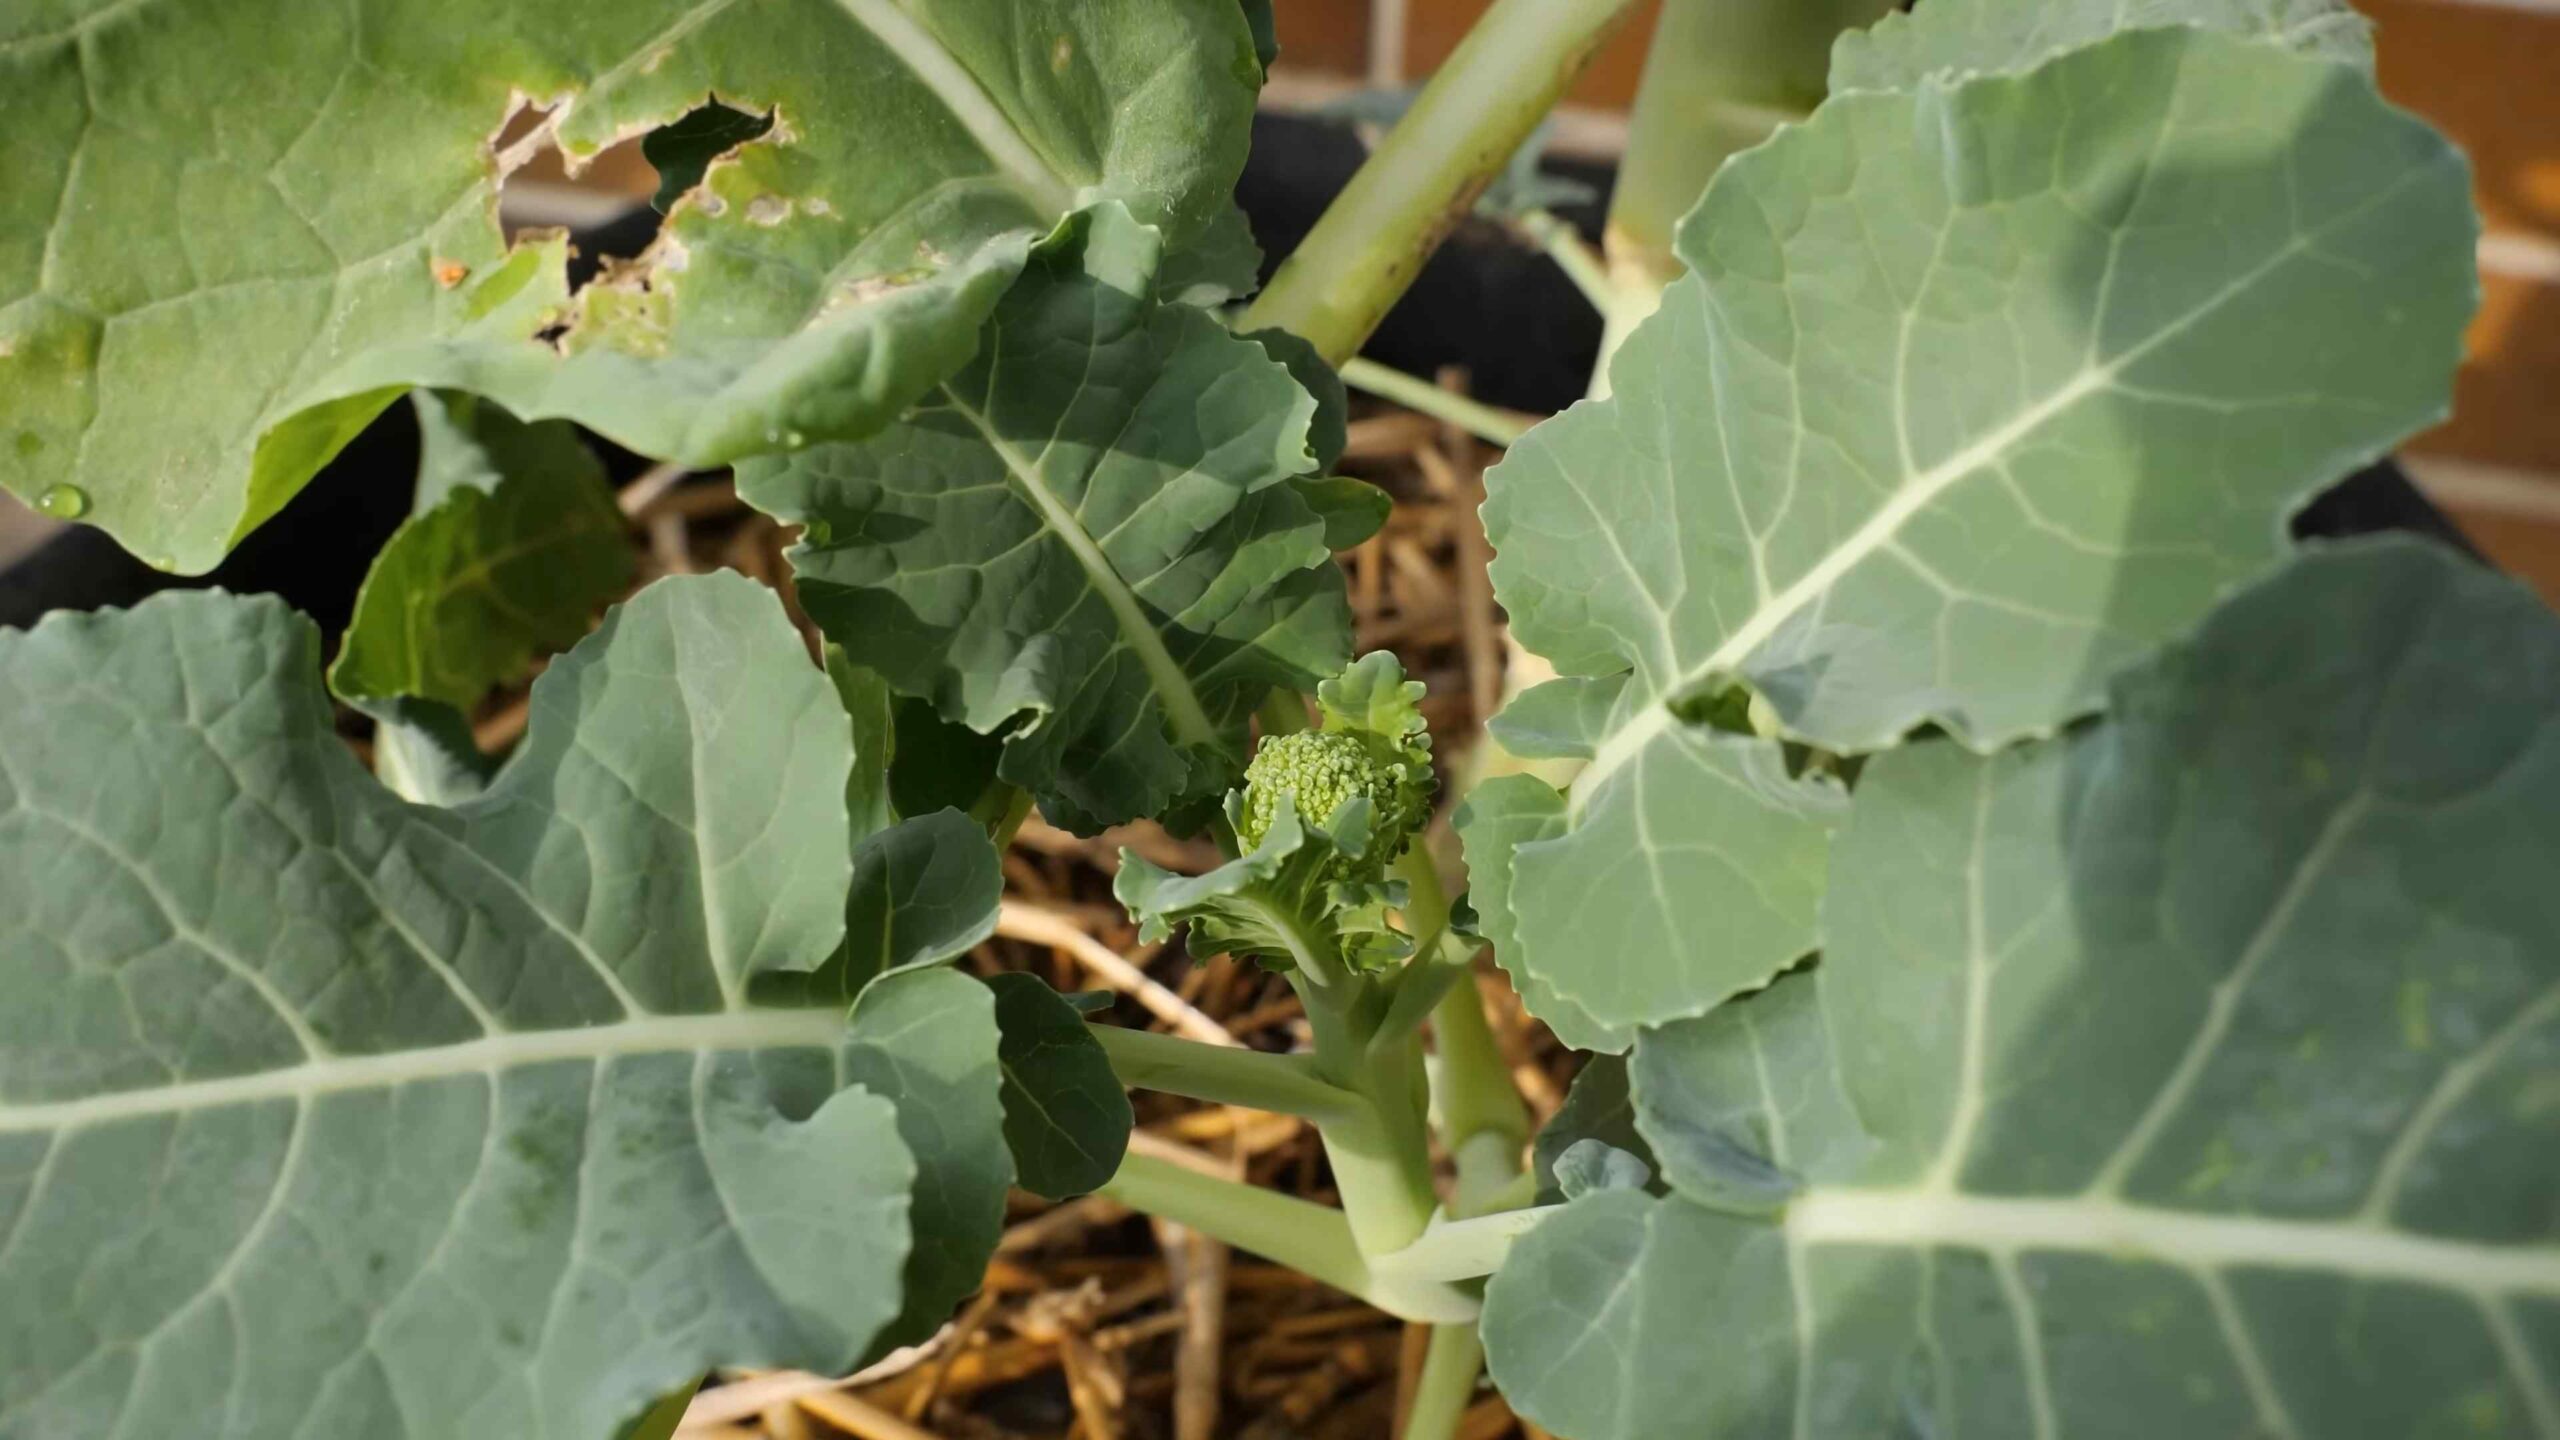
* Encourage Side Shoots: After harvesting the main head, the plant will often produce side shoots with smaller heads. These can be harvested as they mature.
* Store Properly: Store broccoli in the refrigerator for up to a week. To keep it fresh, wrap it in a damp paper towel and place it in a plastic bag.
Troubleshooting Common Broccoli Problems
Even with the best care, you might encounter a few problems while growing broccoli. Here are some common issues and how to address them:
* Buttoning: This is when the broccoli head forms prematurely and remains small. It’s often caused by stress, such as extreme temperatures, lack of water, or nutrient deficiencies. Make sure to provide consistent moisture and fertilization.
* Bolting: This is when the broccoli plant starts to flower prematurely. It’s usually caused by hot weather. Choose heat-tolerant varieties and provide shade during the hottest part of the day.
* Yellowing Leaves: This can be caused by nutrient deficiencies, pests, or diseases. Check the soil pH and nutrient levels, and inspect the plants for pests and diseases.
Enjoying Your Homegrown Broccoli
Congratulations! You’ve successfully grown your own broccoli. Now it’s time to enjoy the fruits (or rather, vegetables) of your labor.
Cooking Ideas:
* Steamed Broccoli: A simple and healthy way to enjoy broccoli.
*
Conclusion
So, there you have it! Transforming your kitchen scraps into a thriving broccoli patch is not only incredibly rewarding but also a fantastic way to reduce waste and enjoy the freshest possible produce. This DIY home broccoli growing guide offers a sustainable and cost-effective alternative to constantly buying broccoli from the store. Imagine the satisfaction of harvesting your own crisp, green florets, knowing you nurtured them from humble beginnings.
This isn’t just about saving money; it’s about connecting with the food you eat and understanding the miracle of growth. Plus, it’s a fantastic project for families, teaching children about sustainability and the life cycle of plants. Get the kids involved in watering, observing, and eventually, harvesting!
Don’t be afraid to experiment! While we’ve focused on the core method, there are plenty of variations you can try. For instance, if you live in a particularly hot climate, consider providing your broccoli plants with some afternoon shade. You can also try different types of soil mixes to see what works best in your area. Some gardeners swear by adding coffee grounds to the soil for extra nitrogen, while others prefer a specific type of compost. The beauty of DIY gardening is the freedom to adapt and learn.
Consider companion planting to further enhance your broccoli’s growth. Marigolds can deter pests, while herbs like rosemary and thyme can attract beneficial insects. These additions not only protect your broccoli but also add beauty and fragrance to your garden.
And speaking of variations, why not try growing different varieties of broccoli? From the classic Calabrese to the vibrant purple sprouting broccoli, there’s a whole world of broccoli to explore. Each variety has its own unique flavor and texture, adding diversity to your meals.
We understand that gardening can sometimes feel daunting, but trust us, this method is surprisingly simple and forgiving. Even if you don’t have a green thumb, you can still succeed with this project. The key is to be patient, observant, and willing to learn from your mistakes.
We are confident that this home broccoli growing guide will empower you to cultivate your own delicious and nutritious broccoli. So, gather your supplies, follow our steps, and get ready to enjoy the fruits (or rather, vegetables!) of your labor.
We are eager to hear about your experiences! Share your photos, tips, and challenges in the comments below. Let’s create a community of home broccoli growers and inspire others to embrace sustainable gardening practices. What worked for you? What challenges did you face? Your insights can help others succeed.
Don’t wait any longer! Start your home broccoli growing journey today and experience the joy of harvesting your own fresh, organic broccoli. You’ll be amazed at how easy and rewarding it is. Happy gardening!
Frequently Asked Questions (FAQ)
What kind of broccoli scraps can I use to start growing?
You can use the thick stem of the broccoli head after you’ve cut off the florets for cooking. Make sure the stem is still firm and healthy-looking, without any signs of rot or mold. A stem that’s starting to sprout small leaves is ideal, as it indicates the plant is still viable. Avoid using stems that are dried out or have been sitting in the refrigerator for too long. The fresher the stem, the better your chances of success.
How long does it take to grow broccoli from scraps?
Growing broccoli from scraps takes time and patience. After planting the stem, it can take anywhere from 4 to 8 weeks for new growth to appear. Once the plant is established, it can take another 2 to 3 months to produce a full head of broccoli. The exact timeframe will depend on factors such as climate, sunlight, and soil conditions. Remember that growing from scraps may not always yield a large, market-sized head of broccoli, but it will still provide you with fresh, edible florets.
What kind of soil is best for growing broccoli?
Broccoli thrives in well-draining, fertile soil that is rich in organic matter. A slightly acidic to neutral pH (around 6.0 to 7.0) is ideal. You can improve your soil by adding compost, aged manure, or other organic amendments. If your soil is heavy clay, consider adding sand or perlite to improve drainage. A good quality potting mix is also suitable, especially if you’re growing your broccoli in containers.
How much sunlight does broccoli need?
Broccoli needs at least 6 hours of direct sunlight per day to grow properly. If you live in a hot climate, providing some afternoon shade can help prevent the plants from overheating. Insufficient sunlight can result in leggy plants with small, underdeveloped heads. Choose a sunny location in your garden or, if growing indoors, place your plants near a south-facing window.
How often should I water my broccoli plants?
Water your broccoli plants regularly, keeping the soil consistently moist but not waterlogged. Water deeply whenever the top inch of soil feels dry to the touch. Avoid overhead watering, as this can promote fungal diseases. Instead, water at the base of the plant. During hot, dry weather, you may need to water more frequently.
What are some common pests and diseases that affect broccoli?
Broccoli is susceptible to several pests and diseases, including aphids, cabbage worms, flea beetles, and clubroot. Regularly inspect your plants for signs of infestation or disease. You can control aphids and cabbage worms with insecticidal soap or Bacillus thuringiensis (Bt). Flea beetles can be deterred with row covers. To prevent clubroot, ensure your soil is well-draining and avoid planting broccoli in the same spot year after year.
Can I grow broccoli indoors?
Yes, you can grow broccoli indoors, but it requires sufficient sunlight or artificial lighting. Place your plants near a south-facing window or use grow lights to provide at least 6 hours of light per day. Choose a large container with drainage holes and use a good quality potting mix. Indoor-grown broccoli may not produce as large of a head as outdoor-grown broccoli, but you can still harvest the florets for a fresh, homegrown treat.
How do I know when my broccoli is ready to harvest?
Broccoli is ready to harvest when the head is firm and the florets are tightly closed. If the florets start to open and turn yellow, it’s a sign that the broccoli is past its prime. Use a sharp knife to cut the head from the plant, leaving a few inches of stem. Side shoots may develop after the main head is harvested, providing you with additional florets.
Can I freeze broccoli that I’ve grown myself?
Yes, you can freeze broccoli to preserve it for later use. Blanch the broccoli florets in boiling water for 3 minutes, then immediately transfer them to an ice bath to stop the cooking process. Drain the broccoli well and spread it out on a baking sheet to freeze individually. Once frozen, transfer the broccoli to a freezer bag or container. Frozen broccoli can be stored for up to 12 months.
What if my broccoli stem doesn’t sprout?
Sometimes, despite your best efforts, a broccoli stem may not sprout. This could be due to several factors, such as the stem being too old, damaged, or infected with disease. Don’t be discouraged! Try again with a fresh stem. You can also try starting multiple stems at once to increase your chances of success. Remember that gardening is a learning process, and even experienced gardeners encounter failures from time to time.

Leave a Comment