

DIY Beeswax Wood Polish: Ever looked at your beloved wooden furniture and wished you could restore its natural luster without harsh chemicals? I know I have! There’s something incredibly satisfying about bringing out the beauty of wood, and that’s where this simple, yet effective, DIY beeswax wood polish comes in.
The use of beeswax for wood preservation isn’t new; in fact, it stretches back centuries! Ancient Egyptians used beeswax to protect their sarcophagi, and it’s been a staple in furniture making and restoration ever since. It’s a natural, non-toxic way to nourish and protect wood, giving it a warm, inviting glow.
But why bother making your own? Well, many commercial wood polishes are packed with synthetic ingredients that can be harmful to your health and the environment. Plus, they can sometimes leave a sticky residue or a fake-looking shine. With this DIY beeswax wood polish, you have complete control over the ingredients, ensuring a safe and natural finish. I’ll show you how to create a polish that not only protects your furniture but also enhances its natural beauty, leaving it looking revitalized and loved. Get ready to ditch those store-bought chemicals and embrace the power of nature!
DIY Beeswax Wood Polish: Revive Your Furniture with Natural Shine!
Hey there, fellow DIY enthusiasts! I’m so excited to share one of my favorite projects with you: making your own beeswax wood polish. Not only is it incredibly satisfying to create something yourself, but this polish is also a fantastic, natural alternative to commercial products that often contain harsh chemicals. Plus, it’s super effective at bringing out the natural beauty of your wooden furniture and protecting it for years to come. Let’s get started!
What You’ll Need: Gathering Your Supplies
Before we dive into the process, let’s make sure you have everything you need. This is a simple recipe, so the ingredient list is short and sweet.
* Beeswax: This is the star of the show! You can find beeswax in various forms – blocks, pellets, or even grated. I personally prefer pellets because they melt more quickly and evenly. Aim for about 2 ounces (by weight).
* Oil: You’ll need a carrier oil to dilute the beeswax and make it spreadable. My go-to is mineral oil because it’s odorless, colorless, and doesn’t go rancid easily. However, you can also use other oils like olive oil, coconut oil (fractionated, so it stays liquid), or even jojoba oil. For this recipe, you’ll need about 8 ounces (by volume).
* Essential Oils (Optional): If you want to add a pleasant scent to your polish, essential oils are a great addition. Lavender, orange, lemon, or cedarwood are all excellent choices for wood polish. A few drops will do the trick – about 10-20 drops total.
* Double Boiler or Heat-Safe Bowl and Saucepan: This is crucial for safely melting the beeswax. You don’t want to apply direct heat, as it can be dangerous.
* Wooden Spoon or Stirring Stick: For mixing the ingredients.
* Heat-Resistant Container: To store your finished polish. I like to use glass jars with wide mouths, but metal tins also work well.
* Measuring Cups and Spoons: For accurate measurements.
* Old Rags or Cloths: For applying and buffing the polish.
Step-by-Step Instructions: Crafting Your Polish
Now for the fun part! Follow these steps carefully, and you’ll have a beautiful, natural wood polish in no time.
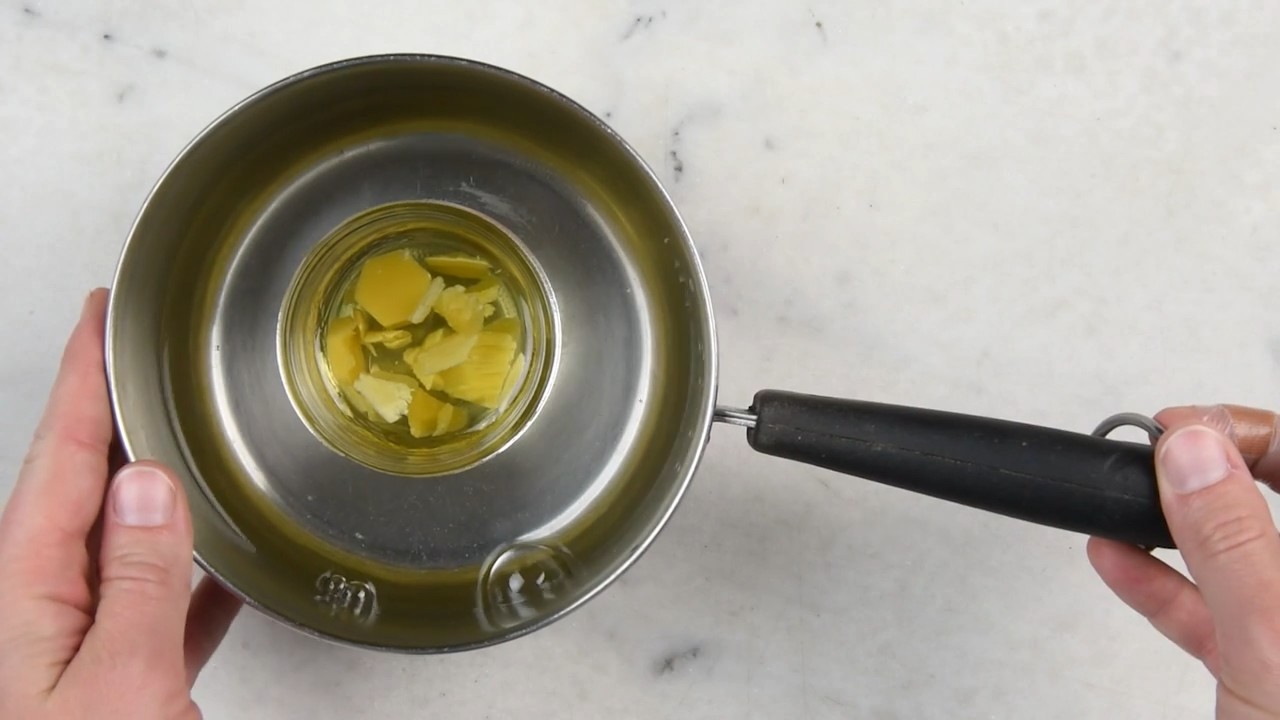
1. Prepare Your Double Boiler: Fill the saucepan with about an inch or two of water and bring it to a simmer over medium heat. Place the heat-safe bowl on top of the saucepan, ensuring that the bottom of the bowl doesn’t touch the water. This indirect heat is key to melting the beeswax safely.
2. Melt the Beeswax: Add the beeswax to the heat-safe bowl. Let it melt slowly and gently, stirring occasionally with your wooden spoon or stirring stick. This process can take some time, so be patient. Don’t rush it!
3. Add the Oil: Once the beeswax is completely melted, slowly pour in the oil. Stir continuously to combine the beeswax and oil thoroughly. You want a smooth, homogenous mixture.
4. Incorporate Essential Oils (Optional): If you’re using essential oils, now’s the time to add them. Remove the bowl from the heat and let the mixture cool slightly for a minute or two before adding the essential oils. This helps preserve their fragrance. Add your chosen essential oils, a few drops at a time, and stir well to distribute them evenly.
5. Pour into Container: Carefully pour the hot polish into your heat-resistant container. Be cautious, as the mixture will be hot.
6. Let it Cool and Harden: Allow the polish to cool and harden completely. This can take several hours, or even overnight. You’ll know it’s ready when it has a solid, creamy consistency.
Applying Your Homemade Beeswax Polish: Bringing Out the Shine
Okay, your polish is ready! Now, let’s learn how to use it to revitalize your wooden furniture.
1. Prepare the Surface: Before applying the polish, make sure the surface of your furniture is clean and dry. Remove any dust, dirt, or grime with a soft cloth. If necessary, you can use a mild soap and water solution, but be sure to dry the surface thoroughly afterward.
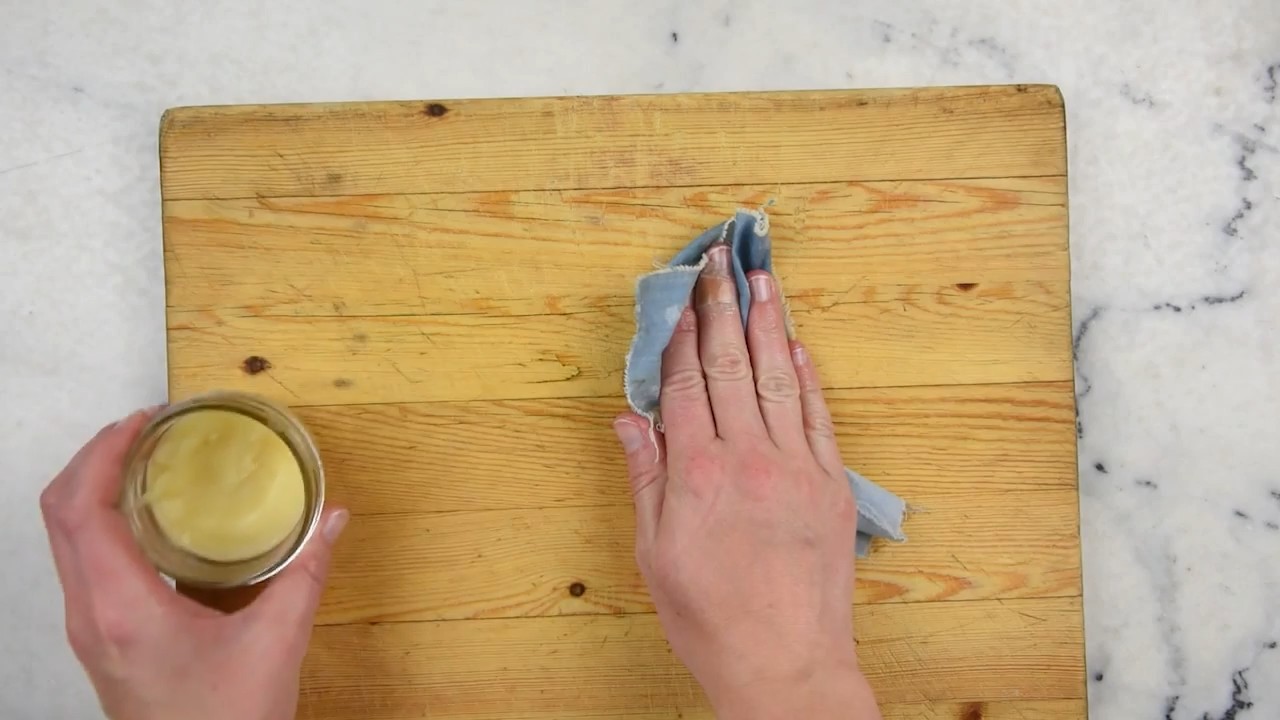
2. Apply the Polish: Using a clean, soft cloth, apply a small amount of the beeswax polish to the wood surface. A little goes a long way! Work the polish into the wood in a circular motion, covering the entire surface evenly.
3. Let it Sit: Allow the polish to sit on the wood for about 15-20 minutes. This gives the beeswax time to penetrate the wood and nourish it.
4. Buff to a Shine: After the polish has sat for the allotted time, use a clean, dry cloth to buff the surface. Buff vigorously in a circular motion until you achieve a beautiful, natural shine. This step is crucial for removing any excess polish and bringing out the wood’s luster.
5. Repeat as Needed: Depending on the condition of your furniture, you may need to repeat the application process. For heavily worn or dry wood, a second coat of polish can work wonders.
Tips and Tricks: Getting the Best Results
Here are a few extra tips to help you get the most out of your homemade beeswax wood polish:
* Test in an Inconspicuous Area: Before applying the polish to the entire piece of furniture, test it in a small, hidden area to ensure that it doesn’t discolor or damage the wood.
* Use Sparingly: Remember, a little goes a long way. Applying too much polish can leave a sticky residue.
* Buff Thoroughly: Buffing is key to achieving a beautiful, natural shine. Don’t skimp on this step!
* Reapply Regularly: To keep your furniture looking its best, reapply the polish every few months, or as needed.
* Experiment with Essential Oils: Don’t be afraid to experiment with different essential oil blends to find your favorite scent.
* Adjust the Ratio: If you find that your polish is too hard or too soft, you can adjust the ratio of beeswax to oil. For a softer polish, add more oil. For a harder polish, add more beeswax.
* Storage: Store your beeswax polish in a cool, dry place. It should last for several months, or even longer.
* Safety First: Always use caution when working with heat. Never leave the double boiler unattended, and be careful when pouring the hot polish into the container.
Troubleshooting: Addressing Common Issues
Sometimes, things don’t go exactly as planned. Here are a few common issues you might encounter and how to fix them:
* Polish is Too Hard: If your polish is too hard to spread easily, it likely has too much beeswax. To fix this, gently melt the polish again in the double boiler and add a small amount of oil until you reach the desired consistency.
* Polish is Too Soft/Oily: If your polish is too soft or oily, it likely has too much oil. To fix this, gently melt the polish again in the double boiler and add a small amount of beeswax until you reach the desired consistency.
* Polish Leaves a Sticky Residue: This usually happens when too much polish is applied. Make sure you’re using a small amount and buffing thoroughly. If you already have a sticky residue, try buffing the surface again with a clean, dry cloth. You can also try using a slightly damp cloth to remove the excess polish, followed by a dry cloth to buff.
* Polish Doesn’t Seem to be Working: If your polish doesn’t seem to be making a difference, it could be that the wood is too dry or damaged. Try applying a second coat of polish and allowing it to sit for a longer period of time before buffing. You may also need to consider other wood restoration techniques if the damage is severe.
* Essential Oil Scent is Too Strong: If you added too much essential oil, the scent might be overpowering. Unfortunately, there’s not much you can do to remove the scent once it’s added. However, the scent will likely fade over time. Next time, start with a smaller amount of essential oil and add more as needed.
Why I Love This DIY Project: The Benefits of Beeswax Polish
I’m a huge fan of this DIY beeswax wood polish for so many reasons. Here are just a few:
* Natural and Non-Toxic: It’s made with simple, natural ingredients that are safe for your family and the environment.
* Effective: It effectively nourishes and protects wood, bringing out its natural beauty and shine.
* Affordable: It’s much cheaper than buying commercial wood polishes.
* Customizable: You can customize the scent with your favorite essential oils.
* Satisfying: It’s incredibly satisfying to create something yourself and see the amazing
Conclusion
So, there you have it! Crafting your own DIY beeswax wood polish is not just a cost-effective alternative to store-bought options; it’s a way to connect with the materials you use to care for your cherished wooden items. It’s about knowing exactly what’s going onto your furniture, floors, and cutting boards, avoiding harsh chemicals and embracing a more natural, sustainable approach.
The benefits are undeniable. You’ll achieve a beautiful, protective sheen that enhances the natural grain of the wood, all while nourishing and conditioning it from within. This homemade polish is incredibly versatile, suitable for a wide range of wooden surfaces, from antique dressers to modern dining tables. Plus, the subtle, natural scent of beeswax is a welcome change from the often overpowering fragrances of commercial polishes.
But the real magic lies in the control you have over the ingredients. Want a deeper shine? Increase the ratio of beeswax. Prefer a softer, more pliable polish? Add a touch more oil. You can even infuse your polish with essential oils like lavender or cedarwood for added fragrance and potential insect-repelling properties. Experiment with different types of oils, such as walnut oil for a richer color or lemon oil for its cleaning properties. The possibilities are truly endless!
We understand that venturing into the world of DIY can sometimes feel daunting, but trust us, this is one project that’s incredibly simple and rewarding. The satisfaction of creating something yourself, knowing you’re using safe and natural ingredients, is truly unmatched.
Don’t just take our word for it, though. We wholeheartedly encourage you to give this DIY beeswax wood polish a try. Gather your ingredients, follow the simple steps outlined, and witness the transformation of your wooden surfaces. We’re confident you’ll be amazed by the results.
Once you’ve experienced the magic of homemade wood polish, we’d love to hear about it! Share your experiences, variations, and tips in the comments below. Let’s build a community of DIY enthusiasts who are passionate about preserving and protecting the beauty of wood, naturally. Your insights could inspire others to take the plunge and discover the joys of crafting their own wood care solutions. So go ahead, unleash your inner artisan and create a wood polish that’s as unique and beautiful as the wood it protects!
Frequently Asked Questions (FAQ)
What kind of beeswax should I use?
We recommend using pure, filtered beeswax for the best results. You can find beeswax in various forms, such as blocks, pellets, or pastilles. Pellets are often easier to measure and melt. Avoid beeswax that has been bleached or chemically treated, as these processes can strip away its natural properties and potentially introduce harmful chemicals to your polish. Look for beeswax that is labeled as “cosmetic grade” or “food grade” if you plan to use the polish on cutting boards or other surfaces that come into contact with food. Local beekeepers are often a great source for high-quality, unprocessed beeswax.
What type of oil is best for DIY beeswax wood polish?
The best oil depends on your preferences and the type of wood you’re polishing. Mineral oil is a popular choice because it’s inexpensive, readily available, and doesn’t go rancid. However, it’s a petroleum-based product, so some people prefer to avoid it. Olive oil is a natural alternative, but it can sometimes leave a slightly sticky residue and may go rancid over time. Jojoba oil is another excellent option, as it’s very stable and has a long shelf life. Walnut oil is a good choice for darker woods, as it can enhance their natural color. Linseed oil (boiled linseed oil, not raw) can also be used, but it takes a long time to dry and can be flammable, so use it with caution. Ultimately, the best oil is the one that you’re comfortable using and that provides the desired results on your specific wood surfaces. Experiment to find what works best for you.
How do I apply the DIY beeswax wood polish?
Apply a small amount of the polish to a clean, soft cloth. Gently rub the polish onto the wood surface in a circular motion, working it into the grain. Allow the polish to sit for a few minutes to penetrate the wood. Then, use a clean, dry cloth to buff the surface until it shines. Be sure to remove any excess polish to prevent a sticky or greasy feel. For intricate carvings or hard-to-reach areas, you can use a soft brush to apply the polish.
How often should I apply the wood polish?
The frequency of application depends on the type of wood, its exposure to the elements, and how often it’s used. For furniture that’s used frequently, you may want to apply the polish every few months. For furniture that’s stored away or rarely used, you may only need to apply it once or twice a year. Signs that your wood needs polishing include a dull appearance, dryness, or a loss of its natural luster. Always test the polish on an inconspicuous area first to ensure it doesn’t discolor or damage the wood.
How should I store the DIY beeswax wood polish?
Store your DIY beeswax wood polish in an airtight container in a cool, dark place. This will help to prevent the oil from going rancid and the beeswax from melting. A glass jar with a tight-fitting lid is ideal. Properly stored, the polish should last for several months, or even a year. If you notice any changes in the color, smell, or consistency of the polish, it’s best to discard it.
Can I use this polish on food-contact surfaces like cutting boards?
Yes, you can use this polish on food-contact surfaces, but it’s crucial to use food-grade ingredients. Make sure your beeswax is labeled as “food grade” and choose an oil that is safe for consumption, such as mineral oil or walnut oil. Avoid using essential oils or other additives that are not food-safe. After applying the polish, allow it to dry completely and then wipe the surface with a clean, damp cloth before using it for food preparation.
What if my polish is too hard or too soft?
If your polish is too hard, it means there’s too much beeswax in the mixture. You can remelt the polish and add more oil to soften it. If your polish is too soft, it means there’s not enough beeswax. You can remelt the polish and add more beeswax to harden it. Start with small adjustments and test the consistency after each addition until you achieve the desired result.
Can I add essential oils to my DIY beeswax wood polish?
Yes, you can add essential oils to your DIY beeswax wood polish for added fragrance and potential benefits. Lavender, cedarwood, and lemon essential oils are popular choices. Add a few drops of your favorite essential oil to the melted beeswax and oil mixture before it cools. Be sure to use high-quality, pure essential oils. Keep in mind that some essential oils can be irritating to the skin, so it’s always a good idea to test the polish on a small, inconspicuous area first. Also, if you’re using the polish on food-contact surfaces, make sure the essential oils you choose are food-safe.
My wood has existing damage (scratches, water rings). Will this polish fix it?
While DIY beeswax wood polish can help to improve the appearance of minor scratches and water rings, it’s not a miracle cure for significant damage. The polish can fill in small scratches and help to blend them in with the surrounding wood. It can also help to protect the wood from further damage. However, for deep scratches, dents, or severe water damage, you may need to consider more extensive repairs, such as sanding, staining, or refinishing. In some cases, a professional wood restorer may be necessary. The polish is best used as a preventative measure and for maintaining the beauty of wood that is already in good condition.
Leave a Comment