

Grow Pea Shoots at Home – and unlock a world of fresh, vibrant flavor right on your windowsill! Have you ever dreamt of snipping your own greens for a salad, just moments before you eat it? Or adding a burst of freshness to your stir-fries without a trip to the grocery store? Well, dream no more! This DIY guide will show you how incredibly easy it is to cultivate these nutritional powerhouses in your own home, regardless of your gardening experience.
Pea shoots, also known as pea tendrils, have been a culinary delight in Asian cuisine for centuries, prized for their delicate sweetness and crisp texture. They’re not just delicious; they’re packed with vitamins A, C, and K, making them a healthy addition to any diet. But you don’t need to travel to Asia to enjoy them. I’m going to show you how to grow pea shoots at home, and it’s simpler than you think!
In today’s fast-paced world, we’re all looking for ways to eat healthier and connect with nature. Growing your own pea shoots is the perfect solution! It’s a quick, rewarding project that provides fresh, organic greens, reduces your carbon footprint, and adds a touch of green to your living space. Plus, it’s a fantastic activity for kids, teaching them about the wonders of plant growth. So, let’s dive in and discover the secrets to successfully growing these delicious greens in the comfort of your own home!
Grow Your Own Delicious Pea Shoots: A Beginner’s Guide
Hey there, fellow plant enthusiasts! Ever wanted to add a burst of fresh, vibrant flavor to your salads, sandwiches, or stir-fries? Well, look no further! Growing your own pea shoots is incredibly easy, rewarding, and takes up minimal space. Trust me, once you taste the sweet, slightly grassy goodness of homegrown pea shoots, you’ll be hooked. I’m going to walk you through everything you need to know to get started.
What You’ll Need
Before we dive into the nitty-gritty, let’s gather our supplies. The beauty of this project is that you probably already have most of these items lying around!
* Pea Seeds: This is the most crucial ingredient! You’ll want to use dried pea seeds specifically meant for sprouting or gardening. Avoid using seeds that have been treated with fungicides or other chemicals. I personally prefer using “Dun” pea seeds, but any variety of garden pea will work. You can find these at most garden centers or online.
* Growing Trays or Containers: You can use anything from shallow plastic trays (like the kind you get from takeout) to repurposed yogurt containers. Just make sure they have drainage holes. I like using a tray that’s about 2-3 inches deep.
* Growing Medium: You have a few options here. You can use potting soil, coconut coir, or even just paper towels. I find that potting soil provides the best results in terms of flavor and yield, but coconut coir is a great sustainable alternative.
* Water: Good old H2O! You’ll need a spray bottle or watering can to keep your pea shoots moist.
* Spray Bottle: For misting the seeds and shoots.
* Weight (Optional): A small plate or book to help with germination.
* Scissors or Kitchen Shears: For harvesting your pea shoots.
* A Dark Place: A cupboard, closet, or even just covering the tray with a towel will do.
Step-by-Step Instructions: From Seed to Sprout
Alright, let’s get our hands dirty! Here’s a detailed guide to growing your own pea shoots:
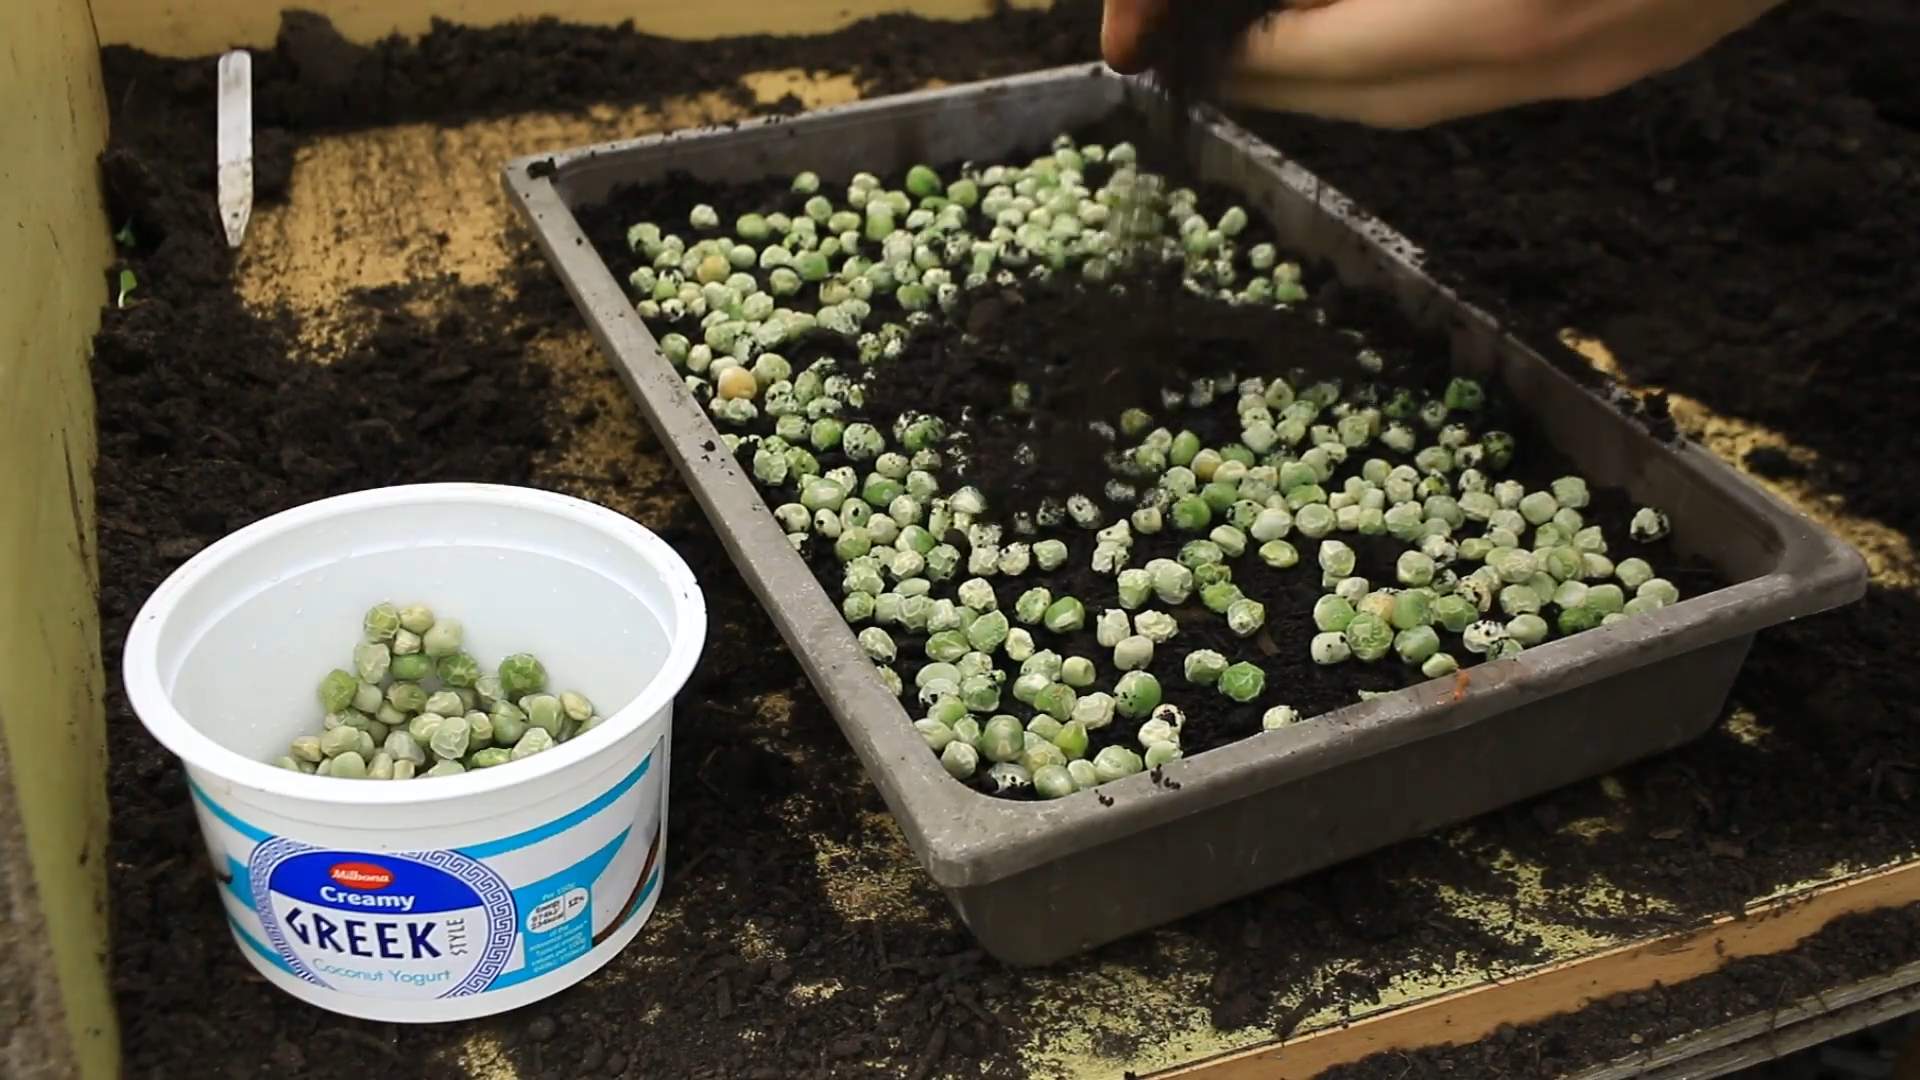
1. Soaking the Seeds: This is a crucial step to kickstart the germination process.
* Place your pea seeds in a bowl.
* Cover them with plenty of cool water.
* Let them soak for 8-12 hours, or even overnight. You’ll notice that the seeds will plump up as they absorb water. This is exactly what we want! Soaking helps soften the seed coat and encourages faster sprouting.
2. Preparing the Growing Tray: Now, let’s get our growing environment ready.
* If you’re using a container without drainage holes, carefully poke some holes in the bottom. This is essential to prevent waterlogging, which can lead to mold and unhappy pea shoots.
* Fill your tray with your chosen growing medium (potting soil or coconut coir) to a depth of about 1-2 inches.
* Gently pat down the soil to create a level surface.
* Moisten the soil thoroughly with your spray bottle or watering can. The soil should be damp, but not soggy.
3. Sowing the Seeds: Time to plant those little guys!
* Drain the soaked pea seeds and spread them evenly over the surface of the soil. You can pack them in pretty tightly – they don’t need a lot of space to grow.
* Gently press the seeds into the soil to ensure good contact.
* Cover the seeds with a thin layer of soil (about ¼ inch).
* Mist the surface of the soil with water to keep it moist.
4. Weighting (Optional but Recommended): This step helps the pea shoots develop strong roots.
* Place a small plate or book on top of the soil. This will provide gentle pressure and encourage the seeds to sprout evenly.
* Don’t use anything too heavy, just enough to keep the seeds in contact with the soil.
5. The Dark Period: This is where the magic happens!
* Place your tray in a dark, cool place. A cupboard, closet, or even under the sink will work perfectly.
* The darkness encourages the seeds to focus on root development, resulting in stronger, healthier shoots.
* Keep the soil moist by misting it with water every day or two. You don’t want the soil to dry out.
* Check on your seeds every day. You should start to see sprouts emerging in 2-3 days.
6. Introducing Light: Once the sprouts have emerged, it’s time to bring them into the light!
* Remove the weight (if you used one) and move the tray to a bright location. A windowsill with indirect sunlight is ideal. Avoid direct sunlight, as it can scorch the delicate shoots.
* Continue to mist the shoots with water regularly, keeping the soil moist.
* Rotate the tray regularly to ensure that the shoots receive even light on all sides. This will prevent them from leaning towards the light source.
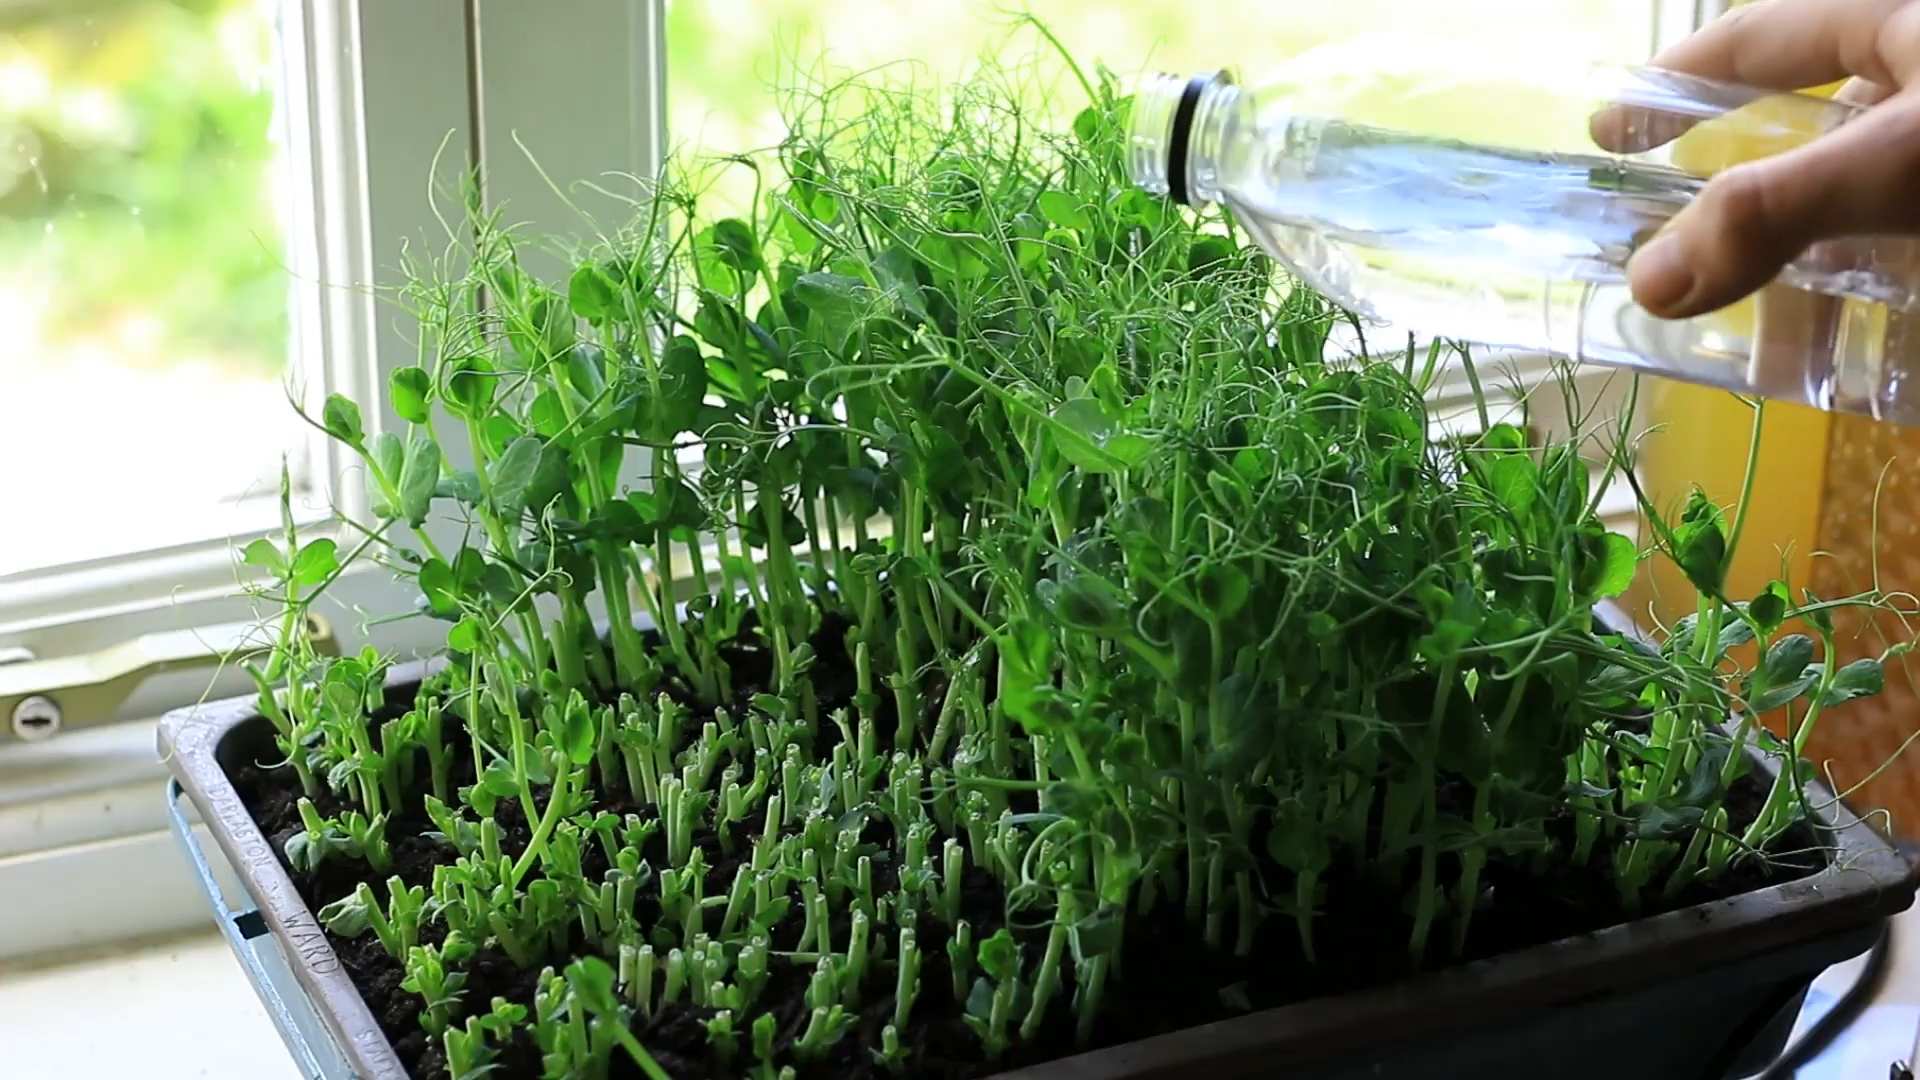
7. Watering: Proper watering is key to healthy pea shoots.
* Check the soil moisture daily. The soil should be consistently moist, but not waterlogged.
* Water from the bottom if possible. This encourages the roots to grow deeper and prevents the shoots from getting too wet, which can lead to mold. You can do this by placing the tray in a shallow dish of water and allowing the soil to absorb the water from the bottom.
* If you’re watering from the top, use a gentle spray to avoid damaging the delicate shoots.
8. Harvesting: The moment we’ve all been waiting for!
* Your pea shoots will be ready to harvest in about 1-2 weeks, when they are 4-6 inches tall.
* Use scissors or kitchen shears to cut the shoots just above the lowest set of leaves.
* You can harvest the shoots multiple times from the same tray. Just leave a few leaves on the bottom, and they will regrow.
* Rinse the harvested pea shoots with water and pat them dry.
* Enjoy them fresh in salads, sandwiches, stir-fries, or as a garnish!
Troubleshooting Tips
Even with the best intentions, sometimes things don’t go exactly as planned. Here are a few common issues you might encounter and how to fix them:
* Mold: If you see mold growing on the soil or the shoots, it’s usually a sign of overwatering or poor ventilation.
* Reduce watering frequency.
* Improve ventilation by placing a small fan near the tray.
* Remove any affected shoots.
* Consider using a diluted hydrogen peroxide solution (1 part hydrogen peroxide to 10 parts water) to spray the affected area.
* Yellowing Leaves: Yellowing leaves can be a sign of underwatering, nutrient deficiency, or too much sunlight.
* Check the soil moisture and water accordingly.
* If you’re using a soilless medium like coconut coir, consider adding a diluted liquid fertilizer to provide essential nutrients.
* Move the tray to a location with less direct sunlight.
* Slow Growth: Slow growth can be caused by a variety of factors, including insufficient light, low temperatures, or poor seed quality.
* Ensure that the tray is receiving adequate light.
* Maintain a consistent temperature of around 65-75°F (18-24°C).
* Use high-quality pea seeds from a reputable source.
* Uneven Germination: Uneven germination can be caused by uneven soil moisture, poor seed contact with the soil, or inconsistent temperatures.
* Ensure that the soil is evenly moist.
* Press the seeds firmly into the soil.
* Maintain a consistent temperature.
Extending Your Harvest
Want to keep those delicious pea shoots coming? Here’s how to extend your harvest:
* Succession Planting: Plant a new tray of pea shoots every week or two to ensure a continuous supply.
* Regrowing: As mentioned earlier, you can harvest pea shoots multiple times from the same tray. Just leave a few leaves on the bottom, and they will regrow. However, the second harvest may not be as abundant as the first.
* Microgreens Mix: Combine pea shoots with other microgreens, such as radish, sunflower, or broccoli, for a diverse and flavorful mix.
Enjoying Your Homegrown Pea Shoots
Now that you’ve successfully grown your own pea shoots, it’s time to enjoy the fruits (or rather, vegetables) of your labor! Here are a few ideas:
* Salads: Add pea shoots to your favorite salads for a boost of flavor and nutrients.
* Sandwiches:
Conclusion
So, there you have it! Growing your own pea shoots at home is not just a fun project; it’s a gateway to incredibly fresh, flavorful, and nutritious greens right at your fingertips. Forget those wilted, overpriced pea shoots at the grocery store. With minimal effort and resources, you can cultivate a thriving patch of these delicate tendrils, adding a burst of springtime to your meals year-round.
Why is this DIY trick a must-try? Because it empowers you to control the quality and freshness of your food. You know exactly what goes into your pea shoots – no pesticides, no questionable growing practices, just pure, unadulterated goodness. Plus, the satisfaction of harvesting something you’ve nurtured from seed is incredibly rewarding. It’s a small step towards self-sufficiency and a deeper connection with the food you eat.
Beyond the basic method outlined, there’s plenty of room for experimentation. Try different varieties of peas to discover your favorite flavor profile. Snow peas, sugar snap peas, and even dried green peas from the grocery store can all be used, though the flavor will vary slightly. You can also experiment with different growing mediums. While soil is the most common, you can also use coconut coir, hydroponic systems, or even just damp paper towels for a super-simple setup.
Consider adding a diluted liquid fertilizer a week or so after sprouting to give your pea shoots an extra boost. Just be sure to use an organic fertilizer to keep things natural. And don’t be afraid to get creative with how you use your harvest! Pea shoots are delicious in salads, stir-fries, soups, sandwiches, and even as a garnish for cocktails. Their delicate sweetness and crisp texture add a unique touch to any dish.
We encourage you to give this DIY project a try. It’s easy, affordable, and incredibly rewarding. You’ll be amazed at how quickly you can grow your own supply of fresh, delicious pea shoots. And once you’ve experienced the joy of harvesting your own greens, you’ll never want to go back to store-bought again.
Don’t just take our word for it! Get your hands dirty, plant some seeds, and watch the magic happen. And most importantly, share your experience with us! We’d love to hear about your successes, your challenges, and any variations you try. Post photos of your pea shoot harvests on social media and tag us. Let’s create a community of home gardeners who are passionate about growing their own food. Embrace the simplicity and freshness of growing pea shoots at home – you won’t regret it!
Frequently Asked Questions (FAQ)
What kind of peas should I use to grow pea shoots?
You can use a variety of pea types to grow pea shoots. Snow peas, sugar snap peas, and even dried green peas from the grocery store are all viable options. However, the flavor will vary depending on the type of pea you choose. Snow peas and sugar snap peas tend to produce sweeter, more tender shoots, while dried green peas may have a slightly earthier flavor. Experiment to find your favorite! Avoid using ornamental peas, as they may not be edible.
How long does it take to grow pea shoots?
One of the best things about growing pea shoots is how quickly you can harvest them. Typically, you can expect to harvest your first batch of pea shoots within 10-14 days of planting. The exact time will depend on factors such as temperature, light, and the variety of pea you’re using. Keep an eye on your pea shoots and harvest them when they reach a height of 4-6 inches.
What kind of soil should I use?
Pea shoots aren’t too fussy about soil, but they do prefer a well-draining potting mix. You can use a standard potting mix that you would use for other container plants. Avoid using garden soil, as it can be too heavy and may contain pests or diseases. You can also use soilless growing mediums like coconut coir or vermiculite.
How much light do pea shoots need?
Pea shoots need plenty of light to thrive. Ideally, they should receive at least 6 hours of direct sunlight per day. If you don’t have a sunny spot indoors, you can use a grow light to supplement the natural light. Place the grow light a few inches above the pea shoots and keep it on for 12-16 hours per day.
How often should I water pea shoots?
Keep the soil consistently moist, but not waterlogged. Water when the top inch of soil feels dry to the touch. Be careful not to overwater, as this can lead to fungal diseases. A spray bottle is a great way to gently water your pea shoots without disturbing the delicate seedlings.
Can I grow pea shoots outdoors?
Yes, you can grow pea shoots outdoors, especially in cooler weather. Pea shoots prefer temperatures between 60-70°F (15-21°C). If you live in a warmer climate, you can still grow pea shoots outdoors, but you’ll need to provide them with some shade during the hottest part of the day.
How do I harvest pea shoots?
Harvesting pea shoots is easy. Simply use scissors or shears to cut the shoots about an inch above the soil line. The pea plants will often regrow, allowing you to harvest multiple times from the same planting.
Can I eat the entire pea shoot?
Yes, you can eat the entire pea shoot, including the leaves, stems, and tendrils. They are all edible and have a delicious, slightly sweet flavor.
How long do pea shoots last after harvesting?
Pea shoots are best eaten fresh, but they can be stored in the refrigerator for up to a week. To store them, wrap them in a damp paper towel and place them in a plastic bag or container.
Are pea shoots nutritious?
Absolutely! Pea shoots are packed with vitamins, minerals, and antioxidants. They are a good source of vitamins A, C, and K, as well as folate, iron, and fiber. They are also low in calories and fat.
Can I grow pea shoots in a container without drainage holes?
While it’s generally recommended to use containers with drainage holes, you can grow pea shoots in a container without drainage holes if you’re careful not to overwater. Add a layer of gravel or pebbles to the bottom of the container to help with drainage. Monitor the moisture level of the soil closely and water sparingly.
My pea shoots are turning yellow. What’s wrong?
Yellowing pea shoots can be caused by a few different factors. Overwatering is a common culprit, as it can lead to root rot. Underwatering can also cause yellowing, as can a lack of nutrients. Make sure you’re watering your pea shoots properly and that they’re getting enough light. If the problem persists, try adding a diluted liquid fertilizer.
Can I reuse the soil after harvesting pea shoots?
It’s generally not recommended to reuse the soil after harvesting pea shoots, as it may be depleted of nutrients and could harbor pests or diseases. However, you can compost the old soil and use it to enrich your garden soil.
Are pea shoots safe for pets to eat?
Pea shoots are generally considered safe for pets to eat in small quantities. However, it’s always a good idea to check with your veterinarian before introducing any new foods to your pet’s diet.

Leave a Comment