

DIY Plastic Bottle Cap Basket: Ever feel overwhelmed by the sheer volume of plastic bottle caps cluttering your home? I know I have! Instead of tossing them into the recycling bin (or worse, the trash!), what if I told you that you could transform those colorful little discs into something beautiful and functional? This isn’t just another craft project; it’s a chance to unleash your creativity, reduce waste, and add a unique, handmade touch to your home decor.
The concept of repurposing materials has deep roots in human history. From ancient civilizations weaving baskets from reeds to modern-day upcycling movements, the desire to create something new from discarded items is a timeless tradition. While the specific history of bottle cap crafts might be more recent, the spirit of resourcefulness and ingenuity remains the same.
In today’s world, where environmental consciousness is more important than ever, finding innovative ways to reduce our plastic footprint is crucial. This DIY Plastic Bottle Cap Basket project offers a tangible solution, allowing you to actively participate in the circular economy. Plus, it’s a fantastic way to personalize your space with a one-of-a-kind creation. Imagine the satisfaction of knowing that your charming basket was made entirely from materials you would have otherwise thrown away! So, grab your stash of bottle caps, and let’s get crafting!
DIY Plastic Bottle Cap Basket: A Colorful and Eco-Friendly Project
Hey there, fellow crafters! Ever look at a pile of plastic bottle caps and think, “There has to be something cool I can do with these?” Well, you’re in luck! I’m going to walk you through creating a vibrant and surprisingly sturdy basket entirely from those little plastic discs. This project is not only a fantastic way to recycle, but it also results in a unique and eye-catching piece for your home. Get ready to unleash your inner artist and create something amazing!
Materials You’ll Need
Before we dive in, let’s gather our supplies. Here’s what you’ll need:
* Plastic Bottle Caps: Lots and lots! The number depends on the size of your desired basket. Start collecting now! Different colors will add to the visual appeal.
* Drill with Small Drill Bit: This is crucial for creating the holes we’ll need to connect the caps.
* Strong Thread or Fishing Line: Choose a color that complements your caps or a clear fishing line for a more subtle look. I prefer using a thicker, waxed thread for extra durability.
* Scissors or Wire Cutters: For trimming the thread.
* Needle (Optional): A large-eyed needle can make threading easier, especially with thicker thread.
* Pliers (Optional): Helpful for gripping the caps while drilling.
* Ruler or Measuring Tape: To ensure consistent hole placement.
* Marker or Pen: For marking drilling points.
* Work Surface: Protect your table with a cutting mat or scrap piece of wood.
* Gloves (Optional): To protect your hands while drilling.
Preparing the Bottle Caps
This is probably the most time-consuming part, but trust me, it’s worth it!
1. Clean the Caps: Wash all your bottle caps thoroughly with soap and water. Make sure to remove any sticky residue or labels. Let them dry completely before moving on. This ensures a clean and hygienic crafting experience.
2. Mark Drilling Points: This is where precision comes in. We need to drill four holes in each cap, evenly spaced around the edge. I find it easiest to use a ruler and marker to mark the points.
* Finding the Center: Imagine a crosshair dividing the cap into four equal sections. Mark a point on the edge of the cap in the middle of each section.
* Consistency is Key: Try to be as consistent as possible with your markings. This will make the basket more uniform and easier to assemble.
3. Drill the Holes: Now for the fun part! Using your drill and a small drill bit (slightly larger than your thread), carefully drill a hole at each of the marked points.
* Safety First: Always wear safety glasses when drilling.
* Secure the Cap: Hold the cap firmly with pliers or your fingers (if you’re comfortable) while drilling. Be careful not to drill through your fingers!
* Slow and Steady: Don’t rush the drilling process. Apply gentle pressure and let the drill do the work. This will prevent the plastic from cracking.
* Deburr the Holes: After drilling, check for any sharp edges or burrs around the holes. You can use a small file or the tip of a craft knife to smooth them out. This will prevent the thread from snagging.
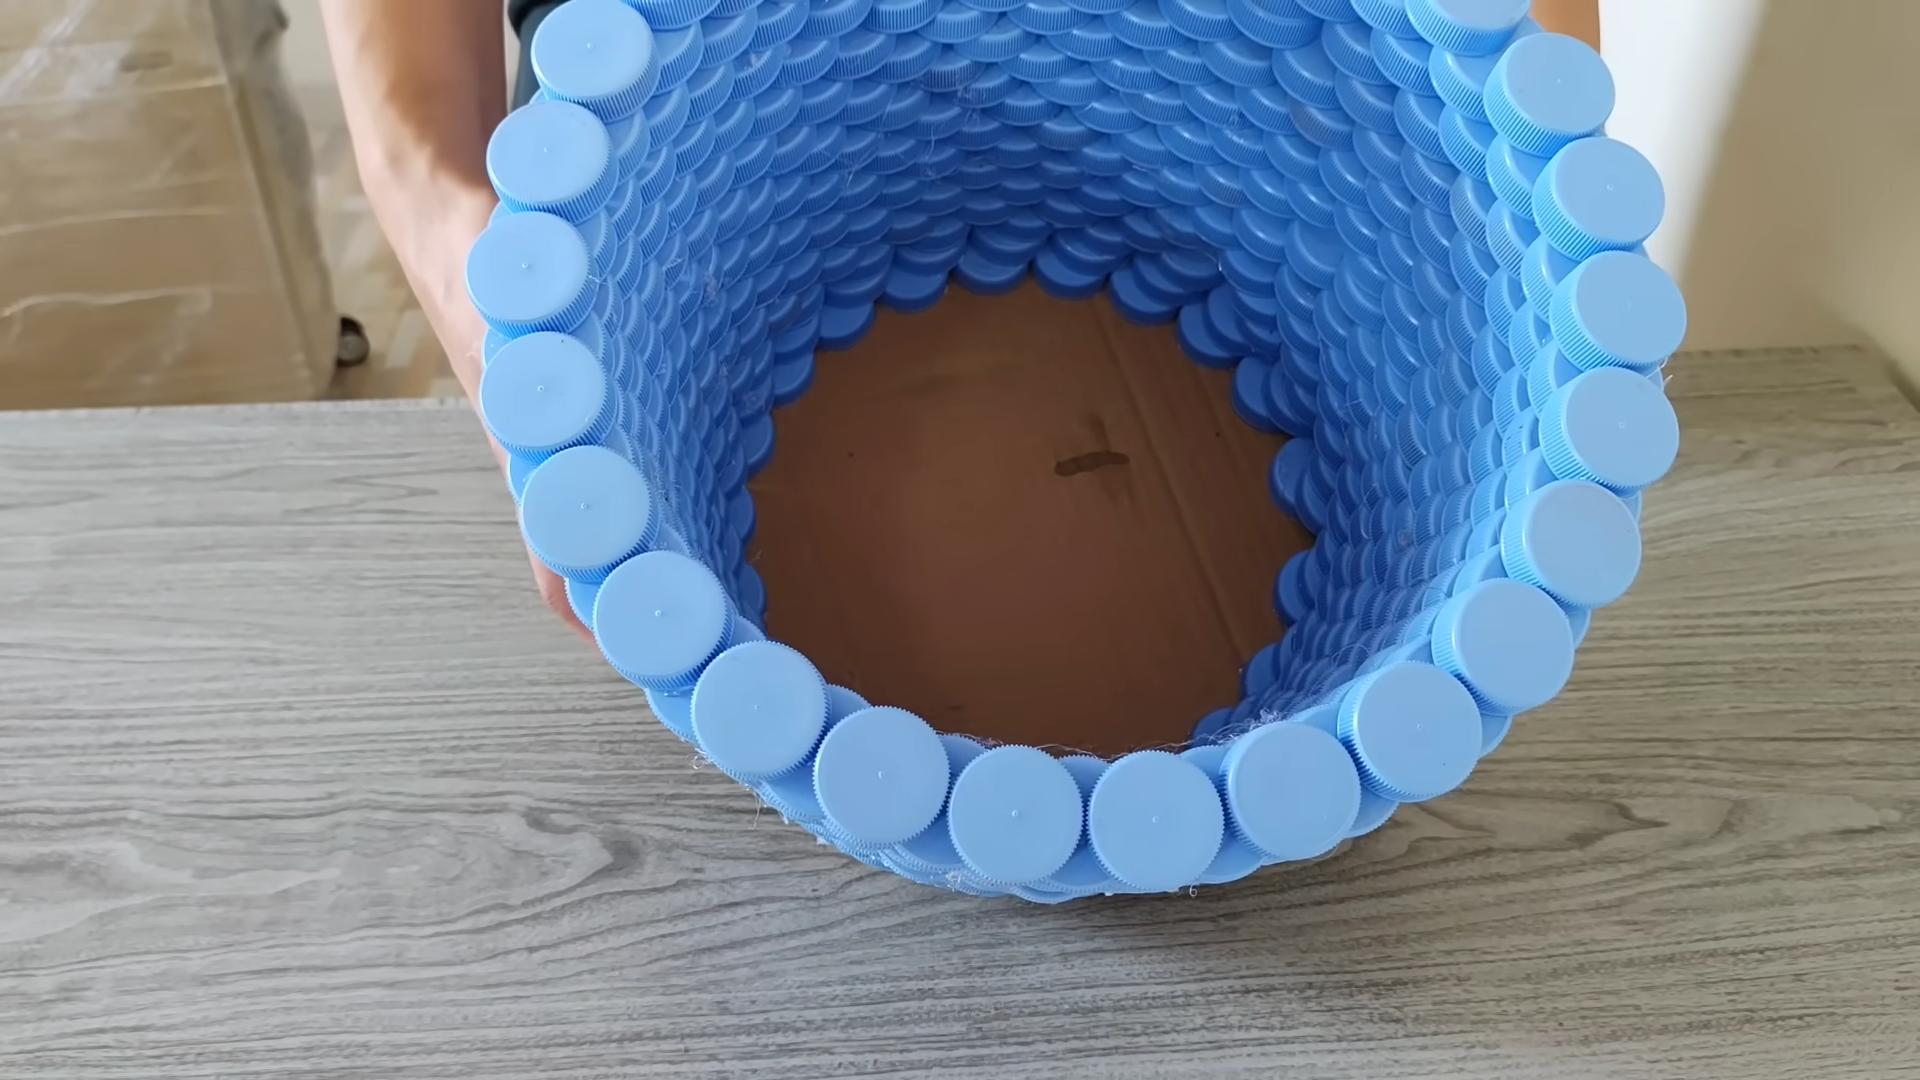
Assembling the Base
The base is the foundation of our basket, so let’s get it right!
1. Creating the First Ring: Take six bottle caps and thread them together to form a ring.
* Threading Technique: Start by threading your thread through one hole in the first cap, then through a hole in the second cap. Tie a knot to secure them together.
* Continue the Circle: Continue threading the caps together, one by one, until you have a complete ring of six caps.
* Secure the Ring: Tie the last cap to the first cap, creating a closed circle. Make sure the knot is tight and secure. Trim any excess thread.
2. Adding the Second Ring: Now we’ll add a second ring of caps around the first ring.
* Attaching to the First Ring: Thread your thread through a hole in one of the caps in the first ring, then through a hole in a new cap.
* Connecting the Caps: Connect the new cap to the adjacent cap in the second ring, and then to the next cap in the first ring. This will create a staggered pattern.
* Continue Around: Continue adding caps in this way until you have a complete second ring.
* Secure the Ring: Tie the last cap to the first cap in the second ring, creating a closed circle. Make sure the knot is tight and secure. Trim any excess thread.
3. Expanding the Base: Continue adding rings of caps in the same way, gradually expanding the base of the basket.
* Increasing the Number of Caps: As you add more rings, you’ll need to increase the number of caps in each ring to maintain a flat, circular shape.
* Experiment and Adjust: Don’t be afraid to experiment and adjust the number of caps as needed. The goal is to create a flat, stable base.
* Check for Flatness: Periodically check the base to make sure it’s lying flat. If it starts to buckle or warp, you may need to adjust the number of caps in the next ring.
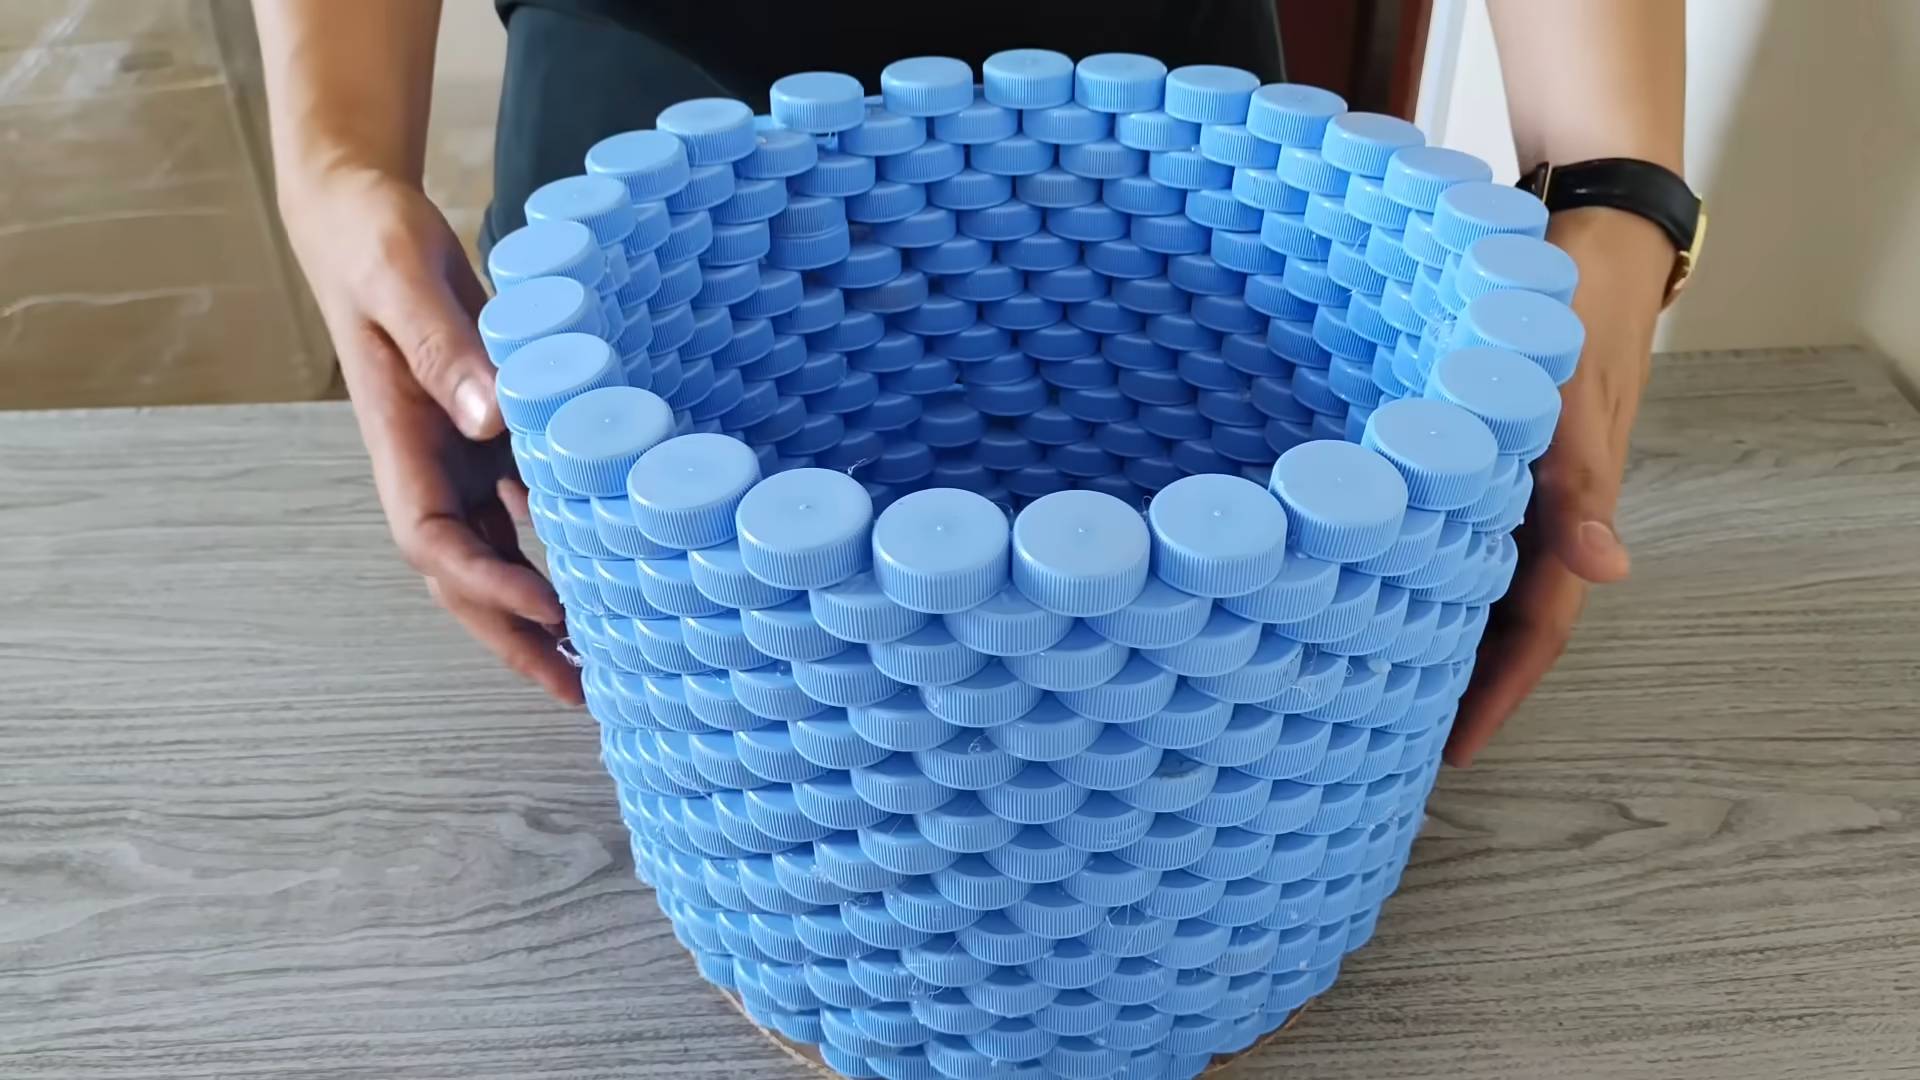
Building the Walls
Now that we have a solid base, let’s start building the walls of our basket.
1. Starting the First Wall Ring: Attach a new ring of caps to the edge of the base, perpendicular to the base.
* Threading Technique: Thread your thread through a hole in one of the caps in the base, then through a hole in a new cap.
* Creating the Upright Position: Make sure the new cap is standing upright, forming the beginning of the wall.
* Connecting the Caps: Connect the new cap to the adjacent cap in the first wall ring, and then to the next cap in the base.
* Continue Around: Continue adding caps in this way until you have a complete first wall ring.
* Secure the Ring: Tie the last cap to the first cap in the first wall ring, creating a closed circle. Make sure the knot is tight and secure. Trim any excess thread.
2. Adding More Wall Rings: Continue adding rings of caps in the same way, building the walls of the basket to your desired height.
* Maintaining the Shape: As you add more rings, try to maintain a consistent shape for the basket. You can make the walls straight, or you can gradually taper them inward or outward.
* Experiment with Colors: This is a great opportunity to get creative with colors. You can create patterns, stripes, or even random color combinations.
* Tightening the Thread: Make sure to pull the thread tight as you add each cap. This will help to create a strong and stable basket.
3. Finishing the Top Edge: Once you’ve reached your desired height, you can finish the top edge of the basket in a variety of ways.
* Simple Edge: Simply tie off the thread and trim any excess.
* Decorative Edge: You can add a decorative edge by weaving the thread through the top row of caps in a pattern.
* Reinforced Edge: You can reinforce the top edge by adding an extra layer of thread or by attaching a piece of ribbon or fabric.
Adding Handles (Optional)
If you want to add handles to your basket, here’s how:
1. Choose Handle Placement: Decide where you want to place the handles on the basket.
* Opposite Sides: The most common placement is on opposite sides of the basket.
* Consider Weight Distribution: Think about how you’ll be carrying the basket and choose a placement that will distribute the weight evenly.
2. Create the Handles: You can create handles using a variety of materials.
* Bottle Caps: You can create handles by stringing together a row of bottle caps.
* Rope or Cord: You can use rope or cord to create handles.
* Fabric Strips: You can use fabric strips to create handles.
3. Attach the Handles: Attach the handles to the basket using thread or glue.
* Secure Attachment: Make sure the handles are securely attached to the basket.
* Reinforce the Attachment: You may want to reinforce the attachment by adding extra layers of thread or glue.
Final Touches
1. Inspect the Basket: Carefully inspect the basket for any loose caps or weak spots.
2.
Conclusion
So, there you have it! Transforming seemingly useless plastic bottle caps into a charming and functional basket is not only a fantastic way to reduce waste but also a surprisingly rewarding creative endeavor. This DIY plastic bottle cap basket project is more than just crafting; it’s about embracing sustainability, unleashing your inner artist, and creating something beautiful and practical from materials often discarded without a second thought.
Why is this a must-try? Because it’s accessible, affordable, and adaptable. You likely already have the primary ingredient – plastic bottle caps – accumulating in your recycling bin. The other materials are readily available and inexpensive. But beyond the practical benefits, this project offers a unique sense of accomplishment. There’s a special satisfaction in knowing you’ve given new life to something destined for the landfill, transforming it into a piece that adds character and functionality to your home.
Don’t be afraid to experiment with variations! Consider using different colored caps to create intricate patterns or mosaic-like designs. You could even incorporate other recycled materials, such as fabric scraps or beads, to add texture and visual interest. For a sturdier basket, use a thicker gauge wire or fishing line for connecting the caps. If you’re feeling ambitious, try creating larger baskets for storing blankets or toys, or smaller ones for organizing desk supplies or toiletries. Think about adding a fabric lining to protect delicate items or to further customize the look of your basket. You can also paint the finished basket with a sealant to protect it from moisture and wear.
The possibilities are truly endless, limited only by your imagination. This project is perfect for crafters of all skill levels, from beginners looking for a simple and satisfying project to experienced artisans seeking a new and innovative way to express their creativity. It’s also a wonderful activity to do with children, teaching them about recycling, resourcefulness, and the joy of making something with their own hands.
We wholeheartedly encourage you to give this DIY plastic bottle cap basket project a try. Gather your caps, choose your colors, and let your creativity flow. We’re confident you’ll be amazed at what you can create. And most importantly, we want to hear about your experience! Share your photos, tips, and variations with us in the comments below. Let’s inspire each other to find new and innovative ways to reduce waste and create beautiful things. We can’t wait to see what you come up with!
Frequently Asked Questions (FAQ)
What type of plastic bottle caps work best for this project?
Ideally, you want to use caps that are relatively uniform in size and shape. Standard soda and water bottle caps are perfect. Avoid using caps from larger containers like laundry detergent or motor oil, as they may be too bulky or have irregular shapes that make them difficult to work with. Also, ensure the caps are clean and free of any sticky residue before you start. A quick wash with soap and water will do the trick.
What kind of wire or string should I use to connect the caps?
The choice of wire or string depends on the desired look and durability of your basket. For a more rustic and visible connection, consider using craft wire in a color that complements your caps. For a more subtle and less visible connection, fishing line or clear beading thread is a good option. If you want a very sturdy basket, use a thicker gauge wire. Experiment with different materials to see what works best for you. Remember to choose a material that is strong enough to hold the weight of the items you plan to store in the basket.
How do I clean the finished plastic bottle cap basket?
Cleaning your DIY plastic bottle cap basket is easy. Simply wipe it down with a damp cloth and mild soap. Avoid submerging the basket in water, as this could weaken the connections. For stubborn stains, you can use a soft brush to gently scrub the affected area. Allow the basket to air dry completely before using it.
How many bottle caps do I need to make a basket?
The number of bottle caps required will depend on the size and shape of the basket you want to create. A small basket might require around 100-200 caps, while a larger basket could require several hundred. It’s always a good idea to collect more caps than you think you’ll need, just in case. You can also adjust the size of your basket as you go, depending on the number of caps you have available.
Can I paint or decorate the bottle caps before assembling the basket?
Absolutely! Painting or decorating the bottle caps is a great way to personalize your basket and add a unique touch. You can use acrylic paints, markers, or even decoupage techniques to create interesting designs and patterns. Just make sure the paint or decorations are completely dry before you start assembling the basket. You can also seal the painted caps with a clear coat to protect the design and prevent chipping.
Is this project suitable for children?
This project can be a fun and educational activity for children, but adult supervision is required, especially when using sharp tools like scissors or needles. Children can help with collecting and cleaning the bottle caps, sorting them by color, and even assisting with the assembly process. It’s a great way to teach them about recycling, creativity, and teamwork.
What other variations can I try with this DIY plastic bottle cap basket project?
The possibilities are endless! You can create different shapes and sizes of baskets, experiment with different colors and patterns, and even incorporate other recycled materials. Consider adding a handle to your basket for easy carrying, or lining it with fabric to protect delicate items. You can also use the same technique to create other items, such as coasters, trivets, or even wall art. Let your imagination run wild and see what you can create!
Where can I find inspiration for different basket designs?
There are many resources available online for finding inspiration for your DIY plastic bottle cap basket project. You can browse websites like Pinterest, Instagram, and YouTube for tutorials, ideas, and examples of different basket designs. You can also check out craft blogs and online forums for tips and advice from other crafters. Don’t be afraid to experiment and create your own unique designs!
Leave a Comment