

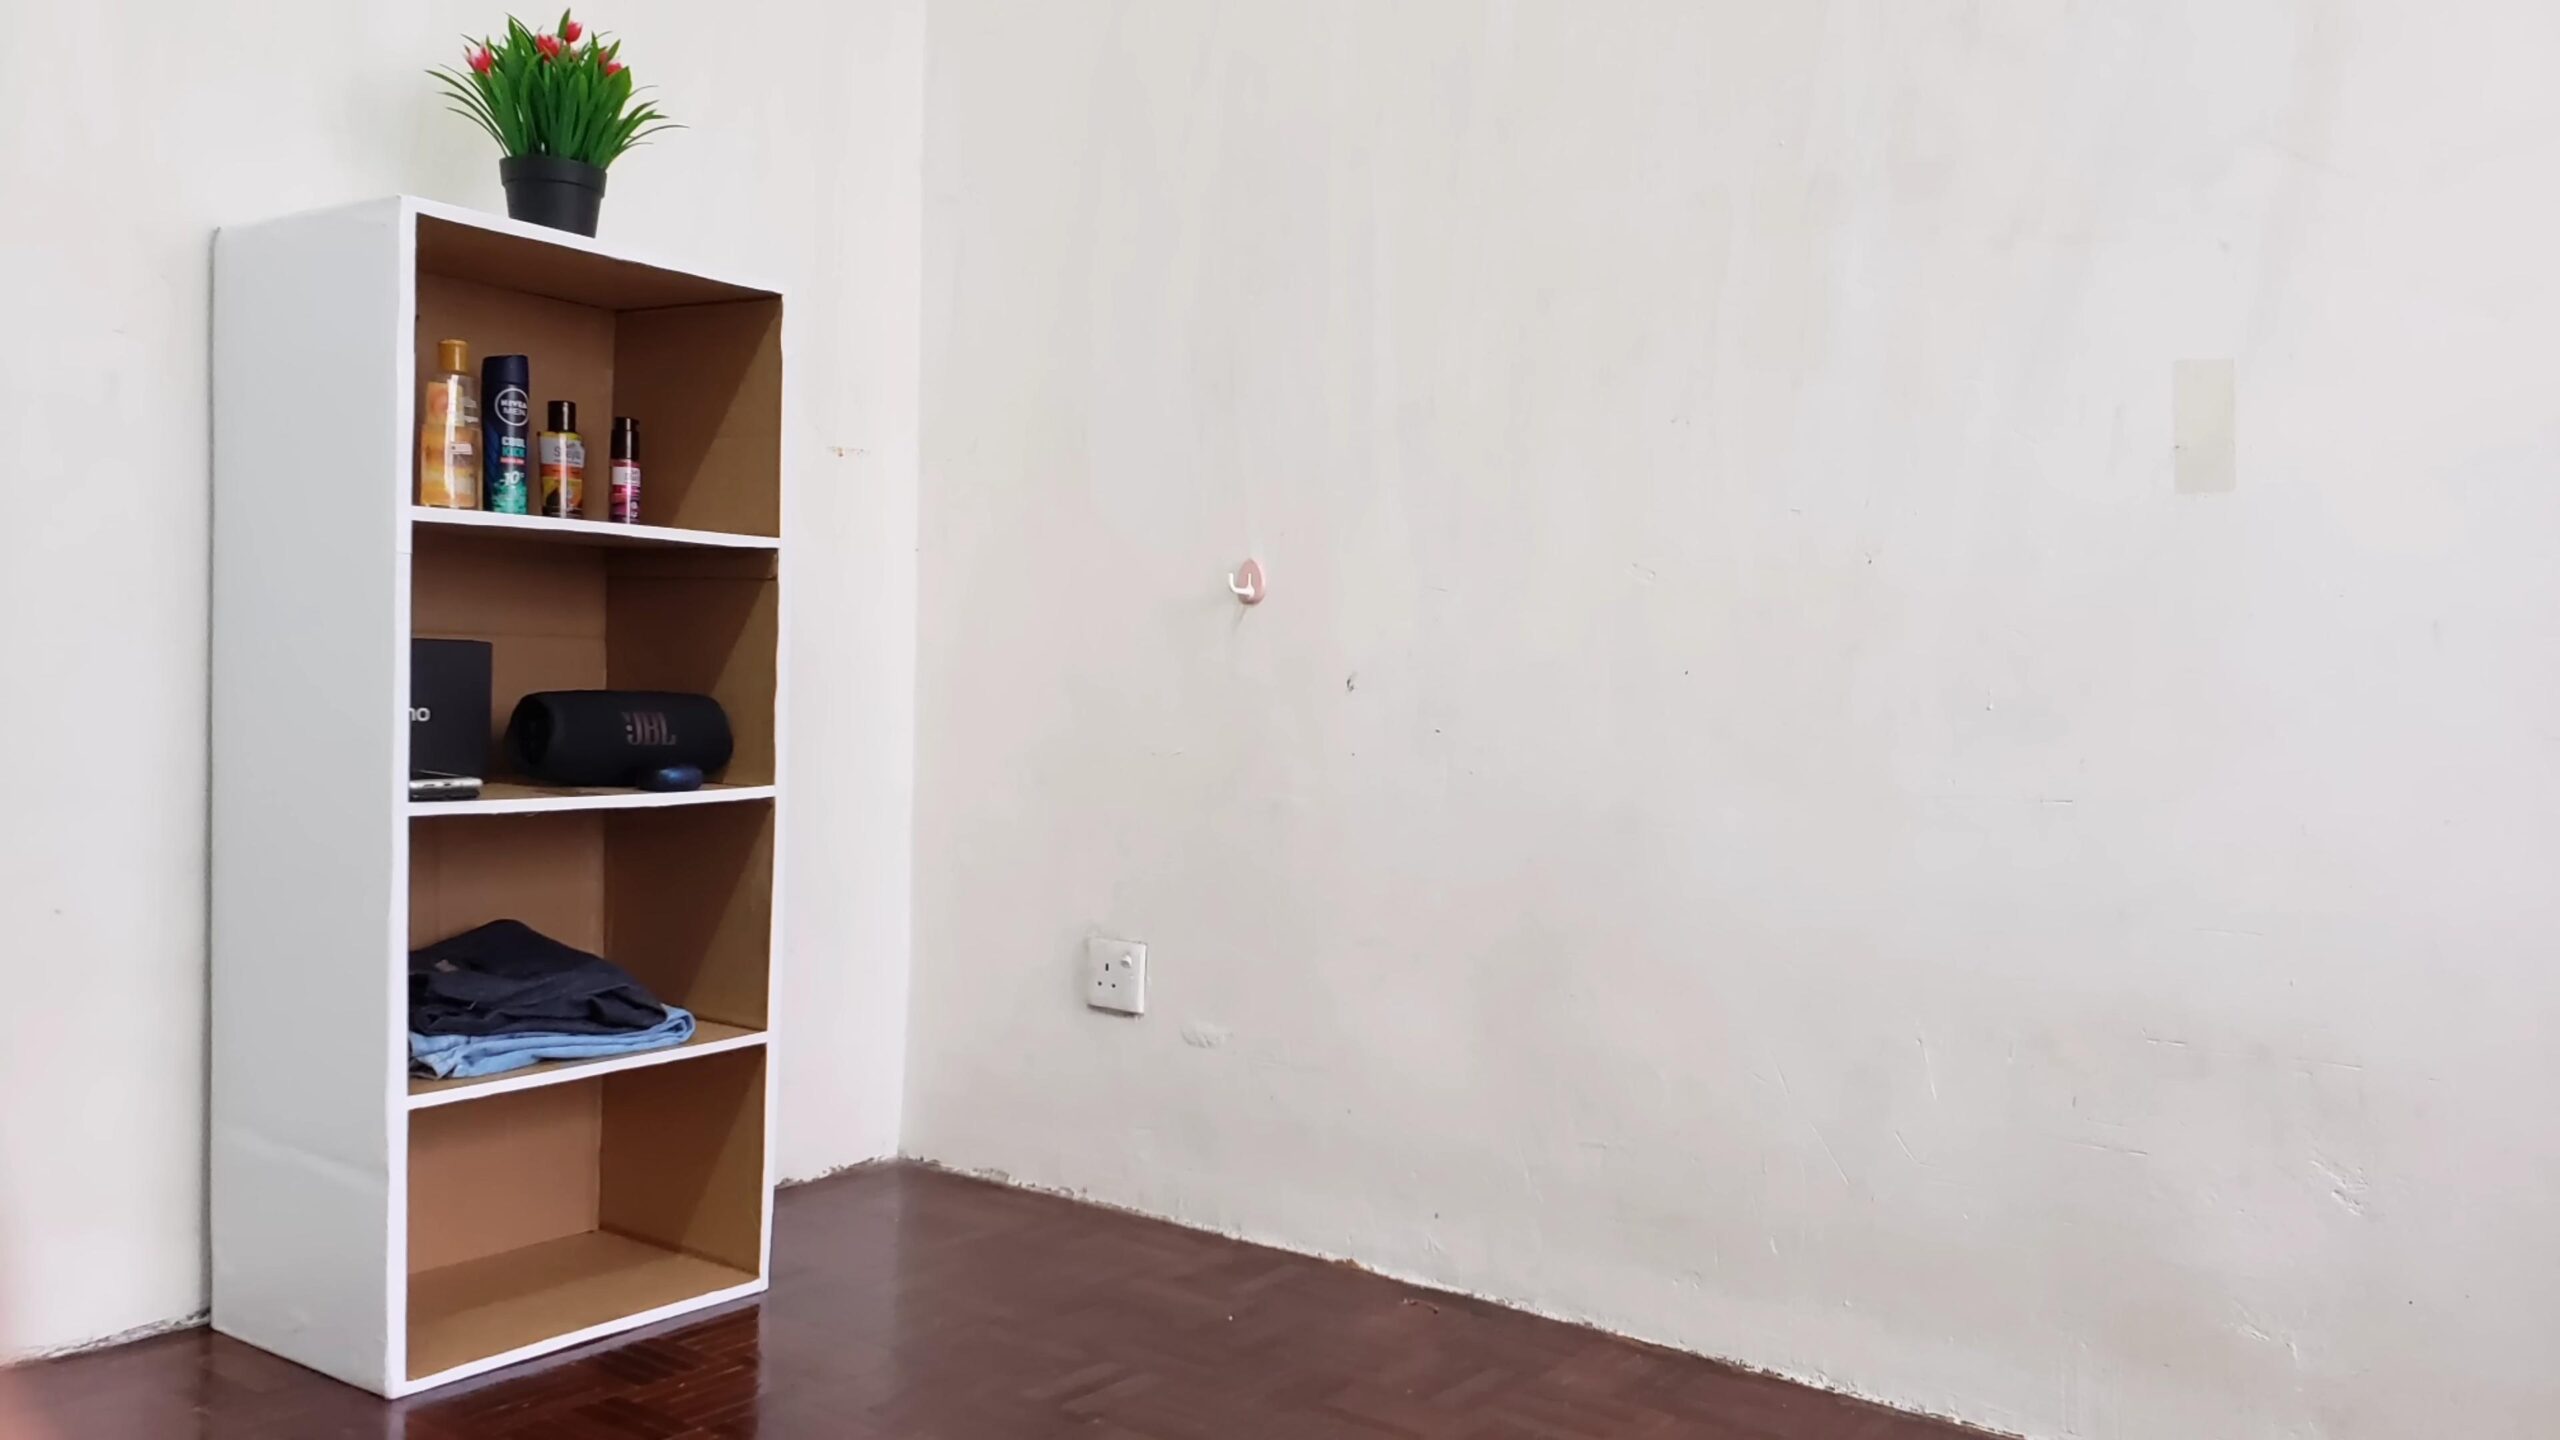
DIY Cardboard Wardrobe: Tired of clothes overflowing from your closet? Or maybe you’re moving and need a temporary storage solution that won’t break the bank? I totally get it! We’ve all been there, staring at a mountain of clothes with nowhere to put them. But what if I told you that the answer to your storage woes might be lurking in your recycling bin?
Believe it or not, the humble cardboard box has a long and resourceful history. From ancient civilizations using papyrus boxes to store scrolls to modern-day shipping containers transporting goods across the globe, cardboard has always been a versatile and readily available material. Think of this DIY project as a modern twist on that resourceful spirit!
In today’s world, where sustainability is more important than ever, finding creative ways to reuse materials is not just practical, it’s also responsible. That’s why I’m so excited to share this amazing DIY Cardboard Wardrobe tutorial with you. It’s a fantastic way to declutter your space, save money, and give those cardboard boxes a new lease on life. Plus, it’s a fun and rewarding project that you can customize to fit your exact needs. So, grab your scissors, gather your cardboard, and let’s get started on building your very own eco-friendly wardrobe!
DIY Cardboard Wardrobe: Organize Your Clothes on a Budget!
Hey there, fellow DIY enthusiasts! Are you struggling with closet space? Need a temporary wardrobe solution for a guest room, dorm, or even just to get your clothes organized without breaking the bank? Well, you’ve come to the right place! I’m going to walk you through building your very own sturdy and surprisingly stylish cardboard wardrobe. Trust me, it’s easier than you think, and the satisfaction of creating something functional from recycled materials is totally worth it.
Materials You’ll Need:
Before we dive in, let’s gather our supplies. This is a cardboard-intensive project, so start collecting those boxes!
* Large Cardboard Boxes: This is the most important part! You’ll need several large, sturdy cardboard boxes. Think appliance boxes (refrigerator, washer/dryer), furniture boxes, or even large moving boxes. The more uniform in size, the better, but don’t worry if they’re slightly different – we can adjust. Aim for at least 4-6 boxes depending on the size of the wardrobe you want.
* Smaller Cardboard Boxes: These will be used for reinforcing corners, creating shelves, and adding extra support. Cereal boxes, shoe boxes, or any other smaller, sturdy boxes will work great.
* Packing Tape: Lots and lots of packing tape! Clear or brown is fine. You’ll be using this to secure everything together, so make sure it’s strong.
* Utility Knife or Box Cutter: A sharp utility knife is essential for cutting and shaping the cardboard. Be careful and always use a cutting mat or protected surface.
* Metal Ruler or Straight Edge: This will help you make straight, clean cuts.
* Measuring Tape: Accurate measurements are key to a well-constructed wardrobe.
* Pencil or Marker: For marking cutting lines and measurements.
* Optional:
* Cardboard Cutter: A specialized cardboard cutter can make the job easier and safer, but it’s not essential.
* Hot Glue Gun and Glue Sticks: For extra reinforcement in certain areas.
* Paint, Wallpaper, or Fabric: To decorate and personalize your wardrobe.
* Clothes Rod: If you want to hang clothes, you’ll need a sturdy clothes rod. You can use a metal pipe, a wooden dowel, or even a thick cardboard tube.
* Shelf Liner: To protect your shelves and make them easier to clean.
Planning Your Wardrobe: Design and Measurements
Before you start cutting, it’s crucial to plan out the design and take accurate measurements. This will prevent mistakes and ensure that your wardrobe fits your space and needs.
1. Determine the Size: Decide how tall, wide, and deep you want your wardrobe to be. Consider the available space in your room and the amount of storage you need. Sketch out a rough design on paper, noting the dimensions.
2. Box Arrangement: Experiment with different arrangements of your cardboard boxes to see how they fit together. You can stack them vertically to create a tall wardrobe or arrange them horizontally for a wider one.
3. Internal Layout: Think about how you want to organize the inside of your wardrobe. Do you want shelves, hanging space, or a combination of both? Plan the placement of shelves and the height of the clothes rod.
4. Measure and Mark: Once you have a design in mind, use your measuring tape and pencil to mark the cutting lines on the cardboard boxes. Be precise and double-check your measurements before cutting.
Building the Wardrobe: Step-by-Step Instructions
Okay, let’s get to the fun part – actually building the wardrobe! Remember to take your time, be careful with the utility knife, and don’t be afraid to adjust your design as you go.
Phase 1: Creating the Base and Walls
1. Prepare the Base: Choose one or two of your largest cardboard boxes to form the base of the wardrobe. If you’re using two boxes, overlap them slightly and secure them together with packing tape. Make sure the base is level and sturdy. You can reinforce the bottom with extra layers of cardboard if needed.
2. Cut and Shape the Walls: Select the boxes you’ll use for the walls of the wardrobe. If the boxes are too tall, cut them down to the desired height using your utility knife and straight edge. Remember to cut carefully and avoid cutting yourself.
3. Attach the Walls to the Base: Position the walls around the base, ensuring they are flush and aligned. Use packing tape to securely attach the walls to the base. Apply multiple layers of tape to create a strong bond. Pay special attention to the corners, as these are the weakest points.
4. Reinforce the Corners: Cut strips of cardboard from your smaller boxes and fold them into right angles. Use these to reinforce the corners of the wardrobe, both inside and outside. Attach them with packing tape or hot glue. This will significantly increase the stability of the structure.
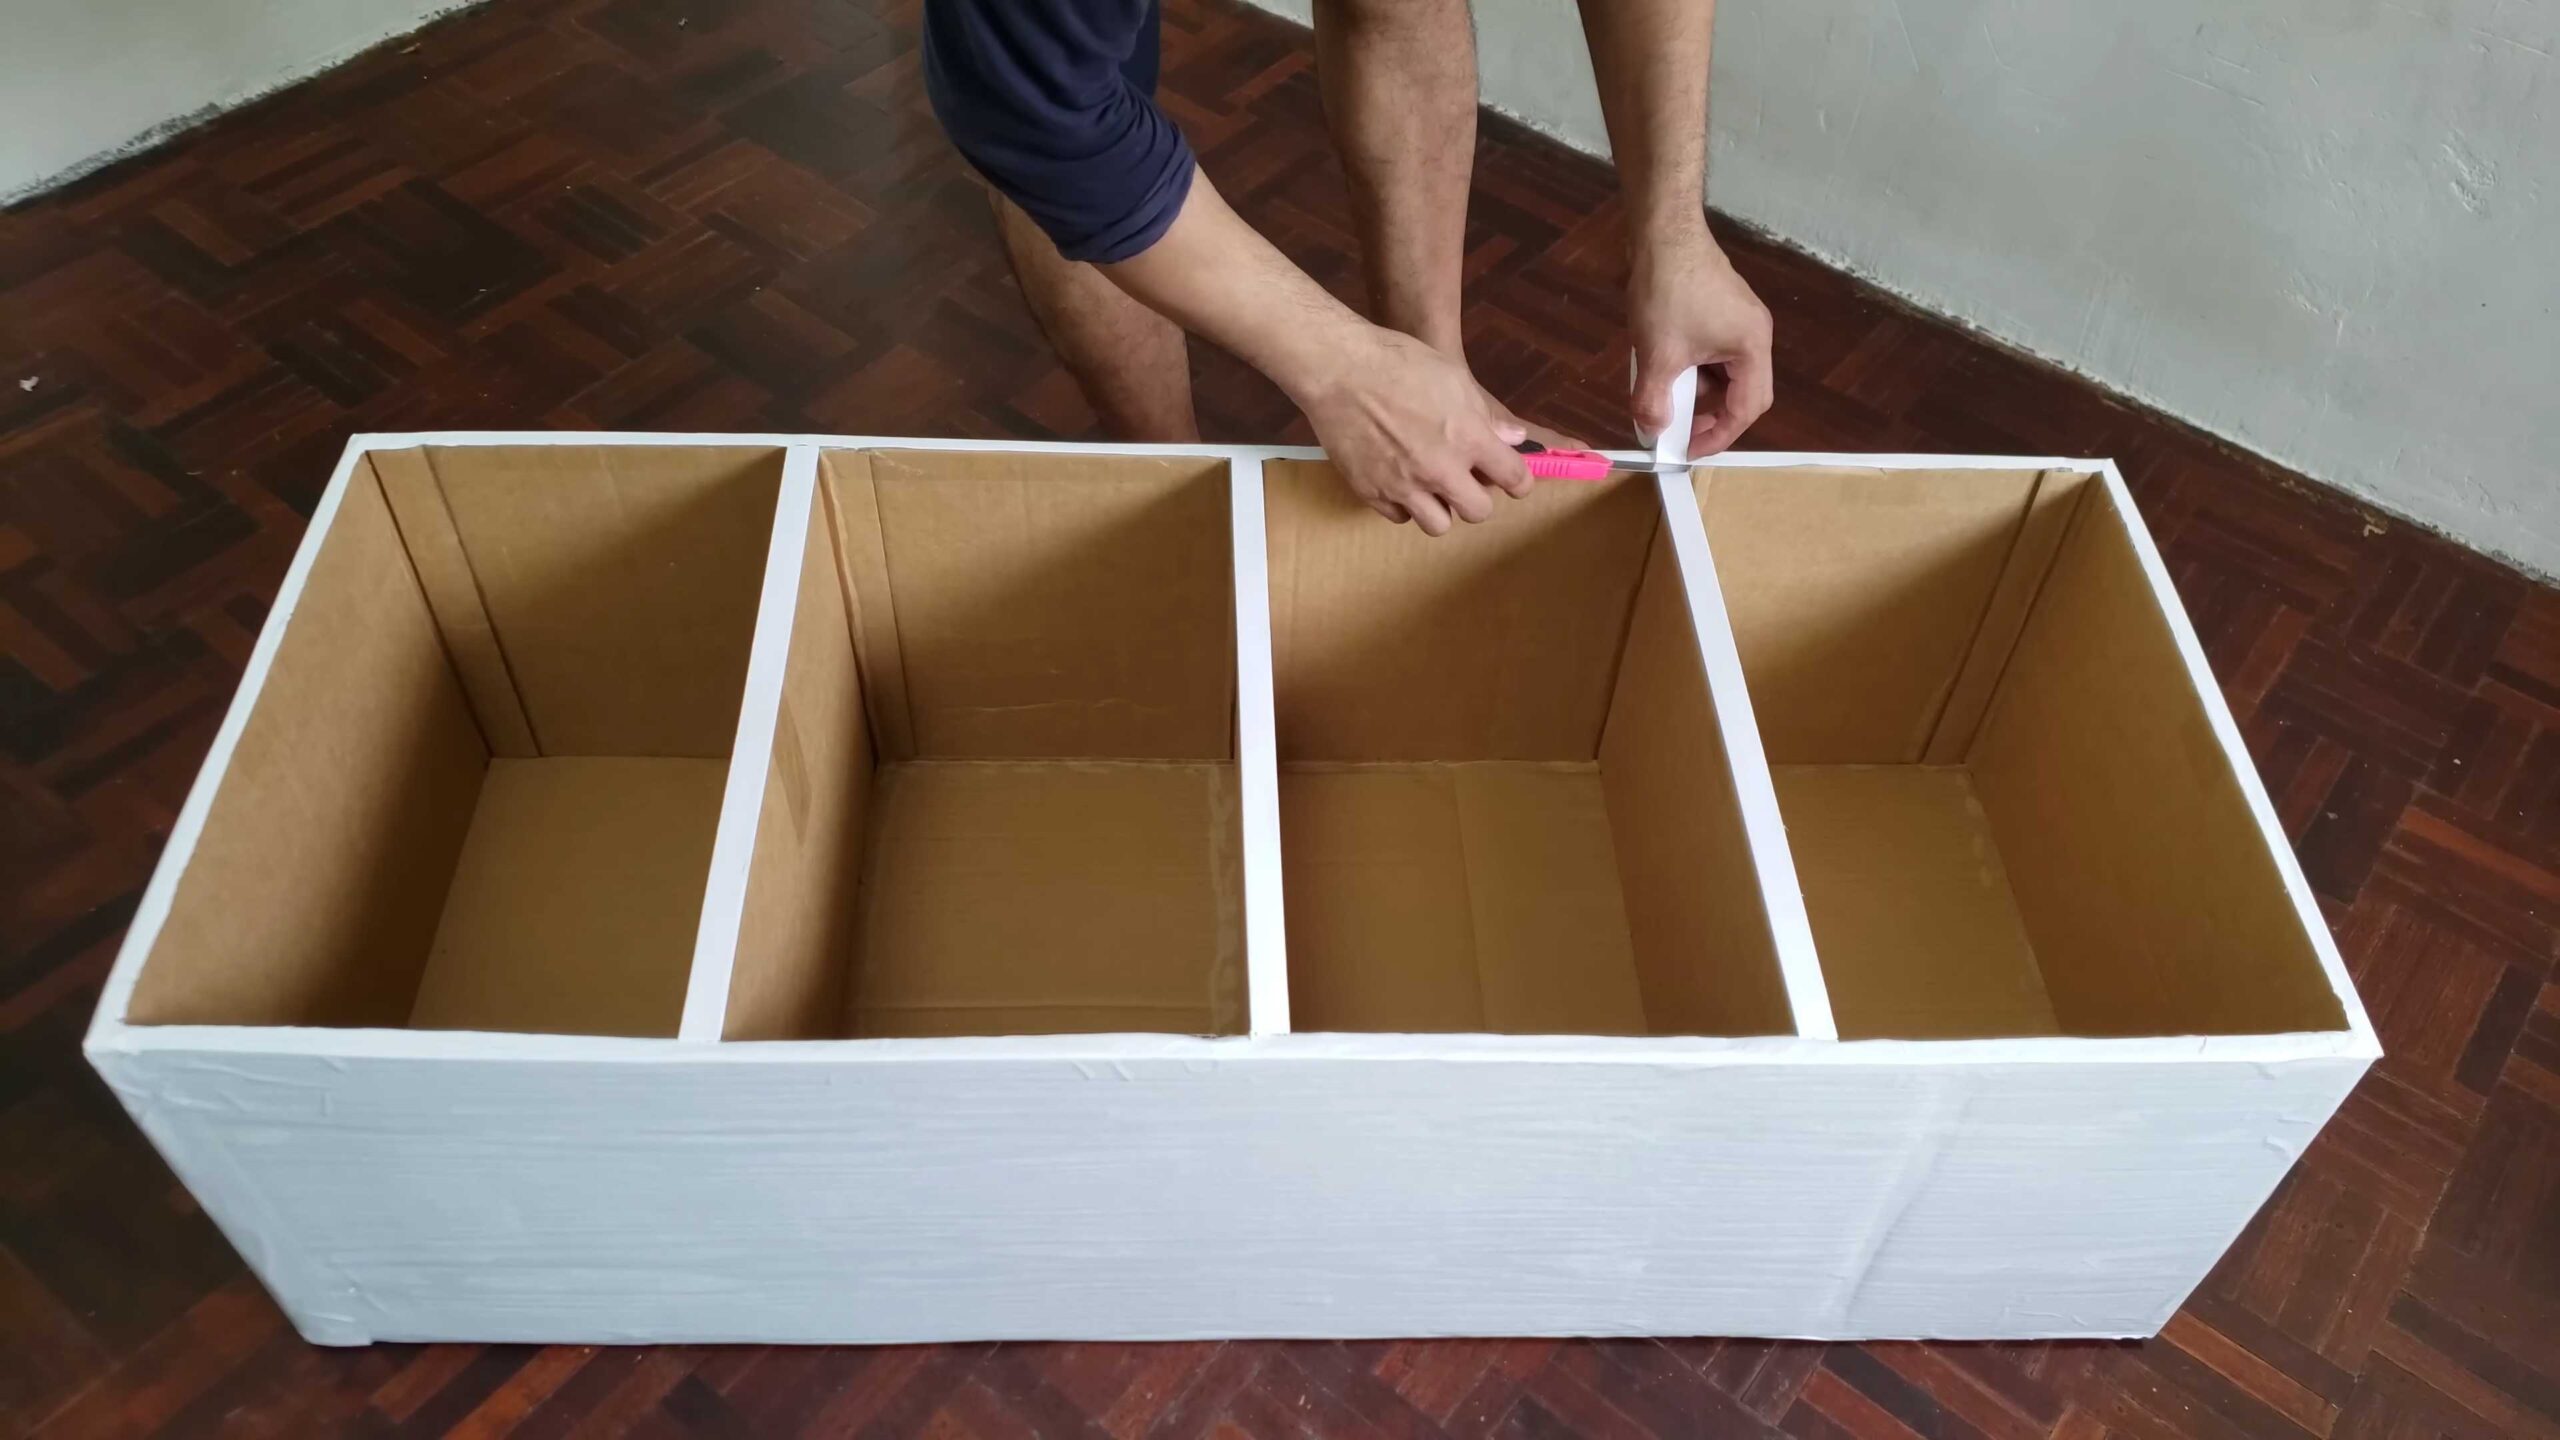
Phase 2: Adding Shelves and Hanging Space
1. Measure and Cut Shelf Supports: Measure the width of the inside of your wardrobe. Cut strips of cardboard from your smaller boxes to create shelf supports. The width of the supports should be slightly less than the inside width of the wardrobe to allow for easy insertion.
2. Attach Shelf Supports: Decide where you want to place your shelves and mark the locations on the inside walls of the wardrobe. Attach the shelf supports to the walls using packing tape or hot glue. Make sure the supports are level and evenly spaced.
3. Create the Shelves: Measure the dimensions of the shelves you need. Cut pieces of cardboard from your larger boxes to create the shelves. The shelves should fit snugly between the shelf supports.
4. Insert the Shelves: Carefully slide the shelves onto the shelf supports. If the shelves are wobbly, you can add extra supports underneath or reinforce them with additional layers of cardboard.
5. Install the Clothes Rod (Optional): If you want to hang clothes, you’ll need to install a clothes rod. Measure the width of the inside of your wardrobe at the desired height for the rod.
6. Create Rod Supports: Cut two pieces of cardboard to create supports for the clothes rod. These supports should be tall enough to hold the rod at the desired height. You can shape them into L-shapes for added stability.
7. Attach Rod Supports: Attach the rod supports to the inside walls of the wardrobe using packing tape or hot glue. Make sure the supports are level and evenly spaced.
8. Install the Rod: Place the clothes rod onto the supports. If the rod is too long, you can cut it down to size. Secure the rod to the supports with tape or glue.
Phase 3: Finishing Touches and Decoration
1. Reinforce Weak Points: Inspect your wardrobe for any weak points or areas that need extra support. Reinforce these areas with additional layers of cardboard and packing tape.
2. Cover Exposed Edges: Cover any exposed edges of the cardboard with packing tape to prevent them from tearing or fraying. This will also give the wardrobe a cleaner, more finished look.
3. Decorate the Wardrobe (Optional): Now comes the fun part – decorating your wardrobe! You can paint it, cover it with wallpaper or fabric, or add decorative elements like stencils or stickers. Get creative and personalize your wardrobe to match your style.
4. Add Shelf Liner (Optional): To protect your shelves and make them easier to clean, you can add shelf liner. Cut the liner to size and place it on top of the shelves.
5. Test the Wardrobe: Before you start loading up your wardrobe with clothes, test its stability by gently pushing and shaking it. If you notice any wobbling or instability, reinforce the weak points.
Tips and Tricks for a Sturdy Cardboard Wardrobe
* Use High-Quality Cardboard: The sturdier the cardboard, the stronger your wardrobe will be. Look for double-walled or triple-walled cardboard boxes for maximum durability.
* Reinforce with Extra Layers: Don’t be afraid to add extra layers of cardboard to reinforce weak points, especially the corners and edges.
* Use Plenty of Packing Tape: Packing tape is your best friend in this project. Use plenty of it to secure everything together and create a strong bond.
* Hot Glue for Extra Strength: Hot glue can be used to add extra strength to certain areas, such as the shelf supports and corner reinforcements.
* Distribute Weight Evenly: When loading up your wardrobe with clothes, distribute the weight evenly to prevent it from tipping over.
* Consider a Back Panel: Adding a cardboard back panel to your wardrobe will significantly increase its stability and prevent it from warping.
* Get Creative with Decoration: Don’t be afraid to get creative with the decoration of your wardrobe. Use paint, wallpaper, fabric, or other materials to personalize it and make it your own.
*
Conclusion
So, there you have it! Building your own DIY cardboard wardrobe isn’t just a fun project; it’s a practical, budget-friendly, and surprisingly stylish solution to your storage woes. We’ve walked you through the steps, highlighting the simplicity and adaptability of this ingenious hack. Forget expensive furniture store trips and complicated assembly instructions. With a little creativity, some cardboard, and our guidance, you can create a functional and personalized storage space that perfectly fits your needs.
Why is this a must-try? Because it empowers you to take control of your living space without breaking the bank. It’s a sustainable choice, giving new life to discarded cardboard boxes and reducing waste. And let’s be honest, there’s a certain satisfaction that comes from building something with your own hands. It’s a project that’s both rewarding and incredibly useful.
But the beauty of this DIY project lies in its versatility. Feel free to experiment with different sizes and configurations. Need more hanging space? Add another rod! Want to organize shoes? Create shelves within the wardrobe. Consider painting the cardboard for a polished look, or use decorative paper to add a touch of personality. You could even incorporate fabric panels for a softer, more sophisticated aesthetic. Think about adding wheels to the bottom for easy mobility, transforming your wardrobe into a portable storage unit. The possibilities are truly endless!
Don’t be afraid to get creative and personalize your DIY cardboard wardrobe to match your unique style and storage requirements. This isn’t just about building a wardrobe; it’s about expressing your creativity and resourcefulness.
We wholeheartedly encourage you to give this DIY project a try. Gather your cardboard, grab your tools, and get ready to transform your space. And most importantly, we want to hear about your experience! Share your photos, tips, and variations with us in the comments below. Let’s inspire each other with our creative cardboard creations. We can’t wait to see what you come up with! Building a DIY cardboard wardrobe is more than just a project; it’s a journey of creativity, resourcefulness, and sustainable living. Embrace the challenge, unleash your inner DIYer, and create a storage solution that’s uniquely yours.
Frequently Asked Questions (FAQ)
What kind of cardboard should I use?
The best cardboard to use for your DIY wardrobe is sturdy, corrugated cardboard. Think appliance boxes, large moving boxes, or even multiple smaller boxes taped together securely. Avoid thin or flimsy cardboard, as it won’t provide adequate support. The thicker the cardboard, the more weight your wardrobe will be able to hold. Look for boxes that are in good condition, free from excessive damage or moisture. Remember to flatten the boxes completely before you start cutting and assembling.
How do I make the wardrobe sturdy enough to hold clothes?
Sturdiness is key! Reinforce the corners and edges of your cardboard wardrobe with strong packing tape. Multiple layers of tape will add significant strength. Consider adding internal supports, such as cardboard tubes or extra cardboard panels, to the frame. Distribute the weight of your clothes evenly to prevent the wardrobe from collapsing. Avoid overloading the hanging rod or shelves with too much weight. If you’re concerned about the overall stability, you can also lean the wardrobe against a wall for added support.
Can I paint or decorate my cardboard wardrobe?
Absolutely! Painting or decorating your cardboard wardrobe is a great way to personalize it and make it blend seamlessly with your decor. Use acrylic paints, as they adhere well to cardboard. Apply a primer first to create a smooth surface and prevent the paint from soaking into the cardboard. You can also use decorative paper, fabric, or even wallpaper to cover the wardrobe. Get creative with stencils, patterns, and colors to create a unique and eye-catching storage solution. Remember to let the paint or glue dry completely before adding clothes to the wardrobe.
How do I create shelves inside the wardrobe?
Creating shelves is a simple way to add extra storage space to your cardboard wardrobe. Cut cardboard panels to the desired size and shape for your shelves. Reinforce the edges of the shelves with tape for added strength. Attach the shelves to the inside of the wardrobe using strong glue or tape. You can also create supports for the shelves by attaching cardboard strips to the sides of the wardrobe. Ensure the shelves are level and securely attached before placing items on them.
How do I make a hanging rod for the wardrobe?
There are several ways to create a hanging rod for your cardboard wardrobe. You can use a sturdy wooden dowel, a metal pipe, or even a thick cardboard tube. Cut the rod to the desired length and attach it to the inside of the wardrobe using brackets or strong tape. Ensure the rod is securely attached and can support the weight of your clothes. You can also reinforce the area around the rod with extra cardboard to prevent it from tearing.
How long will a DIY cardboard wardrobe last?
The lifespan of your DIY cardboard wardrobe depends on several factors, including the quality of the cardboard, the construction techniques, and the weight of the items stored inside. With proper construction and care, a well-built cardboard wardrobe can last for several months or even years. Avoid exposing the wardrobe to moisture or excessive weight, as this can weaken the cardboard. Regularly inspect the wardrobe for any signs of damage and repair as needed.
Is a cardboard wardrobe environmentally friendly?
Yes! Building a DIY cardboard wardrobe is an environmentally friendly way to repurpose discarded cardboard boxes and reduce waste. By giving new life to cardboard, you’re helping to conserve resources and reduce the amount of waste that ends up in landfills. Cardboard is also a recyclable material, so when your wardrobe eventually reaches the end of its lifespan, you can recycle it.
What if my cardboard wardrobe starts to sag or collapse?
If your cardboard wardrobe starts to sag or collapse, it’s important to address the issue immediately to prevent further damage. Reinforce the weak areas with extra cardboard and tape. Redistribute the weight of the items inside the wardrobe to prevent overloading. Consider adding additional supports to the frame. If the damage is severe, you may need to rebuild the wardrobe using stronger cardboard or construction techniques.
Can I make a cardboard wardrobe for shoes?
Absolutely! A cardboard wardrobe can be easily adapted to create a shoe storage solution. Simply create shelves inside the wardrobe that are sized to accommodate your shoes. You can also add dividers to separate different pairs of shoes. Consider adding a door or flap to the front of the wardrobe to keep your shoes dust-free.
What are some other variations I can try?
The possibilities are endless! You can create a cardboard wardrobe with drawers, using smaller cardboard boxes as drawers. You can add a mirror to the front of the wardrobe. You can create a wardrobe with a built-in desk or workspace. You can even create a cardboard wardrobe that doubles as a room divider. Let your imagination run wild and create a cardboard wardrobe that perfectly meets your needs and reflects your personal style. Remember to share your creations with us!
Leave a Comment