

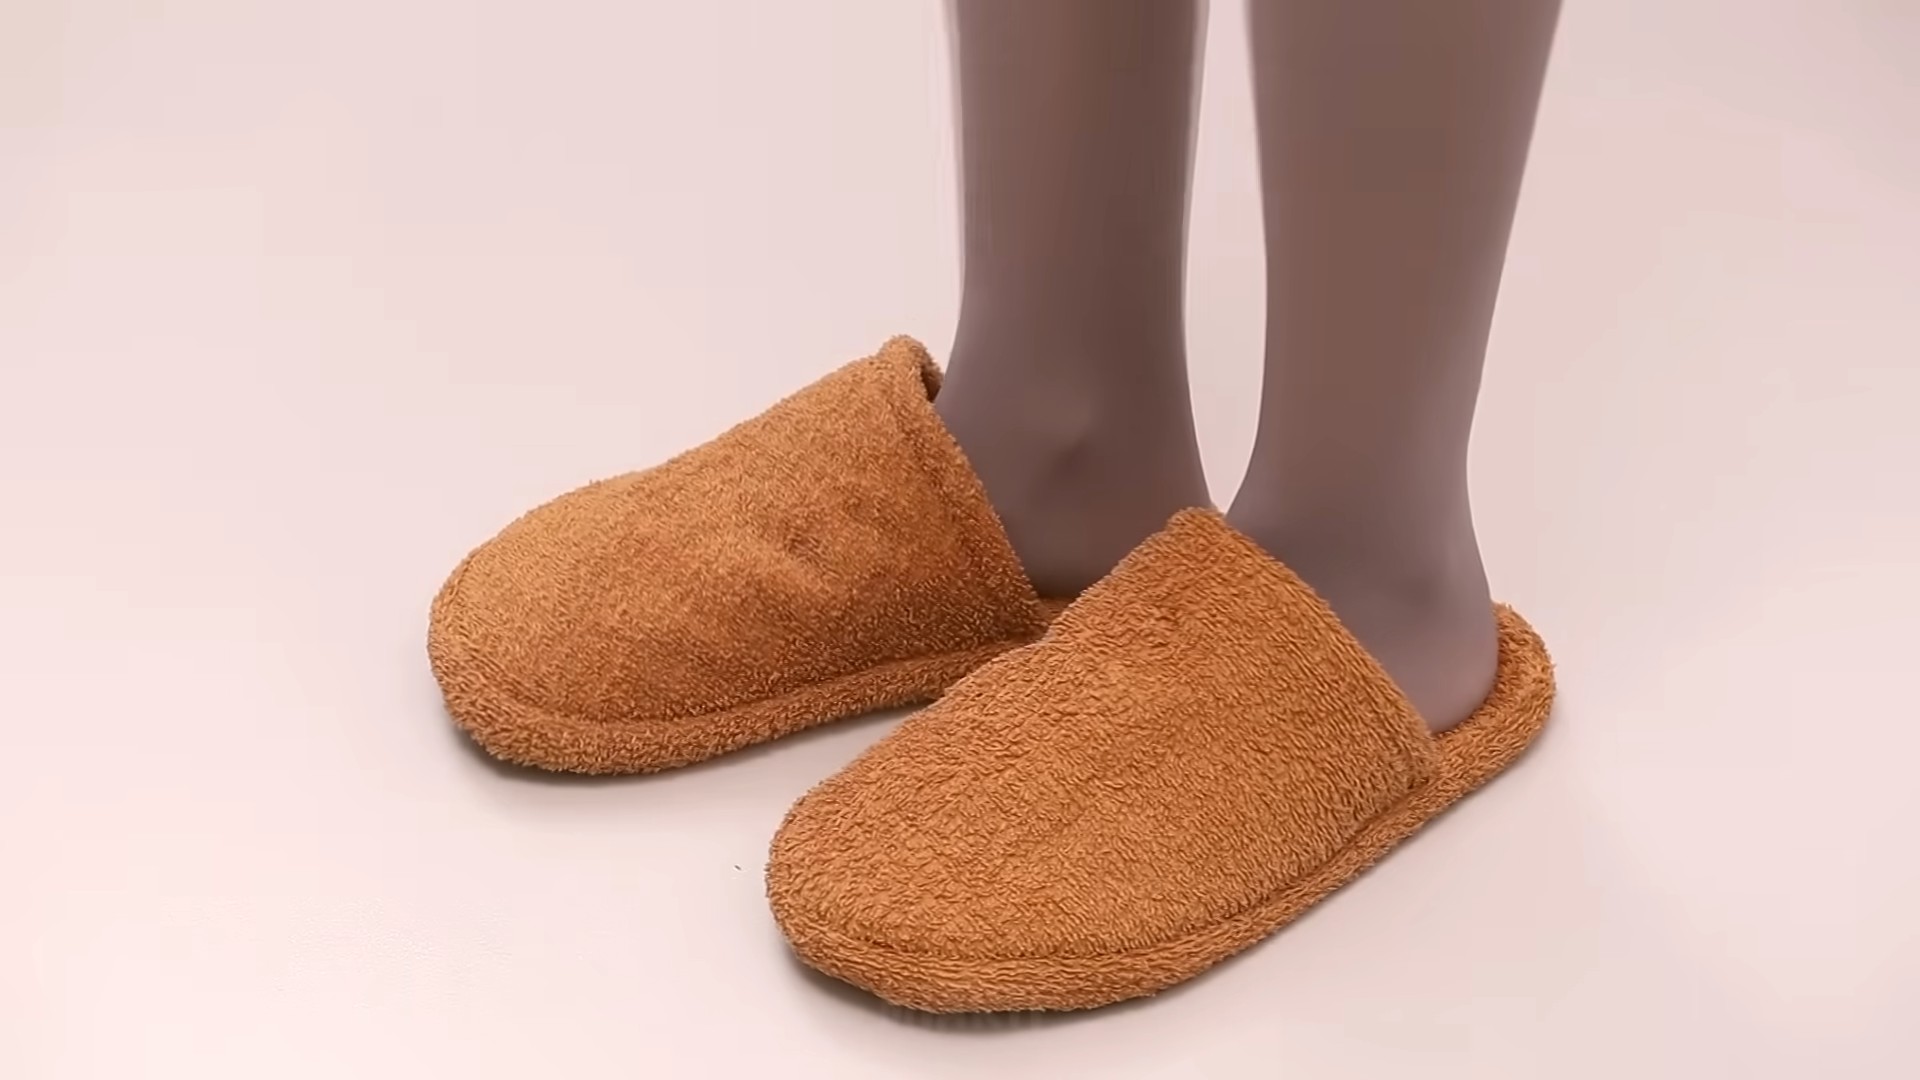
DIY Towel Slippers: Who doesn’t love the feeling of plush, comfy slippers after a long day? But what if I told you that you could create that luxurious comfort yourself, using something you probably already have lying around – old towels! Forget those flimsy, disposable hotel slippers; we’re diving into a fun and sustainable project that will pamper your feet and reduce waste.
The concept of repurposing textiles has roots stretching back centuries, with resourceful individuals finding creative ways to extend the life of fabrics. While the exact origin of towel slippers is hard to pinpoint, the spirit of “make do and mend” is a timeless tradition across cultures. Now, we’re bringing that tradition into the 21st century with a modern twist!
Let’s face it, buying new slippers can be expensive, and often they’re made with materials that aren’t exactly eco-friendly. Plus, finding the perfect fit can be a challenge. That’s where this DIY Towel Slippers project comes in. I’m going to show you how to transform those old, forgotten towels into cozy, custom-fit slippers that are gentle on your wallet and the planet. Whether you’re looking for a relaxing treat for yourself or a thoughtful handmade gift, this tutorial is for you. Get ready to unleash your inner crafter and step into a world of comfort!
DIY Towel Slippers: Cozy Comfort Under Your Feet!
Okay, friends, let’s talk comfort. Specifically, the kind of comfort that greets your feet the second they hit the floor in the morning (or after a long, hard day!). I’m talking about towel slippers! Forget those flimsy hotel slippers; we’re making our own, and they’re going to be amazing. This project is perfect for using up old towels, and it’s surprisingly easy. Trust me, if I can do it, you can too!
Materials You’ll Need:
* An old bath towel (or two hand towels, depending on size) – the fluffier, the better!
* Scissors
* Pins
* Sewing machine (or needle and thread if you’re feeling extra crafty!)
* Cardboard (cereal boxes work great!)
* Pencil or marker
* Fabric scraps (for embellishments, optional)
* Non-slip fabric or rubber shelf liner (for the soles, optional but highly recommended!)
* Ruler or measuring tape
Creating the Pattern: Your Foot’s Blueprint
This is arguably the most important step, so pay close attention! We’re going to create a pattern based on your foot size. Don’t worry, it’s not rocket science.
1. Trace Your Foot: Place a piece of cardboard on a flat surface. Stand on the cardboard and carefully trace around your foot with a pencil or marker. Make sure to keep the pencil perpendicular to the cardboard for an accurate outline. Repeat for your other foot.
2. Add Seam Allowance: Now, we need to add some wiggle room (literally!). Around the entire outline of each foot tracing, draw a second line about 1/2 inch (1.25 cm) outside the original line. This is your seam allowance. This extra space will allow for comfortable movement and prevent the slippers from being too tight.
3. Create the Upper Pattern: This part will cover the top of your foot. Take another piece of cardboard. Measure the width of your foot at the widest point (usually across the ball of your foot). Divide that measurement in half. Now, measure from the tip of your big toe back to about halfway down your foot. This will be the length of your upper pattern.
4. Draw the Upper Pattern Shape: On the cardboard, draw a curved shape that is the width you calculated and the length you measured. Think of it as a rounded rectangle. The curve should be gentle and comfortable. You can always adjust it later. This piece will cover the top of your foot. I usually make mine look like a slightly flattened oval.
5. Add Seam Allowance to the Upper Pattern: Just like with the sole pattern, add a 1/2 inch (1.25 cm) seam allowance around the entire upper pattern piece.
6. Cut Out the Patterns: Carefully cut out all four cardboard pieces: the two sole patterns (left and right foot) and the two upper patterns. Label them clearly (left sole, right sole, left upper, right upper).
Cutting the Fabric: Towel Time!
Now that we have our patterns, it’s time to cut the fabric.
1. Prepare the Towel: Lay your towel flat on a large surface. If you’re using two hand towels, make sure they are clean and dry.
2. Pin the Sole Patterns: Place the sole patterns (left and right) onto the towel. Pin them securely in place, making sure the pins go through both layers of the towel. This will prevent the fabric from shifting while you cut.
3. Cut Out the Soles: Carefully cut out the sole pieces, following the outline of the cardboard patterns. You should now have two towel sole pieces for each foot (four pieces total).
4. Pin the Upper Patterns: Place the upper patterns (left and right) onto the towel. Pin them securely in place.
5. Cut Out the Uppers: Carefully cut out the upper pieces, following the outline of the cardboard patterns. You should now have two towel upper pieces (one for each foot).
6. Cut the Non-Slip Soles (Optional but Recommended): If you’re using non-slip fabric or rubber shelf liner, place your cardboard sole patterns onto the material and cut out two pieces for each foot. This will provide much-needed grip and prevent slipping.
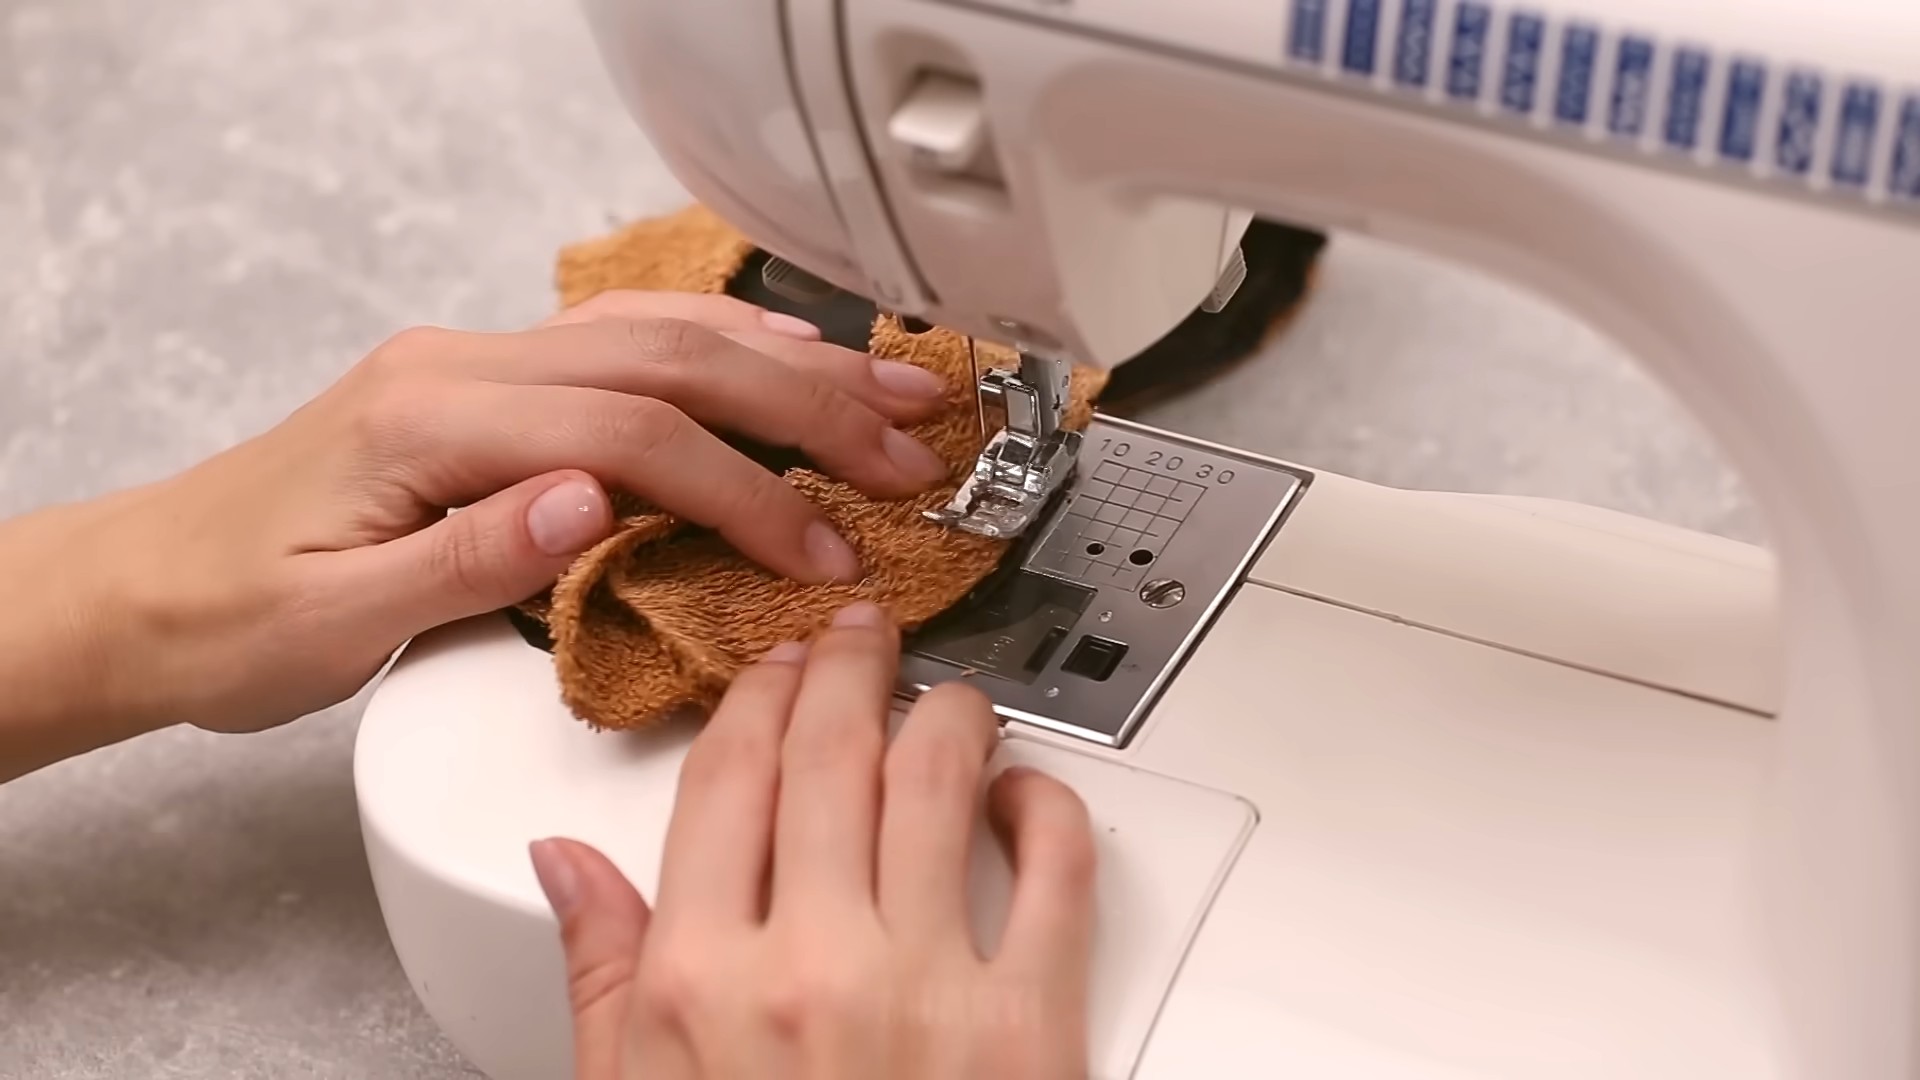
Sewing It All Together: From Fabric to Footwear
This is where the magic happens! We’re going to transform these fabric pieces into cozy slippers.
1. Sew the Sole Layers Together: Take two of the sole pieces for one foot (e.g., two left foot soles). Place them right sides together (meaning the fluffy sides are facing each other). Pin them around the edges.
2. Sew Around the Sole: Using a sewing machine (or hand-sewing if you prefer), sew around the edge of the sole, leaving a 1/2 inch (1.25 cm) seam allowance. Leave a 2-3 inch opening on one side for turning.
3. Clip the Curves: Carefully clip the curves along the seam allowance. This will help the sole lie flat when you turn it right side out. Be careful not to cut through the seam!
4. Turn Right Side Out: Turn the sole right side out through the opening you left. Use a pencil or chopstick to gently push out the seams and corners.
5. Stuff the Sole (Optional): For extra cushioning, you can stuff the sole with batting or extra towel scraps. This is entirely optional, but it will make your slippers even more comfortable.
6. Close the Opening: Fold the raw edges of the opening inward and pin them in place. Sew the opening closed using a hand stitch or a sewing machine.
7. Repeat for the Other Sole: Repeat steps 1-6 for the other foot.
8. Attach the Upper to the Sole: Now, take one of the upper pieces and one of the finished soles. Center the upper piece on top of the sole, with the right side of the upper facing up. Pin the upper to the sole, aligning the edges.
9. Sew the Upper to the Sole: Sew the upper to the sole, using a 1/2 inch (1.25 cm) seam allowance. Start at one side of the upper and sew all the way around to the other side.
10. Attach the Non-Slip Sole (Optional): If you’re using non-slip soles, attach them to the bottom of the towel soles using fabric glue or by sewing them on. Make sure they are securely attached.
11. Repeat for the Other Slipper: Repeat steps 8-10 for the other slipper.
Embellishments (Optional): Adding Your Personal Touch
This is where you can get creative! Add fabric scraps, buttons, ribbons, or anything else you like to personalize your slippers.
* Fabric Flowers: Cut out fabric petals and sew them together to create a flower. Attach the flower to the upper of the slipper.
* Ribbon Bows: Tie a ribbon into a bow and sew it onto the upper of the slipper.
* Buttons: Sew buttons onto the upper of the slipper in a decorative pattern.
* Embroidery: Embroider your initials or a simple design onto the upper of the slipper.
Final Touches: Ready to Relax!
1. Trim Any Loose Threads: Give your slippers a final inspection and trim any loose threads.
2. Try Them On: Slip your feet into your new towel slippers and enjoy the cozy comfort!
Tips and Tricks for Perfect Towel Slippers:
* Choose the Right Towel: A thick, fluffy towel will make the most comfortable slippers. Avoid thin or worn-out towels.
* Accurate Patterns are Key: Take your time when creating the patterns to ensure a good fit.
* Use Sharp Scissors: Sharp scissors will make cutting the fabric much easier and more accurate.
* Pin Generously: Pinning the fabric pieces together will prevent them from shifting while you sew.
* Reinforce the Seams: For extra durability, you can reinforce the seams by sewing over them twice.
* Adjust the Pattern as Needed: If your slippers feel too tight or too loose, adjust the pattern accordingly for your next pair.
* Consider the Sole Material: If you’re not using non-slip fabric, consider adding a layer of leather or suede to the bottom of the soles for better grip.
* Wash Your Slippers Regularly: To keep your slippers clean and fresh, wash them regularly in the washing machine on a gentle cycle. Air dry them to prevent shrinking.
* Experiment with Different Fabrics: While this tutorial focuses on towel slippers, you can also use other fabrics like fleece, flannel, or even old sweaters.
* Make Them as Gifts: These towel slippers make a thoughtful and practical gift for friends and family.
And there you have it!
Conclusion
So, there you have it! Transforming old towels into cozy, custom-fit slippers is not just a fun craft project; it’s a practical and sustainable way to give those forgotten linens a new lease on life. Forget about spending money on flimsy, disposable slippers that end up in landfills. With this simple DIY towel slippers method, you can create comfortable, washable footwear that’s gentle on your feet and the environment.
Why is this DIY trick a must-try? Because it’s incredibly versatile, budget-friendly, and satisfyingly simple. You’re not just making slippers; you’re upcycling, reducing waste, and crafting something uniquely yours. Plus, the feeling of slipping your feet into something you made yourself is surprisingly rewarding.
But the fun doesn’t stop there! Feel free to experiment with variations to truly personalize your towel slippers. Consider adding a layer of non-slip material to the soles for extra grip – old yoga mats or even textured fabric scraps work wonders. You could also embellish your slippers with embroidery, buttons, or fabric paint to add a touch of personality. For a warmer, more luxurious feel, line the inside with fleece or flannel. If you’re feeling adventurous, try creating different styles, like open-toed slippers for warmer weather or high-backed slippers for extra ankle support. The possibilities are endless!
Don’t be afraid to get creative and adapt the instructions to suit your own preferences and available materials. The beauty of this DIY project lies in its adaptability. Whether you’re a seasoned crafter or a complete beginner, you’ll find this project accessible and enjoyable.
We wholeheartedly encourage you to give this DIY towel slippers project a try. It’s a fantastic way to spend a rainy afternoon, a thoughtful gift idea, and a sustainable solution for your footwear needs. Once you’ve made your own pair, we’d love to hear about your experience! Share your creations and any tips or variations you discover in the comments below. Let’s inspire each other to embrace sustainable crafting and create a more comfortable and eco-friendly world, one pair of towel slippers at a time. We are confident that you will enjoy the process and the result.
Frequently Asked Questions (FAQs)
What kind of towels work best for DIY towel slippers?
The best towels for this project are those that are absorbent and relatively thick. Old bath towels are ideal, as they provide cushioning and durability. However, you can also use hand towels or even beach towels, depending on the size and style of slippers you want to create. Avoid using towels that are too thin or worn out, as they may not provide enough support or insulation. Consider the texture of the towel as well; a softer towel will result in more comfortable slippers.
How do I ensure my DIY towel slippers are the right size?
Accurate sizing is crucial for comfortable slippers. The best way to ensure a good fit is to trace your foot onto a piece of paper while wearing socks (if you plan to wear socks with your slippers). Add about half an inch to the outline for seam allowance and wiggle room. Use this template to cut out the soles of your slippers. You can also measure the length and width of your foot and compare it to standard shoe size charts to get a general idea of the correct dimensions. Remember to test the fit as you go, especially when attaching the upper part of the slipper.
Can I wash my DIY towel slippers?
Yes, one of the great advantages of making towel slippers is that they are washable! However, it’s important to consider the materials you used. If you added any embellishments like buttons or delicate fabric paint, hand washing might be a safer option. Otherwise, you can typically machine wash your slippers on a gentle cycle with cold water. Avoid using bleach, as it can damage the fabric and fade the colors. Tumble dry on low heat or, even better, air dry them to prevent shrinkage and prolong their lifespan.
How can I make my DIY towel slippers more durable?
To enhance the durability of your towel slippers, consider reinforcing the seams with multiple rows of stitching. You can also add a layer of sturdy fabric, such as canvas or denim, to the soles for extra protection against wear and tear. Using a thicker towel will also contribute to the overall durability. If you plan to wear your slippers frequently, consider replacing the soles periodically as needed.
What if I don’t have a sewing machine? Can I still make these slippers?
Absolutely! While a sewing machine can speed up the process, you can definitely make these slippers by hand. Use a strong needle and thread, and take your time to ensure that your stitches are secure and even. A backstitch or running stitch is recommended for hand sewing. Hand sewing may take longer, but it’s a perfectly viable option, especially for smaller projects or if you enjoy the meditative aspect of handcrafting.
How can I make my DIY towel slippers non-slip?
Adding a non-slip sole is essential for safety, especially on smooth floors. You have several options for achieving this. You can purchase non-slip fabric or rubber sheeting from a craft store and attach it to the soles of your slippers using fabric glue or stitching. Alternatively, you can use silicone sealant or puffy paint to create a textured surface on the soles. Old yoga mats or rubber placemats can also be repurposed as non-slip soles.
Can I use different fabrics besides towels for this project?
While towels are the primary material for this project, you can certainly incorporate other fabrics for different parts of the slipper. For example, you could use fleece or flannel for the lining to create a warmer and softer feel. Denim or canvas can be used for the soles to provide extra durability. You can also use decorative fabrics for embellishments or accents. Just be sure to choose fabrics that are compatible in terms of weight and washability.
How do I customize my DIY towel slippers with embellishments?
Customizing your slippers with embellishments is a great way to add personality and style. You can use buttons, beads, embroidery, fabric paint, or even appliqués to decorate your slippers. Consider the placement of the embellishments carefully to ensure they don’t interfere with comfort or functionality. For example, avoid placing large buttons on the soles or in areas that will rub against your feet. Use fabric glue or strong thread to attach the embellishments securely.
What are some creative gift ideas using DIY towel slippers?
DIY towel slippers make thoughtful and personalized gifts for friends and family. You can customize the slippers to match the recipient’s style and preferences. For example, you could make a pair of spa-themed slippers with lavender-scented inserts or a pair of cozy winter slippers lined with fleece. You can also package the slippers with other related items, such as a bath bomb, lotion, or a cozy robe, to create a complete gift set. Consider the recipient’s interests and hobbies when choosing embellishments and fabrics.
How do I store my DIY towel slippers when not in use?
Proper storage can help prolong the lifespan of your towel slippers. When not in use, store them in a dry, well-ventilated area to prevent mildew and odors. You can keep them in a shoe rack, a drawer, or a storage bin. Avoid storing them in direct sunlight, as this can fade the colors. If you live in a humid climate, consider using a dehumidifier or placing silica gel packets near your slippers to absorb excess moisture.
Leave a Comment