

Grow Pineapples in Containers? Absolutely! Imagine plucking a juicy, homegrown pineapple right from your patio. Sounds like a tropical dream, right? Well, it’s more attainable than you think! For centuries, pineapples have symbolized hospitality and welcome, a tradition rooted in their exotic appeal and sweet flavor. From being a rare delicacy gracing royal tables to becoming a symbol of warmth and friendship, the pineapple has always held a special place in our hearts and homes.
But let’s be honest, most of us think growing pineapples is only for tropical climates. That’s where this DIY guide comes in! I’m here to show you how to successfully grow pineapples in containers, no matter where you live. Whether you have a sprawling garden or just a sunny balcony, you can enjoy the satisfaction of nurturing your own pineapple plant. This isn’t just about having a cool plant; it’s about experiencing the joy of growing your own food, reducing your grocery bill, and adding a touch of the tropics to your everyday life. Plus, who wouldn’t want to impress their friends with a homegrown pineapple?
This article will provide you with easy-to-follow steps, expert tips, and troubleshooting advice to ensure your pineapple growing journey is a success. So, grab your gardening gloves, and let’s get started on this exciting adventure of growing your own delicious pineapples!
Grow Your Own Tropical Paradise: A Beginner’s Guide to Container Pineapples
Okay, let’s be honest, who doesn’t love the idea of growing their own pineapple? It seems so exotic and rewarding! And guess what? You don’t need a tropical plantation to do it. You can absolutely grow pineapples in containers, even if you live in a cooler climate. I’m going to walk you through everything you need to know, from prepping the pineapple top to harvesting your very own homegrown fruit. Get ready to impress your friends (and yourself!) with this fun and surprisingly easy project.
Choosing Your Pineapple and Preparing the Top
This is the most crucial first step! The success of your pineapple growing adventure hinges on selecting a healthy pineapple and properly preparing its crown.
* Selecting the Right Pineapple: Head to your local grocery store and look for a pineapple that’s ripe but not overripe. You want one with healthy, green leaves. Avoid pineapples with brown, wilted, or damaged leaves. The fruit itself should be fragrant and slightly soft to the touch.
* Why Organic Matters (Optional but Recommended): While not strictly necessary, using an organic pineapple is a good idea. Non-organic pineapples may have been treated with growth inhibitors that can prevent the top from rooting.
* Preparing the Pineapple Top: This is where the magic begins!
1. Twisting Off the Top: Grip the base of the leaves firmly and twist the top off the pineapple. You might need to use a bit of force. Alternatively, you can cut the top off with a sharp knife, leaving about an inch of fruit attached.
2. Removing Excess Fruit: If you twisted the top off, you’ll likely have some fruit still attached. Carefully remove this fruit by peeling it away with your fingers or using a small knife. This is important because the fruit will rot and can prevent the top from rooting. If you cut the top off, carefully slice away the fruit, leaving only the base of the leaves.
3. Peeling Back the Lower Leaves: Peel back several layers of the lower leaves to expose about an inch or two of the stem. This will encourage root growth. Don’t be afraid to be a little aggressive here; you want to see the stem clearly.
4. Letting it Callous: This is a crucial step that many people skip! Place the prepared pineapple top in a cool, dry place for about a week to allow the cut end to callous over. This helps prevent rot when you plant it. I usually just leave mine on a paper towel on the kitchen counter.
Rooting Your Pineapple Top
Now that your pineapple top is prepped and calloused, it’s time to encourage those roots to grow! You have two main options here: rooting in water or planting directly in soil. I personally prefer rooting in water because it allows you to see the roots develop, which is super satisfying.
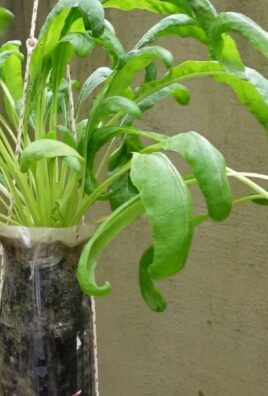
* Rooting in Water (My Preferred Method):
1. Choosing a Container: Select a clear glass or jar that’s wide enough to support the pineapple top but narrow enough so that only the base of the stem is submerged in water.
2. Adding Water: Fill the container with fresh, clean water. I recommend using distilled or filtered water to avoid any chemicals that might inhibit root growth.
3. Placing the Pineapple Top: Place the pineapple top in the container, ensuring that only the exposed stem is submerged in water. The leaves should be above the water line.
4. Finding the Right Spot: Place the container in a warm, bright location, but avoid direct sunlight, which can scorch the leaves. A windowsill that receives indirect sunlight is perfect.
5. Changing the Water Regularly: Change the water every few days to prevent algae growth and keep the water fresh.
6. Patience is Key: It can take several weeks, or even a couple of months, for roots to develop. Be patient and keep changing the water regularly. You’ll start to see small roots emerging from the stem.
7. When to Plant: Once the roots are about 2-3 inches long, your pineapple top is ready to be planted in soil.
* Planting Directly in Soil (Alternative Method):
1. Choosing the Right Potting Mix: Use a well-draining potting mix specifically formulated for tropical plants. A mix of potting soil, perlite, and sand works well.
2. Preparing the Pot: Choose a pot that’s at least 6 inches in diameter and has drainage holes.
3. Planting the Pineapple Top: Plant the pineapple top in the pot, burying the stem up to the base of the leaves.
4. Watering: Water the soil thoroughly after planting, but avoid overwatering. The soil should be moist but not soggy.
5. Finding the Right Spot: Place the pot in a warm, bright location, but avoid direct sunlight.
6. Keeping the Soil Moist: Keep the soil consistently moist, but avoid overwatering.
7. Patience is Still Key: It can take several weeks for the pineapple top to root in soil. You’ll know it’s rooted when you see new growth.
Planting and Caring for Your Pineapple Plant
Alright, your pineapple top has roots! Now it’s time to give it a permanent home in a container and provide the care it needs to thrive.
* Choosing the Right Container: Pineapples need plenty of room to grow, so choose a pot that’s at least 10-12 inches in diameter. A larger pot is even better, as it will give the plant more room to develop a strong root system. Make sure the pot has drainage holes to prevent waterlogging.
* Selecting the Right Potting Mix: Again, well-draining soil is crucial. A mix of potting soil, perlite, and sand is ideal. You can also add some compost to provide extra nutrients. I like to use a mix that’s about 50% potting soil, 25% perlite, and 25% sand.
* Planting Your Pineapple:
1. Fill the Pot: Fill the pot with the potting mix, leaving a few inches of space at the top.
2. Create a Hole: Dig a hole in the center of the pot that’s large enough to accommodate the root ball of your pineapple top.
3. Plant the Pineapple: Carefully remove the pineapple top from the water (if you rooted it in water) or from its smaller pot (if you planted it directly in soil). Gently loosen the roots and place the pineapple top in the hole.
4. Fill in the Hole: Fill in the hole with potting mix, gently firming the soil around the base of the plant.
5. Water Thoroughly: Water the soil thoroughly after planting, making sure the water drains out of the drainage holes.
* Providing the Right Environment:
1. Sunlight: Pineapples need plenty of sunlight to thrive. Aim for at least 6 hours of direct sunlight per day. If you live in a cooler climate, you may need to supplement with a grow light.
2. Temperature: Pineapples prefer warm temperatures, ideally between 65°F and 85°F (18°C and 29°C). Protect your plant from frost and cold temperatures. If you live in a colder climate, you’ll need to bring your pineapple plant indoors during the winter.
3. Watering: Water your pineapple plant regularly, but avoid overwatering. The soil should be moist but not soggy. Allow the top inch of soil to dry out between waterings.
4. Humidity: Pineapples appreciate high humidity. You can increase humidity by misting the leaves regularly or placing the pot on a tray filled with pebbles and water.
5. Fertilizing: Feed your pineapple plant every 2-3 months with a balanced fertilizer. Follow the instructions on the fertilizer label. I like to use a fertilizer specifically formulated for tropical plants.
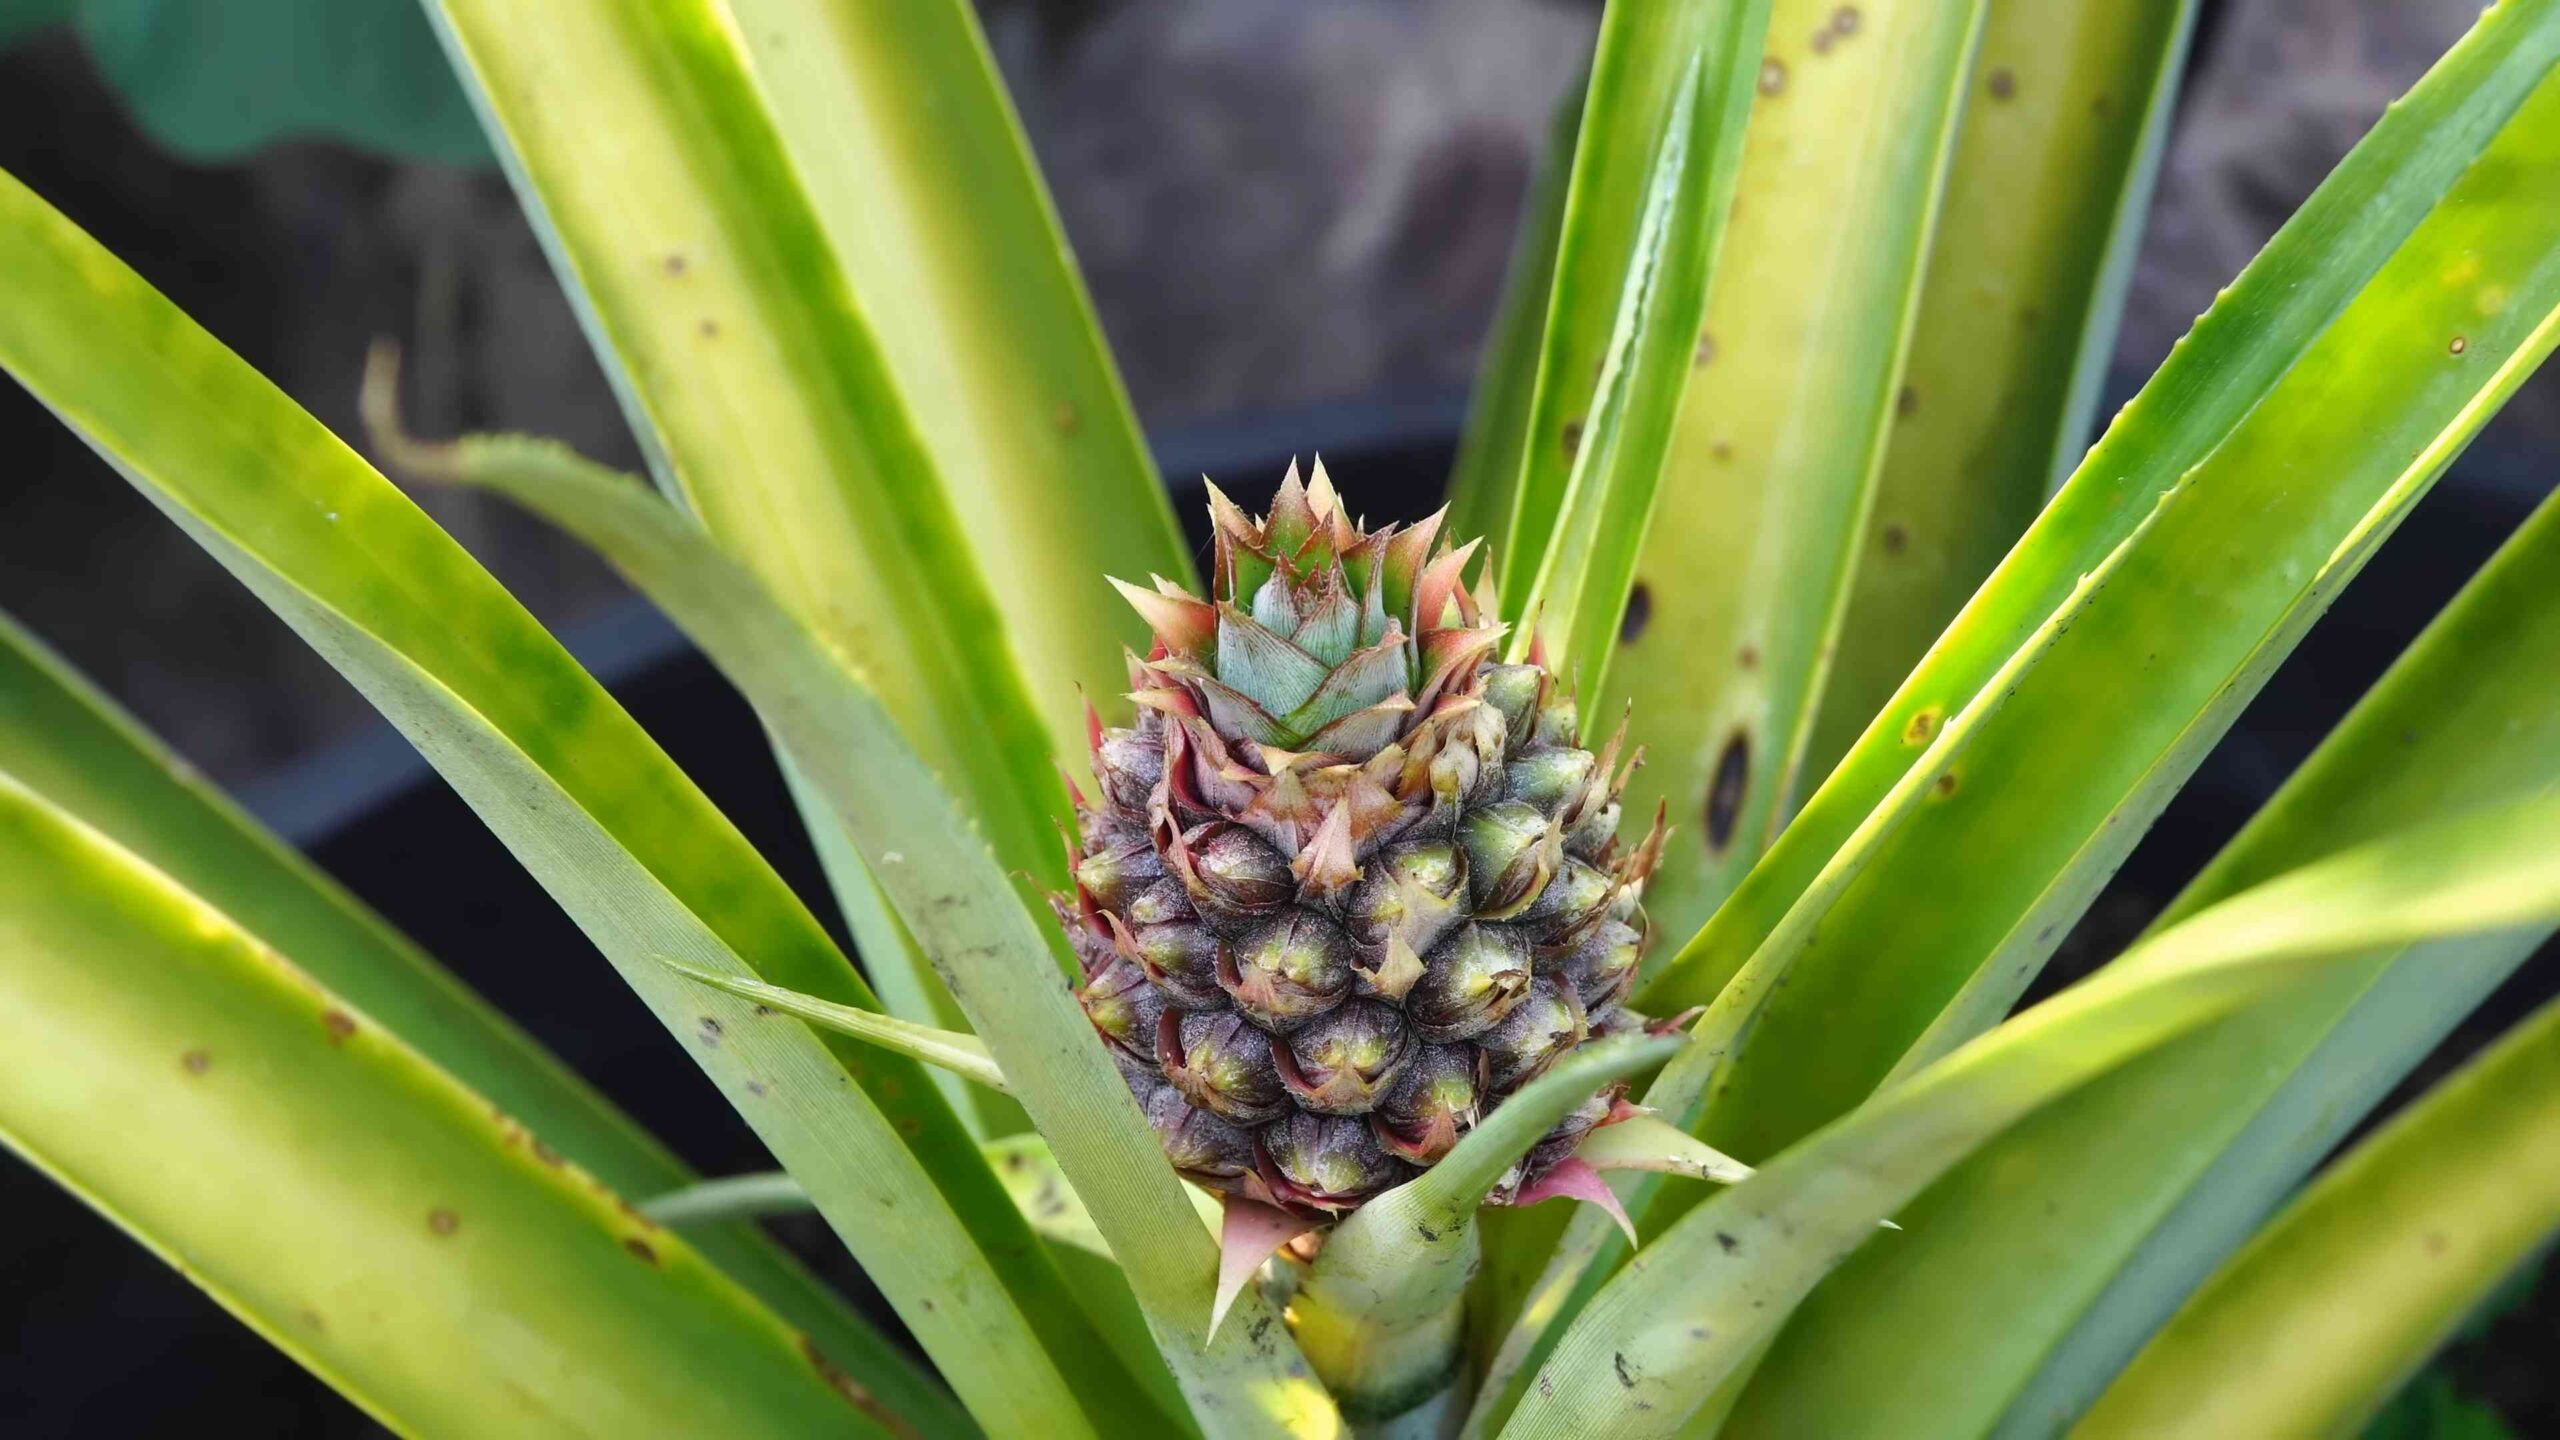
Encouraging Fruiting
This is where things get interesting! It can take a while for a container-grown pineapple to produce fruit, typically 2-3 years. But don’t worry, there are things you can do to encourage fruiting.
* Ethylene Gas Induction (The Apple Trick): This is a common method used to induce flowering in pineapples. Pineapples are sensitive to ethylene gas, which triggers the flowering process.
1. The Apple Method: Place a ripe apple (or banana) inside a large plastic bag with your pineapple plant. Seal the bag tightly. The apple will release ethylene gas as it ripens, which will stimulate flowering.
2. How Long: Leave the bag sealed for about a week. Then, remove the bag and the apple.
3. Repeat if Necessary: You may need to repeat this process a few times to induce flowering.
Conclusion
So, there you have it! Growing pineapples in containers might seem like an exotic endeavor reserved for tropical climates, but as we’ve shown, it’s entirely achievable, even if you’re working with limited space or live in a cooler region. This DIY pineapple growing trick is more than just a fun project; it’s a rewarding experience that connects you to the origins of your food and allows you to cultivate a little bit of the tropics right in your own home.
Why is this a must-try? Because it’s surprisingly simple, incredibly satisfying, and yields a delicious, homegrown pineapple that tastes infinitely better than anything you can buy in the store. Think about it: you’re taking a discarded pineapple top, giving it new life, and nurturing it into a fruit-bearing plant. That’s pretty amazing! Plus, it’s a fantastic conversation starter and a unique way to impress your friends and family.
But the benefits don’t stop there. Growing your own pineapple allows you to control the growing environment, ensuring that your fruit is free from harmful pesticides and chemicals. You can choose organic soil, use natural fertilizers, and monitor the plant’s health closely, resulting in a healthier and more flavorful pineapple.
Ready to take your pineapple growing to the next level? Consider experimenting with different varieties of pineapples. While the smooth Cayenne is a popular choice, there are other cultivars like the MD-2 (Gold pineapple) or even ornamental varieties that can add a touch of tropical flair to your container garden. You can also try different potting mixes to see which one works best for your climate and growing conditions. Some gardeners swear by a mix of peat moss, perlite, and vermiculite, while others prefer a more organic blend with compost and coconut coir.
Another variation to consider is the use of companion planting. Certain herbs and flowers, like basil, marigolds, and nasturtiums, can help deter pests and attract beneficial insects, creating a healthier environment for your pineapple plant.
Don’t be afraid to experiment with different fertilization schedules and techniques. While a balanced liquid fertilizer is a good starting point, you can also supplement with organic options like compost tea or fish emulsion. Just be sure to avoid over-fertilizing, as this can damage the plant.
Ultimately, the key to success with this DIY pineapple growing trick is patience and observation. Pineapples take time to mature, so don’t get discouraged if you don’t see results immediately. Pay attention to your plant’s needs, adjust your care routine as necessary, and enjoy the process of watching it grow.
We’re confident that you’ll find this DIY project to be both enjoyable and rewarding. So, grab a pineapple, follow our instructions, and get ready to experience the satisfaction of growing your own tropical fruit.
We encourage you to try this DIY pineapple growing trick and share your experiences with us! Post photos of your pineapple plants on social media using #ContainerPineapple and let us know how it goes. We can’t wait to see your homegrown pineapples! We are always looking for ways to improve our methods and learn from other gardeners. Your feedback is invaluable in helping us refine our techniques and share the joy of growing pineapples with others. Happy growing!
Frequently Asked Questions (FAQ)
How long does it take to grow a pineapple from a top?
Growing a pineapple from a top is a patience-testing process. Generally, it takes anywhere from 2 to 3 years for a pineapple plant to mature and produce fruit. The exact timeframe depends on various factors, including the climate, the variety of pineapple, and the care provided. Don’t be discouraged if it takes longer than expected; the reward of harvesting your own homegrown pineapple is well worth the wait.
What kind of soil is best for growing pineapples in containers?
Pineapples thrive in well-draining, slightly acidic soil. A good potting mix for container-grown pineapples consists of equal parts peat moss, perlite, and vermiculite. You can also add some compost or coconut coir to improve drainage and nutrient content. Avoid using heavy clay soils, as they can retain too much moisture and lead to root rot. The ideal pH range for pineapple soil is between 5.5 and 6.5.
How often should I water my pineapple plant?
Water your pineapple plant regularly, especially during the growing season (spring and summer). Allow the soil to dry out slightly between waterings, but avoid letting it dry out completely. Overwatering can lead to root rot, so it’s important to strike a balance. In the winter, reduce watering frequency as the plant’s growth slows down. A good rule of thumb is to water when the top inch of soil feels dry to the touch.
What kind of fertilizer should I use for my pineapple plant?
Pineapples are heavy feeders and benefit from regular fertilization. Use a balanced liquid fertilizer (e.g., 10-10-10) diluted to half strength every 2-3 weeks during the growing season. You can also supplement with organic fertilizers like compost tea or fish emulsion. Avoid over-fertilizing, as this can damage the plant. Look for fertilizers that contain micronutrients like iron, manganese, and zinc, which are essential for pineapple growth.
How much sunlight does a pineapple plant need?
Pineapples need plenty of sunlight to thrive. Aim for at least 6-8 hours of direct sunlight per day. If you’re growing your pineapple indoors, place it near a sunny window or supplement with artificial grow lights. Insufficient sunlight can lead to stunted growth and reduced fruit production. Rotate the plant regularly to ensure that all sides receive adequate sunlight.
How do I encourage my pineapple plant to fruit?
Getting a pineapple plant to fruit can sometimes be challenging. One common trick is to expose the plant to ethylene gas, which can stimulate flowering. You can do this by placing a ripe apple or banana near the plant and covering it with a plastic bag for a few days. The ripening fruit will release ethylene gas, which can trigger the flowering process. Another method is to water the plant with a solution of calcium carbide (available at garden centers) diluted in water. However, use this method with caution, as calcium carbide can be harmful if used improperly.
What are some common pests and diseases that affect pineapple plants?
Pineapple plants can be susceptible to pests like mealybugs, scale insects, and spider mites. Regularly inspect your plant for signs of infestation and treat accordingly. You can use insecticidal soap or neem oil to control these pests. Root rot is a common disease that affects pineapples, especially in poorly drained soil. To prevent root rot, ensure that your potting mix is well-draining and avoid overwatering.
Can I grow a pineapple indoors year-round?
Yes, you can grow a pineapple indoors year-round, especially if you live in a cooler climate. Provide your plant with plenty of sunlight, regular watering, and fertilization. You may need to supplement with artificial grow lights during the winter months. Maintain a consistent temperature and humidity level to create a favorable growing environment.
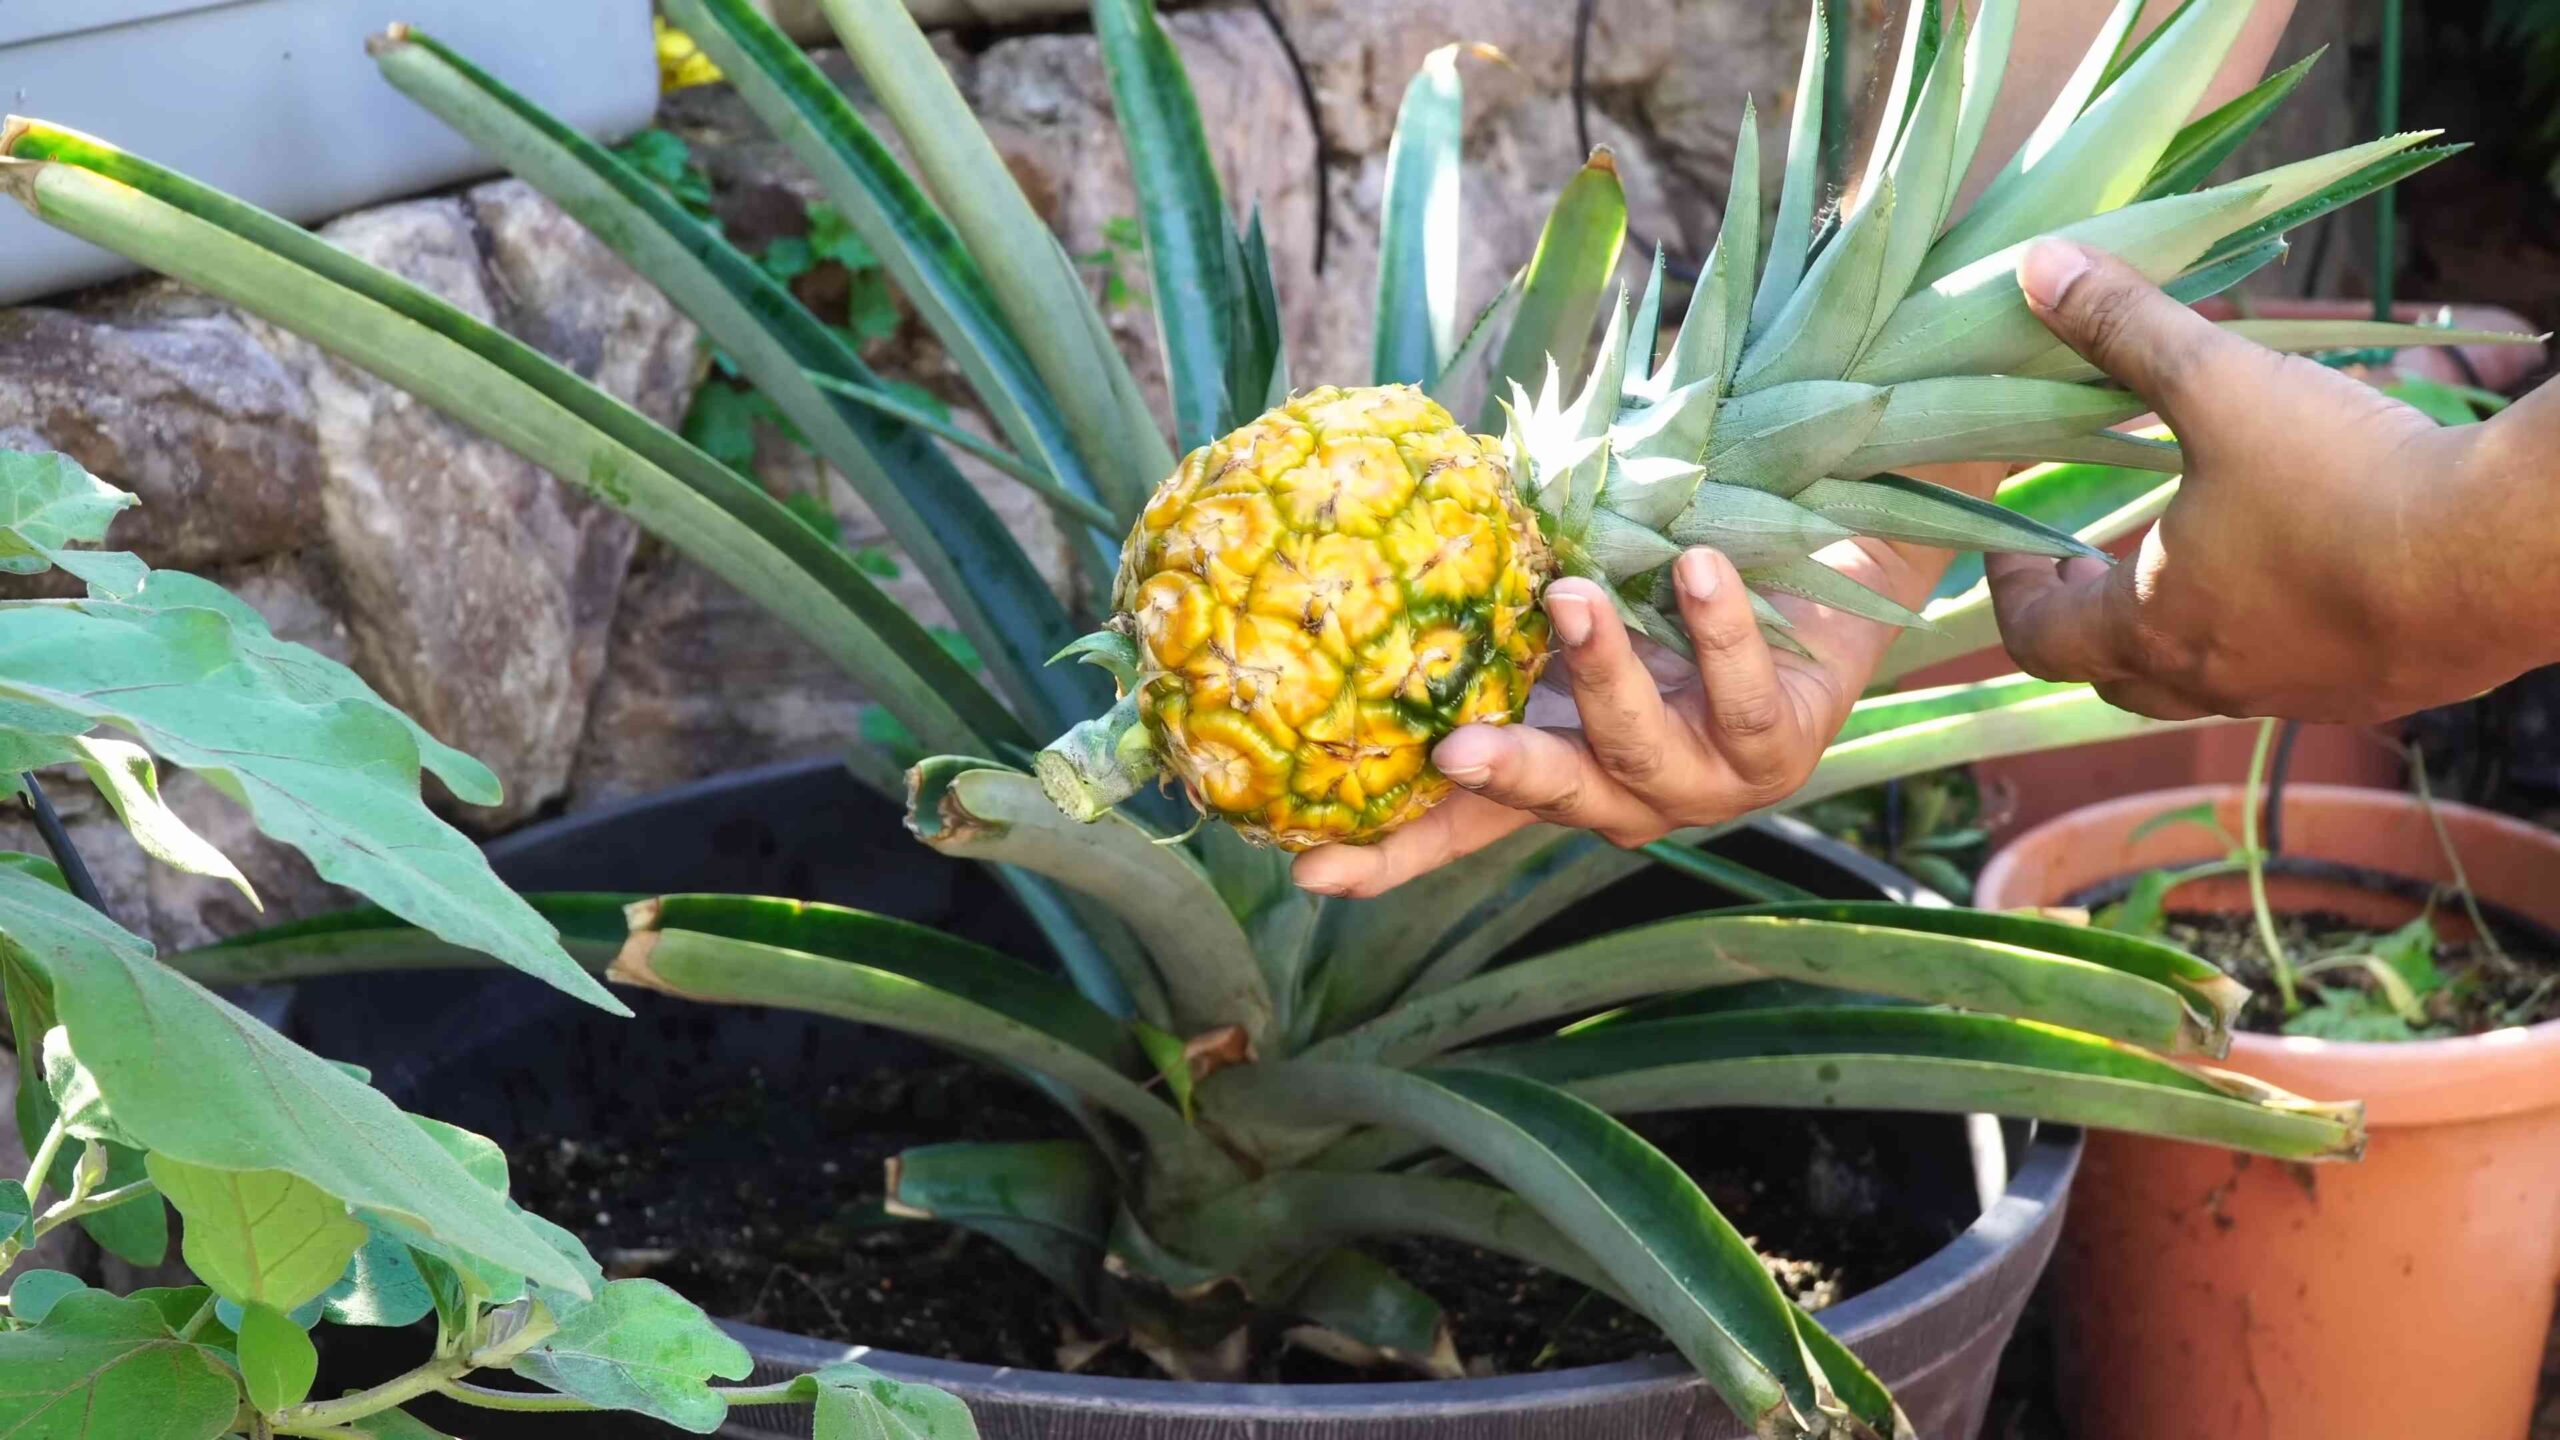
How do I know when my pineapple is ripe?
Determining when a pineapple is ripe can be tricky. Look for these signs: the fruit should have a golden-yellow color, a sweet aroma, and a slightly soft feel when gently squeezed. The eyes (the individual segments of the pineapple) should be flattened and slightly separated. You can also try pulling out one of the leaves from the top of the pineapple; if it comes out easily, the fruit is likely ripe.
What do I do with the pineapple top after harvesting the fruit?
After harvesting your pineapple, don’t throw away the top! You can use it to start a new pineapple plant. Simply cut off the top, remove the lower leaves, and allow it to dry for a few days. Then, plant it in a pot of well-draining soil and follow the same instructions as before. With a little patience, you’ll have another pineapple plant growing in no time! This is a great way to propagate your own pineapples and create a sustainable cycle of homegrown fruit.
Leave a Comment