

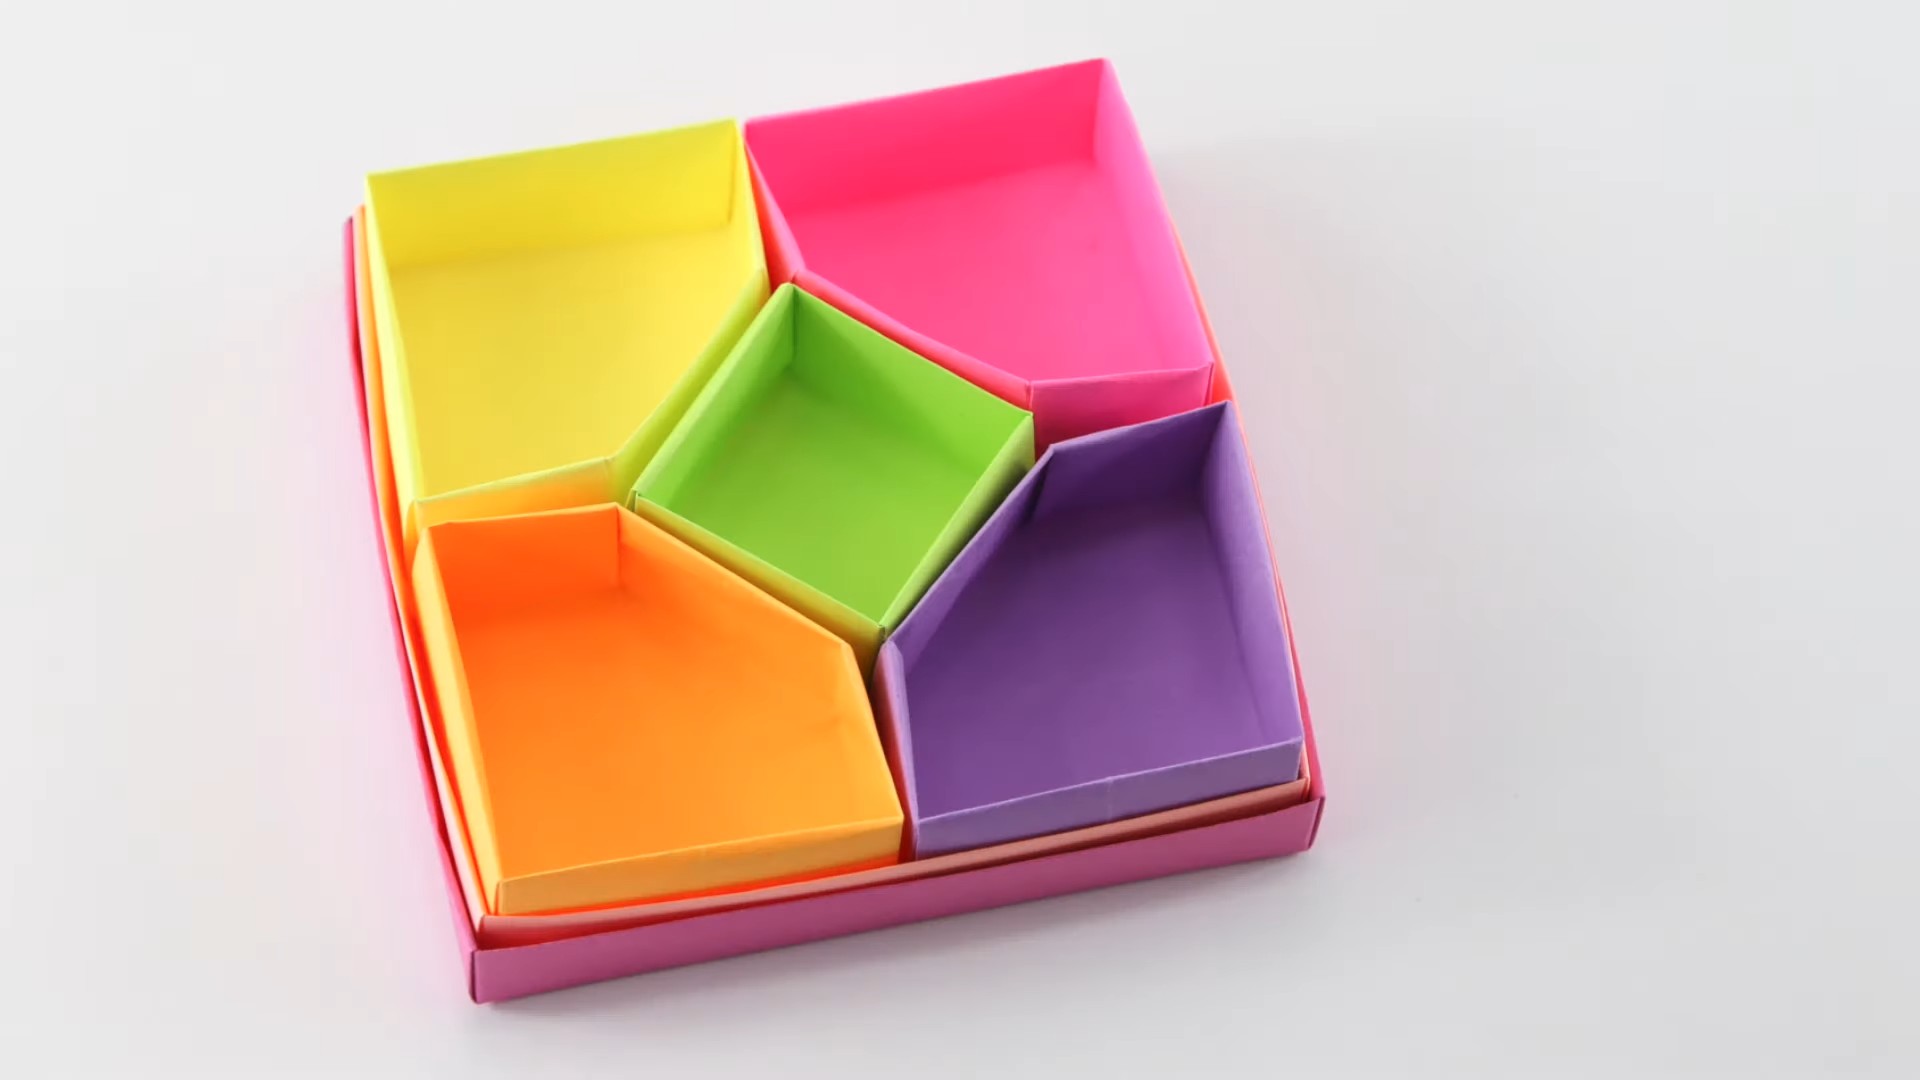
DIY Origami Divider Box: Unleash your inner artist and organizer with this surprisingly simple and elegant craft! Have you ever looked at a cluttered drawer or desk and wished for a beautiful, bespoke solution? I know I have! That’s where the magic of origami comes in. Forget those boring plastic dividers; we’re diving into the world of paper folding to create stunning and functional boxes perfect for tidying up everything from jewelry and makeup to office supplies and craft materials.
Origami, the ancient Japanese art of paper folding, has a rich history steeped in tradition and symbolism. Originally practiced by the elite, it gradually spread throughout society, becoming a beloved pastime and a powerful form of artistic expression. Beyond its aesthetic appeal, origami fosters patience, precision, and problem-solving skills – qualities that make it a truly rewarding activity.
In today’s fast-paced world, finding moments of calm and creativity is more important than ever. This DIY Origami Divider Box project offers a chance to disconnect from screens, engage your hands, and create something beautiful and useful. Plus, it’s incredibly budget-friendly! Why spend a fortune on store-bought organizers when you can transform ordinary paper into personalized storage solutions? I’m excited to show you how easy it is to create these charming boxes, adding a touch of zen and organization to your life. Let’s get folding!
DIY Origami Divider Box: Organize Your Life with Paper!
Hey there, fellow crafters! Are you drowning in clutter? Do you need a stylish and affordable way to organize your desk, drawers, or even your craft supplies? Well, look no further! I’m going to show you how to create a super cool origami divider box that’s not only functional but also adds a touch of handmade charm to your space. This project is surprisingly easy, and once you get the hang of it, you’ll be churning out these boxes like a pro!
Materials You’ll Need:
Before we dive in, let’s gather our supplies. The beauty of this project is that you probably already have most of these things lying around!
* Square Paper: This is the most important ingredient! You’ll need square sheets of paper. The size of the paper will determine the size of your finished box. I recommend starting with paper that’s at least 8.5 x 8.5 inches (standard printer paper works great!), but feel free to experiment with larger sizes for bigger boxes. You’ll need one sheet for the base and one sheet for each divider you want to create.
* Ruler: A ruler will help you make precise folds, which is crucial for a neat and sturdy box.
* Pencil: For marking fold lines (lightly!).
* Scissors (Optional): You might need scissors to trim any excess paper or to create decorative edges.
* Bone Folder (Optional but Recommended): A bone folder (or even the back of a spoon) will help you create crisp, clean folds. This makes a HUGE difference in the final look of your box.
* Glue or Double-Sided Tape (Optional): For extra security, you can use a little glue or double-sided tape to reinforce the folds, especially if you’re using thinner paper.
* Decorative Paper (Optional): If you want to add some flair to your box, you can use decorative paper for the outside or inside. Think scrapbook paper, wrapping paper, or even patterned origami paper.
Making the Base Box:
This is the foundation of our divider box. Follow these steps carefully to create a sturdy base.
1. Start with a Square: Make sure your paper is perfectly square. If it’s not, trim it with scissors.
2. Fold in Half Diagonally: Fold the paper in half diagonally, creating a triangle. Make sure the edges line up perfectly. Crease the fold firmly. Unfold.
3. Fold in Half Diagonally (Other Direction): Repeat the previous step, folding the paper in half diagonally in the other direction. Crease firmly. Unfold. You should now have two diagonal creases that intersect in the center of the square.
4. Fold in Half Horizontally: Fold the paper in half horizontally, bringing the top edge to the bottom edge. Crease firmly. Unfold.
5. Fold in Half Vertically: Fold the paper in half vertically, bringing the left edge to the right edge. Crease firmly. Unfold. You should now have a grid of creases dividing your square into smaller squares.
6. Collapse into a Square: This is where the magic happens! Gently pinch the corners of the square and bring them towards the center. The creases you made earlier will guide you. The paper should naturally collapse into a smaller square. This is sometimes called a “waterbomb base.”
7. Fold the Top Flaps to the Center Line: Take the top two flaps of the square and fold them towards the center line. The edges of the flaps should meet in the middle. Crease firmly.
8. Repeat on the Bottom Flaps: Repeat the previous step on the bottom two flaps. You should now have a rectangle.
9. Fold the Top Corners to the Center Line: Take the top two corners of the rectangle and fold them inwards, towards the center line. Crease firmly.
10. Repeat on the Bottom Corners: Repeat the previous step on the bottom two corners.
11. Open the Flaps: Carefully unfold the flaps you just folded in steps 9 and 10. You’ll see a small pocket formed by the creases.
12. Inside Reverse Fold: This is a slightly trickier fold, but don’t worry, you can do it! Gently open the pocket you created in the previous step. Push the corner of the paper *inside* the pocket, creating a new crease along the existing fold lines. This will form a small triangle that points outwards. Crease firmly.
13. Repeat on All Four Corners: Repeat the inside reverse fold on all four corners of the rectangle. You should now have a shape that looks like a little box with four triangular flaps sticking out.
14. Stand Up the Sides: Gently stand up the sides of the box, using the creases as guides. The triangular flaps will form the corners of the box.
15. Secure the Corners (Optional): For extra stability, you can add a small dab of glue or a piece of double-sided tape to the inside of each corner where the flaps meet. This will help prevent the box from collapsing.
Making the Dividers:
Now that we have our base box, let’s create the dividers to organize our stuff! The process is very similar to making the base, but with a few key differences.
1. Start with a Square (Again!): Just like with the base, make sure your paper is perfectly square. The size of the paper for the dividers will determine the height of the dividers. I usually use the same size paper as the base for dividers that reach the top of the box, but you can use smaller squares for shorter dividers.
2. Fold in Half Diagonally: Fold the paper in half diagonally, creating a triangle. Crease firmly. Unfold.
3. Fold in Half Diagonally (Other Direction): Repeat the previous step, folding the paper in half diagonally in the other direction. Crease firmly. Unfold.
4. Fold in Half Horizontally: Fold the paper in half horizontally, bringing the top edge to the bottom edge. Crease firmly. Unfold.
5. Fold in Half Vertically: Fold the paper in half vertically, bringing the left edge to the right edge. Crease firmly. Unfold.
6. Collapse into a Square: Just like with the base, gently pinch the corners of the square and bring them towards the center. The paper should naturally collapse into a smaller square.
7. Fold the Top Flaps to the Center Line: Take the top two flaps of the square and fold them towards the center line. The edges of the flaps should meet in the middle. Crease firmly.
8. Repeat on the Bottom Flaps: Repeat the previous step on the bottom two flaps. You should now have a rectangle.
9. Fold the Top Corners to the Center Line: Take the top two corners of the rectangle and fold them inwards, towards the center line. Crease firmly.
10. Repeat on the Bottom Corners: Repeat the previous step on the bottom two corners.
11. Fold in Half (Long Way): Now, fold the entire rectangle in half lengthwise, bringing one long edge to the other. Crease firmly. This will create a long, narrow strip.
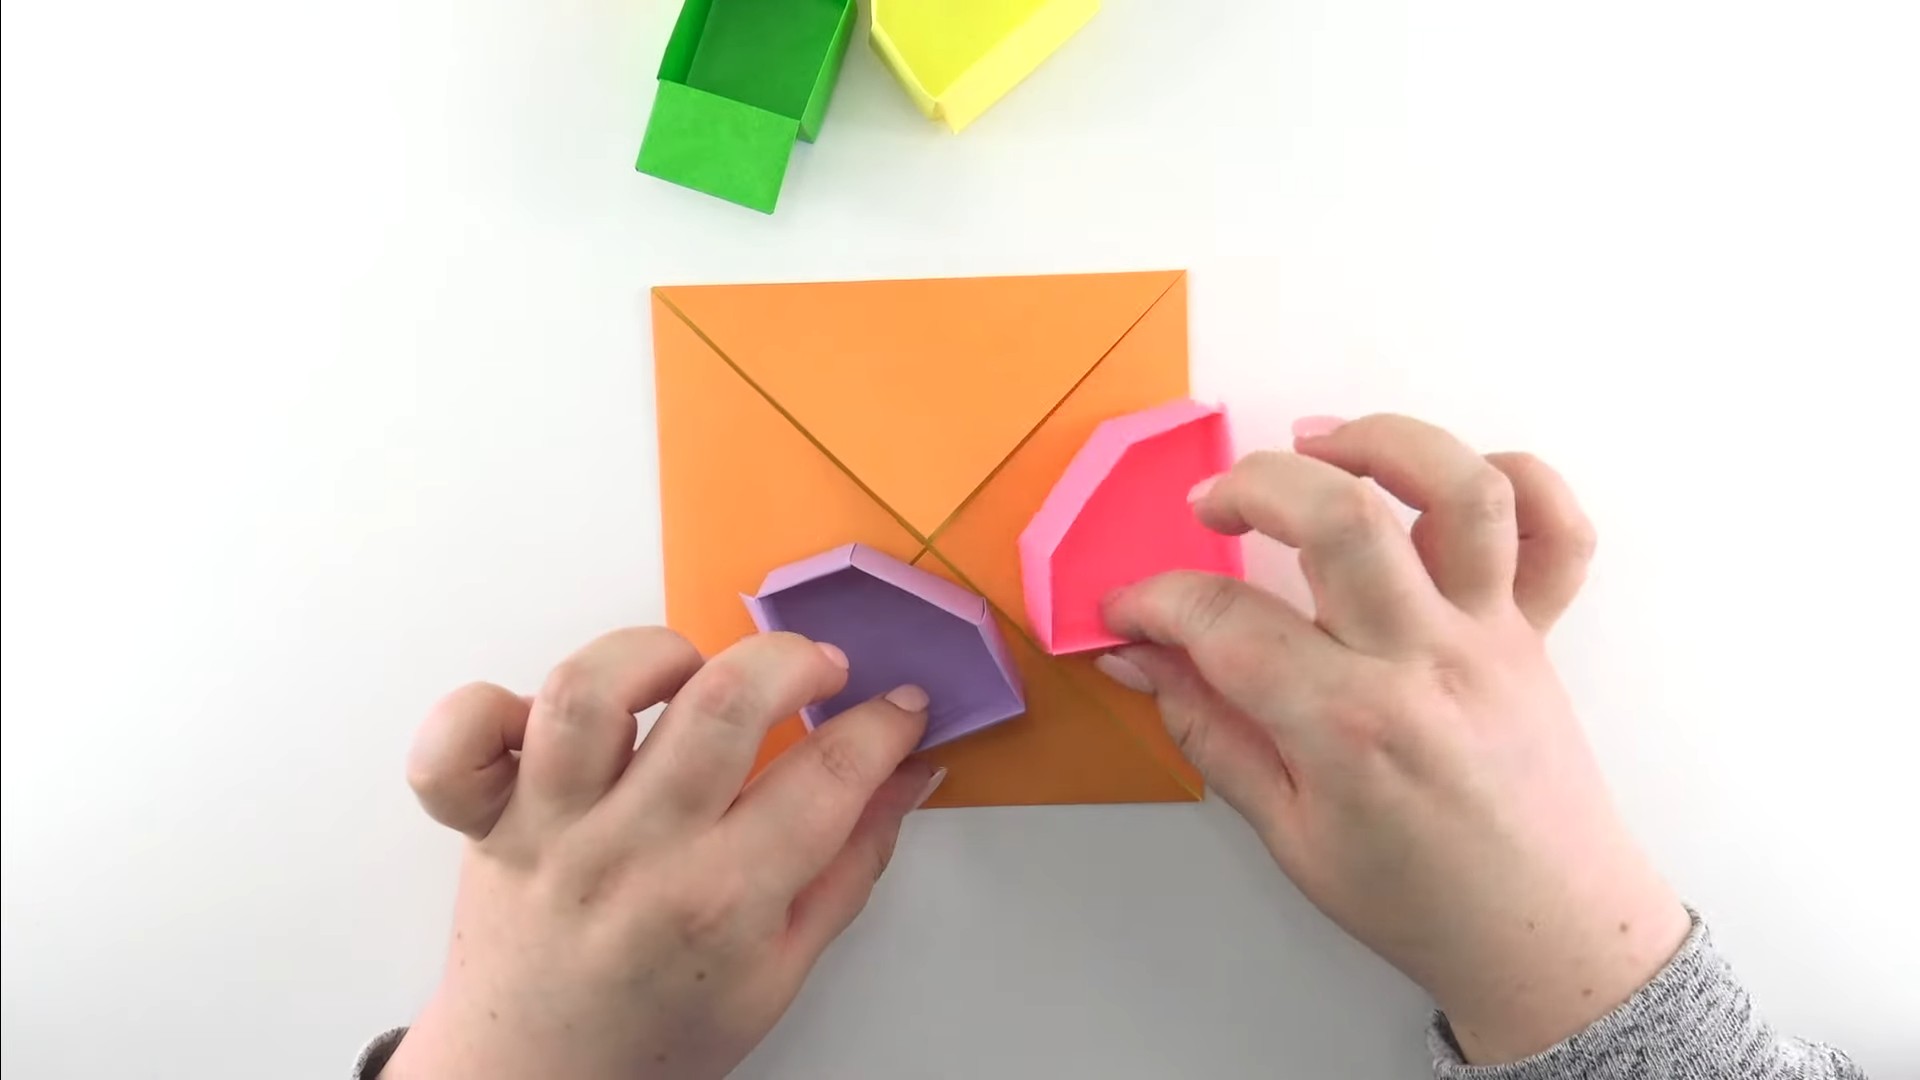
12. Insert into the Box: Carefully insert the folded divider into the base box. You can position it wherever you want to create different compartments.
13. Repeat for More Dividers: Repeat steps 1-12 to create as many dividers as you need. Experiment with different placements to find the configuration that works best for you.
Tips and Tricks for a Perfect Origami Divider Box:
* Use High-Quality Paper: Thicker paper will create a sturdier box. Cardstock is a great option, but even good-quality printer paper will work well.
* Crease Firmly: The key to a successful origami project is crisp, clean folds. Use a bone folder or the back of a spoon to ensure that your creases are sharp.
* Be Precise: Accuracy is important, especially when folding the base box. Take your time and make sure the edges line up perfectly.
* Experiment with Sizes: Don’t be afraid to experiment with different sizes of paper to create boxes of different sizes. You can even make a whole set of nesting boxes!
* Decorate Your Boxes: Add some personality to your boxes by using decorative paper, stickers, or even paint.
* Reinforce with Glue: If you’re using thinner paper or if you want extra durability, reinforce the folds with a small dab of glue or a piece of double-sided tape.
* Practice Makes Perfect: Don’t get discouraged if your first box isn’t perfect. Keep practicing, and you’ll soon be folding like a pro!
* Consider the Weight: If you plan to store heavy items in your box, use thicker paper and reinforce the corners
Conclusion
So, there you have it! Creating your own DIY Origami Divider Box is not just a fun craft project; it’s a practical and surprisingly elegant solution to everyday organizational challenges. Forget rummaging through cluttered drawers or settling for generic, ill-fitting containers. This simple yet ingenious technique empowers you to craft custom dividers perfectly tailored to your specific needs and the dimensions of your existing drawers or boxes.
Why is this a must-try? Because it’s incredibly versatile. Need to organize jewelry? Create small, perfectly sized compartments. Taming a chaotic desk drawer filled with pens, paperclips, and sticky notes? Origami dividers to the rescue! Want to present homemade treats in a beautifully organized and personalized way? This is your answer. The possibilities are truly endless.
Beyond its practicality, the DIY Origami Divider Box offers a unique opportunity for creative expression. Experiment with different paper types – from vibrant patterned origami paper to sturdy cardstock for added durability. Consider using recycled materials like old maps, magazines, or even wrapping paper for an eco-friendly twist. You can also personalize your boxes with embellishments like ribbons, stickers, or hand-drawn designs. Imagine crafting a set of these boxes as a thoughtful and personalized gift for a friend or loved one!
For variations, think about the depth of your dividers. By adjusting the initial size of your paper square, you can create shallower or deeper compartments to accommodate different items. You could also explore different folding techniques to create unique shapes and configurations within your box. Perhaps a combination of square and triangular compartments? Let your imagination be your guide!
Don’t be intimidated if your first attempt isn’t perfect. Origami, like any craft, takes practice. Embrace the process, enjoy the meditative rhythm of folding, and learn from any mistakes. The beauty of this project is that it’s inexpensive and easily repeatable, so you can keep refining your technique until you achieve the desired results.
We wholeheartedly encourage you to give this DIY Origami Divider Box a try. It’s a rewarding project that combines creativity, practicality, and a touch of mindful crafting. Once you experience the satisfaction of creating your own custom organizational solutions, you’ll wonder how you ever lived without them.
And most importantly, we want to hear about your experience! Share your creations with us – post photos of your finished boxes on social media using [Your Hashtag Here] and tell us how you’re using them to organize your life. We’re eager to see your unique designs and learn from your creative adaptations. Happy folding!
Frequently Asked Questions (FAQ)
Q: What kind of paper is best for making Origami Divider Boxes?
A: The best paper depends on the intended use of your divider box. For lightweight items like jewelry or small office supplies, standard origami paper or printer paper works well. However, for heavier items or for boxes that need to withstand more wear and tear, consider using cardstock or thicker paper. Decorative scrapbook paper is also a great option for adding visual appeal. Experiment with different weights and textures to find what works best for your needs. Remember that thinner paper will be easier to fold, especially for beginners.
Q: What size paper should I use?
A: The size of the paper you use will determine the size of the finished divider box. A good starting point is a square piece of paper that is 6×6 inches or 8×8 inches. You can adjust the size up or down depending on the size of the drawer or box you want to organize. Keep in mind that the larger the paper, the larger the finished divider box will be. It’s always a good idea to measure the space you’re working with before you start folding to ensure that your divider box will fit properly.
Q: Is this origami technique difficult to learn?
A: The basic origami technique for creating a divider box is relatively simple and beginner-friendly. The folds are straightforward and easy to follow, especially with visual aids like diagrams or video tutorials. However, like any origami project, it may take a few tries to get the hang of it. Don’t be discouraged if your first attempt isn’t perfect. Practice makes perfect!
Q: Can I use glue or tape to reinforce the divider box?
A: While the origami technique is designed to create a self-supporting box, you can certainly use glue or tape to reinforce the folds if desired. This is particularly helpful if you’re using thinner paper or if you want to create a more durable box. A small amount of glue or double-sided tape can be applied to the inside folds to secure them in place. However, be careful not to use too much glue, as it can make the paper stiff and difficult to fold.
Q: How do I clean the Origami Divider Box?
A: Cleaning your Origami Divider Box will depend on the type of paper you used. If you used paper that is not water-resistant, simply dust it off with a dry cloth or a soft brush. Avoid using water or cleaning solutions, as they can damage the paper. If you used laminated paper or cardstock, you may be able to gently wipe it down with a damp cloth. Always test a small, inconspicuous area first to ensure that the cleaning method doesn’t damage the paper.
Q: Can I customize the height of the dividers?
A: Yes, you can customize the height of the dividers by adjusting the initial folds. The deeper you fold the edges of the paper towards the center, the shorter the dividers will be. Conversely, the shallower you fold the edges, the taller the dividers will be. Experiment with different fold depths to achieve the desired height for your dividers.
Q: What are some other uses for Origami Divider Boxes besides drawer organization?
A: The possibilities are endless! Here are a few ideas:
* **Gift Boxes:** Use them to present small gifts in a unique and personalized way.
* **Party Favors:** Fill them with treats and give them out as party favors.
* **Desk Organizers:** Use them to organize pens, paperclips, and other desk supplies.
* **Craft Storage:** Store beads, buttons, and other small craft supplies.
* **Travel Organizers:** Use them to keep your toiletries or jewelry organized while traveling.
* **Plant Starters:** Use them as small pots for starting seeds. (Line with plastic first!)
Q: Where can I find inspiration for different paper designs and folding techniques?
A: The internet is a treasure trove of inspiration! Search for “origami box tutorials” or “DIY drawer dividers” on YouTube, Pinterest, and other social media platforms. You’ll find countless examples of different paper designs, folding techniques, and customization ideas. You can also check out origami books and websites for more advanced techniques and patterns.
Q: Can I make these with kids?
A: Absolutely! This is a great craft project to do with kids. It’s a fun way to teach them about origami and help them develop their fine motor skills. Just be sure to supervise them closely, especially when using scissors or glue. Choose simpler paper designs and folding techniques for younger children.
Q: How durable are these boxes?
A: The durability of your DIY Origami Divider Box depends on the type of paper you use and how carefully you fold it. Cardstock and thicker papers will create more durable boxes than thinner origami paper. Reinforcing the folds with glue or tape can also increase their durability. While these boxes are not designed to hold extremely heavy items, they are generally sturdy enough for organizing lightweight items like jewelry, office supplies, and small craft supplies.

Leave a Comment