

Grow Honeysuckle on Trellis and transform your garden into a fragrant, vibrant haven! Have you ever dreamt of a garden that not only looks stunning but also fills the air with a sweet, intoxicating aroma? I know I have! For centuries, honeysuckle has been cherished for its beauty and delightful scent, adorning gardens and even featuring in folklore across various cultures. From ancient Chinese medicine to Victorian-era romantic symbolism, this climbing vine holds a special place in our hearts.
But let’s be honest, sometimes getting these beauties to thrive can feel a little tricky. That’s where this DIY guide comes in! Many gardeners struggle with supporting their honeysuckle properly, leading to tangled messes and fewer blooms. I’m here to show you how to easily grow honeysuckle on trellis, providing the support it needs to flourish and create a breathtaking focal point in your outdoor space. This isn’t just about aesthetics; a well-supported honeysuckle is a healthier honeysuckle, producing more of those gorgeous, fragrant flowers we all adore. So, grab your gardening gloves, and let’s get started on this rewarding project!

DIY: Creating a Stunning Honeysuckle Trellis Display
Okay, honeysuckle lovers, gather ’round! I’m going to walk you through building a beautiful and thriving honeysuckle trellis. This project is perfect for adding a touch of romance and fragrance to your garden, and trust me, it’s more rewarding than you might think. We’ll cover everything from choosing the right honeysuckle variety to constructing a sturdy trellis and ensuring your plant flourishes. Let’s get started!
Choosing Your Honeysuckle and Trellis Style
Before we dive into the construction, let’s talk about the stars of the show: the honeysuckle and the trellis.
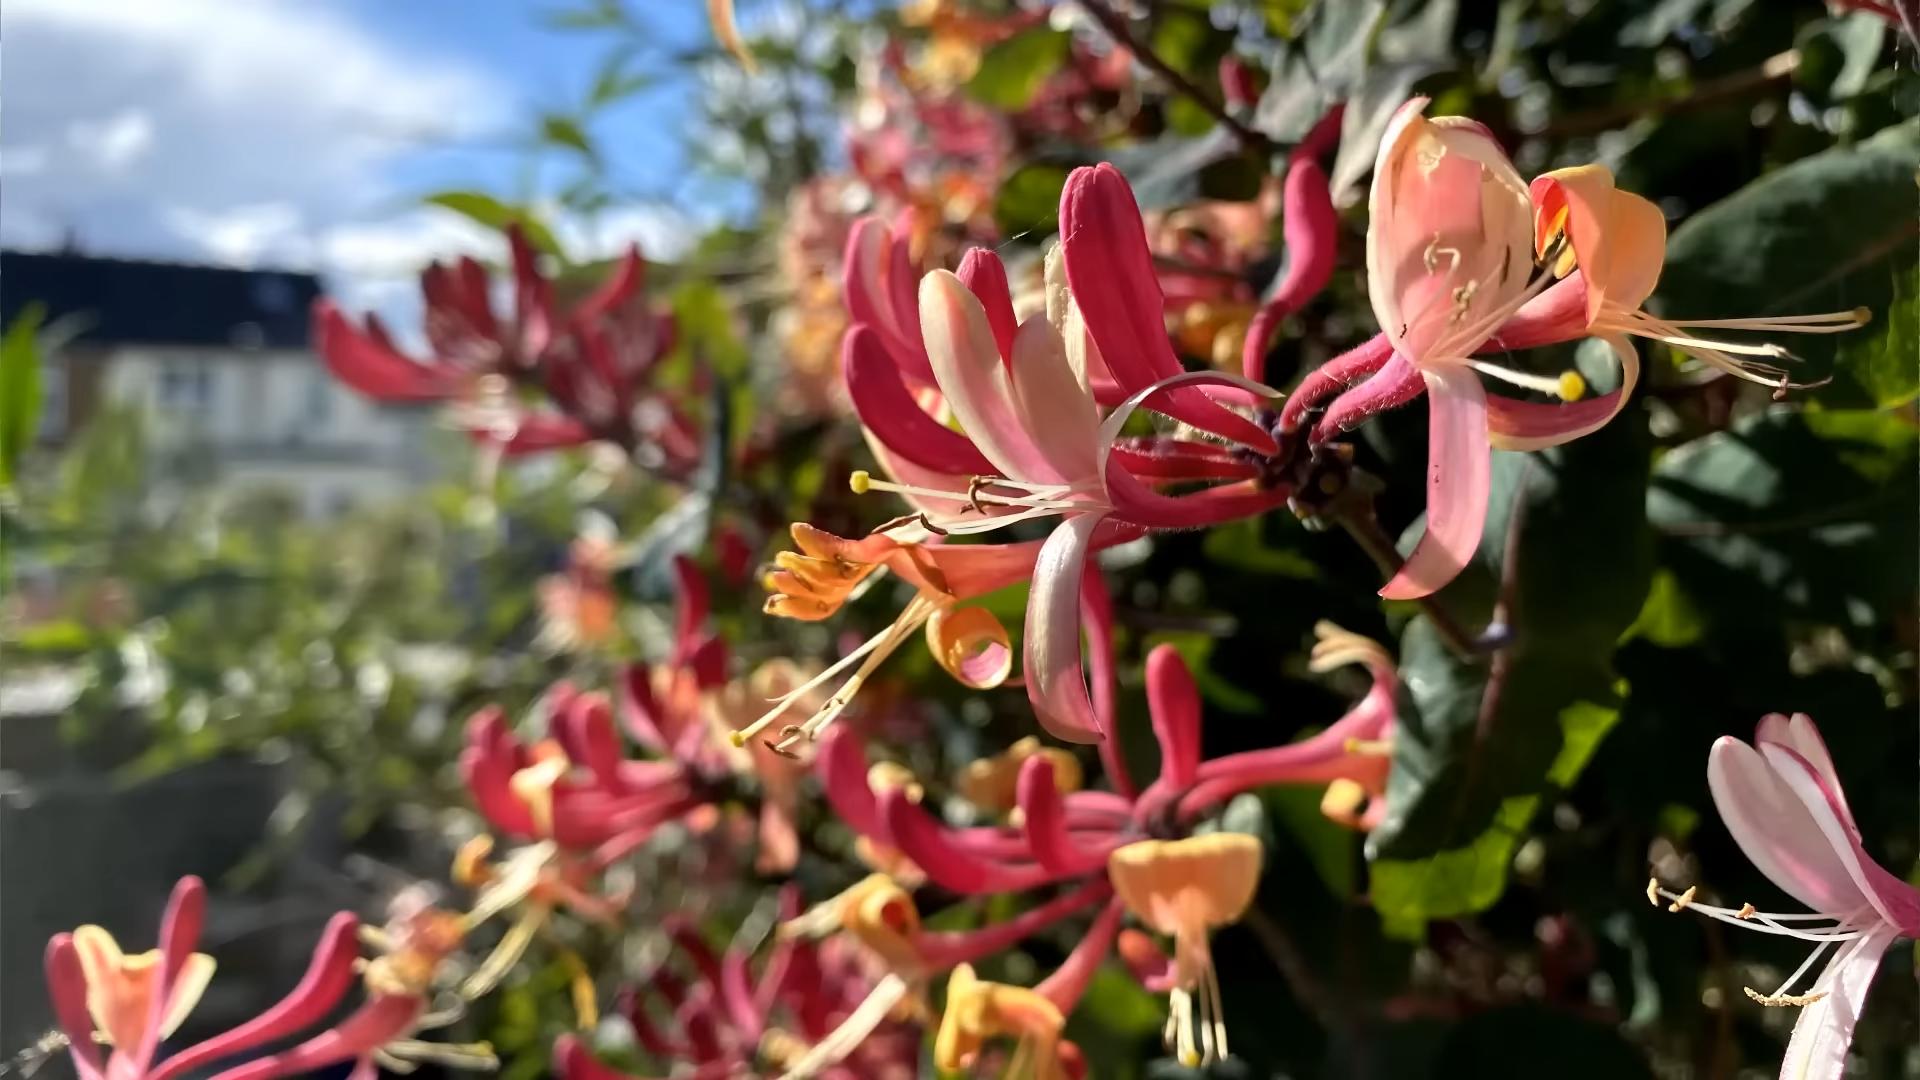
* Honeysuckle Varieties: Not all honeysuckles are created equal! Some are invasive, while others are well-behaved and delightfully fragrant.
* Japanese Honeysuckle (Lonicera japonica): While beautiful, this one is often considered invasive in many areas. I’d advise against it unless you’re prepared to keep it rigorously pruned.
* Trumpet Honeysuckle (Lonicera sempervirens): This native beauty boasts vibrant red or orange flowers that attract hummingbirds. It’s a great choice for a less aggressive, more wildlife-friendly option.
* Goldflame Honeysuckle (Lonicera x heckrottii ‘Goldflame’): This hybrid offers stunning pink and yellow blooms and is known for its long blooming season. It’s a personal favorite!
* Dropmore Scarlet Honeysuckle (Lonicera x brownii ‘Dropmore Scarlet’): Another excellent choice for attracting hummingbirds, this variety features bright scarlet flowers and is relatively low-maintenance.
* Trellis Styles: The trellis is your honeysuckle’s support system and a key design element in your garden. Consider these options:
* Fan Trellis: These are great for smaller spaces and can be attached directly to a wall or fence.
* A-Frame Trellis: These offer a more substantial structure and can be placed anywhere in your garden. They’re perfect for creating a focal point.
* Obelisk Trellis: These add vertical interest and a touch of elegance to your garden.
* DIY Trellis: Get creative! You can build a trellis from reclaimed wood, bamboo, or even metal pipes. The possibilities are endless! I’m going to focus on a simple, yet sturdy, DIY wooden trellis for this guide.
Materials You’ll Need
Alright, let’s gather our supplies. This list assumes we’re building a basic rectangular wooden trellis, roughly 6 feet tall and 4 feet wide. Adjust the quantities based on your desired size.
* Lumber:
* Two 8-foot 2x4s (for the vertical posts)
* Two 4-foot 2x4s (for the top and bottom horizontal supports)
* Approximately 20-30 feet of 1×2 lumber (for the lattice strips)
* Fasteners:
* Exterior wood screws (2-3 inches long)
* Galvanized nails or staples (for attaching the lattice strips)
* Tools:
* Saw (circular saw or hand saw)
* Drill with drill bits
* Measuring tape
* Pencil
* Level
* Hammer or staple gun
* Safety glasses
* Work gloves
* Optional: Wood stain or paint and sealant
Building Your Wooden Trellis: Step-by-Step
Okay, let’s get our hands dirty! Follow these steps to build your sturdy wooden trellis.
Phase 1: Constructing the Frame
1. Cut the Lumber: Using your saw, cut the lumber according to the following dimensions:
* Two vertical posts: 6 feet each (from the 8-foot 2x4s)
* Top and bottom horizontal supports: 4 feet each (from the 4-foot 2x4s)
* Lattice strips: Cut the 1×2 lumber into strips of your desired length. I recommend lengths between 1 and 2 feet for a visually appealing lattice pattern. You’ll need enough strips to create a grid within the frame.
2. Assemble the Frame: Lay the two vertical posts on a flat surface, parallel to each other. Position the top and bottom horizontal supports between the posts, creating a rectangular frame.
3. Secure the Frame: Using your drill and wood screws, attach the horizontal supports to the vertical posts. Pre-drill pilot holes to prevent the wood from splitting. Make sure the corners are square by using a carpenter’s square or by measuring the diagonals (they should be equal).
4. Reinforce the Corners (Optional): For added stability, you can add corner braces made from scrap wood. Cut small triangles and attach them to the inside corners of the frame using screws.
Phase 2: Creating the Lattice
1. Plan Your Lattice Pattern: Decide on the spacing and arrangement of your lattice strips. A simple grid pattern is easy to create, but you can also experiment with diagonal or more intricate designs.
2. Attach the First Layer of Lattice Strips: Starting at one corner of the frame, attach the first lattice strip horizontally using galvanized nails or staples. Ensure the strip is flush with the inside edge of the frame.
3. Space the Strips Evenly: Use a spacer block (a small piece of wood cut to the desired spacing) to maintain consistent gaps between the lattice strips. This will give your trellis a professional look.
4. Attach the Remaining Horizontal Strips: Continue attaching the horizontal lattice strips, using the spacer block to ensure even spacing.
5. Attach the Vertical Lattice Strips: Once all the horizontal strips are in place, begin attaching the vertical strips. Weave them over and under the horizontal strips to create the lattice pattern. Secure them with nails or staples.
6. Trim Excess Lattice Strips: If any lattice strips extend beyond the frame, trim them flush using your saw.
Phase 3: Finishing Touches
1. Sand the Trellis: Use sandpaper to smooth any rough edges or splinters on the wood. This will make the trellis safer to handle and give it a more polished look.
2. Apply Stain or Paint (Optional): If you want to protect the wood and enhance the appearance of your trellis, apply a coat of exterior wood stain or paint. Follow the manufacturer’s instructions for application and drying time. I personally love a natural wood stain to let the beauty of the wood shine through.
3. Seal the Trellis (Optional): After the stain or paint has dried, apply a coat of sealant to protect the wood from the elements. This will help your trellis last longer.
Planting Your Honeysuckle
Now for the fun part: planting your honeysuckle!
1. Choose a Sunny Location: Honeysuckle thrives in full sun (at least 6 hours of direct sunlight per day).
2. Prepare the Soil: Honeysuckle prefers well-drained soil that is rich in organic matter. Amend the soil with compost or well-rotted manure before planting.
3. Dig a Hole: Dig a hole that is twice as wide as the honeysuckle’s root ball and just as deep.
4. Plant the Honeysuckle: Gently remove the honeysuckle from its container and loosen the roots. Place the plant in the hole, ensuring that the top of the root ball is level with the surrounding soil.
5. Backfill the Hole: Fill the hole with soil, gently firming it around the base of the plant.
6. Water Thoroughly: Water the honeysuckle thoroughly after planting.
7. Mulch Around the Base: Apply a layer of mulch around the base of the plant to help retain moisture and suppress weeds.
Training Your Honeysuckle
Honeysuckle needs a little guidance to climb the trellis.
1. Gently Guide the Vines: As the honeysuckle grows, gently guide the vines towards the trellis.
2. Tie the Vines (If Necessary): If the vines are not naturally clinging to the trellis, you can tie them loosely with soft twine or plant ties. Be careful not to tie them too tightly, as this can damage the stems.
3. Prune Regularly: Prune your honeysuckle regularly to encourage bushier growth and prevent it from becoming too unruly. Prune after flowering to avoid removing next year’s blooms. Remove any dead, damaged, or crossing branches.
Caring for Your Honeysuckle
With a little care, your honeysuckle will thrive and provide years of beauty and fragrance.
* Watering: Water regularly, especially during dry periods. Honeysuckle prefers consistently moist soil.
* Fertilizing: Fertilize in the spring with a balanced fertilizer.
* Pest Control: Keep an eye out for pests such as aphids and spider mites
Conclusion
So, there you have it! Growing honeysuckle on a trellis isn’t just about adding a beautiful, fragrant plant to your garden; it’s about creating a living, breathing work of art. It’s about attracting hummingbirds and butterflies, filling your outdoor space with the sweet scent of summer, and enjoying the satisfaction of nurturing something beautiful from start to finish. This DIY trick is a must-try for anyone looking to elevate their garden aesthetic and create a more inviting and vibrant outdoor environment.
Why is this a must-try? Because it’s surprisingly simple, incredibly rewarding, and offers a dramatic visual impact. Forget about sprawling, unruly honeysuckle vines taking over your garden. With a trellis, you can control the growth, direct the beauty, and enjoy the intoxicating fragrance exactly where you want it. Plus, a well-trained honeysuckle vine on a trellis becomes a stunning focal point, adding vertical interest and a touch of romance to any landscape.
But don’t stop there! Feel free to experiment with different honeysuckle varieties. ‘Goldflame’ offers vibrant pink and yellow blooms, while ‘Halliana’ is a classic choice with its creamy white flowers that age to yellow. Consider the color of your trellis too. A dark-colored trellis will make the honeysuckle flowers pop, while a lighter trellis can create a more subtle and elegant look. You can also incorporate other climbing plants, like clematis or climbing roses, to create a mixed tapestry of color and texture. Think about adding some fairy lights to your trellis for a magical nighttime display.
And the best part? This project is incredibly budget-friendly. You can often find trellises at reasonable prices, or even build your own using reclaimed wood or bamboo. Honeysuckle plants are also relatively inexpensive and easy to propagate from cuttings, meaning you can expand your collection without breaking the bank.
We’ve armed you with the knowledge, now it’s time to get your hands dirty! Don’t be intimidated by the thought of training a climbing vine. With a little patience and the right techniques, you’ll be amazed at what you can achieve. Imagine stepping out into your garden and being greeted by the sweet fragrance of honeysuckle, the vibrant colors of the blooms, and the gentle hum of pollinators. It’s an experience that will enrich your life and bring joy to your everyday.
So, grab your gloves, choose your trellis, and get ready to embark on this exciting gardening adventure. We’re confident that you’ll love the results. And most importantly, we want to hear about your experience! Share your photos, tips, and stories with us in the comments below. Let’s create a community of honeysuckle enthusiasts and inspire others to transform their gardens with this simple yet stunning DIY trick. Let us know what variety of honeysuckle on trellis you chose and how it worked out for you! We can’t wait to see what you create!
Frequently Asked Questions (FAQ)
What type of trellis is best for honeysuckle?
The best type of trellis for honeysuckle depends on your aesthetic preferences and the size of your garden. Sturdy wooden trellises, metal trellises, and even DIY trellises made from bamboo or repurposed materials can all work well. Consider the mature size of your honeysuckle variety when choosing a trellis. A larger, more vigorous variety will require a more robust trellis to support its weight. Also, think about the style of your garden. A rustic wooden trellis might be perfect for a cottage garden, while a sleek metal trellis could complement a more modern design. Make sure the trellis is tall enough to accommodate the honeysuckle’s growth habit, typically 6-10 feet.
How often should I water my honeysuckle on a trellis?
Watering frequency depends on your climate and soil conditions. Generally, honeysuckle prefers consistently moist soil, especially during the growing season. Water deeply when the top inch of soil feels dry to the touch. Avoid overwatering, as this can lead to root rot. During hot, dry periods, you may need to water more frequently. Mulching around the base of the plant can help retain moisture and reduce the need for frequent watering. In the winter, reduce watering frequency, but don’t allow the soil to dry out completely.
How do I train my honeysuckle to grow on the trellis?
Training honeysuckle to grow on a trellis is relatively simple. As the vine grows, gently guide the stems towards the trellis and secure them with plant ties, twine, or even strips of fabric. Space the ties evenly along the stem to encourage even growth. Regularly check the ties to ensure they are not too tight, as this can restrict growth. Prune any stray stems that are not growing in the desired direction. With consistent training, your honeysuckle will quickly learn to climb the trellis and create a beautiful display.
When is the best time to prune honeysuckle growing on a trellis?
The best time to prune honeysuckle is after it has finished flowering. This allows you to remove any dead, damaged, or crossing branches without sacrificing blooms. Pruning also helps to maintain the shape of the vine and encourage new growth. You can also do light pruning throughout the growing season to remove any unwanted stems or to tidy up the plant. Avoid heavy pruning, as this can reduce flowering.
What kind of fertilizer should I use for honeysuckle on a trellis?
Honeysuckle benefits from regular fertilization, especially during the growing season. Use a balanced fertilizer with an NPK ratio of 10-10-10 or 20-20-20. Apply the fertilizer according to the package directions, typically in the spring and again in mid-summer. Avoid over-fertilizing, as this can lead to excessive foliage growth at the expense of flowers. You can also amend the soil with compost or other organic matter to improve its fertility and drainage.
My honeysuckle isn’t flowering. What could be the problem?
There are several reasons why your honeysuckle might not be flowering. One common cause is lack of sunlight. Honeysuckle needs at least six hours of sunlight per day to bloom properly. Another possibility is that the plant is not getting enough water or nutrients. Make sure to water regularly and fertilize as needed. Over-pruning can also reduce flowering, so avoid heavy pruning. Finally, some honeysuckle varieties take a few years to mature and begin flowering. Be patient, and your honeysuckle should eventually reward you with beautiful blooms.
Is honeysuckle invasive?
Some honeysuckle varieties, particularly Japanese honeysuckle (Lonicera japonica), can be invasive in certain regions. It’s important to choose a non-invasive variety or to manage the plant carefully to prevent it from spreading. Native honeysuckle varieties are generally less likely to be invasive. Regular pruning and monitoring can help to control the spread of honeysuckle. Check with your local extension office or garden center to determine which honeysuckle varieties are best suited for your area.
How do I propagate honeysuckle?
Honeysuckle is relatively easy to propagate from cuttings. Take softwood cuttings in the spring or hardwood cuttings in the fall. Dip the cut end in rooting hormone and plant the cutting in a well-draining potting mix. Keep the soil moist and provide indirect sunlight. The cuttings should root within a few weeks. Once the cuttings have rooted, you can transplant them into larger pots or directly into the garden.
What pests and diseases affect honeysuckle?
Honeysuckle is generally resistant to pests and diseases, but it can be susceptible to aphids, powdery mildew, and leaf spot. Aphids can be controlled with insecticidal soap or by introducing beneficial insects like ladybugs. Powdery mildew can be prevented by providing good air circulation and avoiding overhead watering. Leaf spot can be treated with a fungicide. Regularly inspect your honeysuckle for signs of pests or diseases and take action promptly to prevent them from spreading.

Leave a Comment