

DIY tile and grout cleaner: Are you tired of scrubbing endlessly at your bathroom or kitchen tiles, only to be met with stubborn stains and dingy grout? I know I am! It feels like a never-ending battle, doesn’t it? But what if I told you there’s a simple, effective, and budget-friendly solution hiding right in your pantry?
Tile and grout cleaning has been a household chore for centuries. From ancient Roman mosaics to the intricate tilework of Moroccan riads, cultures around the world have valued beautiful tiled surfaces. However, maintaining that beauty has always been a challenge. Traditional methods often involved harsh chemicals that were both expensive and potentially harmful to our health and the environment.
That’s where this DIY tile and grout cleaner comes in! In today’s world, we’re all looking for ways to save money, reduce our reliance on harsh chemicals, and create a healthier home environment. This DIY cleaner not only tackles tough stains and grime but also uses ingredients you likely already have on hand. It’s a win-win! I’m going to show you how to whip up a powerful cleaner that will leave your tiles sparkling and your grout looking fresh, without breaking the bank or exposing your family to harmful toxins. Get ready to say goodbye to endless scrubbing and hello to a cleaner, brighter home with this amazing DIY tile and grout cleaner!
DIY Tile and Grout Cleaner: Say Goodbye to Grime!
Okay, let’s face it: cleaning tile and grout is nobody’s favorite chore. But with this super effective DIY cleaner, you can ditch those harsh chemicals and get sparkling results with ingredients you probably already have in your pantry! I’ve been using this method for years, and trust me, it works wonders.
What You’ll Need
Before we dive in, let’s gather our supplies. This is a pretty simple recipe, so you won’t need anything too fancy.
* Baking Soda: This is our gentle abrasive. It helps lift dirt and grime without scratching your tiles.
* Hydrogen Peroxide (3%): This is a natural disinfectant and bleaching agent. It helps brighten grout and kill bacteria.
* Dish Soap (Dawn is my go-to!): This helps cut through grease and grime, making everything easier to scrub away.
* Spray Bottle: For easy application.
* Old Toothbrush or Grout Brush: For scrubbing those stubborn areas.
* Sponge or Cloth: For wiping away the cleaner.
* Gloves: To protect your hands (especially if you have sensitive skin).
* Small Bowl: For mixing the paste (optional).
* Warm Water: For rinsing.
* Optional: Essential Oils (Tea Tree, Lemon, or Eucalyptus): For a fresh scent and added antibacterial properties.
Making the Magic Paste: Two Methods
I’m going to give you two options for making your tile and grout cleaner. The first is a paste, which is great for really stubborn stains and heavily soiled grout. The second is a spray, which is perfect for regular maintenance and lighter cleaning.
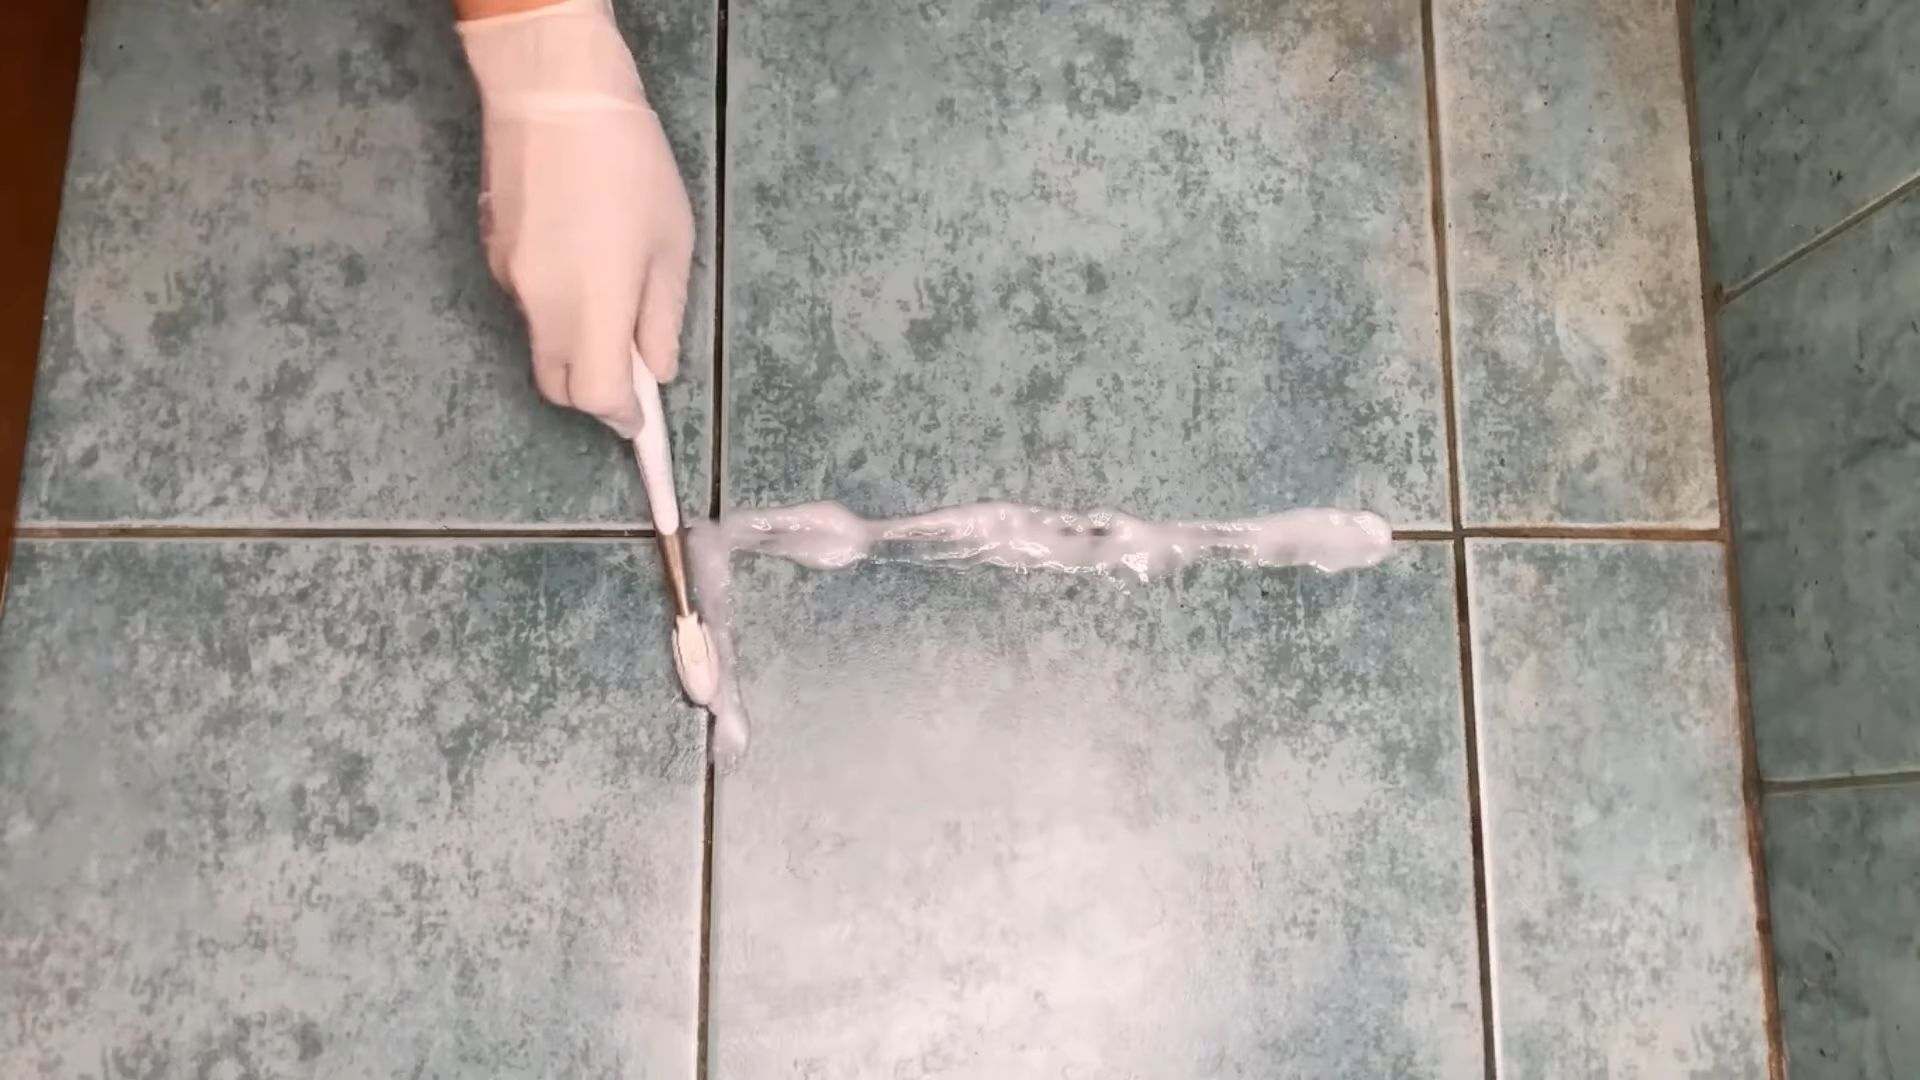
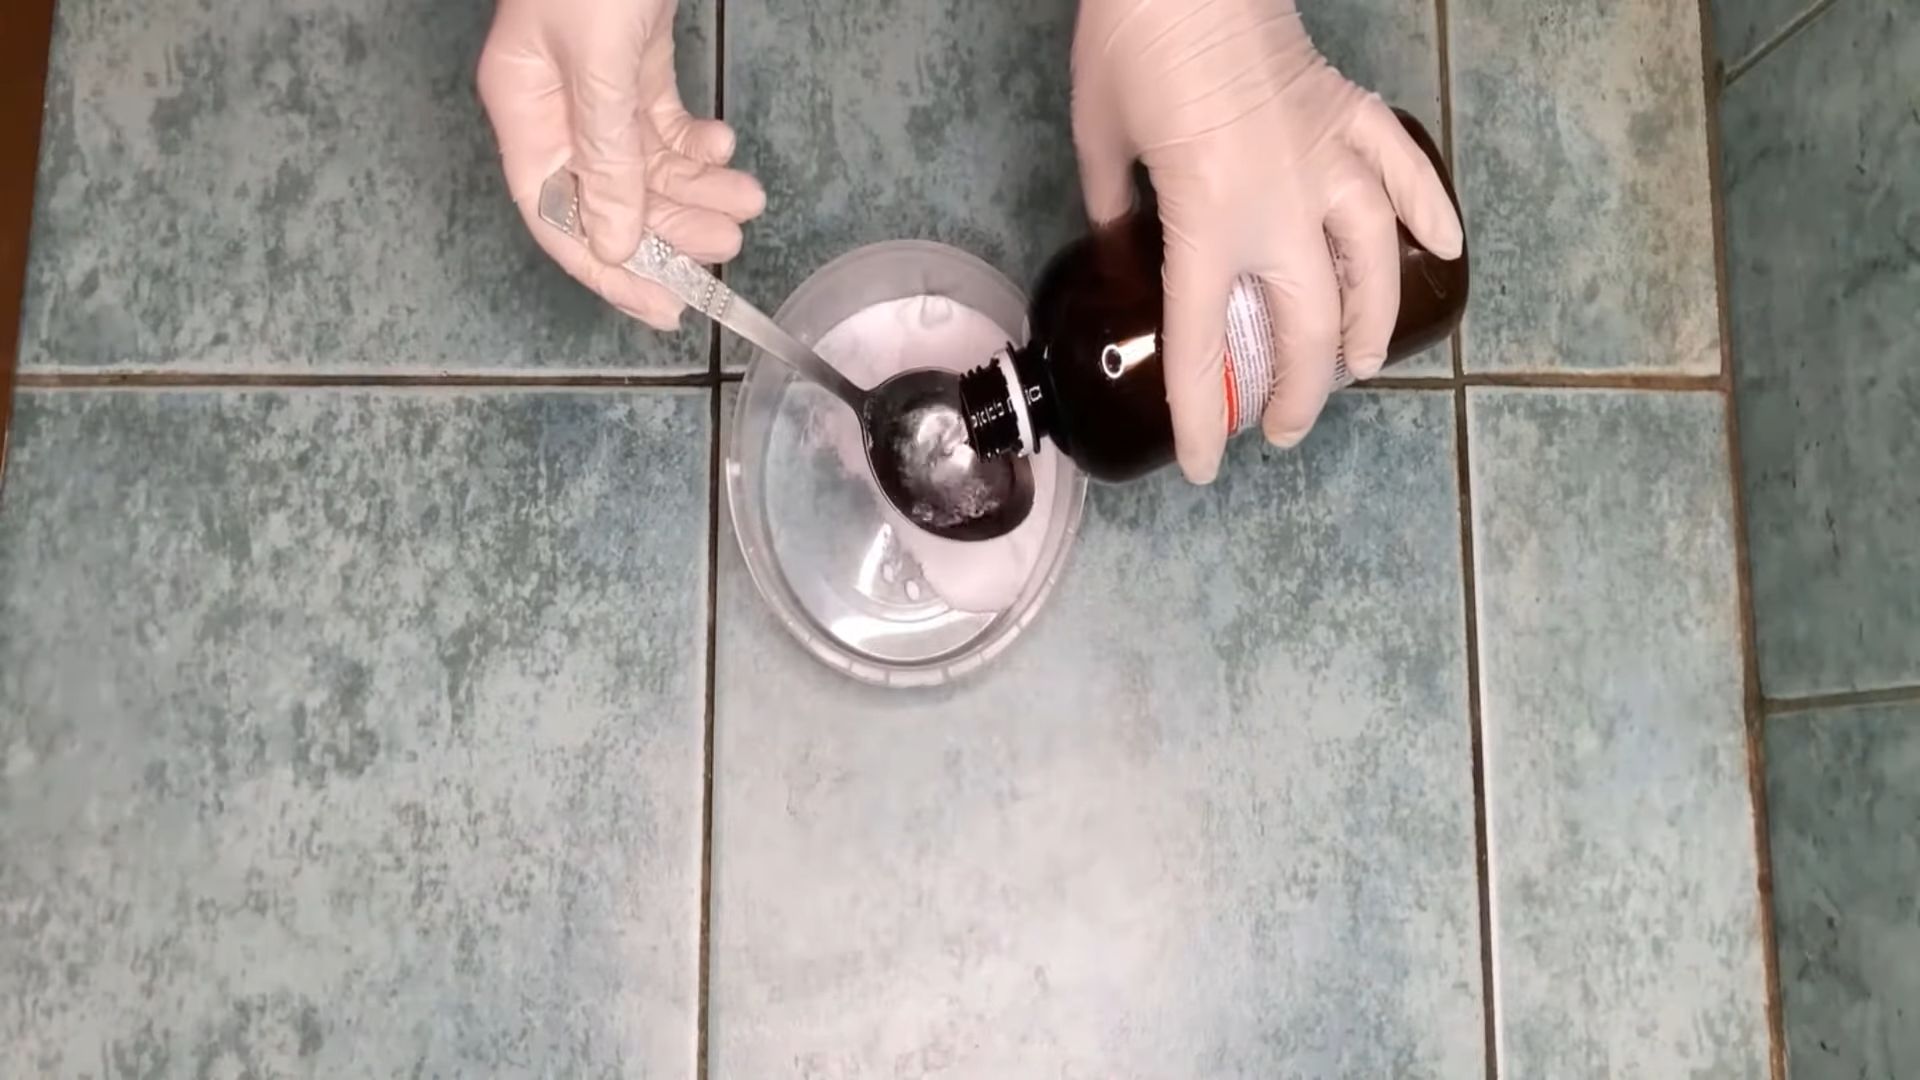
Method 1: The Powerful Paste
This method is my go-to when my grout is looking particularly sad. It takes a little more elbow grease, but the results are worth it!
1. Combine Baking Soda and Hydrogen Peroxide: In your small bowl, mix together baking soda and hydrogen peroxide to form a thick paste. I usually start with about ½ cup of baking soda and slowly add hydrogen peroxide until I get the right consistency. You want it to be thick enough to stick to the grout, but not so thick that it’s hard to spread.
2. Add a Squirt of Dish Soap: Add a small squirt (about a teaspoon) of dish soap to the paste. This will help cut through grease and grime.
3. Optional: Add Essential Oils: If you’re using essential oils, add a few drops (5-10) to the paste. Tea tree, lemon, and eucalyptus are all great choices for their antibacterial and refreshing properties.
4. Mix Well: Stir everything together until it’s well combined.
5. Apply the Paste: Using your fingers (with gloves on!), an old toothbrush, or a grout brush, apply the paste liberally to the grout lines. Make sure you cover all the dirty areas.
6. Let it Sit: This is the key! Let the paste sit on the grout for at least 10-15 minutes. For really stubborn stains, you can let it sit for up to 30 minutes. The longer it sits, the more time the baking soda and hydrogen peroxide have to work their magic.
7. Scrub, Scrub, Scrub!: After the paste has sat, it’s time to scrub. Use your old toothbrush or grout brush to scrub the grout lines thoroughly. You’ll probably see the dirt and grime starting to lift away.
8. Rinse with Warm Water: Once you’ve scrubbed all the grout lines, rinse the area with warm water. You can use a sponge or cloth to wipe away the excess paste and water.
9. Dry the Area: Finally, dry the area with a clean towel. You should see a noticeable difference in the appearance of your grout!
Method 2: The Quick and Easy Spray
This method is perfect for regular maintenance and lighter cleaning. It’s quick, easy, and doesn’t require as much scrubbing.
1. Combine Ingredients in Spray Bottle: In your spray bottle, combine 1 cup of hydrogen peroxide, 1 tablespoon of dish soap, and 2 cups of warm water.
2. Optional: Add Essential Oils: If you’re using essential oils, add a few drops (5-10) to the spray bottle.
3. Shake Well: Shake the spray bottle well to combine all the ingredients.
4. Spray the Tile and Grout: Spray the tile and grout liberally with the cleaner.
5. Let it Sit: Let the cleaner sit on the tile and grout for 5-10 minutes.
6. Wipe and Scrub: Use a sponge or cloth to wipe down the tile. For the grout lines, use an old toothbrush or grout brush to scrub away any dirt and grime.
7. Rinse with Warm Water: Rinse the area with warm water.
8. Dry the Area: Dry the area with a clean towel.
Cleaning Different Types of Tile
It’s important to consider the type of tile you’re cleaning before you start. While this DIY cleaner is generally safe for most types of tile, there are a few things to keep in mind.
* Ceramic and Porcelain Tile: These are the most common types of tile, and they’re generally very durable and easy to clean. This DIY cleaner is perfectly safe for ceramic and porcelain tile.
* Natural Stone Tile (Marble, Granite, Slate): Natural stone tile is more porous than ceramic or porcelain tile, so it’s more susceptible to staining and damage. While this DIY cleaner is generally safe for natural stone, it’s always a good idea to test it in an inconspicuous area first. Avoid using acidic cleaners (like vinegar or lemon juice) on natural stone, as they can etch the surface.
* Glass Tile: Glass tile is generally easy to clean, but it can be scratched easily. Be careful not to use abrasive cleaners or scrub too hard. This DIY cleaner is safe for glass tile, but use a soft sponge or cloth to avoid scratching.
Tips and Tricks for Sparkling Results
Here are a few extra tips and tricks to help you get the best possible results:
* Test in an Inconspicuous Area: Before you clean your entire tile floor or shower, test the cleaner in an inconspicuous area to make sure it doesn’t damage or discolor the tile or grout.
* Ventilate the Area: Make sure the area you’re cleaning is well-ventilated. Open a window or turn on a fan to help circulate the air.
* Wear Gloves: Protect your hands by wearing gloves. Baking soda and hydrogen peroxide can be drying to the skin.
* Don’t Mix with Other Cleaners: Never mix this DIY cleaner with other cleaning products, especially bleach. Mixing cleaners can create dangerous fumes.
* Clean Regularly: The best way to keep your tile and grout clean is to clean it regularly. A quick wipe-down after each shower or a weekly cleaning can prevent dirt and grime from building up.
* Use a Squeegee: After showering, use a squeegee to remove excess water from the tile and grout. This will help prevent mildew and soap scum from forming.
* Seal Your Grout: Sealing your grout can help protect it from stains and make it easier to clean. You can purchase grout sealant at most home improvement stores. Follow the manufacturer’s instructions for application.
* Stubborn Stains: For really stubborn stains, you can try making a paste of baking soda and water and applying it to the stain. Let it sit for several hours or overnight, then scrub and rinse.
* Mold and Mildew: For mold and mildew, you can try using a solution of hydrogen peroxide and water. Spray the solution on the affected area and let it sit for 10-15 minutes, then scrub and rinse. You can also use a bleach solution (1 part bleach to 10 parts water), but be sure to ventilate the area well and wear gloves.
* Steam Cleaning: A steam cleaner can be a great way to clean tile and grout without using any chemicals. The steam helps to loosen dirt and grime, making it easier to wipe away.
Safety First!
While this DIY cleaner is made with relatively safe ingredients, it’s still important to take some precautions:
* Keep out of reach of children and pets.
* Avoid contact with eyes. If contact occurs, rinse thoroughly with water.
* Do not ingest.
* Ventilate the area well.
* Wear gloves to protect your hands.
Troubleshooting
Sometimes, even with the best cleaner, you might encounter a few snags. Here’s how to handle them:
* Cleaner isn’t working: Make sure you’re letting the cleaner sit long enough. For stubborn stains, you might need to let it
Conclusion
So, there you have it! A simple, effective, and budget-friendly way to tackle grimy tile and grout without resorting to harsh chemicals. This DIY tile and grout cleaner isn’t just about saving money; it’s about creating a healthier home environment for you and your family. The satisfaction of seeing your tiles sparkle after using a cleaner you made yourself is truly rewarding.
Why is this DIY trick a must-try? Because it’s a game-changer. It’s a powerful solution that utilizes readily available ingredients, minimizing your environmental impact and maximizing your cleaning power. Commercial cleaners often contain volatile organic compounds (VOCs) that can irritate your lungs and contribute to indoor air pollution. Our DIY alternative avoids these harmful chemicals, providing a safer and more sustainable cleaning option. Plus, the cost savings are significant. You’ll be amazed at how much you can save by ditching expensive store-bought cleaners and embracing this simple recipe.
But the beauty of this DIY approach lies in its adaptability. Feel free to experiment with variations to suit your specific needs and preferences. For instance, if you’re dealing with particularly stubborn stains, consider adding a tablespoon of borax to the mixture for extra cleaning power. Borax is a natural mineral that acts as a powerful disinfectant and deodorizer. Alternatively, if you prefer a more fragrant cleaner, add a few drops of your favorite essential oil, such as lemon, lavender, or tea tree oil. Lemon oil is known for its degreasing properties, while lavender and tea tree oil offer antibacterial benefits. Just be sure to test the essential oil on an inconspicuous area first to ensure it doesn’t discolor your grout.
Another variation involves adjusting the consistency of the paste. If you prefer a thinner cleaner that’s easier to apply, simply add more water until you reach your desired consistency. Conversely, if you need a thicker paste for vertical surfaces, reduce the amount of water. The key is to experiment and find what works best for your specific tile and grout.
Don’t be intimidated by the “DIY” label. This recipe is incredibly easy to follow, even for beginners. The steps are straightforward, and the ingredients are readily available at most grocery stores. You’ll be surprised at how quickly you can whip up a batch of this powerful cleaner and transform your grimy tiles into sparkling surfaces.
We wholeheartedly encourage you to try this DIY tile and grout cleaner. It’s a simple, effective, and eco-friendly way to achieve professional-quality results without breaking the bank. Once you’ve tried it, we’d love to hear about your experience! Share your before-and-after photos, tips, and variations in the comments section below. Let’s create a community of DIY enthusiasts who are passionate about clean homes and sustainable living. Your feedback will not only help other readers but also inspire us to continue developing and sharing innovative DIY solutions. So, grab your ingredients, put on your cleaning gloves, and get ready to transform your tiles! We can’t wait to see your sparkling results!
Frequently Asked Questions (FAQ)
What type of tiles is this DIY cleaner safe for?
This DIY tile and grout cleaner is generally safe for most types of tiles, including ceramic, porcelain, and glass. However, it’s always a good idea to test the cleaner on an inconspicuous area first, especially if you have natural stone tiles like marble or granite. Natural stone can be porous and sensitive to acidic cleaners, so it’s crucial to ensure that the cleaner doesn’t damage or discolor the surface. If you’re unsure about the type of tile you have, consult the manufacturer’s instructions or a professional tile installer. For natural stone, consider using a pH-neutral cleaner specifically designed for those surfaces.
How often should I use this DIY cleaner?
The frequency of cleaning depends on the amount of foot traffic and the level of dirt and grime in your tile and grout. For high-traffic areas like bathrooms and kitchens, you may need to clean your tiles and grout once a week. For less frequently used areas, cleaning every two to four weeks may be sufficient. Regular cleaning will prevent the buildup of dirt and grime, making it easier to maintain your tiles and grout in the long run. You can also spot-clean any spills or stains as they occur to prevent them from setting in.
Can I use this cleaner on colored grout?
Yes, you can use this DIY tile and grout cleaner on colored grout, but it’s essential to test it on a small, hidden area first to ensure that it doesn’t fade or discolor the grout. Some colored grouts are more sensitive to cleaning agents than others, so it’s always better to be cautious. If you notice any color change after testing, dilute the cleaner with more water or consider using a gentler cleaning solution specifically designed for colored grout.
What if the grout is heavily stained or moldy?
For heavily stained or moldy grout, you may need to use a more concentrated cleaner or repeat the cleaning process several times. You can also try using a grout brush with stiff bristles to scrub the grout more effectively. For mold, consider adding a small amount of hydrogen peroxide to the cleaner, as it has antifungal properties. However, always test the hydrogen peroxide on an inconspicuous area first to ensure that it doesn’t damage the grout or tile. In severe cases of mold infestation, it may be necessary to consult a professional mold remediation service.
How long should I leave the cleaner on the grout before scrubbing?
Allowing the cleaner to sit on the grout for a few minutes before scrubbing helps to loosen the dirt and grime, making it easier to remove. We recommend leaving the cleaner on for 5-10 minutes, but don’t let it dry completely. If the cleaner starts to dry, lightly mist it with water to keep it moist. After the soaking period, scrub the grout with a grout brush or an old toothbrush, paying attention to any stubborn stains or areas with heavy buildup.
What’s the best way to rinse the cleaner off the tiles and grout?
After scrubbing, thoroughly rinse the tiles and grout with clean water to remove any remaining cleaner residue. You can use a sponge, a mop, or a wet cloth to rinse the surfaces. Make sure to remove all traces of the cleaner, as any residue can attract dirt and grime. For large areas, you can use a garden hose with a spray nozzle to rinse the tiles and grout. After rinsing, dry the tiles and grout with a clean towel or allow them to air dry.
Can I use this cleaner on other surfaces besides tile and grout?
While this DIY tile and grout cleaner is primarily designed for tile and grout, it can also be used on other surfaces, such as porcelain sinks, bathtubs, and shower stalls. However, it’s essential to test the cleaner on an inconspicuous area first to ensure that it doesn’t damage or discolor the surface. Avoid using this cleaner on delicate surfaces like wood, painted walls, or polished metals.
Is this DIY cleaner safe for septic systems?
Yes, this DIY cleaner is generally safe for septic systems, as it contains natural ingredients that are biodegradable and won’t harm the beneficial bacteria in your septic tank. However, it’s always a good idea to use cleaning products sparingly and avoid flushing large amounts of cleaner down the drain at once. If you have any concerns about the impact of cleaning products on your septic system, consult a professional septic system service.


Leave a Comment