

Grow Healthy Eggplants and unlock the secrets to a bountiful harvest right in your own backyard! Have you ever dreamed of plucking plump, vibrant eggplants fresh from the vine, ready to be transformed into delicious dishes? I know I have! But let’s be honest, sometimes growing these beauties can feel like a real challenge. That’s where these DIY tricks and hacks come in – they’re your secret weapon to eggplant success!
Eggplants, with their rich history tracing back to ancient Asia, have been cultivated for centuries and hold a special place in cuisines around the world. From the Mediterranean’s moussaka to Asia’s stir-fries, this versatile vegetable has truly stood the test of time. But even with centuries of cultivation, many gardeners still struggle to grow healthy eggplants that are free from pests and diseases.
That’s why I’m so excited to share these simple yet effective DIY solutions. Whether you’re battling pesky flea beetles, struggling with blossom-end rot, or simply want to maximize your yield, these tips will empower you to create the perfect environment for your eggplants to thrive. Imagine the satisfaction of serving up a home-cooked meal featuring eggplants you nurtured from seed to table! Let’s dive in and transform your garden into an eggplant paradise!
DIY: From Seed to Supper – Growing Gorgeous Eggplants at Home
Okay, eggplant lovers, let’s get down to business! I’m going to walk you through everything you need to know to grow plump, juicy eggplants right in your own backyard (or even in containers!). It might seem a little intimidating at first, but trust me, with a little patience and these tips, you’ll be harvesting delicious eggplants before you know it.
Choosing Your Eggplant Variety
Before we even think about seeds, let’s talk about eggplant varieties. There are so many cool options beyond the classic dark purple globe! Consider these factors:
* Climate: Some varieties are better suited for cooler climates, while others thrive in heat. Check your local growing zone and choose accordingly.
* Space: If you’re growing in containers, you’ll want a more compact variety.
* Taste and Use: Do you prefer a mild, creamy eggplant for grilling? Or a more robust flavor for curries? Research different varieties to find your perfect match.
Here are a few popular choices:
* Black Beauty: The classic, reliable dark purple globe eggplant.
* Japanese Eggplant (Ichiban): Long, slender, and mild-flavored. Great for stir-fries.
* Italian Eggplant (Rosa Bianca): Beautiful lavender and white striped eggplant with a delicate flavor.
* Thai Eggplant: Small, round, and often green or white. Used in Thai curries.
* Fairy Tale Eggplant: Small, purple and white striped, and early to mature.
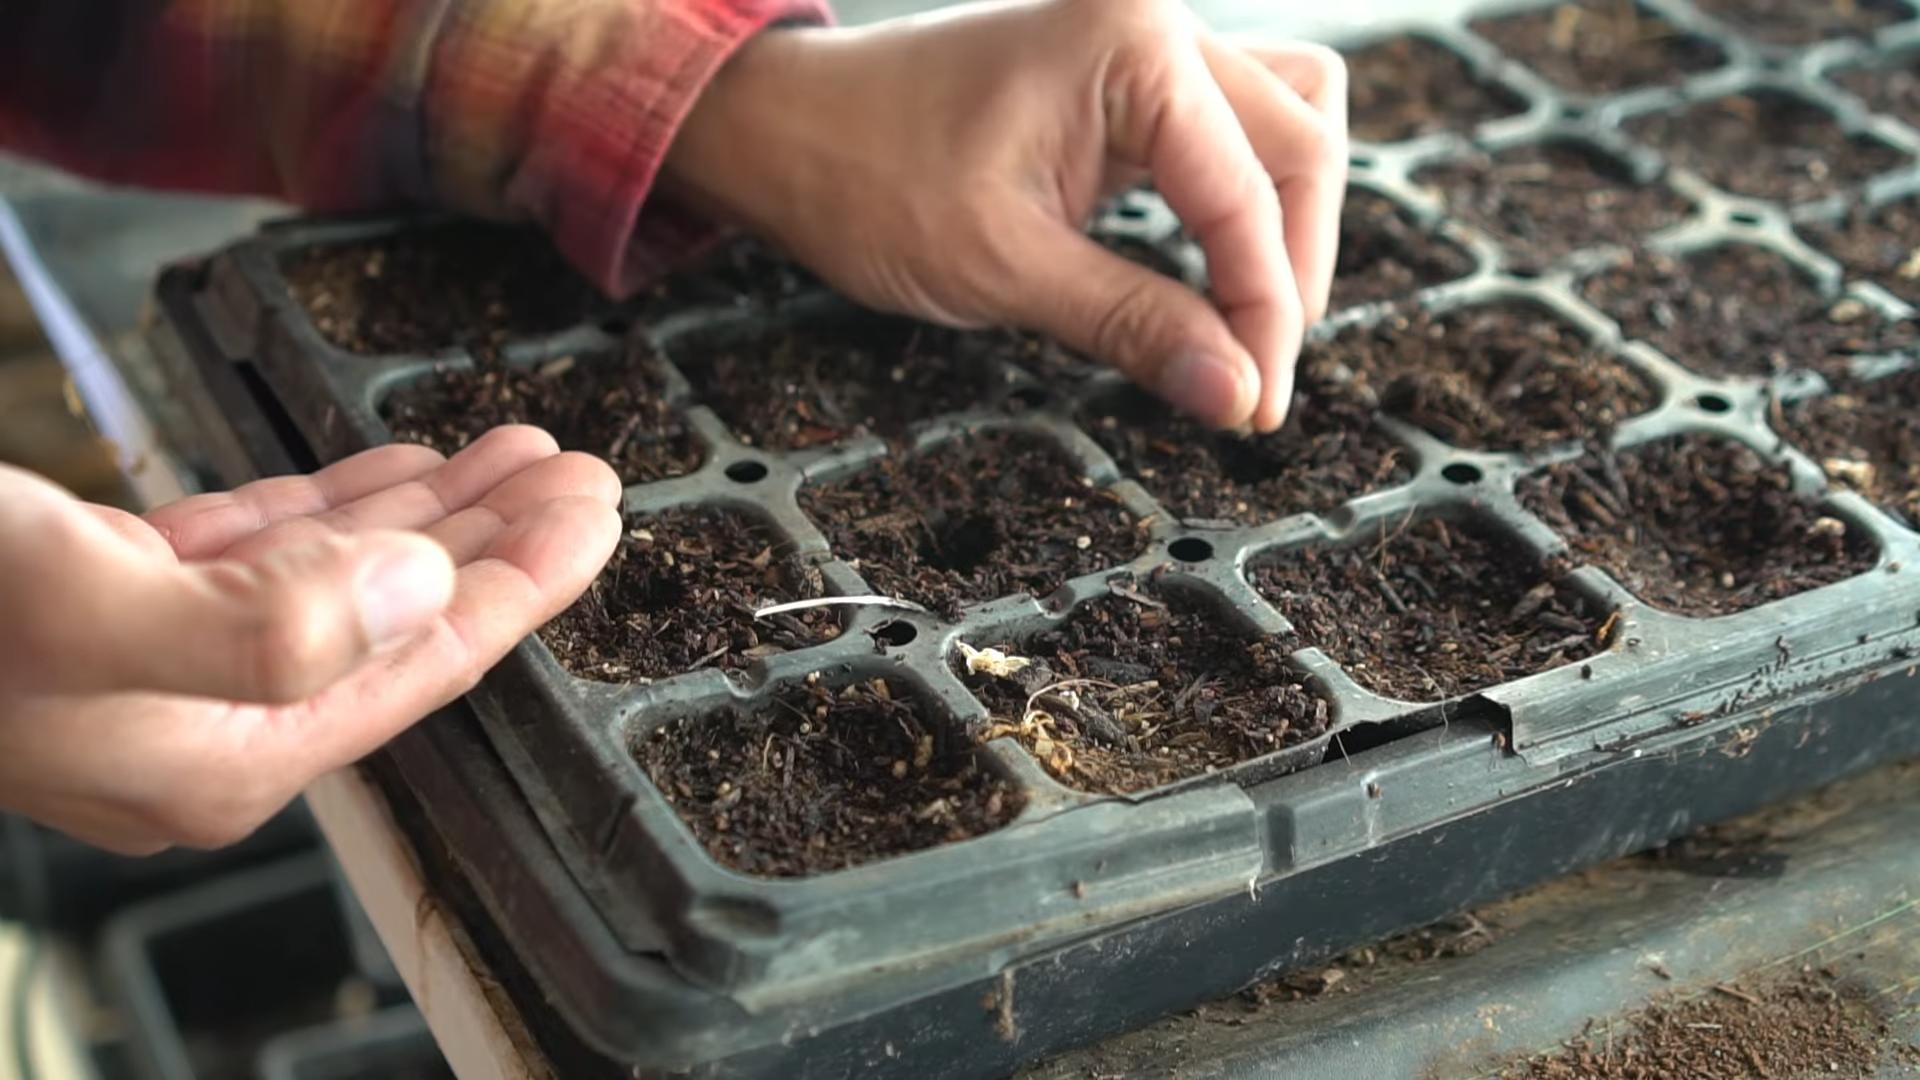
Starting Eggplant Seeds Indoors
Eggplants need a long growing season, so starting them indoors is crucial, especially if you live in a cooler climate. I usually start mine about 8-10 weeks before the last expected frost.
1. Gather Your Supplies:
* Eggplant seeds
* Seed starting trays or small pots
* Seed starting mix (a light, well-draining mix is essential)
* Heat mat (optional, but highly recommended)
* Grow light (also optional, but helps prevent leggy seedlings)
* Spray bottle
* Watering can with a gentle rose head
2. Sow the Seeds:
* Moisten the seed starting mix thoroughly. It should be damp, but not soggy.
* Fill your seed starting trays or pots with the moistened mix.
* Make a small indentation (about ¼ inch deep) in the center of each cell or pot.
* Place 2-3 seeds in each indentation. This increases your chances of at least one seed germinating.
* Gently cover the seeds with the seed starting mix.
* Lightly mist the surface with water.
3. Provide Warmth and Light:
* Place the seed starting trays or pots on a heat mat. Eggplant seeds germinate best in warm temperatures (around 80-85°F).
* If you’re using a grow light, position it a few inches above the trays or pots.
* If you don’t have a grow light, place the trays or pots in a sunny window, but be aware that the seedlings may become leggy (tall and spindly) if they don’t get enough light.
4. Keep the Soil Moist:
* Check the soil moisture daily. It should be consistently moist, but not waterlogged.
* Use a spray bottle to mist the surface of the soil as needed.
* Once the seedlings emerge, you can water them more deeply, but be careful not to overwater.
5. Thin the Seedlings:
* Once the seedlings have developed their first true leaves (the second set of leaves), thin them to one seedling per cell or pot.
* Choose the strongest, healthiest-looking seedling and snip off the others at the soil line with small scissors. Don’t pull them out, as this can disturb the roots of the remaining seedling.
Transplanting Eggplant Seedlings
Once the danger of frost has passed and the soil has warmed up, it’s time to transplant your eggplant seedlings outdoors. This is a crucial step, so take your time and do it carefully.
1. Harden Off the Seedlings:
* Before transplanting, you need to “harden off” the seedlings. This means gradually exposing them to outdoor conditions to acclimate them to the sun, wind, and temperature changes.
* Start by placing the seedlings outdoors in a sheltered location for an hour or two each day.
* Gradually increase the amount of time they spend outdoors each day over the course of a week or two.
* This will help prevent transplant shock.
2. Prepare the Planting Site:
* Choose a sunny location with well-drained soil. Eggplants need at least 6-8 hours of sunlight per day.
* Amend the soil with compost or well-rotted manure to improve drainage and fertility. Eggplants are heavy feeders and need nutrient-rich soil.
* The soil pH should be between 6.0 and 7.0.
3. Transplant the Seedlings:
* Dig holes that are slightly larger than the root balls of the seedlings.
* Gently remove the seedlings from their pots or trays. Be careful not to damage the roots.
* Place the seedlings in the holes and backfill with soil.
* Water thoroughly.
* Space the plants about 18-24 inches apart.
4. Provide Support:
* Eggplant plants can get quite heavy with fruit, so it’s a good idea to provide them with support.
* You can use stakes, cages, or trellises.
* Insert the supports into the ground near the plants and tie the stems to the supports as they grow.
Caring for Your Eggplant Plants
Now that your eggplants are in the ground, it’s time to provide them with the care they need to thrive.
1. Watering:
* Water deeply and regularly, especially during hot, dry weather.
* Eggplants need consistent moisture to produce good fruit.
* Water at the base of the plants to avoid wetting the foliage, which can lead to fungal diseases.
2. Fertilizing:
* Fertilize your eggplant plants every 2-3 weeks with a balanced fertilizer.
* You can also use a side dressing of compost or well-rotted manure.
* Avoid over-fertilizing, as this can lead to excessive foliage growth and reduced fruit production.
3. Mulching:
* Apply a layer of mulch around the plants to help retain moisture, suppress weeds, and regulate soil temperature.
* Organic mulches, such as straw, wood chips, or shredded leaves, are best.
4. Pest and Disease Control:
* Keep an eye out for pests and diseases. Common eggplant pests include aphids, flea beetles, and spider mites. Common diseases include blossom-end rot and fungal diseases.
* Inspect your plants regularly and take action promptly if you notice any problems.
* Use organic pest control methods whenever possible.
* Ensure good air circulation around the plants to prevent fungal diseases.
5. Pruning:
* Pruning can help improve air circulation and encourage fruit production.
* Remove any suckers (small shoots that grow from the base of the plant) and any yellowing or diseased leaves.
* You can also pinch off the tips of the branches to encourage branching and more fruit.
Harvesting Your Eggplants
The moment you’ve been waiting for! Harvesting your eggplants is the most rewarding part of the process.
1. When to Harvest:
* Eggplants are typically ready to harvest about 60-80 days after transplanting.
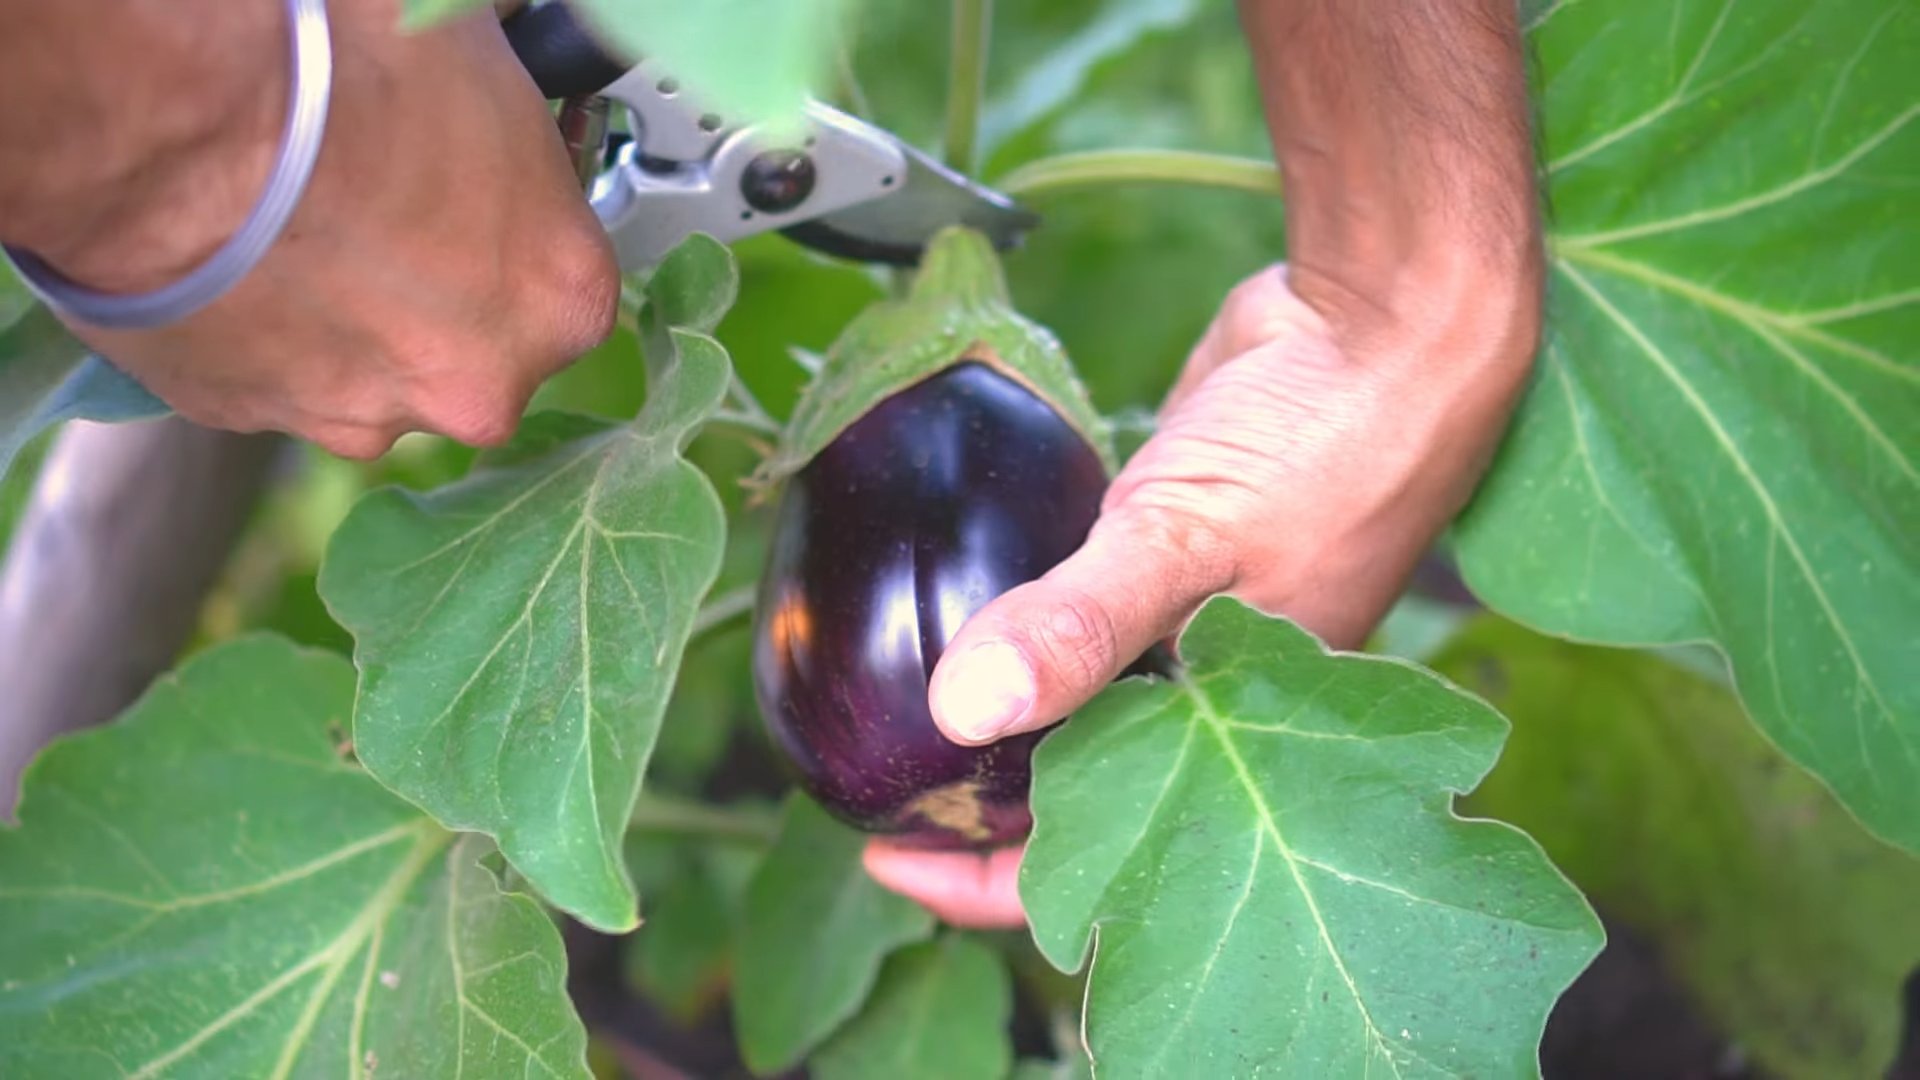
* The fruit should be firm, glossy, and have a deep, rich color.
* The skin should be smooth and unblemished.
* Gently press the skin with your thumb. If it springs back, the eggplant is ripe. If it leaves a dent, it’s overripe.
2. How to Harvest:
* Use a sharp knife or pruning shears to cut the eggplant from the plant.
* Leave about an inch of stem attached to the fruit.
* Handle the eggplants carefully to avoid bruising them.
3. Storage:
* Store eggplants in the refrigerator for up to a week.
* Do not wash them until you’re ready to use them.
Troubleshooting Common Eggplant Problems
Even with the best care, you might encounter some problems along the way. Here are a few common issues and how to address them:
* Blossom-End Rot
Conclusion
So, there you have it! This simple, yet effective DIY trick for growing healthy eggplants is more than just a gardening hack; it’s a game-changer. We’ve walked you through the process, highlighting the benefits of this method, and hopefully, dispelled any doubts you might have had. The beauty of this approach lies in its simplicity and accessibility. You don’t need to be a seasoned gardener with years of experience to achieve impressive results. All you need is a little bit of time, a few readily available materials, and a willingness to experiment.
Why is this a must-try? Because it addresses some of the most common challenges faced by eggplant growers. It provides essential support, improves air circulation, and helps to protect your precious plants from pests and diseases. The result? Stronger, healthier eggplants that produce a more abundant and delicious harvest. Imagine biting into a perfectly ripe, homegrown eggplant, knowing that you played a direct role in its success. That’s the satisfaction this DIY trick offers.
But don’t stop there! Feel free to get creative and adapt this method to suit your specific needs and preferences. For example, if you live in a windy area, you might consider using sturdier materials for your supports. Or, if you’re dealing with a particularly aggressive pest problem, you could add a layer of netting around your plants for extra protection. You can also experiment with different types of mulch to see which one works best for your soil and climate. Consider companion planting with herbs like basil or marigolds to naturally deter pests and attract beneficial insects. These variations can further enhance the effectiveness of this DIY trick and help you achieve even better results.
We are confident that once you try this DIY trick for growing healthy eggplants, you’ll be amazed by the difference it makes. It’s a cost-effective, environmentally friendly, and incredibly rewarding way to cultivate these versatile vegetables. So, grab your gardening gloves, gather your materials, and get ready to transform your eggplant patch.
We encourage you to give this method a try and share your experiences with us. Let us know what worked well for you, what challenges you encountered, and any variations you came up with. Your feedback is invaluable and will help us to refine this technique and make it even more accessible to other gardeners. Share your photos and stories on social media using #HealthyEggplantsDIY and let’s create a community of eggplant enthusiasts! Happy gardening!
Frequently Asked Questions (FAQ)
What type of materials are best for creating the supports?
The best materials for creating supports depend on your budget, availability, and aesthetic preferences. Bamboo stakes are a popular choice because they are strong, lightweight, and relatively inexpensive. Wooden stakes are another good option, but they may be more prone to rotting over time. Metal stakes are the most durable, but they can also be the most expensive. You can also use repurposed materials like old branches, PVC pipes, or even tomato cages. The key is to choose materials that are sturdy enough to support the weight of the eggplant plants as they grow and produce fruit. Make sure the materials are free of any harmful chemicals or treatments that could leach into the soil.
How often should I water my eggplants after implementing this DIY trick?
Watering frequency depends on several factors, including your climate, soil type, and the age of your plants. Generally, eggplants need about 1-2 inches of water per week. Check the soil moisture regularly by sticking your finger about an inch into the soil. If it feels dry, it’s time to water. When watering, water deeply and thoroughly, ensuring that the water reaches the roots. Avoid watering the foliage, as this can increase the risk of fungal diseases. Mulching around the base of the plants can help to retain moisture and reduce the need for frequent watering. During hot, dry weather, you may need to water more frequently.
What if I don’t have access to all the materials listed? Can I substitute anything?
Absolutely! One of the great things about this DIY trick is that it’s adaptable. If you don’t have access to all the materials listed, feel free to substitute with what you have on hand. For example, if you don’t have bamboo stakes, you can use wooden stakes, metal rods, or even sturdy branches. If you don’t have twine, you can use zip ties, fabric strips, or even old pantyhose. The key is to be creative and resourceful. Just make sure that the materials you use are strong enough to support the weight of the plants and that they won’t damage the stems.
How do I protect my eggplants from pests and diseases after using this method?
This DIY trick helps to improve air circulation, which can reduce the risk of fungal diseases. However, it’s still important to take other measures to protect your eggplants from pests and diseases. Regularly inspect your plants for signs of infestation or disease. Remove any affected leaves or fruit immediately. You can also use organic pest control methods like insecticidal soap, neem oil, or diatomaceous earth. Companion planting with herbs like basil or marigolds can also help to deter pests. If you’re dealing with a particularly severe pest or disease problem, you may need to use a stronger treatment, but always follow the instructions carefully and choose products that are safe for use on edible plants.
How long does it take to see results after implementing this DIY trick?
The time it takes to see results will vary depending on the age and health of your plants, as well as the growing conditions. However, you should start to notice improvements within a few weeks. You may see that your plants are growing taller and stronger, with more leaves and flowers. You may also notice that they are less susceptible to pests and diseases. Ultimately, you should see an increase in the number and size of the eggplants you harvest. Be patient and consistent with your care, and you’ll be rewarded with a bountiful harvest.
Can this DIY trick be used for other types of plants besides eggplants?
Yes, this DIY trick can be adapted for use with other types of plants that need support, such as tomatoes, peppers, and cucumbers. The basic principles are the same: provide support to help the plants grow upright, improve air circulation, and protect them from pests and diseases. You may need to adjust the materials and techniques depending on the specific needs of the plant. For example, tomatoes may require sturdier supports than eggplants, while cucumbers may benefit from being trained to grow up a trellis.
What is the best time of day to water eggplants?
The best time of day to water eggplants is in the morning. This gives the plants plenty of time to absorb the water before the heat of the day, and it also allows the foliage to dry out, which can help to prevent fungal diseases. Avoid watering in the evening, as this can leave the foliage wet overnight, creating a favorable environment for disease.
How do I know when my eggplants are ripe and ready to harvest?
Eggplants are typically ready to harvest when they are firm, glossy, and have a deep, rich color. The skin should be smooth and unblemished. Gently press the skin with your finger. If it springs back, the eggplant is ripe. If it feels soft or mushy, it’s overripe. The size of the eggplant will vary depending on the variety, so don’t rely solely on size to determine ripeness. Use a sharp knife or pruning shears to cut the eggplant from the plant, leaving a short stem attached.


Leave a Comment