

DIY fruit crate closet: Ever feel like your clothes are staging a rebellion, overflowing from every corner of your room? I know the feeling! We’ve all been there, staring into a chaotic closet, wishing for a magical solution that doesn’t involve spending a fortune at a fancy furniture store. Well, guess what? That solution might be closer than you think – hiding in plain sight at your local farmers market or craft store!
For generations, fruit crates have been more than just containers for transporting nature’s bounty. They’ve been repurposed into everything from rustic shelves to charming coffee tables. This tradition of resourceful reuse speaks to a time when ingenuity and sustainability were paramount. Now, we’re bringing that spirit into the 21st century with a stylish and practical project: building your very own DIY fruit crate closet.
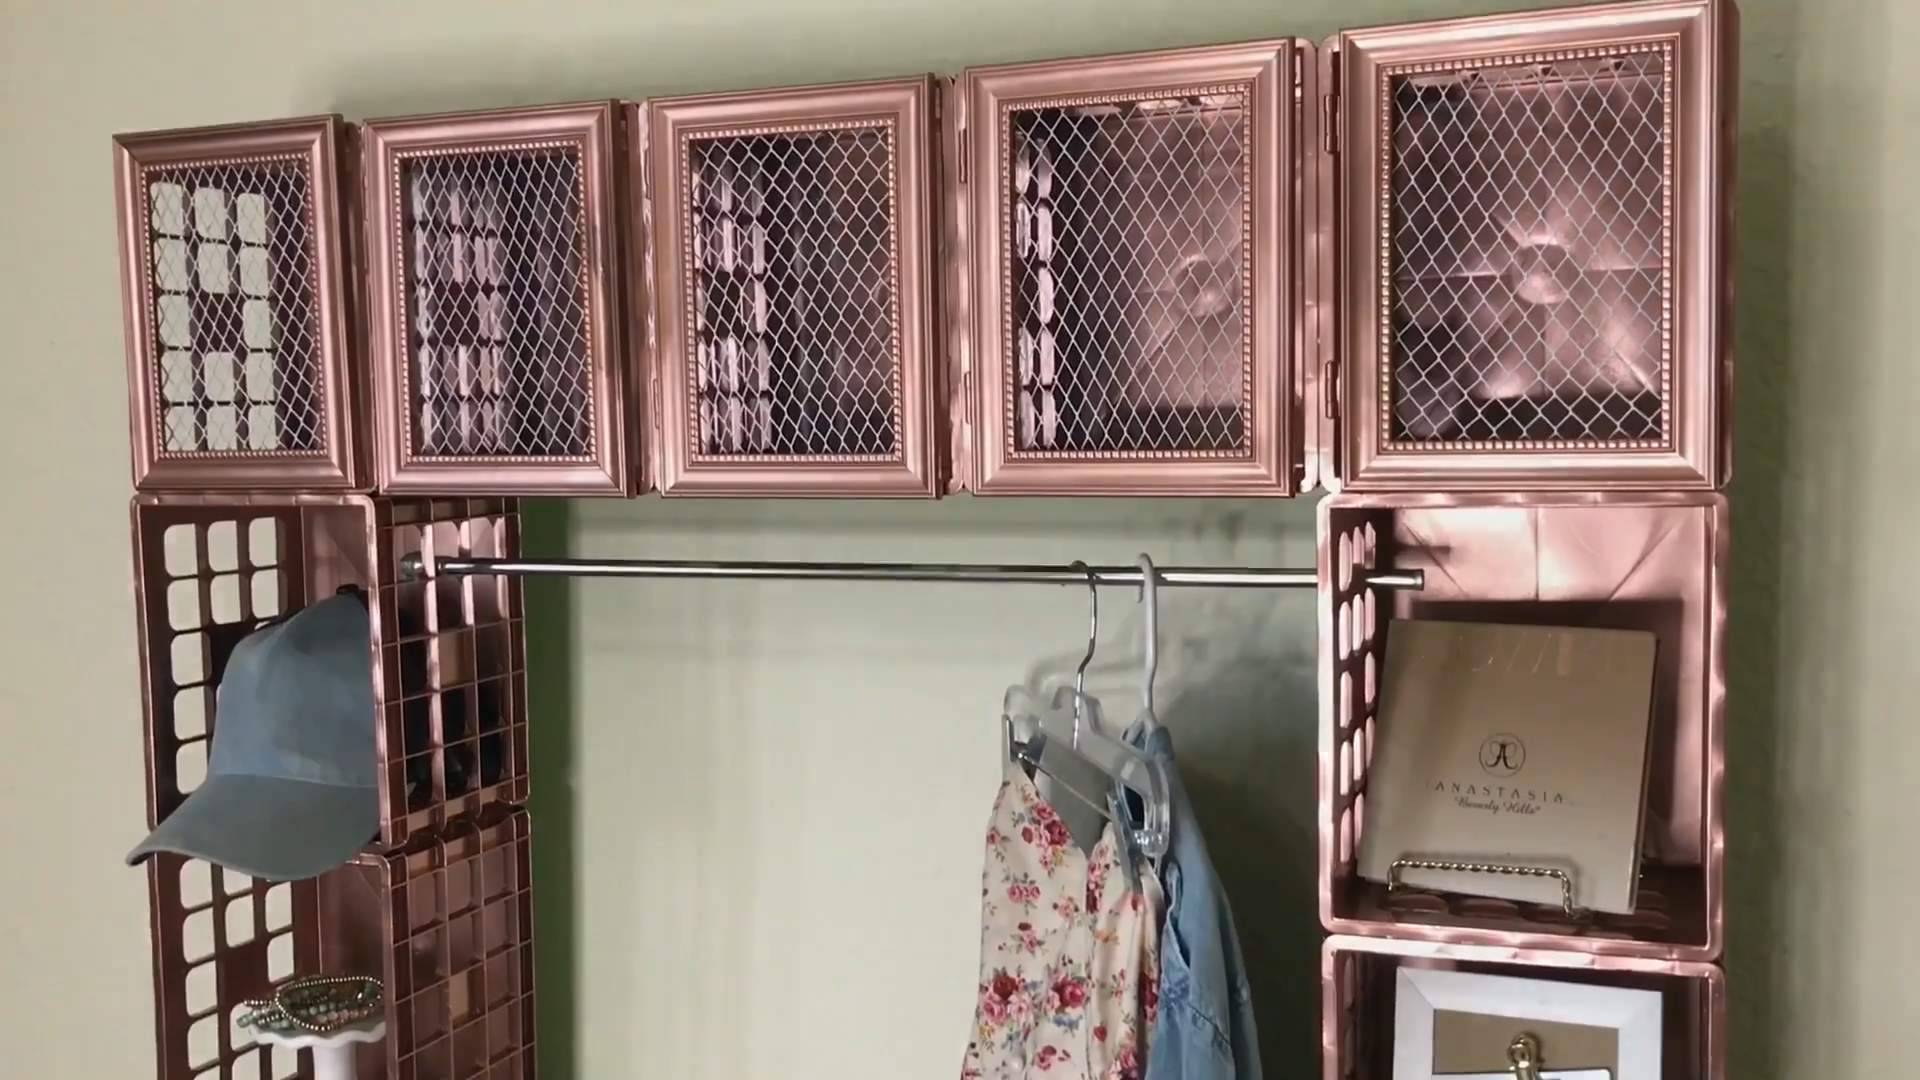
Why a fruit crate closet, you ask? Because it’s affordable, customizable, and adds a touch of unique character to any space. Whether you’re dealing with a small apartment, a cramped dorm room, or simply want to add some rustic charm to your existing closet, this DIY project is a game-changer. I’m going to show you how to transform humble fruit crates into a functional and fashionable storage solution that will not only tame your wardrobe chaos but also become a conversation starter. Get ready to unleash your inner DIY enthusiast and create a closet that’s as unique as you are!
DIY Fruit Crate Closet: Rustic Charm Meets Organized Bliss
Hey there, fellow DIY enthusiasts! Are you tired of staring at overflowing closets and dreaming of a more organized space? Do you love the rustic, farmhouse aesthetic? Well, get ready to combine those desires because today, we’re building a super cool and functional fruit crate closet! This project is surprisingly easy, budget-friendly, and totally customizable to fit your needs and style. I’m so excited to share this with you!
Materials You’ll Need:
Before we dive in, let’s gather our supplies. This is where you can really tailor the project to your budget and desired look.
* **Fruit Crates:** Obviously! The number you need depends on the size of your closet and how many compartments you want. I recommend starting with at least 6-8 crates for a decent-sized closet. You can find these at farmers’ markets, antique stores, online marketplaces, or even ask your local grocery store if they have any they’re willing to part with. Look for sturdy crates in good condition.
* **Sandpaper:** Medium and fine grit. We want those crates smooth!
* **Wood Stain or Paint:** Choose your favorite color! This is where your personal style shines. Consider matching your existing decor or going for a bold, contrasting look.
* **Paintbrushes or Rags:** For applying the stain or paint.
* **Wood Screws:** 1 1/4″ or 1 1/2″ should do the trick.
* **Drill:** With a screwdriver bit.
* **Measuring Tape:** Essential for planning and alignment.
* **Level:** To ensure your closet is straight and stable.
* **Safety Glasses:** Protect those peepers!
* **Gloves:** To keep your hands clean and protected.
* **Optional: Wood Glue:** For extra stability.
* **Optional: Casters (Wheels):** If you want a mobile closet.
* **Optional: Shelf Liner:** To protect your clothes and the inside of the crates.
* **Optional: Decorative Hardware (Knobs, Pulls):** To add a personal touch.
Preparing the Fruit Crates: The Foundation of Our Closet
This is a crucial step, so don’t skip it! Proper preparation ensures a beautiful and long-lasting finished product.
1. **Cleaning:** Start by thoroughly cleaning the fruit crates. Use a brush or vacuum to remove any dirt, debris, or cobwebs. If they’re particularly dirty, you can wash them with mild soap and water, but make sure they’re completely dry before moving on.
2. **Sanding:** This is where the elbow grease comes in! Use medium-grit sandpaper to smooth out any rough edges, splinters, or imperfections on the crates. Pay special attention to the corners and edges. Once you’ve gone over the entire crate with medium-grit sandpaper, switch to fine-grit sandpaper for a super smooth finish. This will make the staining or painting process much easier and result in a more professional look.
3. **Repairing (If Necessary):** If you notice any loose nails or staples, hammer them in or remove them completely. If there are any significant cracks or damage, you can use wood glue and clamps to repair them. Let the glue dry completely before proceeding.
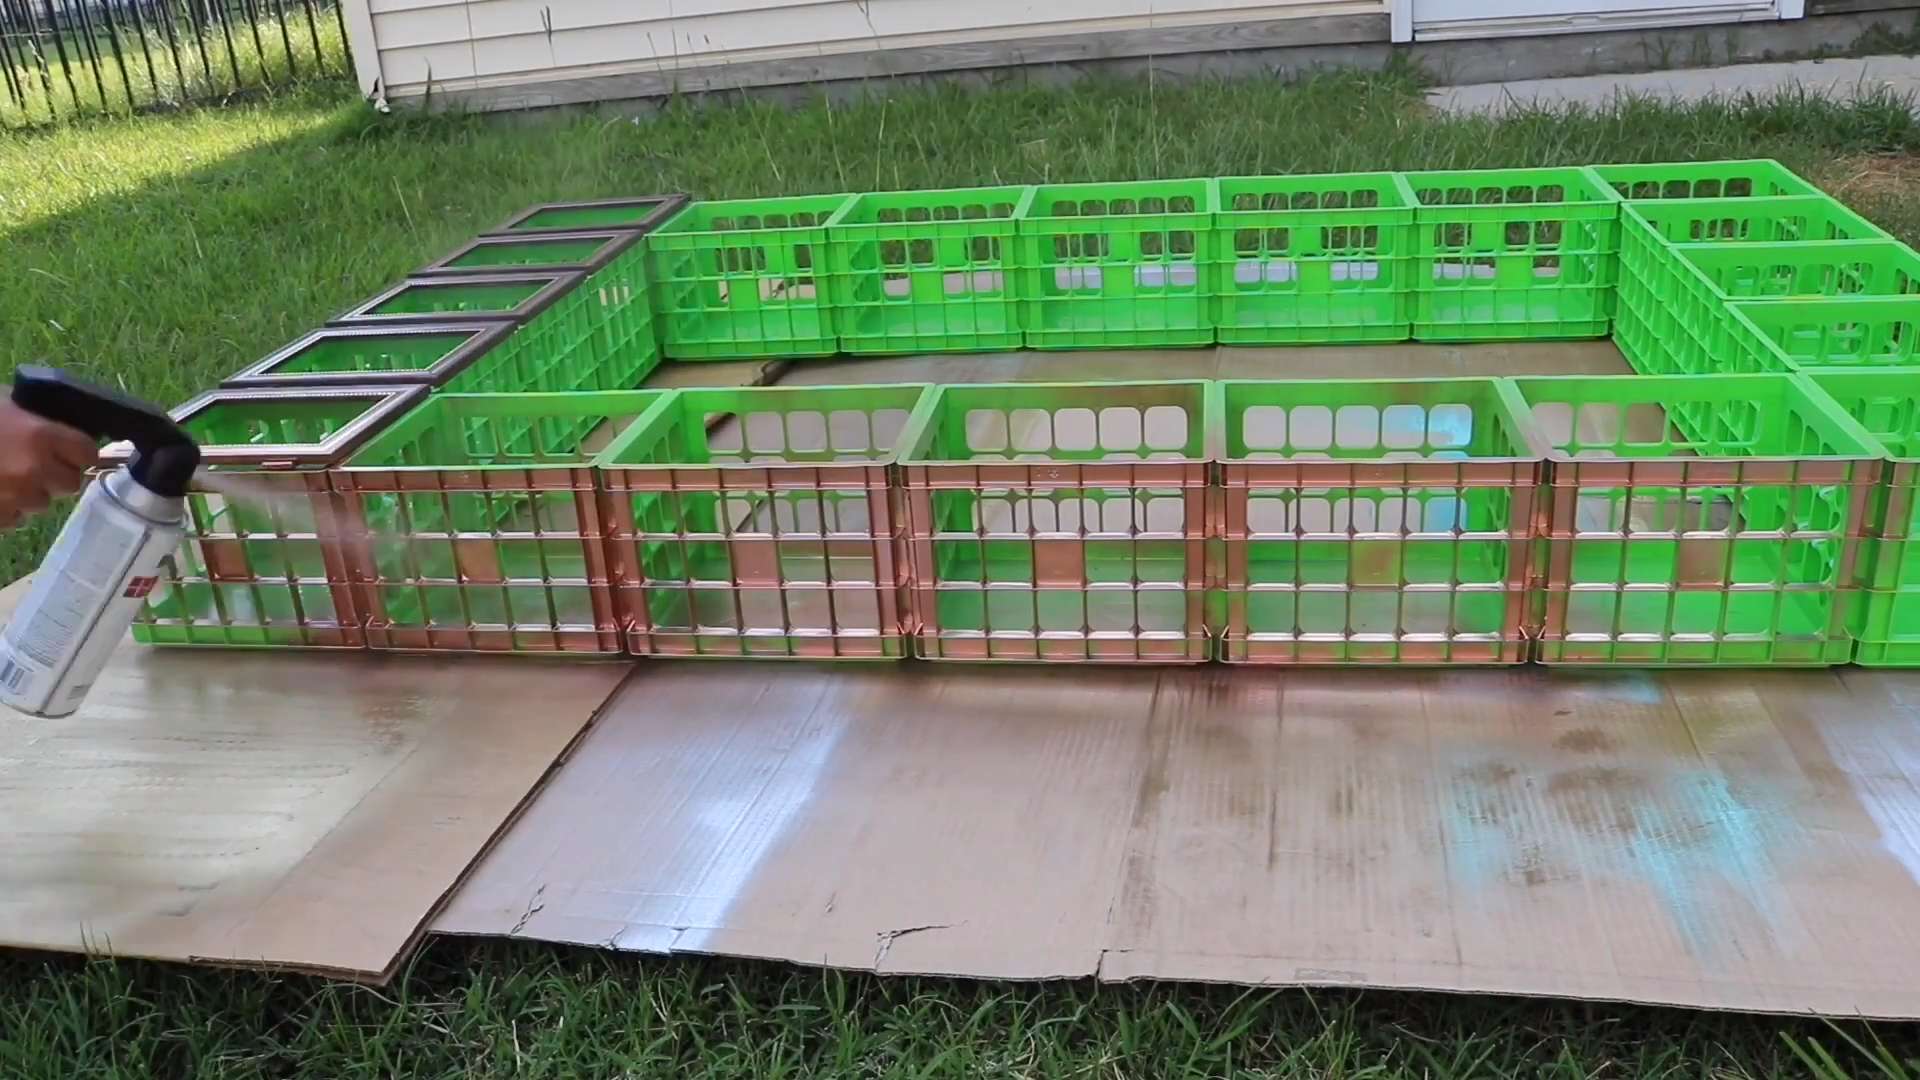
Staining or Painting: Adding Your Personal Touch
Now for the fun part! This is where you get to unleash your creativity and transform those plain fruit crates into something truly special.
1. **Choosing Your Finish:** Decide whether you want to stain or paint your crates. Stain will enhance the natural wood grain and give them a rustic, weathered look. Paint will provide a more solid color and can be used to create a more modern or vibrant aesthetic.
2. **Applying the Finish:**
* **Staining:** Apply the stain evenly using a paintbrush or rag. Follow the manufacturer’s instructions for application and drying time. You may need to apply multiple coats to achieve your desired color depth. Wipe off any excess stain with a clean rag.
* **Painting:** Apply a primer first for better adhesion and coverage, especially if you’re using a light color on dark wood. Let the primer dry completely. Then, apply your chosen paint in thin, even coats, allowing each coat to dry completely before applying the next. Two or three coats should be sufficient.
3. **Drying Time:** Be patient! Allow the stain or paint to dry completely before moving on to the next step. This is crucial for preventing smudging or sticking.
Assembling the Closet: Bringing It All Together
This is where your vision starts to become a reality!
1. **Planning Your Layout:** Before you start screwing things together, take some time to plan your layout. Consider the size of your closet space and the number of crates you have. Experiment with different configurations until you find one that you like. Think about how you want to organize your clothes and accessories. Do you want some crates stacked vertically for hanging clothes? Do you want some crates arranged horizontally for shelves?
2. **Securing the Crates:** Once you’ve decided on your layout, it’s time to start securing the crates together.
* **Wood Glue (Optional):** Apply a thin layer of wood glue to the surfaces where the crates will meet. This will provide extra stability.
* **Screwing the Crates Together:** Use your drill and wood screws to attach the crates together. Pre-drill pilot holes to prevent the wood from splitting. Make sure the screws are long enough to securely hold the crates together, but not so long that they poke through the other side. I recommend using at least two screws per connection point.
3. **Adding Casters (Optional):** If you want your closet to be mobile, now is the time to attach the casters. Flip the assembled closet upside down and attach the casters to the bottom of the crates using screws. Make sure the casters are evenly spaced and securely attached.
Finishing Touches: Making It Your Own
These final details will really elevate your fruit crate closet and make it a unique reflection of your personal style.
1. **Shelf Liner (Optional):** Line the inside of the crates with shelf liner to protect your clothes and the wood. This is especially helpful if you’re storing delicate items.
2. **Decorative Hardware (Optional):** Add knobs or pulls to the front of the crates to make them easier to open and close. Choose hardware that complements your overall aesthetic.
3. **Organizing Your Clothes:** Now for the best part – filling your new closet! Organize your clothes and accessories in a way that makes sense for you. Use hangers, baskets, and dividers to maximize space and keep things tidy.
4. **Leveling:** Use a level to make sure your closet is sitting straight. If it’s wobbly, you can use shims to level it out.
Tips and Tricks for a Perfect Fruit Crate Closet
* Source Quality Crates: The sturdier the crate, the longer your closet will last. Don’t be afraid to inspect them carefully before purchasing.
* Consider the Weight: Remember that wood crates can be heavy, especially when filled with clothes. If you’re planning on moving your closet frequently, casters are a must.
* Customize the Size: Don’t feel limited by the standard size of fruit crates. You can cut them down to size using a saw if needed.
* Get Creative with Storage: Use baskets, bins, and dividers to maximize space and keep your closet organized.
* Add Lighting: Consider adding a string of fairy lights or a battery-operated LED light to illuminate the inside of your closet.
* Seal the Wood: To protect your closet from moisture and wear, consider applying a sealant after staining or painting.
* Embrace Imperfections: Part of the charm of a fruit crate closet is its rustic, imperfect nature. Don’t worry too much about making everything perfect.
And there you have it! Your very own DIY fruit crate closet. I hope you enjoyed this project as much as I did. Now go forth and create a beautiful and organized space that you’ll love for years to come! Happy DIY-ing!
Conclusion
So, there you have it! Transforming humble fruit crates into a stylish and functional closet is not just a budget-friendly solution; it’s a statement. It’s a statement about your creativity, your commitment to sustainable living, and your ability to turn the ordinary into the extraordinary. This DIY fruit crate closet project is more than just assembling boxes; it’s about crafting a personalized storage solution that reflects your unique style and needs.
Why is this a must-try? Because it’s incredibly versatile. Whether you’re dealing with a small apartment, a walk-in closet in need of organization, or a child’s room overflowing with toys, fruit crates offer a customizable and adaptable solution. Forget those expensive, mass-produced closet systems that lack character. With a little elbow grease and imagination, you can create a closet that’s perfectly tailored to your space and aesthetic.
But the benefits don’t stop there. This project is also incredibly rewarding. There’s a certain satisfaction that comes from taking something discarded and giving it new life. You’re not just buying a closet; you’re building one, imbuing it with your own personal touch. And let’s not forget the environmental aspect. By repurposing fruit crates, you’re reducing waste and contributing to a more sustainable lifestyle.
Looking for variations? Absolutely! Consider painting the crates in different colors to create a vibrant and playful look. Use stencils to add patterns or designs. Attach casters to the bottom for easy mobility. Line the crates with fabric to protect delicate items. Add shelves or hanging rods to maximize storage space. The possibilities are truly endless. You can even incorporate other reclaimed materials, such as old doors or pallets, to create a truly unique and eclectic closet system.
For a rustic chic look, leave the crates in their natural state and simply sand them down to remove any splinters. Apply a clear sealant to protect the wood and enhance its natural beauty. Add vintage-inspired hardware, such as antique knobs or pulls, to complete the look.
If you’re going for a more modern aesthetic, paint the crates in a sleek, monochromatic color scheme. Use clean lines and minimalist hardware. Consider adding LED strip lighting to illuminate the inside of the closet and create a more sophisticated ambiance.
Don’t be afraid to experiment and get creative. The beauty of this project is that it’s completely customizable. Let your imagination run wild and create a closet that’s truly one-of-a-kind.
We wholeheartedly encourage you to embark on this DIY adventure. It’s a fun, affordable, and rewarding project that will transform your space and add a touch of personality to your home. And most importantly, we want to hear about your experience! Share your photos, tips, and tricks with us in the comments below. Let’s inspire each other and create a community of DIY enthusiasts who are passionate about sustainable living and creative home decor. Show us your amazing DIY fruit crate closet creations! We can’t wait to see what you come up with.
FAQ
What kind of fruit crates should I use?
The best fruit crates to use are those that are sturdy and in good condition. Look for crates made from solid wood, such as pine or fir. Avoid crates that are cracked, warped, or heavily damaged. You can often find used fruit crates at farmers’ markets, produce distributors, or online marketplaces. Make sure to clean and sanitize the crates thoroughly before using them in your closet. You can use a mild detergent and water to clean the crates, and then allow them to dry completely.
How do I prepare the fruit crates for use?
Before assembling your closet, you’ll need to prepare the fruit crates. Start by sanding down any rough edges or splinters. You can use a sanding block or an electric sander for this. If you want to paint or stain the crates, now is the time to do so. Apply a primer first to ensure that the paint or stain adheres properly. Allow the paint or stain to dry completely before proceeding.
How do I assemble the fruit crate closet?
There are several ways to assemble your fruit crate closet. One option is to simply stack the crates on top of each other. You can use wood glue or screws to secure the crates together. Another option is to attach the crates to a wall using brackets or cleats. This will provide additional stability and prevent the closet from tipping over. You can also create a frame for the closet using lumber and then attach the crates to the frame.
How do I customize the interior of the closet?
The interior of your fruit crate closet can be customized to suit your specific needs. You can add shelves, hanging rods, drawers, or baskets to maximize storage space. Shelves can be made from plywood or reclaimed wood. Hanging rods can be made from metal pipes or wooden dowels. Drawers can be made from smaller fruit crates or other containers. Baskets can be used to store smaller items, such as socks, underwear, or accessories.
How do I make the closet more stable?
Stability is key for a fruit crate closet, especially if you’re stacking the crates high. To increase stability, consider the following:
* Secure to the Wall: Use L-brackets to attach the top crates to the wall. This is especially important if you have children or pets.
* Connect the Crates: Use wood screws and wood glue to firmly attach the crates to each other. Pre-drilling pilot holes will prevent the wood from splitting.
* Level the Base: Ensure the bottom crates are level. Use shims if necessary to compensate for uneven floors.
* Add a Backing: Attaching a piece of plywood or hardboard to the back of the closet will significantly increase its stability.
What if my crates are different sizes?
Variations in crate size can add character, but they can also pose a challenge. Here’s how to handle it:
* Plan Your Layout: Carefully plan the layout of your closet, placing the larger crates at the bottom for stability and the smaller crates at the top.
* Use Shims: Use shims to level out any uneven surfaces between the crates.
* Embrace the Asymmetry: Don’t be afraid to embrace the asymmetry. It can add a unique and interesting touch to your closet.
How do I protect my clothes from snagging on the wood?
Rough wood can snag delicate clothing. Here’s how to prevent it:
* Sand Thoroughly: Sand all surfaces of the crates, paying particular attention to any rough edges or splinters.
* Line the Crates: Line the inside of the crates with fabric, such as felt or burlap. This will create a smooth surface that won’t snag your clothes.
* Use Drawer Liners: Use drawer liners to protect delicate items, such as lingerie or silk scarves.
Can I use this DIY fruit crate closet outdoors?
While possible, using a fruit crate closet outdoors requires extra precautions. The wood needs to be treated to withstand the elements. Use a weather-resistant sealant or paint specifically designed for outdoor use. Consider adding a roof or cover to protect the closet from rain and snow. Keep in mind that even with these precautions, the lifespan of an outdoor fruit crate closet may be shorter than an indoor one.
Where can I find inspiration for my fruit crate closet design?
The internet is a treasure trove of inspiration! Browse Pinterest, Instagram, and home decor blogs for ideas. Look for images of fruit crate closets that match your style and needs. Don’t be afraid to adapt and modify existing designs to create something that’s truly unique. Remember to consider the size of your space, the amount of storage you need, and your personal aesthetic when designing your closet.


Leave a Comment