

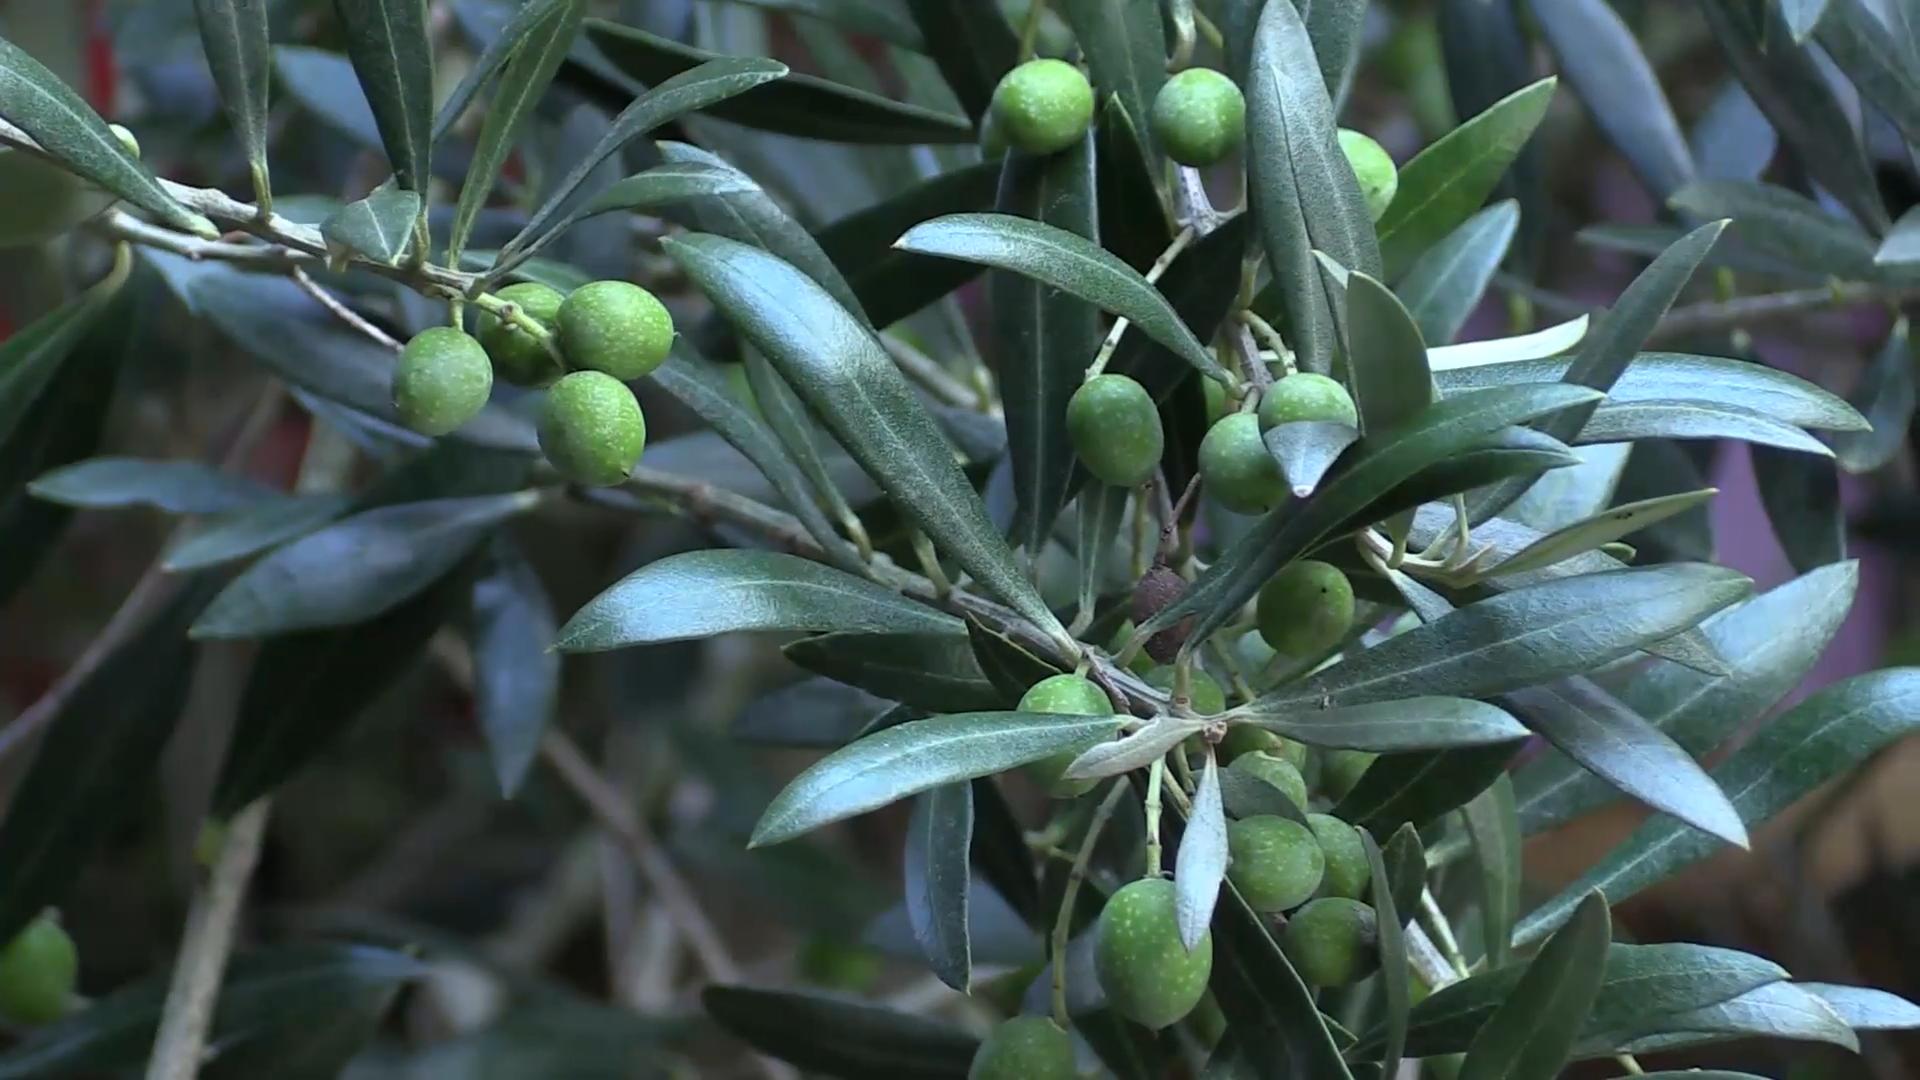
Growing Table Olives at home might sound like a Mediterranean dream, but trust me, it’s more achievable than you think! For centuries, olives have been a staple in diets and cultures around the world, symbolizing peace, wisdom, and prosperity. From the ancient Greeks who crowned Olympic victors with olive wreaths to the sun-drenched groves of Italy and Spain, the olive tree holds a special place in history.
But why should you consider growing table olives yourself? Well, imagine the satisfaction of harvesting your own plump, flavorful olives, knowing exactly where they came from and how they were grown. Plus, store-bought olives can be expensive and often lack the fresh, vibrant taste of homegrown ones. This DIY guide will walk you through simple, effective tricks and hacks to successfully cultivate your own olive bounty, even if you have limited space or experience. I’m here to show you that with a little know-how, you can enjoy the delicious rewards of your own olive harvest. Let’s get started!
DIY: Grafting Your Way to Table Olive Abundance
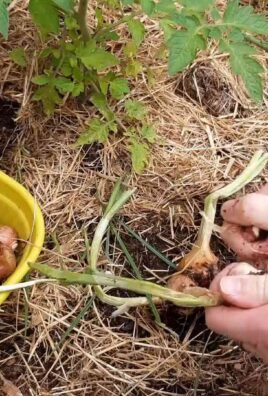
Okay, olive lovers! So, you’re dreaming of briny, delicious table olives straight from your own backyard? Me too! While growing olive trees is relatively straightforward, getting the *right* kind of olives – the ones perfect for curing and snacking – can be a bit trickier. That’s where grafting comes in! It might sound intimidating, but trust me, with a little patience and these instructions, you can absolutely do it. We’re going to take a hardy, established olive tree (the rootstock) and attach a cutting (the scion) from a variety known for its amazing table olives. Let’s get started!
Choosing Your Rootstock and Scion
Before we even think about knives and tape, we need to gather our players. This is crucial, so don’t skip this step!
* **Rootstock:** This is the base of your future tree. You want something strong, disease-resistant, and well-adapted to your local climate. Wild olive trees (Olea europaea sylvestris) are often used, or you can use a seedling olive tree that you’ve grown yourself. The key is that it’s healthy and established. If you already have an olive tree that produces olives you don’t like, that can also be used as rootstock.
* **Scion:** This is where the magic happens! The scion is a cutting from the specific table olive variety you want to grow. Popular choices include:
* **Manzanilla:** A classic Spanish olive, known for its plumpness and mild flavor.
* **Sevillano:** Another Spanish variety, larger than Manzanilla, with a slightly more robust flavor.
* **Ascolano:** A large, green Italian olive, prized for its buttery texture.
* **Mission:** A common California olive, good for both oil and table olives.
* **Kalamata:** A Greek olive, known for its dark purple color and distinctive flavor.
* Important: Make sure your scion wood is from a healthy, productive tree and is the same species as your rootstock (Olea europaea).
Gathering Your Supplies
Alright, time to assemble our grafting toolkit! Here’s what you’ll need:
* **Sharp Grafting Knife:** This is non-negotiable. A dull knife will crush the tissues and ruin your chances of success. A dedicated grafting knife is ideal, but a very sharp, clean utility knife will also work.
* **Pruning Shears:** For trimming branches and preparing the rootstock.
* **Grafting Tape or Grafting Wax:** To seal the graft union and protect it from drying out. Grafting tape is easier for beginners, but grafting wax provides a more complete seal. You can also use Parafilm tape.
* **Rubbing Alcohol:** To sterilize your tools and prevent the spread of disease.
* **Clean Cloth or Paper Towels:** For wiping down your tools.
* **Plant Labels and a Permanent Marker:** To label your grafts with the variety and date.
* **Optional: Grafting Compound:** Some people like to use grafting compound to further protect the graft union.
Timing is Everything
The best time to graft olive trees is in the **spring**, just as the tree is starting to come out of dormancy. This is when the sap is flowing, and the tree is actively growing, which will help the graft union heal quickly. In warmer climates, you might also be able to graft in late winter.
Preparing the Rootstock
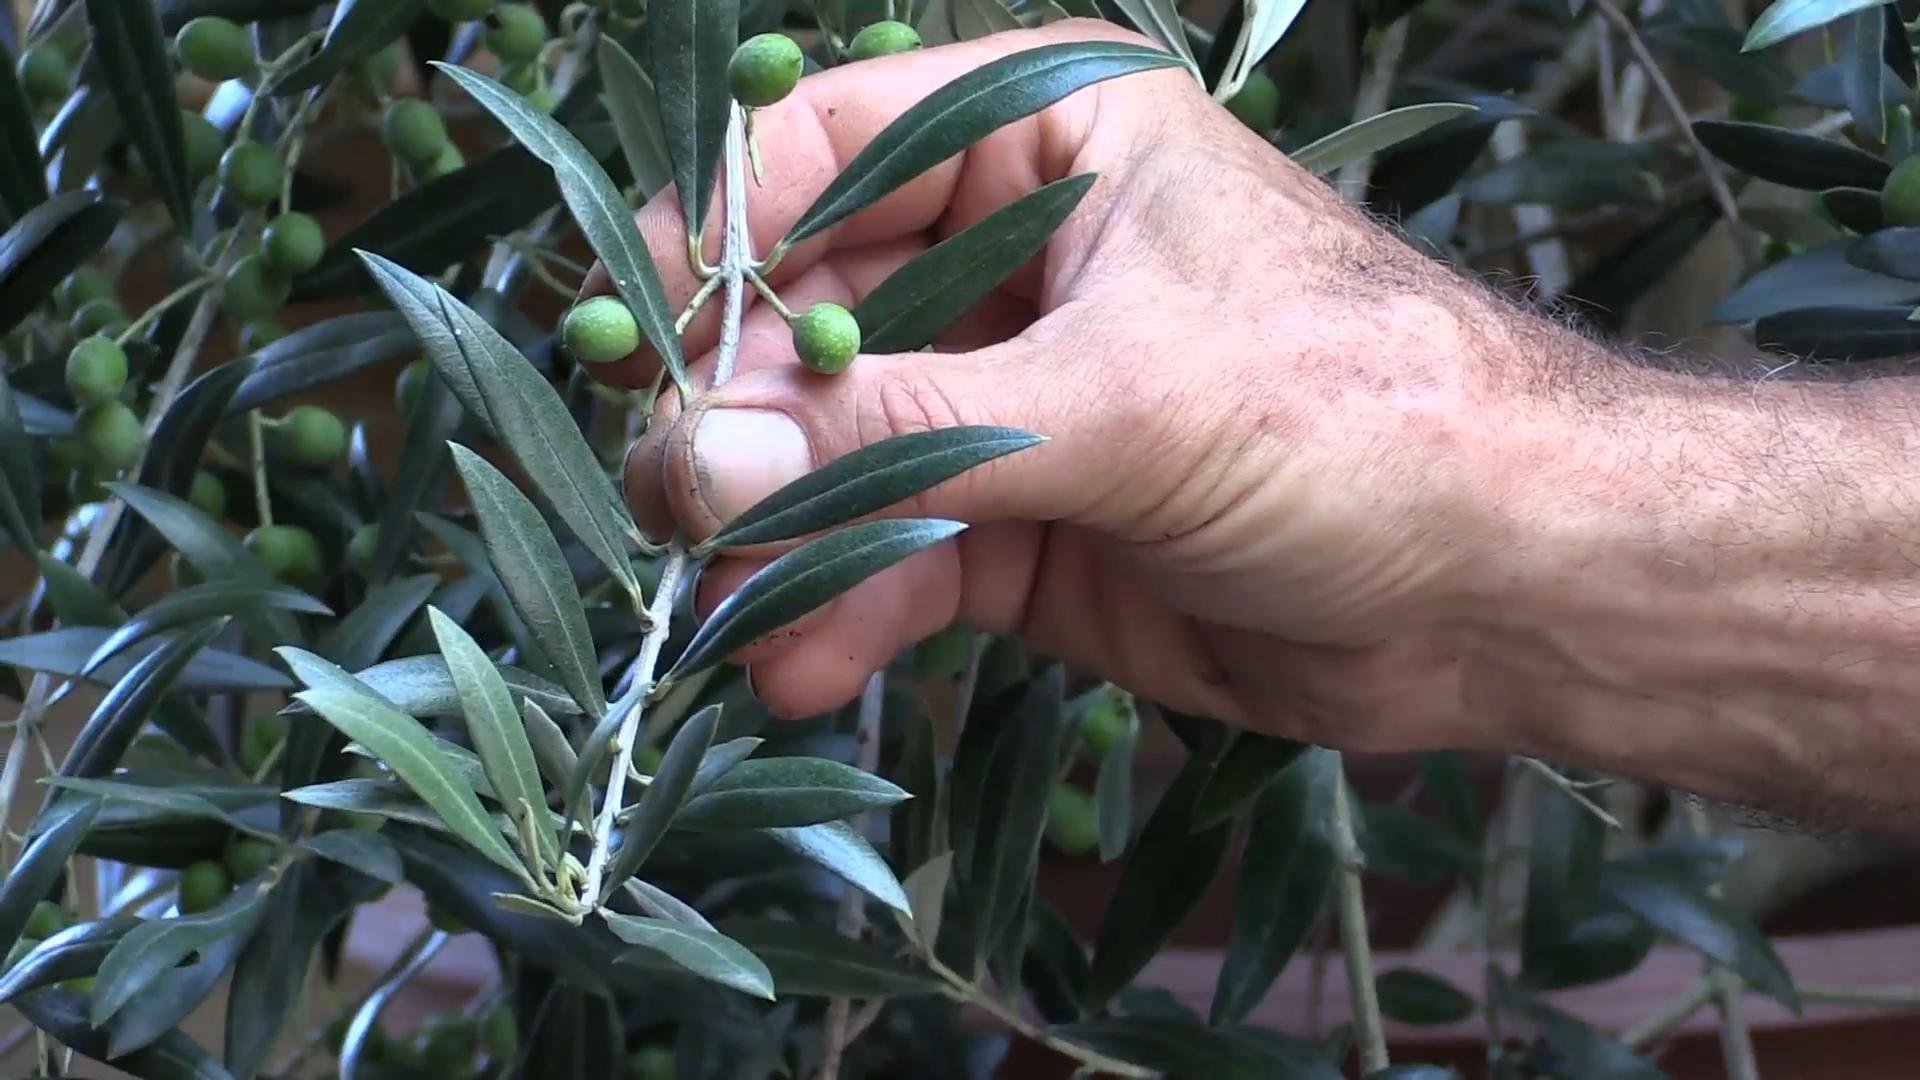
Now, let’s get our rootstock ready for its new addition! We’re going to use a technique called **cleft grafting**, which is relatively easy for beginners.
1. **Choose a Branch:** Select a healthy branch on the rootstock that is about 1-2 inches in diameter. This branch should be relatively straight and free of knots or damage.
2. **Cut the Branch:** Using your pruning shears, cut the branch cleanly at a point where it is relatively smooth.
3. **Make the Cleft:** This is where your sharp grafting knife comes in. Carefully split the cut end of the branch down the middle, creating a cleft about 2-3 inches deep. Be very careful not to cut yourself! Hold the branch firmly and use a steady, controlled motion. You can use a small wedge (like a screwdriver) to keep the cleft open while you insert the scion.
Preparing the Scion
Next, we need to prepare the scion wood.
1. **Select Scion Wood:** Choose a healthy, dormant scion from the desired table olive variety. The scion should be about 4-6 inches long and have 2-4 buds. The diameter of the scion should be similar to the thickness of the branch you are grafting onto.
2. **Make the Wedge Cuts:** Using your grafting knife, make two smooth, sloping cuts at the base of the scion, forming a wedge shape. The cuts should be about 1-2 inches long and should taper to a point. Make sure the cuts are clean and even. The goal is to expose the cambium layer (the green layer just under the bark) on both sides of the wedge.
Grafting Time!
This is the moment we’ve been waiting for!
1. **Insert the Scion:** Carefully insert the wedge-shaped base of the scion into the cleft in the rootstock. Make sure the cambium layers of the scion and rootstock are in contact. This is crucial for the graft to take. You may need to adjust the position of the scion slightly to ensure good contact. If the scion is narrower than the rootstock, align the cambium on one side.
2. **Secure the Graft:** Once the scion is in place, remove the wedge (if you used one) and tightly wrap the graft union with grafting tape or grafting wax. Start wrapping below the cleft and work your way up, overlapping each layer. The goal is to create a tight, waterproof seal that will prevent the graft from drying out. If using grafting wax, apply it generously to completely cover the cut surfaces.
3. **Label the Graft:** Use a plant label and a permanent marker to label the graft with the variety of the scion and the date of grafting. This will help you keep track of your grafts and monitor their progress.
Post-Grafting Care
The hard work is done, but the journey isn’t over yet! Proper care after grafting is essential for success.
1. **Protect from the Elements:** If the graft is exposed to direct sunlight or strong winds, you may want to cover it with a paper bag or a piece of cloth to protect it from drying out.
2. **Monitor the Graft:** Check the graft regularly for signs of growth. After a few weeks, you should start to see buds swelling on the scion.
3. **Remove Suckers:** Remove any suckers that grow from the rootstock below the graft union. These suckers will compete with the scion for nutrients and water.
4. **Remove Grafting Tape (Eventually):** If you used grafting tape, you’ll need to remove it after a few months, once the graft union has healed. Be careful not to damage the graft when removing the tape. Grafting wax will naturally degrade over time.
5. **Water Regularly:** Water the tree regularly, especially during dry periods.
6. **Fertilize Lightly:** Fertilize the tree lightly in the spring with a balanced fertilizer.
Troubleshooting
Grafting isn’t always successful on the first try. Here are some common problems and how to address them:
* **Graft Fails to Take:** This is the most common problem. It can be caused by a number of factors, including poor cambium contact, drying out, or disease. If the graft fails, you can try again next year.
* **Suckers Overgrow the Scion:** If suckers from the rootstock are allowed to grow unchecked, they can quickly outcompete the scion. Be diligent about removing suckers.
* **Disease or Pests:** Protect the graft from disease and pests by using appropriate control measures.
Alternative Grafting Methods
While cleft grafting is a great starting point, there are other grafting methods you might want to explore as you gain experience:
* **Whip and Tongue Grafting:** This method provides a larger cambium contact area and is often used for smaller diameter rootstock and scion. It requires more precision but can result in a stronger graft union.
* **Bark Grafting:** This method is used when the bark of the rootstock is slipping (easily separated from the wood). It involves inserting the scion under the bark of the rootstock.
* **Bud Grafting (Chip Budding or T-Budding):** This method involves grafting a single bud from the scion onto the rootstock. It’s often used for propagating fruit trees.
Patience is Key
Remember, grafting takes time and patience. Don’t be discouraged if your first attempt isn’t successful. Keep practicing, and you’ll eventually master the art of grafting. And imagine the satisfaction of harvesting your own delicious table olives from a tree
Conclusion
So, there you have it! Transforming humble, bitter olives into delectable, ready-to-eat treats right in your own home is not only achievable but surprisingly rewarding. This DIY method for curing growing table olives is a game-changer for anyone with access to fresh olives, whether from their own tree or a local source. Forget the expensive, store-bought varieties laden with preservatives; with a little patience and this simple process, you can enjoy olives bursting with natural flavor and free from unwanted additives.
Why is this a must-try? Because it empowers you to control the entire process, from selecting the perfect olives to customizing the final flavor profile. Imagine serving homemade olives at your next gathering, knowing you nurtured them from tree to table. The satisfaction is unparalleled. Plus, you’ll be amazed at the difference in taste compared to commercially produced olives. They’re fresher, brighter, and simply more delicious.
But the fun doesn’t stop there! Feel free to experiment with different brines and flavorings. Add a touch of chili flakes for a spicy kick, infuse the brine with lemon or orange zest for a citrusy twist, or incorporate herbs like rosemary, thyme, or oregano for an earthy aroma. You can even try different types of vinegar, such as red wine vinegar or apple cider vinegar, to alter the overall taste. Consider adding garlic cloves, bay leaves, or peppercorns to the brine for added depth. The possibilities are truly endless!
Don’t be intimidated by the curing process. It’s much simpler than it sounds, and the results are well worth the effort. The key is patience and consistency. Remember to change the water or brine regularly, and taste-test the olives periodically to ensure they’re reaching your desired level of bitterness.
We wholeheartedly encourage you to give this DIY olive curing method a try. It’s a fantastic way to connect with your food, learn a new skill, and enjoy the fruits (literally!) of your labor. Once you’ve mastered the basics, you can start experimenting with different varieties of olives and flavor combinations to create your own signature blends.
We’re confident that you’ll be thrilled with the results. And we’d love to hear about your experience! Share your photos, tips, and variations in the comments below. Let’s build a community of olive-curing enthusiasts and inspire others to embrace this rewarding DIY project. Happy curing!
Frequently Asked Questions (FAQ)
What type of olives are best for curing?
The best olives for curing are those specifically grown for table consumption. These varieties tend to have a higher flesh-to-pit ratio and a more palatable flavor profile. Some popular choices include Manzanilla, Sevillano, Mission, and Kalamata olives. However, you can experiment with other varieties as well, keeping in mind that the curing time and final flavor may vary. Avoid using olives that are already damaged or bruised, as these can spoil during the curing process.
How long does it take to cure olives?
The curing time depends on the method you choose (water curing, brine curing, or lye curing) and the type of olive. Water curing typically takes several weeks, while brine curing can take several months. Lye curing is the fastest method, but it requires careful handling of lye and is not recommended for beginners. Taste-testing the olives regularly is the best way to determine when they’re ready. They should be firm, plump, and have a pleasant, slightly salty flavor with minimal bitterness.
What is the purpose of changing the water or brine regularly?
Changing the water or brine is crucial for removing the bitter compounds (oleuropein) from the olives. Oleuropein is a natural phenolic compound that gives fresh olives their characteristic bitterness. By regularly replacing the water or brine, you’re effectively leaching out the oleuropein and making the olives more palatable. The frequency of water or brine changes depends on the method you’re using and the size of the olives. Generally, you should change the water daily for the first week and then every other day for the remaining curing period. For brine curing, you can change the brine less frequently, perhaps every week or two.
Can I use tap water for curing olives?
It’s generally recommended to use filtered or spring water for curing olives, especially if your tap water has a strong chlorine taste. Chlorine can interfere with the curing process and affect the final flavor of the olives. If you must use tap water, let it sit in an open container for 24 hours to allow the chlorine to dissipate.
How do I store cured olives?
Cured olives should be stored in an airtight container in the refrigerator. They can be stored in their brine or in olive oil. If storing in brine, make sure the olives are completely submerged to prevent spoilage. Cured olives can typically last for several months in the refrigerator if stored properly.
What if my olives are still bitter after curing?
If your olives are still bitter after the recommended curing time, you can continue the curing process for a longer period. Simply continue changing the water or brine regularly until the bitterness is reduced to your liking. You can also try soaking the olives in a fresh brine solution with a higher salt concentration, as salt helps to draw out the bitter compounds.
Can I reuse the brine from cured olives?
It’s generally not recommended to reuse the brine from cured olives, as it may contain bacteria or other contaminants that could spoil future batches of olives. It’s best to discard the brine after each use and prepare a fresh brine solution for each batch of olives.
What are some common problems encountered when curing olives?
Some common problems encountered when curing olives include spoilage, mold growth, and excessive bitterness. Spoilage and mold growth can be prevented by using clean containers, changing the water or brine regularly, and ensuring that the olives are completely submerged in the liquid. Excessive bitterness can be addressed by extending the curing time and using a higher salt concentration in the brine.
Is lye curing safe for beginners?
Lye curing is the fastest method for curing olives, but it involves using lye (sodium hydroxide), which is a caustic substance that can cause burns if not handled properly. It’s generally not recommended for beginners unless they have experience working with lye or are under the guidance of someone who does. If you choose to use lye curing, be sure to wear protective gloves and eyewear, and follow the instructions carefully.
Can I cure green and black olives together?
It’s generally not recommended to cure green and black olives together, as they have different levels of bitterness and require different curing times. Green olives are typically less ripe and more bitter than black olives, so they require a longer curing period. Curing them together could result in some olives being over-cured while others are still too bitter. It’s best to cure them separately to ensure optimal results.
Leave a Comment