

Grow Coral Cactus and transform your living space into a vibrant, miniature desert oasis! Have you ever looked at a coral cactus and thought, “Wow, that’s stunning, but way too complicated for me to handle?” I’m here to tell you that growing this unique succulent is surprisingly achievable, even for beginners.
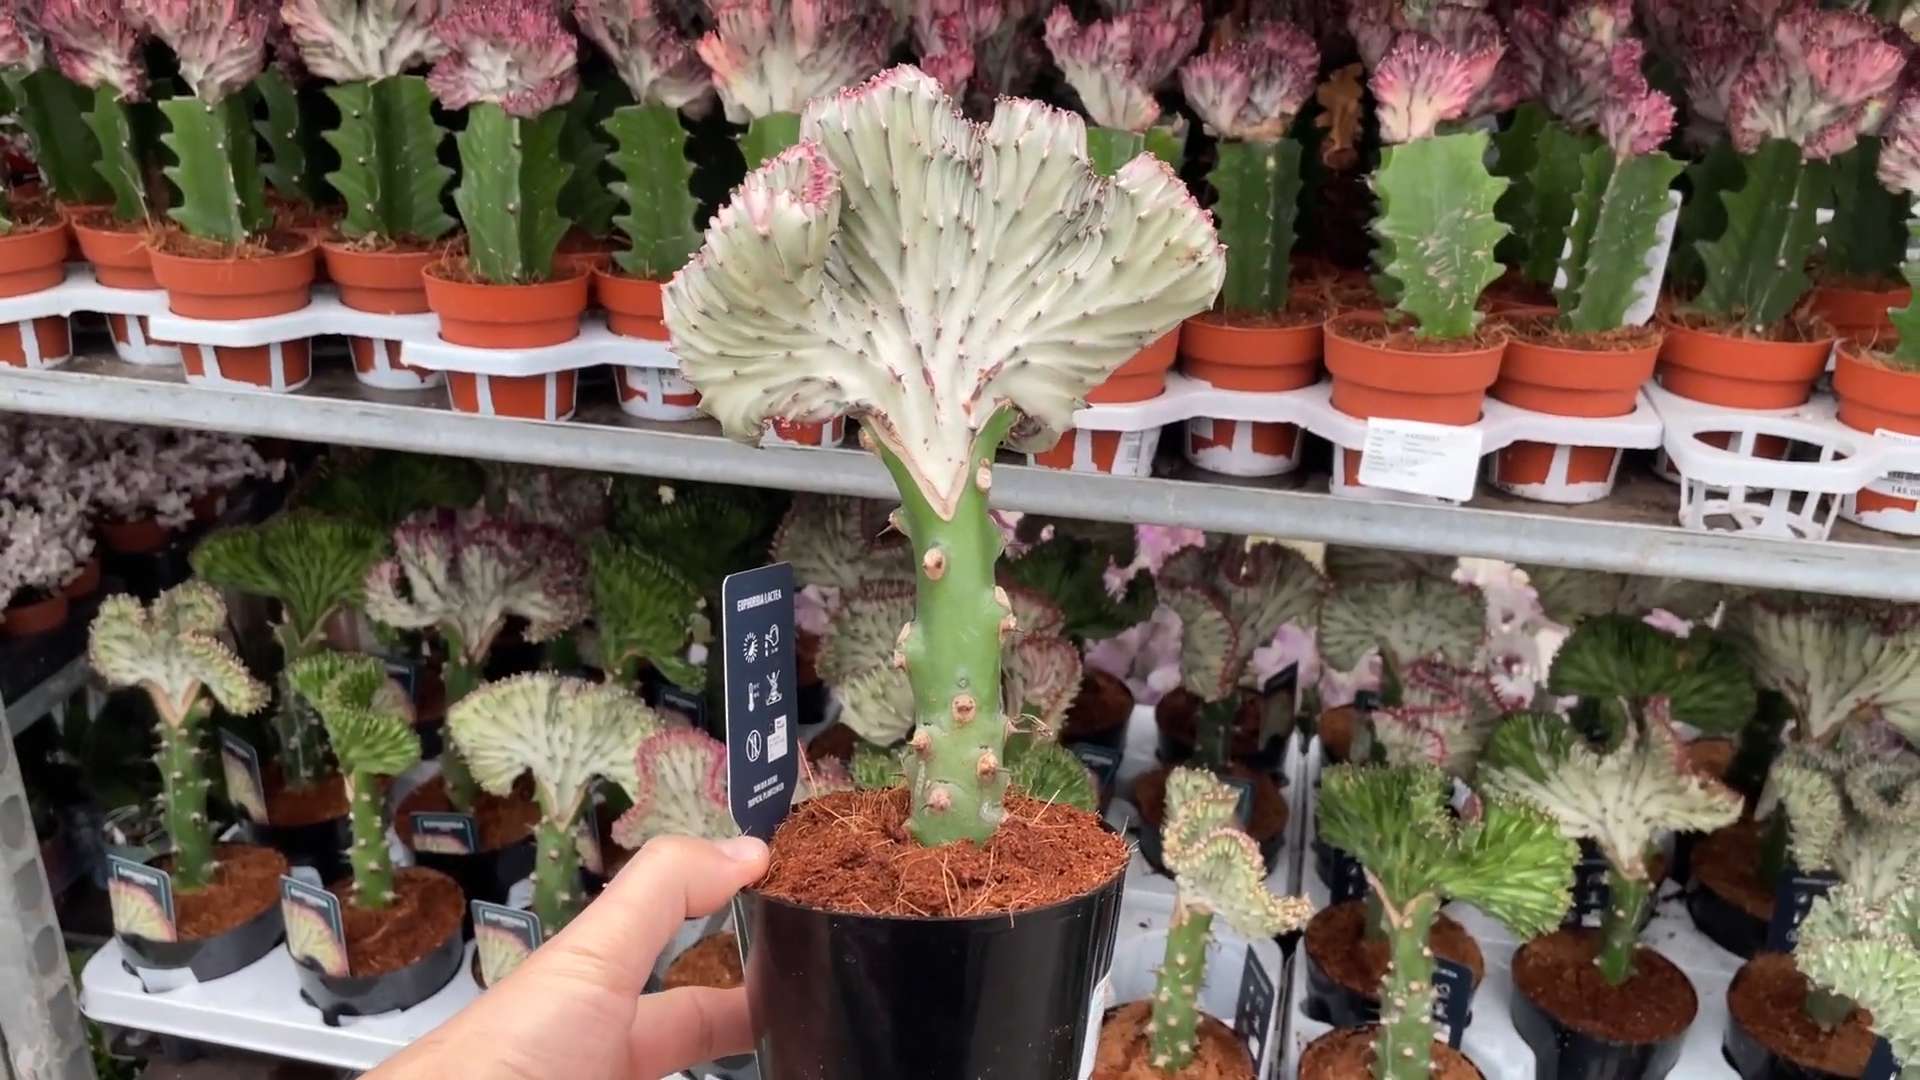
The coral cactus, scientifically known as Euphorbia lactea cristata, isn’t actually a cactus at all, but a fascinating grafted succulent. The ‘coral’ part is the crested Euphorbia lactea, grafted onto a sturdy Euphorbia rootstock. Grafting, a technique used for centuries in horticulture, allows us to enjoy the beauty of plants that might otherwise be difficult to cultivate on their own. Think of it as a botanical partnership, where each plant contributes its strengths!
Why should you learn this DIY trick? Well, beyond the sheer aesthetic appeal, growing your own coral cactus offers a rewarding connection to nature. It’s a fantastic way to add a touch of the exotic to your home, and it’s a conversation starter for sure! Plus, in our increasingly busy lives, nurturing a plant can be incredibly therapeutic. This DIY guide will provide you with simple, step-by-step instructions to grow coral cactus successfully, ensuring you avoid common pitfalls and enjoy a thriving, eye-catching addition to your plant collection. Let’s get started and unlock the secrets to cultivating this captivating succulent!
DIY: Propagating and Caring for Your Coral Cactus (Euphorbia Lactea Cristata)
Okay, plant lovers, let’s dive into the fascinating world of Coral Cactus! These quirky, sculptural succulents are actually two plants grafted together, making them a bit of a DIY project in themselves! I’m going to walk you through everything you need to know about keeping your Coral Cactus happy and even propagating it (though, fair warning, propagating the *cristata* form is tricky and usually involves grafting, which we won’t cover here. We’ll focus on the *lactea* rootstock).
Understanding Your Coral Cactus
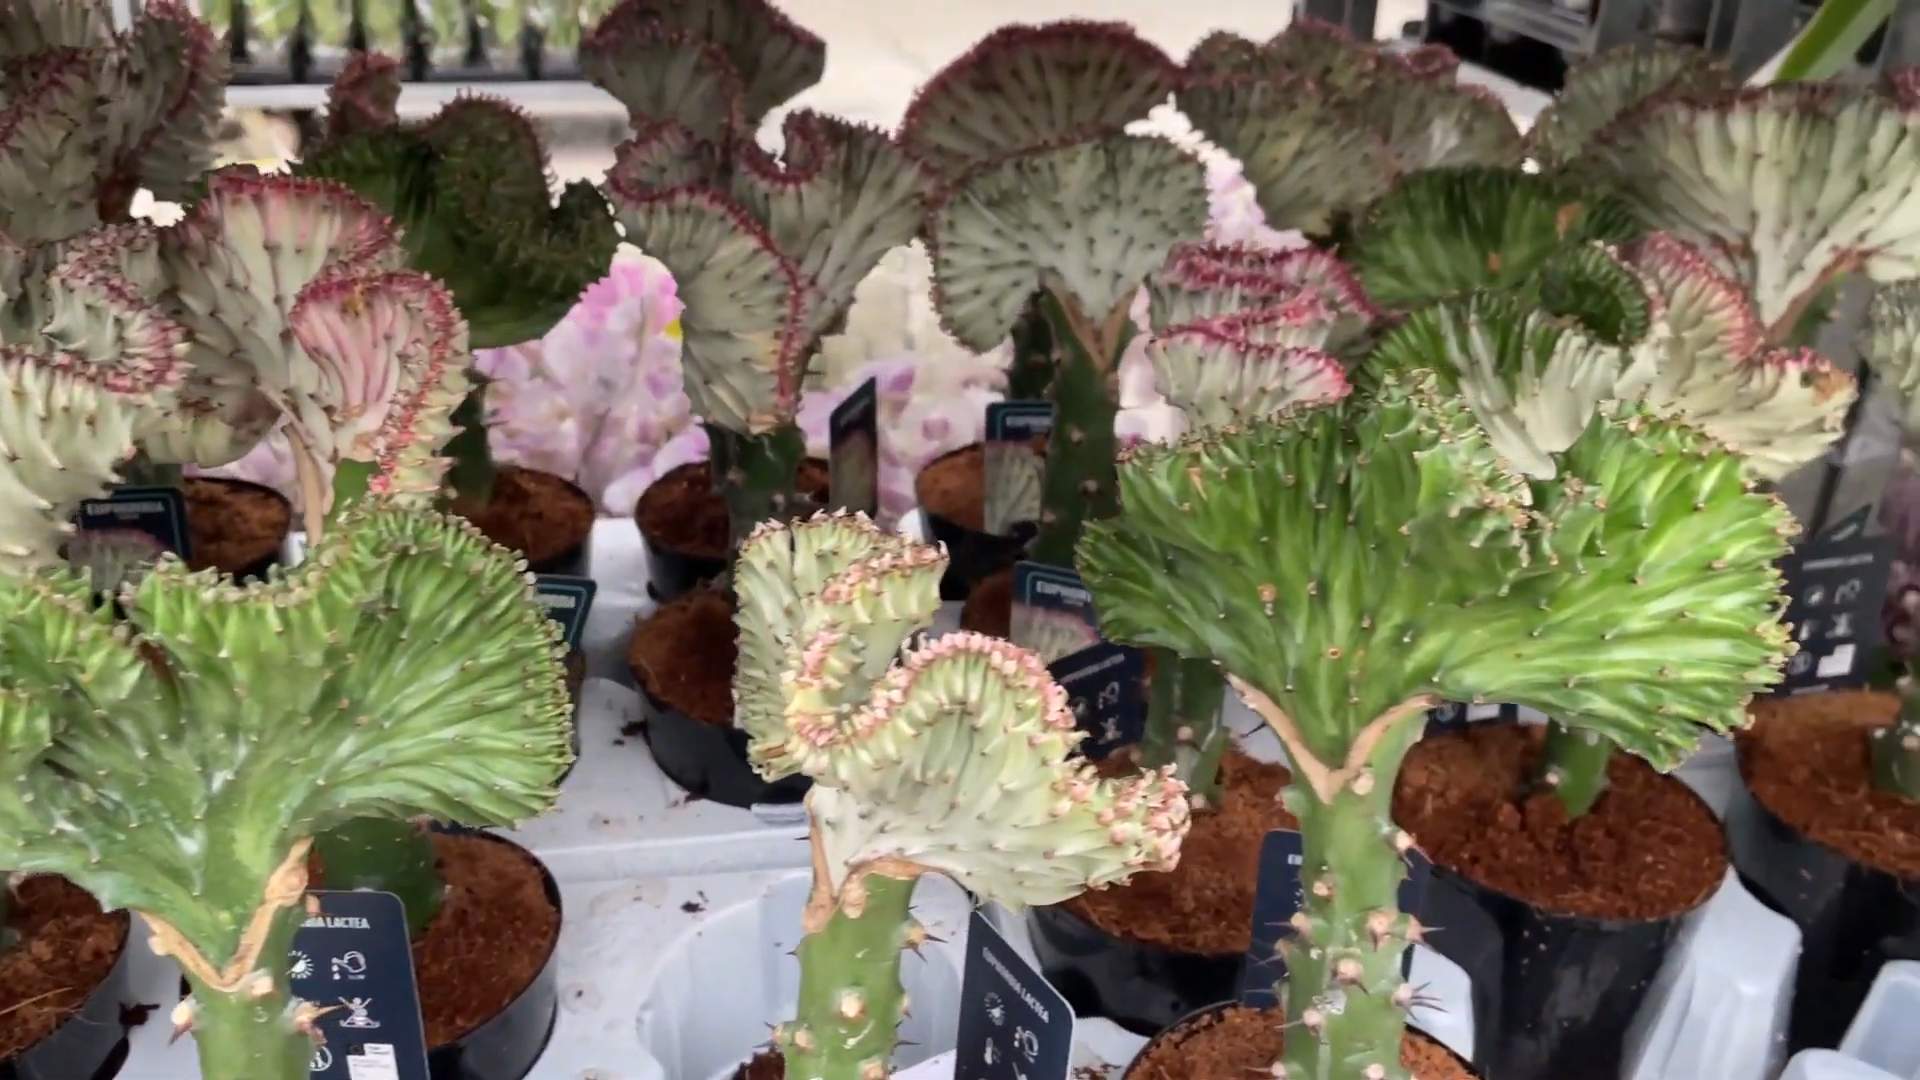
Before we get started, it’s important to understand what a Coral Cactus *actually* is. It’s not a single plant, but a graft. The top part, the fan-like, crested growth, is *Euphorbia lactea cristata*. This part is often colorful, coming in shades of green, white, pink, or even purple. The bottom part, the stem, is usually *Euphorbia neriifolia* or another sturdy Euphorbia species. This is the rootstock, providing the base and roots for the crested top.
Why graft? Well, the *cristata* form often doesn’t have chlorophyll and can’t survive on its own. Grafting it onto a plant that *can* photosynthesize allows it to thrive.
What You’ll Need
* **A healthy Coral Cactus:** Obviously! Look for one with vibrant color and a firm stem.
* **Well-draining potting mix:** This is crucial! Cactus and succulent mix is ideal. You can also make your own by mixing regular potting soil with perlite and coarse sand. I usually go for a 1:1:1 ratio.
* **A pot with drainage holes:** Again, drainage is key to prevent root rot. Choose a pot that’s only slightly larger than the root ball of your cactus.
* **Gardening gloves:** Euphorbias have a milky sap that can be irritating to the skin. Trust me, you’ll want gloves.
* **A clean, sharp knife or pruning shears:** For taking cuttings (if you’re propagating the rootstock).
* **Rooting hormone (optional):** This can help encourage root growth, but it’s not essential.
* **Watering can or spray bottle:** For watering your cactus.
* **Bright, indirect light:** A sunny windowsill is perfect.
Caring for Your Coral Cactus
Okay, let’s talk about keeping your Coral Cactus happy and thriving.
* **Light:** Coral Cactus loves bright, indirect light. Direct sunlight can scorch the crested top, so avoid placing it in a spot where it will get intense afternoon sun. An east- or west-facing window is usually ideal. If you notice the color fading or the plant stretching, it’s probably not getting enough light.
* **Watering:** This is where people often go wrong. Coral Cactus is a succulent, so it stores water in its leaves and stem. Overwatering is a surefire way to kill it. Water thoroughly only when the soil is completely dry. During the growing season (spring and summer), you might water every 2-3 weeks. In the dormant season (fall and winter), you can reduce watering to once a month or even less. When you do water, make sure the water drains freely from the drainage holes. Never let your cactus sit in standing water.
* **Soil:** As mentioned earlier, well-draining soil is essential. Cactus and succulent mix is the best option.
* **Temperature:** Coral Cactus prefers temperatures between 65°F and 80°F (18°C and 27°C). Avoid exposing it to temperatures below 50°F (10°C).
* **Humidity:** Coral Cactus doesn’t need high humidity. Normal household humidity is fine.
* **Fertilizing:** Fertilize sparingly during the growing season with a balanced liquid fertilizer diluted to half strength. Avoid fertilizing during the dormant season.
* **Repotting:** Repot your Coral Cactus every 2-3 years, or when it outgrows its pot. Choose a pot that’s only slightly larger than the previous one.
* **Pests:** Coral Cactus is relatively pest-resistant, but it can occasionally be affected by mealybugs or scale. If you notice any pests, treat them with insecticidal soap or neem oil.
Propagating the Rootstock (Euphorbia Neriifolia)
Now, for the fun part! While you can’t propagate the *cristata* form without grafting, you *can* propagate the rootstock, *Euphorbia neriifolia*. This is a great way to get more of the base plant, which you could potentially use for grafting later (though that’s a whole other level of DIY!).
Here’s how I do it:
Taking a Cutting
1. **Gather your supplies:** You’ll need your healthy *Euphorbia neriifolia* (or the rootstock of your Coral Cactus if it’s getting too tall), gardening gloves, a clean, sharp knife or pruning shears, and rooting hormone (optional).
2. **Prepare the cutting:** Choose a healthy stem that’s at least 4-6 inches long. Using your clean knife or shears, make a clean cut at a 45-degree angle.
3. **Let the cutting callous:** This is a crucial step! Euphorbia sap can cause the cutting to rot if planted immediately. Place the cutting in a dry, shady spot for 1-2 weeks, or until the cut end forms a callous. This will help prevent infection and encourage root growth. You’ll notice a hardened layer forming over the cut.
4. **Apply rooting hormone (optional):** Dip the calloused end of the cutting in rooting hormone powder. This will help stimulate root growth.
Planting the Cutting
1. **Prepare the potting mix:** Fill a pot with well-draining cactus and succulent mix.
2. **Plant the cutting:** Make a hole in the potting mix and insert the calloused end of the cutting. Gently firm the soil around the cutting.
3. **Water sparingly:** Water the cutting lightly, just enough to moisten the soil. Avoid overwatering, as this can cause the cutting to rot.
4. **Provide bright, indirect light:** Place the pot in a location with bright, indirect light.
5. **Wait for roots to develop:** This can take several weeks or even months. You’ll know the cutting has rooted when you see new growth. You can gently tug on the cutting to see if it resists. If it does, it has likely rooted.
6. **Care for the new plant:** Once the cutting has rooted, care for it as you would a mature *Euphorbia neriifolia*. Water thoroughly when the soil is dry, provide bright, indirect light, and fertilize sparingly during the growing season.
Troubleshooting
* **Yellowing leaves:** This is usually a sign of overwatering. Allow the soil to dry out completely before watering again.
* **Drooping:** This can be caused by underwatering or lack of light. Check the soil moisture and move the plant to a brighter location.
* **Brown spots:** This could be sunburn. Move the plant to a location with less direct sunlight.
* **Soft, mushy stem:** This is a sign of root rot. Unfortunately, root rot is often fatal. You can try to save the plant by cutting off the healthy parts and propagating them, but it’s not always successful.
* **The grafted top is falling off:** This is a sign that the graft has failed. Unfortunately, there’s not much you can do to save the *cristata* form. You can try to propagate the rootstock, as described above.
Important Safety Note
Remember that Euphorbias have a milky sap that can be irritating to the skin and eyes. Always wear gardening gloves when handling your Coral Cactus, and avoid getting the sap on your skin or in your eyes. If you do get sap on your skin, wash it off immediately with soap and water. If you get sap in your eyes, rinse them thoroughly with water. Keep Coral Cactus out of reach of children and pets.
Final Thoughts
Growing and caring for a Coral Cactus is a rewarding experience. These unique plants add a touch of sculptural beauty to any home. With a little bit of knowledge and care, you can keep your Coral Cactus happy and healthy for years to come. And who knows, maybe you’ll even try your hand at grafting someday! Happy gardening!
Conclusion
So, there you have it! Cultivating your own coral cactus using this simple DIY trick is not just a fun project; it’s a gateway to a more vibrant and personalized indoor garden. We’ve walked you through the process, highlighting the ease and affordability of propagating these fascinating succulents. But why is this a must-try?
Firstly, it’s incredibly rewarding. Watching a small cutting transform into a thriving coral cactus is a testament to your green thumb and a source of immense satisfaction. Secondly, it’s a cost-effective way to expand your succulent collection. Instead of purchasing multiple plants, you can create new ones from a single, healthy specimen. Thirdly, it allows you to control the health and environment of your new plants, ensuring they get the best possible start in life.
This DIY trick also opens the door to experimentation and creativity. Consider using different types of rootstock to create unique grafted combinations. Perhaps a vibrant green Euphorbia neriifolia as the base for a crested coral cactus? Or experiment with different potting mixes to find the perfect blend for optimal growth. You could even try different grafting techniques, such as side grafting or cleft grafting, for a more advanced challenge.
Don’t be afraid to get creative with your displays, too. Plant your propagated coral cacti in unique containers, like repurposed teacups or vintage planters, to add a touch of personality to your home decor. Group them together with other succulents to create a stunning desert-themed arrangement. The possibilities are endless!
Remember, patience is key. While some cuttings may take root quickly, others may require more time. Don’t be discouraged if you don’t see results immediately. Just keep providing the right conditions – bright, indirect light, well-draining soil, and infrequent watering – and your coral cactus will eventually thrive.
We are confident that this DIY trick will empower you to successfully propagate your own coral cactus. It’s a simple, effective, and enjoyable way to expand your succulent collection and add a touch of the extraordinary to your indoor garden.
Now, we want to hear from you! Give this DIY trick a try and share your experiences with us. What challenges did you encounter? What successes did you celebrate? What variations did you experiment with? Share your photos and stories in the comments below. Let’s create a community of coral cactus enthusiasts and learn from each other’s experiences. Happy growing!
Frequently Asked Questions (FAQ)
What exactly is a coral cactus, and why is it so popular?
The coral cactus, scientifically known as *Euphorbia lactea cristata*, isn’t actually a cactus at all! It’s a crested (cristate) form of *Euphorbia lactea* grafted onto another *Euphorbia* species, typically *Euphorbia neriifolia*. The crested part resembles coral, hence the name. Its popularity stems from its unique and unusual appearance, its relatively low maintenance requirements, and its ability to add a touch of sculptural interest to any indoor space. People love its architectural form and the fact that it’s a conversation starter.
What kind of rootstock is best for grafting a coral cactus?
The most common and recommended rootstock for grafting a coral cactus is *Euphorbia neriifolia*. This species is hardy, drought-tolerant, and provides a strong and stable base for the crested *Euphorbia lactea cristata*. Other *Euphorbia* species can be used, but *E. neriifolia* is generally considered the most reliable and readily available option. Ensure the rootstock is healthy and well-established before attempting the graft.
How long does it take for a grafted coral cactus to take root?
The time it takes for a grafted coral cactus to take root can vary depending on several factors, including the health of the rootstock and scion (the crested part), the grafting technique used, and the environmental conditions. Generally, it takes anywhere from 2 to 8 weeks for the graft to fully fuse and for the coral cactus to start showing signs of growth. Patience is key! Avoid disturbing the graft during this period and maintain consistent humidity and temperature.
What are the ideal growing conditions for a coral cactus?
Coral cacti thrive in bright, indirect light. Direct sunlight can scorch the crested part, so avoid placing them in a south-facing window without some form of shading. They prefer well-draining soil, such as a cactus mix or a blend of potting soil, perlite, and sand. Water sparingly, allowing the soil to dry out completely between waterings. Overwatering is a common cause of root rot in coral cacti. They also prefer warm temperatures and low humidity.
How often should I water my coral cactus?
Watering frequency depends on the climate, the size of the pot, and the type of soil. As a general rule, water your coral cactus only when the soil is completely dry to the touch. During the growing season (spring and summer), this may be every 2-3 weeks. In the dormant season (fall and winter), reduce watering to once a month or even less. Always err on the side of underwatering rather than overwatering.
What are some common problems that affect coral cacti, and how can I prevent them?
The most common problems affecting coral cacti are root rot, caused by overwatering, and sunburn, caused by excessive direct sunlight. To prevent root rot, use well-draining soil and water sparingly. To prevent sunburn, provide bright, indirect light and avoid placing the plant in direct sunlight, especially during the hottest part of the day. Mealybugs and scale insects can also occasionally infest coral cacti. Inspect your plant regularly and treat any infestations promptly with insecticidal soap or neem oil.
Can I propagate a coral cactus from a cutting?
While the rootstock can be propagated from cuttings, the crested part (*Euphorbia lactea cristata*) cannot be reliably propagated on its own. It needs to be grafted onto a compatible rootstock to survive and thrive. Therefore, the DIY trick focuses on the grafting process, not on rooting the crested part directly.
What if my graft fails? What are the signs of a failed graft?
A failed graft can be disappointing, but it’s important to learn from the experience. Signs of a failed graft include the scion (crested part) shriveling, turning brown or black, and becoming detached from the rootstock. If the graft fails, you can try again with a fresh cutting and a new rootstock. Ensure that both the scion and rootstock are healthy and that the cut surfaces are clean and properly aligned.
Is the sap of a coral cactus poisonous?
Yes, the sap of *Euphorbia lactea* and other *Euphorbia* species is toxic and can cause skin irritation and eye damage. Wear gloves and eye protection when handling coral cacti, especially when cutting or grafting them. Wash your hands thoroughly after handling the plant. Keep coral cacti out of reach of children and pets.
Where can I find the materials needed for this DIY trick?
You can find the materials needed for this DIY trick at most garden centers, nurseries, and online retailers. Look for healthy *Euphorbia neriifolia* rootstock, a *Euphorbia lactea cristata* scion (crested part), a sharp, sterilized knife or grafting tool, grafting wax or tape, and well-draining cactus mix. You may also need gloves and eye protection to protect yourself from the toxic sap.
Leave a Comment