

Growing Mint at Home can be incredibly rewarding, filling your kitchen with fresh, aromatic leaves ready to elevate your culinary creations and refresh your senses. But let’s be honest, sometimes it feels like mint has a mind of its own, doesn’t it? It either takes over your entire garden like a green, leafy army, or it mysteriously withers despite your best efforts. Don’t worry, I’ve been there!
Mint has a rich history, dating back to ancient civilizations where it was prized for its medicinal and culinary properties. The Romans even brought it to Britain, spreading its delightful fragrance and flavor across the land. Today, mint remains a beloved herb worldwide, used in everything from refreshing teas and cocktails to savory dishes and desserts.
That’s why I’m so excited to share these simple yet effective DIY tricks and hacks for growing mint at home successfully. Whether you’re a seasoned gardener or just starting out, these tips will help you tame this vigorous herb and enjoy a bountiful harvest. We’ll cover everything from choosing the right container and soil to preventing those pesky spreading tendencies. Get ready to unlock the secrets to a thriving mint patch, right in your own backyard (or windowsill!).
Growing Mint at Home: A Beginner’s Guide to a Thriving Herb Garden
Hey there, fellow plant enthusiasts! I’m so excited to share my experience with growing mint at home. It’s surprisingly easy, incredibly rewarding, and having fresh mint on hand is a game-changer for everything from mojitos to teas to adding a vibrant touch to your meals. Trust me, once you start, you’ll wonder why you didn’t do it sooner!
Choosing Your Mint Variety
Before we dive into the nitty-gritty, let’s talk about mint varieties. There’s a whole world beyond just “mint,” and each type has its own unique flavor profile. Here are a few popular options:
* Peppermint: This is your classic mint, with a strong, refreshing flavor. It’s perfect for teas and desserts.
* Spearmint: Milder and sweeter than peppermint, spearmint is a great choice for cocktails and savory dishes.
* Chocolate Mint: As the name suggests, this variety has a subtle chocolatey aroma and flavor. It’s delicious in desserts and drinks.
* Apple Mint: This mint has a fruity, apple-like scent and flavor. It’s a lovely addition to salads and fruit salads.
* Orange Mint: With a citrusy aroma and flavor, orange mint is a refreshing choice for teas and cocktails.
I personally love having a mix of peppermint and spearmint on hand, but feel free to experiment and find your favorites!
Getting Started: What You’ll Need
Okay, let’s gather our supplies. Here’s what you’ll need to get your mint-growing journey started:
* Mint Seeds or Cuttings: You can start from seeds, but I find it much easier and faster to propagate from cuttings. You can often find mint cuttings at your local nursery or even from a friend who already grows mint.
* Potting Soil: Use a well-draining potting mix. Avoid using garden soil, as it can be too heavy and compact for container gardening.
* Pots or Containers: Choose pots that are at least 6 inches in diameter. Mint spreads quickly, so it’s best to grow it in containers to prevent it from taking over your garden.
* Watering Can or Hose: You’ll need a way to water your mint regularly.
* Sunny Location: Mint thrives in a sunny spot that receives at least 4-6 hours of sunlight per day.
* Optional: Fertilizer: A balanced liquid fertilizer can help your mint grow strong and healthy.
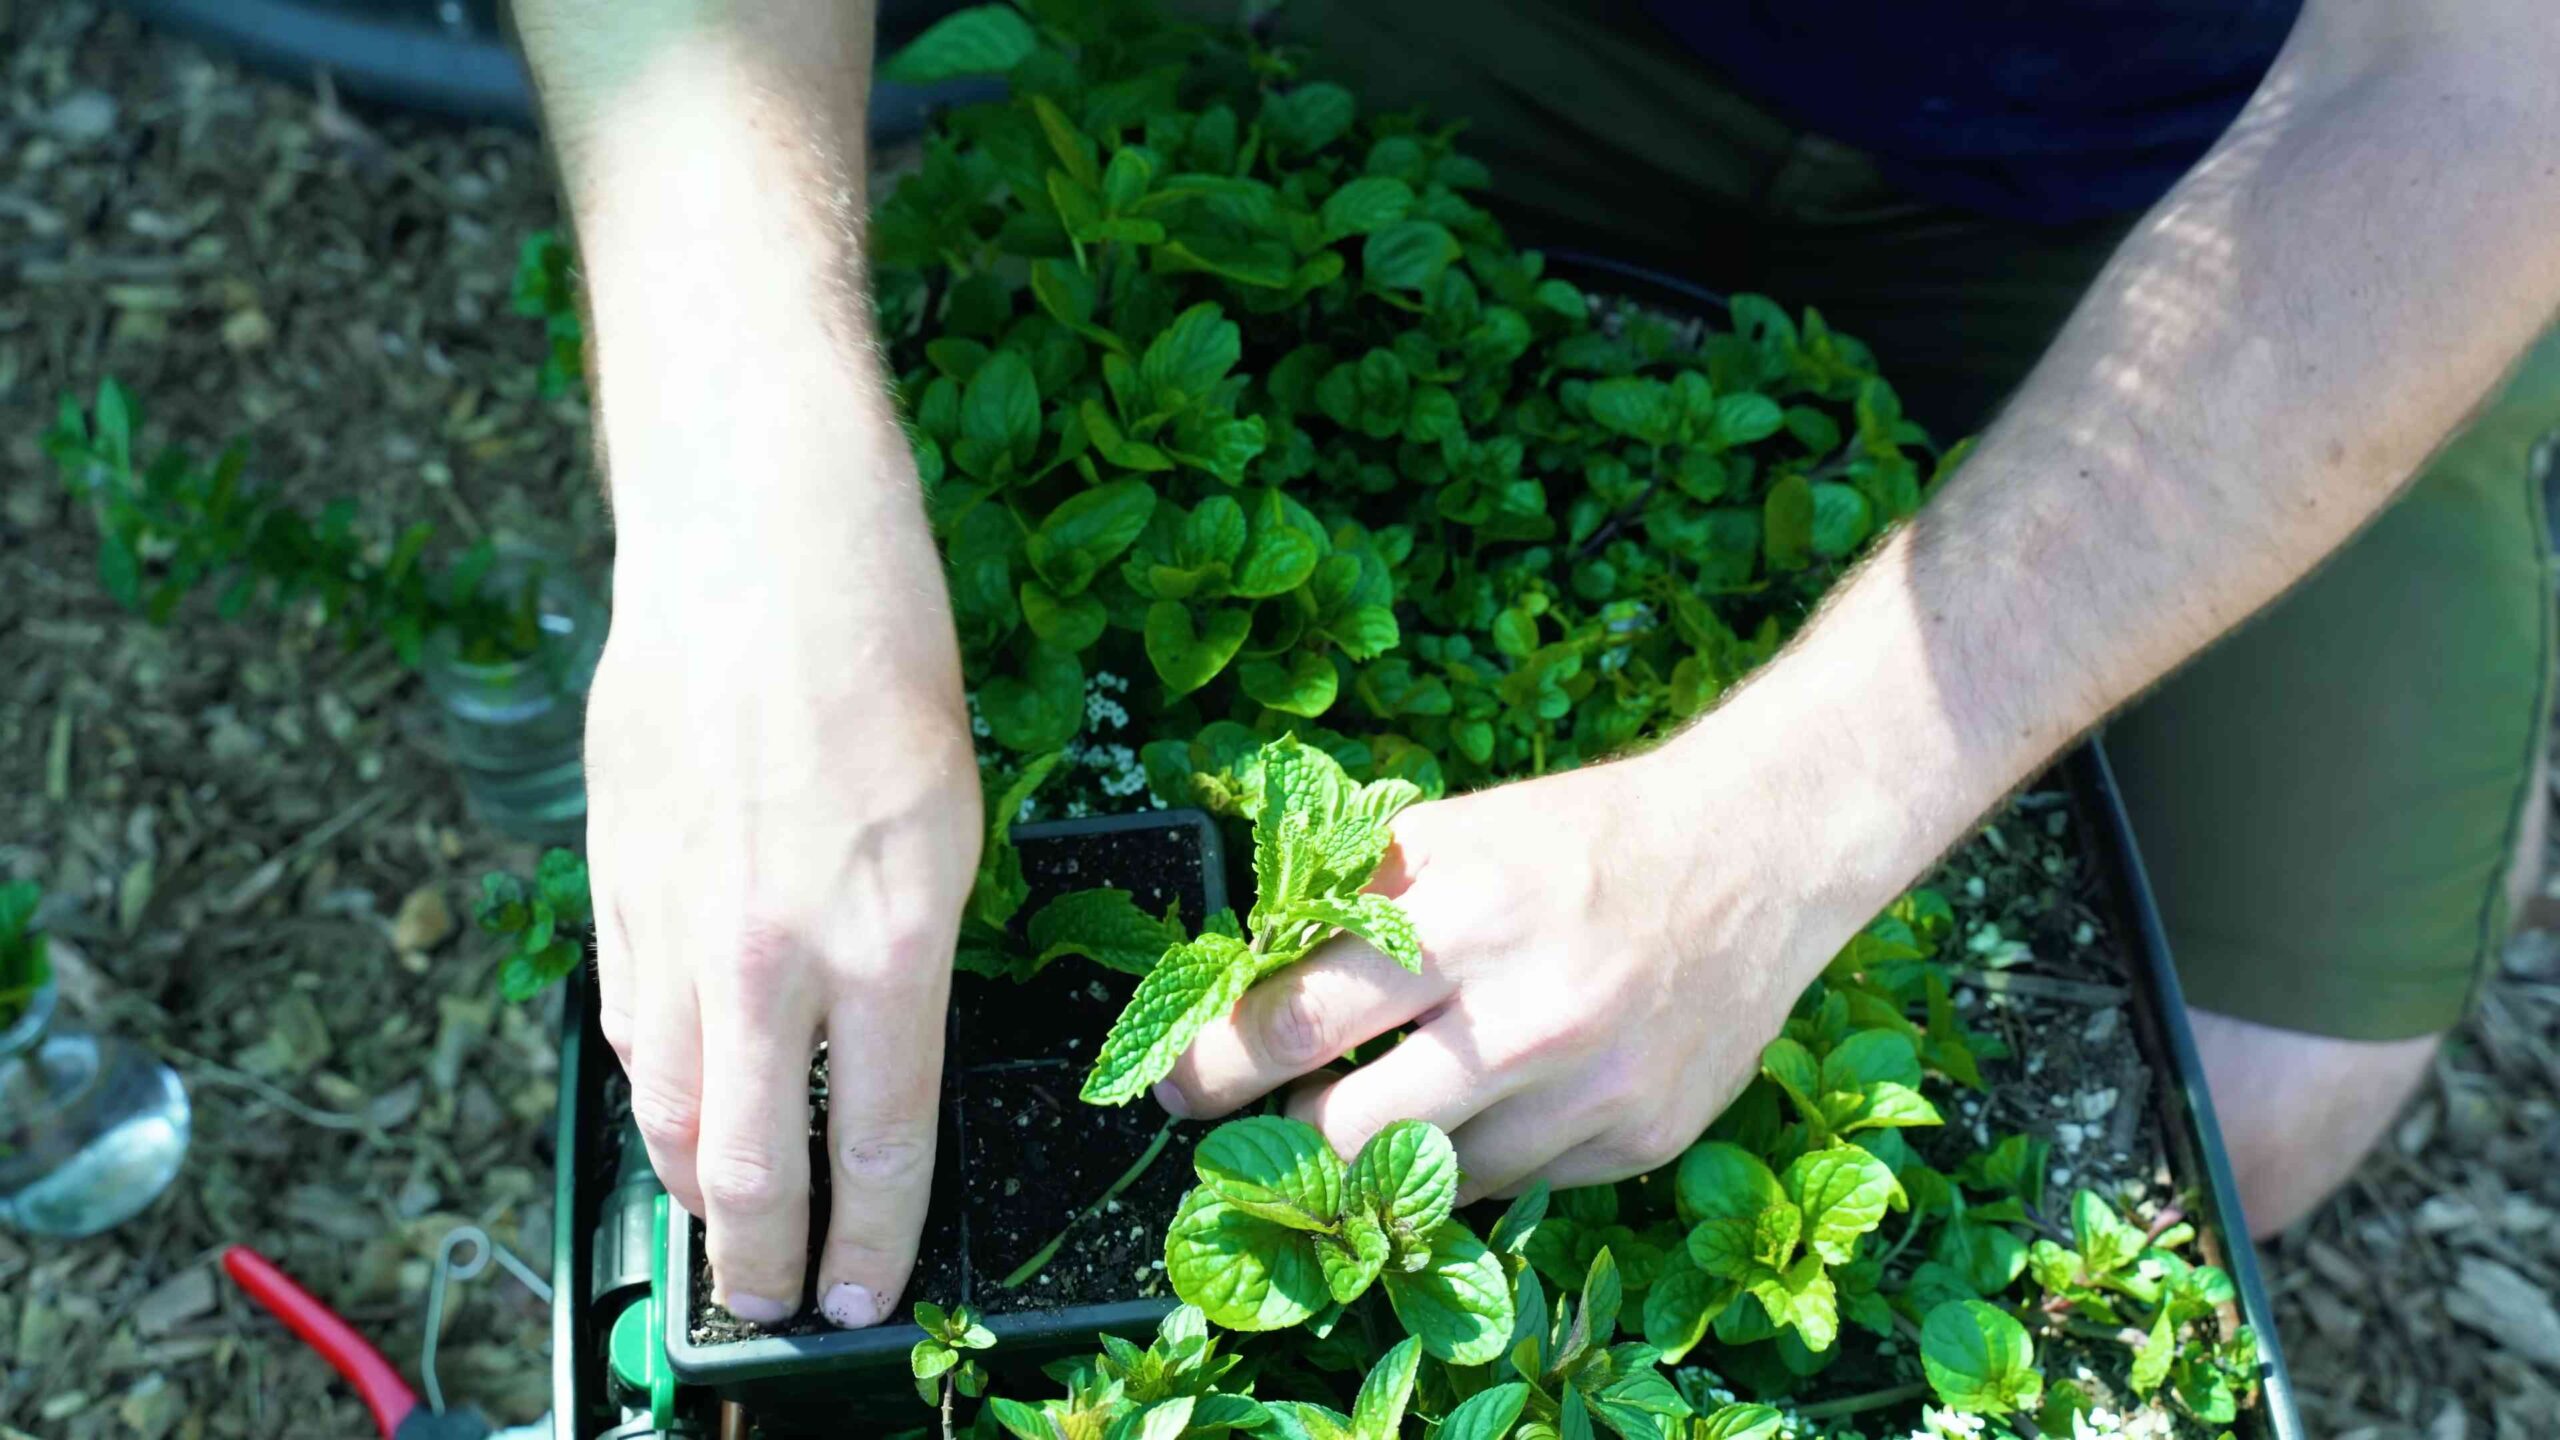
Propagating Mint from Cuttings (My Preferred Method!)
This is my go-to method because it’s quick, easy, and reliable.
1. Take Cuttings: Select healthy stems from an existing mint plant. Cut the stems about 4-6 inches long, just below a leaf node (the point where leaves grow from the stem). Remove the leaves from the bottom 1-2 inches of the stem.
2. Rooting in Water: Place the cuttings in a glass or jar filled with water, making sure the bottom nodes are submerged. Place the jar in a bright, indirect light location.
3. Wait for Roots: Change the water every 1-2 days. You should start to see roots forming within a week or two.
4. Planting the Cuttings: Once the roots are about an inch long, it’s time to plant your cuttings in pots filled with potting mix.
5. Water Thoroughly: Water the newly planted cuttings thoroughly and keep the soil consistently moist.
Planting Mint Seeds (The Patient Gardener’s Approach)
If you’re starting from seeds, be prepared to be a little more patient.
1. Sowing Seeds: Fill your pots with potting mix and moisten the soil. Sprinkle the mint seeds evenly over the surface of the soil.
2. Cover Lightly: Gently press the seeds into the soil, but don’t bury them too deeply. Mint seeds need light to germinate.
3. Water Gently: Water the seeds gently with a spray bottle to avoid disturbing them.
4. Cover with Plastic Wrap: Cover the pots with plastic wrap to create a humid environment. This will help the seeds germinate.
5. Place in a Sunny Location: Place the pots in a warm, sunny location.
6. Remove Plastic Wrap: Once the seeds germinate (usually within 1-2 weeks), remove the plastic wrap.
7. Thin Seedlings: Once the seedlings are a few inches tall, thin them out, leaving only the strongest plants in each pot.
Caring for Your Mint Plants
Now that your mint is planted, here’s how to keep it happy and thriving:
1. Watering: Mint loves moisture, so water it regularly, especially during hot weather. The soil should be consistently moist, but not waterlogged. Check the soil moisture by sticking your finger about an inch into the soil. If it feels dry, it’s time to water.
2. Sunlight: Mint needs at least 4-6 hours of sunlight per day. If you’re growing it indoors, place it near a sunny window. If you’re growing it outdoors, choose a location that receives plenty of sunlight.
3. Fertilizing: Feed your mint plants with a balanced liquid fertilizer every 2-4 weeks during the growing season. This will help them grow strong and healthy. Follow the instructions on the fertilizer label.
4. Pruning: Pruning is essential for keeping your mint plants bushy and productive. Pinch off the top leaves regularly to encourage branching. You can also harvest entire stems as needed.
5. Preventing Flowering: Mint plants will eventually flower, which can reduce their flavor. To prevent flowering, pinch off any flower buds as soon as you see them.
6. Repotting: Mint grows quickly, so you may need to repot it into a larger container every year or two. Choose a pot that is at least 2 inches larger in diameter than the current pot.
7. Pest Control: Mint is generally pest-resistant, but it can occasionally be affected by aphids or spider mites. If you notice any pests, spray the plants with insecticidal soap.
8. Overwintering: If you live in a cold climate, you’ll need to overwinter your mint plants indoors. Before the first frost, cut the plants back to a few inches above the soil line and bring them indoors. Place them in a cool, sunny location and water them sparingly.
Harvesting Your Mint
The best part! You can start harvesting mint as soon as the plants are a few inches tall.
1. Harvesting Leaves: Simply pinch off the leaves or cut entire stems as needed. The more you harvest, the more the plant will grow!
2. Best Time to Harvest: The best time to harvest mint is in the morning, after the dew has dried. This is when the leaves are at their most flavorful.
3. Using Fresh Mint: Fresh mint is best used immediately. You can add it to teas, cocktails, salads, desserts, and savory dishes.
4. Drying Mint: If you want to preserve your mint, you can dry it. To dry mint, tie the stems together and hang them upside down in a cool, dry place. Once the leaves are completely dry, crumble them and store them in an airtight container.
Troubleshooting Common Mint Problems
Even with the best care, you might encounter a few issues. Here’s how to handle them:
* Yellowing Leaves: This could be a sign of overwatering or underwatering. Check the soil moisture and adjust your watering accordingly. It could also be a sign of nutrient deficiency. Try fertilizing your plants with a balanced liquid fertilizer.
* Leggy Growth: This is usually caused by insufficient sunlight. Move your mint plants to a sunnier location.
* Powdery Mildew: This is a fungal disease that can affect mint plants. To prevent powdery mildew, make sure your plants have good air circulation and avoid overhead watering. If you see powdery mildew, spray the plants with a fungicide.
* Pests: As mentioned earlier, mint can occasionally be affected by aphids or spider mites. Spray the plants with insecticidal soap to get rid of these pests.
Mint’s Invasive Nature: A Word of Caution
I can’t stress this enough: mint is an enthusiastic grower! If you plant it directly in your garden, it will spread rapidly and can become difficult to control. That’s why I always recommend growing mint in containers. This will keep it contained and prevent it from taking over your garden. If you do plant it in the ground, consider using a barrier to prevent it from spreading. You can bury a plastic or metal barrier around the planting area, making sure it extends several inches above and below the ground.
Enjoying Your Homegrown Mint
Growing mint at home is a truly rewarding experience. Not only do

Conclusion
So, there you have it! Growing mint at home isn’t just a gardening project; it’s an investment in flavor, freshness, and a touch of aromatic bliss that you can enjoy every single day. From the simplest mojito to the most elaborate lamb dish, the vibrant taste of homegrown mint elevates everything it touches. We’ve explored the ease of propagation, the importance of containment, and the simple steps to ensure your mint thrives.
But why is this DIY trick a must-try? Because it puts you in control. You know exactly where your mint comes from, what (or rather, what *not*) has been sprayed on it, and you can harvest it at its peak of freshness. Store-bought mint, while convenient, often lacks the intense aroma and flavor of homegrown. Plus, let’s be honest, there’s a certain satisfaction that comes from nurturing something from a tiny cutting into a flourishing plant.
Beyond the basic method, there’s a world of minty variations to explore. Experiment with different varieties like chocolate mint (perfect for desserts!), spearmint (the classic mojito choice), or peppermint (ideal for teas and candies). You can also play with different containers – terracotta pots, repurposed buckets, even hanging baskets – to create a mint garden that’s both functional and aesthetically pleasing. Consider companion planting your mint with tomatoes or cabbage to deter pests naturally.
Don’t be afraid to get creative! Infuse your own mint-flavored oils or vinegars, dry your mint for teas and potpourri, or even use it to create refreshing bath products. The possibilities are truly endless.
We wholeheartedly encourage you to give this DIY trick a try. It’s a simple, rewarding, and incredibly useful skill to have. Imagine stepping outside your door to snip a few sprigs of fresh mint for your evening tea or adding a burst of flavor to your summer salads. It’s a small change that can make a big difference in your culinary life.
And most importantly, we want to hear about your experiences! Share your photos, tips, and triumphs in the comments below. What variety of mint did you choose? What challenges did you face, and how did you overcome them? What are your favorite ways to use your homegrown mint? Let’s create a community of mint enthusiasts and learn from each other. Your insights could inspire someone else to embark on their own mint-growing journey. So, grab a cutting, find a pot, and get ready to experience the joy of growing mint at home. You won’t regret it!
Frequently Asked Questions (FAQ)
1. What is the best time of year to start growing mint?
The best time to start growing mint is in the spring or early summer. This allows the plant to establish itself and grow strong roots before the colder months arrive. However, because mint is relatively hardy, you can also start it indoors at any time of year, provided you have adequate light. If you’re starting from cuttings, spring and summer offer the most favorable conditions for rooting.
2. How much sunlight does mint need?
Mint thrives in partial shade to full sun. Ideally, aim for at least 4-6 hours of sunlight per day. In hotter climates, providing some afternoon shade can prevent the leaves from scorching. If you’re growing mint indoors, place it near a sunny window or use a grow light to supplement natural light. Insufficient sunlight can lead to leggy growth and reduced flavor.
3. What kind of soil is best for growing mint?
Mint prefers moist, well-draining soil that is rich in organic matter. A good potting mix amended with compost or aged manure is ideal. The soil pH should be slightly acidic to neutral (around 6.0 to 7.0). Avoid heavy clay soils, as they can become waterlogged and lead to root rot. If you have clay soil, amend it with plenty of organic matter to improve drainage.
4. How often should I water my mint plant?
Mint needs consistent moisture to thrive. Water regularly, especially during hot, dry weather. The soil should be kept consistently moist but not soggy. Check the soil moisture by sticking your finger about an inch deep. If it feels dry, it’s time to water. Overwatering can lead to root rot, so ensure your pot has good drainage. During the winter months, reduce watering frequency.
5. How do I prevent mint from spreading aggressively?
Mint is notorious for its aggressive growth habit. To prevent it from taking over your garden, it’s best to grow it in containers. This confines the roots and prevents them from spreading. If you want to plant mint directly in the ground, consider burying a large container (without a bottom) in the soil and planting the mint inside. This will act as a barrier to contain the roots. Regularly prune the plant to control its size and prevent it from flowering, as flowering can encourage further spreading.
6. What are some common pests and diseases that affect mint?
Mint is generally a hardy plant, but it can be susceptible to certain pests and diseases. Common pests include aphids, spider mites, and whiteflies. These can be controlled with insecticidal soap or neem oil. Diseases that can affect mint include mint rust, powdery mildew, and verticillium wilt. Ensure good air circulation around the plant to prevent fungal diseases. Remove any infected leaves promptly. Avoid overhead watering, as this can create a humid environment that encourages fungal growth.
7. How do I harvest mint?
Harvest mint by snipping off stems just above a leaf node. This encourages the plant to branch out and produce more leaves. You can harvest mint throughout the growing season. For the best flavor, harvest in the morning after the dew has dried. Avoid harvesting more than one-third of the plant at a time, as this can stress it.
8. How do I store fresh mint?
Freshly harvested mint can be stored in several ways. One method is to wrap the stems in a damp paper towel and store them in a plastic bag in the refrigerator. This will keep the mint fresh for several days. Another method is to place the stems in a glass of water, like cut flowers, and store them in the refrigerator. Change the water every day or two. You can also dry mint by hanging bunches of stems upside down in a cool, dark, and well-ventilated place. Once the leaves are completely dry, store them in an airtight container.
9. Can I grow mint indoors year-round?
Yes, you can grow mint indoors year-round. Provide it with adequate light (either natural or artificial), consistent moisture, and well-draining soil. Rotate the pot regularly to ensure even growth. Fertilize occasionally with a balanced liquid fertilizer.
10. What are some creative ways to use homegrown mint?
The possibilities are endless! Use it in teas, cocktails (like mojitos and mint juleps), salads, sauces, and desserts. Add it to smoothies, soups, and stir-fries. Infuse it into oils and vinegars. Use it to make mint jelly or mint chocolate chip ice cream. You can even use it to create refreshing bath products or potpourri. Experiment and discover your own favorite ways to enjoy the fresh, vibrant flavor of homegrown mint.
Leave a Comment