

Growing peas can seem daunting, especially if you’re just starting your home gardening journey. But trust me, there’s nothing quite as satisfying as harvesting your own sweet, plump peas straight from the vine! For centuries, peas have been a staple in diets around the world, dating back to ancient civilizations. They’re not just delicious; they’re packed with nutrients and relatively easy to cultivate, making them a perfect choice for beginner gardeners like you and me.
Have you ever dreamed of skipping the grocery store produce aisle and instead, strolling through your own backyard to gather fresh ingredients for dinner? Well, growing peas is a fantastic way to make that dream a reality! This beginner’s guide is packed with simple, actionable tips and tricks to help you successfully grow peas, even if you’ve never planted a seed before. We’ll cover everything from choosing the right variety and preparing your soil to providing support for your climbing peas and protecting them from pests.
Why do you need this DIY guide? Because store-bought peas simply can’t compare to the flavor and freshness of homegrown ones. Plus, gardening is a wonderful way to connect with nature, reduce stress, and enjoy the fruits (or, in this case, vegetables!) of your labor. So, let’s get our hands dirty and embark on this exciting adventure of growing peas together!
Growing Peas: A Beginner’s Guide to Sweet Success!
Hey there, fellow garden enthusiasts! I’m so excited you’re thinking about growing peas. They’re one of the first crops I plant every spring, and there’s nothing quite like the taste of fresh, homegrown peas straight from the pod. This guide will walk you through everything you need to know to get started, even if you’ve never grown anything before. Trust me, it’s easier than you think!
Choosing Your Pea Variety
Before we get our hands dirty, let’s talk about pea varieties. There are a few main types, and each has its own unique characteristics:
* Shelling Peas (English Peas): These are the classic peas you probably think of. You pop them out of the pod to eat the round, sweet peas inside. Popular varieties include ‘Little Marvel’ and ‘Green Arrow’.
* Snap Peas: These are my personal favorite! You can eat the entire pod, shell and all. They’re crisp, sweet, and perfect for snacking or stir-fries. ‘Sugar Snap’ is a widely available and reliable variety.
* Snow Peas: These have flat pods with small peas inside. They’re also eaten whole and are often used in Asian cuisine. ‘Oregon Sugar Pod II’ is a good choice.
When choosing a variety, consider your climate, the amount of space you have, and your personal preferences. Some varieties are bush types, which are more compact, while others are vining types that need support.
Preparing Your Garden Bed
Peas thrive in well-drained soil that’s rich in organic matter. Here’s how to get your garden bed ready:
1. Choose a Sunny Spot: Peas need at least 6 hours of sunlight per day.
2. Test Your Soil: A soil test will tell you the pH level and nutrient content of your soil. Peas prefer a slightly acidic to neutral pH (around 6.0 to 7.0). You can buy a soil testing kit at most garden centers.
3. Amend the Soil: Based on your soil test results, you may need to amend the soil. Add compost or well-rotted manure to improve drainage and fertility. I usually add a generous layer of compost to my pea beds.
4. Loosen the Soil: Use a garden fork or tiller to loosen the soil to a depth of at least 12 inches. This will allow the pea roots to grow easily.
5. Remove Rocks and Debris: Clear the area of any rocks, weeds, or other debris.
Planting Your Pea Seeds
Peas are cool-season crops, which means they prefer cooler temperatures. The best time to plant them is in early spring, as soon as the soil can be worked. You can also plant them in late summer for a fall harvest in some climates.
1. Soak the Seeds (Optional): Soaking the pea seeds in water for 12-24 hours before planting can help them germinate faster. I usually skip this step, but it can be helpful if your soil is dry.
2. Create Furrows: Use a hoe or trowel to create furrows in the soil. The furrows should be about 1 inch deep and spaced about 2 inches apart.
3. Sow the Seeds: Place the pea seeds in the furrows, spacing them about 1-2 inches apart.
4. Cover the Seeds: Gently cover the seeds with soil and pat it down lightly.
5. Water Thoroughly: Water the area thoroughly after planting. Keep the soil moist but not waterlogged until the seeds germinate.
Providing Support for Your Peas
Most pea varieties, especially vining types, need some kind of support to climb on. This helps keep the plants off the ground, which prevents disease and makes harvesting easier.
* Pea Trellis: You can buy a pre-made pea trellis at a garden center, or you can build your own. A simple trellis can be made from bamboo stakes and twine.
* Netting: Pea netting is another popular option. It’s lightweight and easy to install.
* Brush: If you have access to some sturdy branches, you can use them as a natural trellis. Simply stick the branches into the ground near the pea plants.
How to Build a Simple Pea Trellis:
1. Gather Your Materials: You’ll need bamboo stakes (or other sturdy stakes), twine, and scissors.
2. Place the Stakes: Drive the stakes into the ground at regular intervals along the row of pea plants. The stakes should be tall enough to support the mature height of your pea variety.
3. Tie the Twine: Tie the twine to the first stake, about 6 inches above the ground. Then, run the twine along the row, tying it to each stake as you go. Repeat this process every 6-8 inches, creating a grid for the pea plants to climb on.
Caring for Your Pea Plants
Once your pea plants are established, here’s how to keep them healthy and productive:
1. Water Regularly: Peas need consistent moisture, especially during flowering and pod development. Water deeply whenever the soil feels dry to the touch.
2. Weed Regularly: Keep the area around your pea plants free of weeds. Weeds compete with the peas for water and nutrients.
3. Fertilize (Optional): If your soil is poor, you can fertilize your pea plants with a balanced fertilizer. However, peas are legumes, which means they can fix nitrogen from the air, so they don’t usually need a lot of fertilizer. I rarely fertilize mine.
4. Pest Control: Peas can be susceptible to certain pests, such as aphids and pea weevils. Check your plants regularly for signs of pests and take action if necessary. Insecticidal soap or neem oil can be effective for controlling aphids.
5. Disease Prevention: To prevent disease, avoid overhead watering and ensure good air circulation around the plants.
Harvesting Your Peas
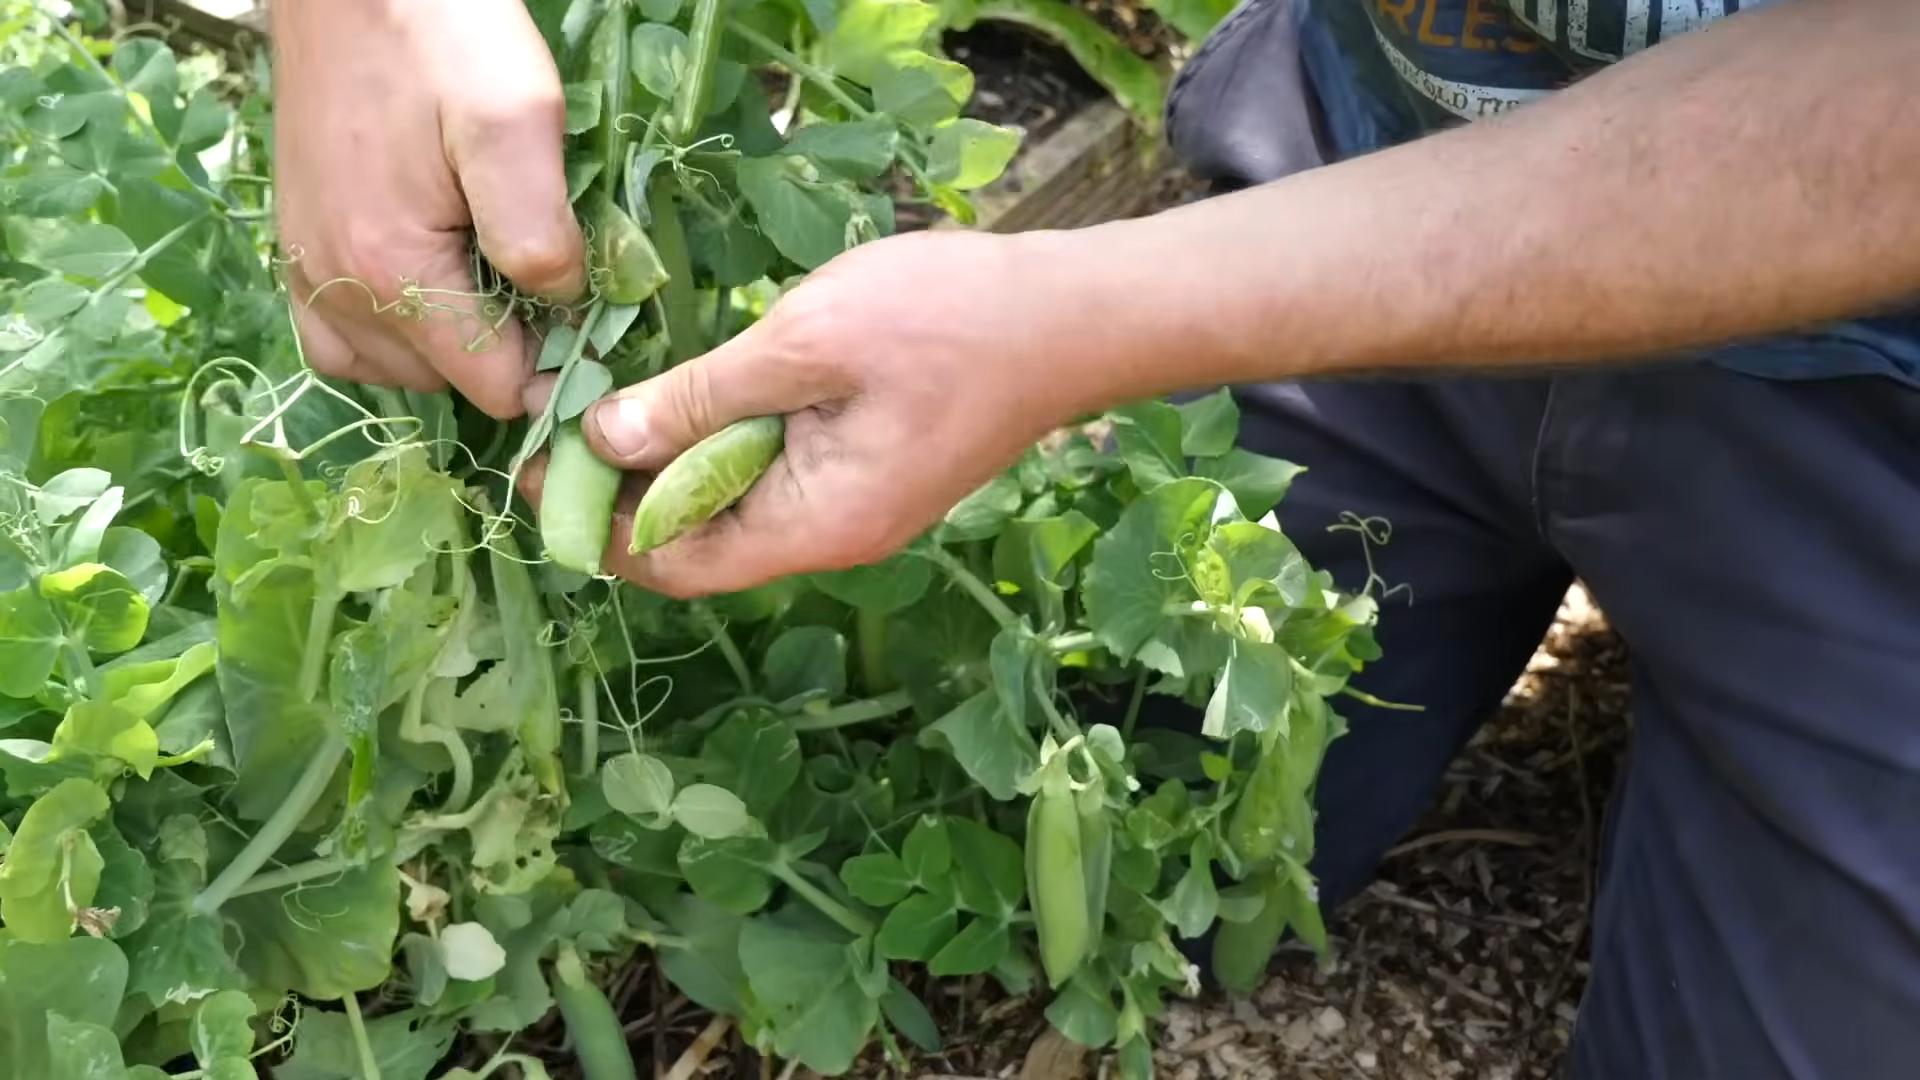
The moment you’ve been waiting for! Harvesting peas is one of the most rewarding parts of gardening.
1. Timing is Key: The timing of the harvest depends on the type of pea you’re growing. Shelling peas are ready to harvest when the pods are plump and filled with peas. Snap peas and snow peas are ready when the pods are tender and crisp.
2. Harvest Regularly: Harvest your peas regularly to encourage continued production.
3. Pick Carefully: Gently pick the pea pods from the vine, being careful not to damage the plant.
4. Enjoy Your Harvest: Eat your peas fresh, or store them in the refrigerator for a few days. You can also freeze or can them for later use.
Troubleshooting Common Pea Problems
Even with the best care, you might encounter some problems when growing peas. Here are a few common issues and how to address them:
* Poor Germination: If your pea seeds aren’t germinating, it could be due to cold soil, dry soil, or old seeds. Make sure the soil temperature is above 40°F (4°C) before planting. Keep the soil moist but not waterlogged. Use fresh seeds for best results.
* Yellowing Leaves: Yellowing leaves can be a sign of nutrient deficiency, overwatering, or disease. Check your soil pH and nutrient levels. Ensure good drainage and avoid overwatering.
* Powdery Mildew: Powdery mildew is a fungal disease that can affect peas, especially in humid conditions. It appears as a white, powdery coating on the leaves. To prevent powdery mildew, ensure good air circulation around the plants and avoid overhead watering. You can also treat it with a fungicide.
* Aphids: Aphids are small, sap-sucking insects that can weaken pea plants. They’re often found on the undersides of leaves. You can control aphids with insecticidal soap or neem oil.
Saving Pea Seeds (Optional)
If you want to save seeds from your pea plants for next year, here’s how:
1. Choose Healthy Plants: Select healthy, vigorous plants that produce good-quality peas.
2. Allow Pods to Dry: Allow some of the pea pods to dry completely on the vine. The pods should turn brown and brittle.
3. Harvest the Seeds: Once the pods are dry, harvest them and shell the seeds.
4. Dry the Seeds Further: Spread the seeds out on a tray and allow them to dry for a few more days.
5. Store the Seeds: Store the seeds in an airtight container in a cool, dry place.
Growing peas is a rewarding experience that anyone can enjoy. With a little planning and care, you can harvest a bountiful crop of sweet, delicious peas from your own garden. Happy gardening!

Conclusion
So, there you have it – a comprehensive guide to successfully growing peas, even if you’re a complete beginner! We’ve covered everything from selecting the right variety and preparing your soil to providing essential support and protecting your precious plants from pests and diseases. But the real magic lies in our DIY trick: creating your own pea trellis using readily available materials.
Why is this DIY trellis a must-try? Because it’s not just about saving money (although that’s a definite perk!). It’s about empowering you to take control of your garden, customize it to your specific needs and space, and foster a deeper connection with the growing process. A DIY trellis allows you to tailor the height and width to perfectly suit your chosen pea variety, maximizing sunlight exposure and air circulation, which are crucial for healthy growth and abundant yields. Plus, it’s incredibly satisfying to see your peas climbing a structure you built yourself!
Beyond the basic A-frame trellis we described, feel free to get creative! Consider using bamboo poles for a more rustic look, or repurpose old ladders or even branches for a truly unique and eco-friendly structure. For smaller spaces, a simple string trellis attached to a wall or fence can work wonders. You can even experiment with different materials like chicken wire or netting, depending on what you have on hand. Remember to ensure your chosen material is sturdy enough to support the weight of the mature pea plants.
Growing peas is a rewarding experience, and with our DIY trellis trick, it’s even more accessible and enjoyable. Imagine the satisfaction of harvesting your own plump, sweet peas, knowing that you nurtured them from seed to table, with a little help from your own handcrafted support system.
We wholeheartedly encourage you to give this DIY trick a try. Don’t be intimidated – it’s easier than you think! And once you’ve experienced the joy of growing your own peas with your custom-built trellis, we’d love to hear about it. Share your photos, tips, and variations in the comments below. Let’s build a community of pea-growing enthusiasts and inspire others to embrace the magic of homegrown goodness. Happy gardening!
Frequently Asked Questions (FAQs)
What are the best pea varieties for beginners?
Choosing the right pea variety is crucial for success. For beginners, we recommend bush varieties like ‘Little Marvel’ or ‘Sugar Ann’ because they are compact and don’t require extensive trellising. However, if you’re set on growing climbing peas, ‘Sugar Snap’ or ‘Oregon Sugar Pod II’ are excellent choices known for their disease resistance and delicious flavor. Remember to check the days to maturity for each variety to ensure it aligns with your growing season.
How do I prepare the soil for planting peas?
Peas thrive in well-drained soil that is rich in organic matter. Before planting, amend your soil with compost or well-rotted manure to improve its fertility and drainage. Peas prefer a slightly acidic to neutral soil pH (around 6.0 to 7.0). You can test your soil pH with a simple soil testing kit available at most garden centers. Avoid using fertilizers that are high in nitrogen, as this can promote leafy growth at the expense of pod production. A balanced fertilizer or one slightly higher in phosphorus and potassium is ideal.
When is the best time to plant peas?
Peas are a cool-season crop, so they should be planted in early spring as soon as the soil can be worked. In warmer climates, you can also plant a fall crop. The ideal soil temperature for pea germination is between 45°F and 70°F (7°C and 21°C). To get a head start, you can start pea seeds indoors 2-3 weeks before the last expected frost. However, peas don’t transplant well, so be sure to use biodegradable pots that can be planted directly into the ground.
How often should I water my pea plants?
Peas need consistent moisture, especially during flowering and pod development. Water deeply and regularly, aiming to keep the soil consistently moist but not waterlogged. Avoid overhead watering, as this can promote fungal diseases. A soaker hose or drip irrigation system is ideal for delivering water directly to the roots. Mulching around the plants can also help to retain moisture and suppress weeds.
What are some common pests and diseases that affect peas?
Common pea pests include aphids, pea weevils, and slugs. Aphids can be controlled with insecticidal soap or a strong blast of water from a hose. Pea weevils can be managed by handpicking or using row covers. Slugs can be deterred with beer traps or copper tape. Common pea diseases include powdery mildew and root rot. Powdery mildew can be prevented by ensuring good air circulation and avoiding overhead watering. Root rot can be prevented by planting in well-drained soil and avoiding overwatering.
How do I know when my peas are ready to harvest?
The timing of harvest depends on the variety of pea you are growing. For shelling peas, harvest when the pods are plump and filled with peas. For snap peas, harvest when the pods are still tender and the peas are just beginning to develop. For snow peas, harvest when the pods are flat and tender, before the peas have fully formed. Regular harvesting will encourage the plants to produce more pods.
Can I save pea seeds for next year?
Yes, you can save pea seeds for next year. Allow some of the pods to dry completely on the vine. Once the pods are dry and brittle, shell the peas and store them in an airtight container in a cool, dry place. Be sure to label the container with the variety and date. It’s important to note that hybrid pea varieties may not produce true-to-type seeds, so you may want to stick with open-pollinated varieties if you plan to save seeds.
What if my pea plants are not producing pods?
There are several reasons why your pea plants might not be producing pods. It could be due to insufficient sunlight, poor soil fertility, lack of pollination, or high temperatures. Ensure your plants are getting at least 6 hours of sunlight per day. Amend your soil with compost or fertilizer to provide essential nutrients. Attract pollinators to your garden by planting flowers nearby. And if temperatures are consistently above 80°F (27°C), your plants may stop producing pods.
How does the DIY trellis help with growing peas?
The DIY trellis provides essential support for climbing pea varieties, allowing them to grow vertically. This maximizes sunlight exposure and air circulation, which are crucial for healthy growth and abundant yields. A trellis also helps to keep the pods off the ground, preventing them from rotting or becoming infested with pests. Furthermore, a trellis makes harvesting easier and more efficient.
What are some alternative materials I can use for my DIY pea trellis?
Besides the materials mentioned in the article, you can also use sturdy branches, old ladders, or even repurposed metal fencing to create your DIY pea trellis. The key is to choose materials that are strong enough to support the weight of the mature pea plants and that provide adequate support for the vines to climb. Get creative and use what you have on hand to create a unique and functional trellis for your peas.
Leave a Comment