

Daily House Cleaning Guide: Your Secret Weapon for a Sparkling Home!
Let’s face it, nobody *really* enjoys spending their entire weekend scrubbing floors and battling dust bunnies. Imagine instead, having a consistently clean and inviting home without sacrificing your precious free time. Sounds like a dream, right? Well, it doesn’t have to be! This Daily House Cleaning Guide is your roadmap to achieving just that – a perpetually tidy space with minimal effort.
The concept of daily cleaning, while seemingly modern, actually has roots in ancient practices. Think of the meticulously maintained homes of ancient Rome or the daily rituals of cleanliness in traditional Japanese culture. These weren’t just about aesthetics; they were about creating a healthy and harmonious living environment. Over time, the idea of daily upkeep has evolved, but the core principle remains the same: small, consistent efforts yield big results.
Why do you need this Daily House Cleaning Guide? Because life is busy! We’re juggling work, family, hobbies, and everything in between. Spending hours cleaning each week simply isn’t feasible for most of us. By breaking down cleaning tasks into manageable daily chunks, you’ll prevent dirt and clutter from accumulating, making your home feel more peaceful and welcoming. Plus, you’ll have more time to actually enjoy it! I’m excited to share these simple yet effective strategies that will transform your cleaning routine and give you back your weekends.

Daily House Cleaning: A DIY Guide to a Sparkling Home
Okay, let’s face it, nobody *loves* cleaning. But a little bit each day can make a huge difference in how your home feels and looks. I’m going to walk you through my daily cleaning routine, which is designed to be manageable and keep things from getting out of control. This isn’t about perfection; it’s about maintaining a comfortable and tidy living space.
The Daily Tidy-Up: Your Foundation for a Clean Home
This is the core of my daily routine. It’s quick, easy, and prevents major messes from accumulating.
- Make the Beds: Seriously, this takes less than 5 minutes and instantly makes your bedrooms look more put-together.
- Wipe Down Kitchen Counters and Sink: After every meal, give the counters and sink a quick wipe. This prevents food buildup and keeps things sanitary.
- Sweep or Vacuum High-Traffic Areas: Focus on entryways, kitchens, and hallways. A quick sweep or vacuum prevents dirt from spreading throughout the house.
- One Load of Laundry: Don’t let laundry pile up! Doing one load a day keeps it manageable.
- Quick Dishwash or Load the Dishwasher: Don’t let dishes sit in the sink. Wash them immediately after use or load them into the dishwasher.
Step-by-Step Instructions for the Daily Tidy-Up
- Make the Beds:
- Pull up the sheets and blankets.
- Fluff the pillows and arrange them neatly.
- Straighten the bedspread or duvet.
- Wipe Down Kitchen Counters and Sink:
- Spray the counters and sink with a multi-purpose cleaner. I like to use a natural cleaner with vinegar and essential oils.
- Wipe down the surfaces with a clean cloth or sponge.
- Rinse the sink and dry with a clean cloth.
- Sweep or Vacuum High-Traffic Areas:
- Grab your broom or vacuum cleaner.
- Sweep or vacuum the floors in high-traffic areas, paying attention to corners and edges.
- Empty the dustpan or vacuum canister as needed.
- One Load of Laundry:
- Gather dirty laundry from hampers and floors.
- Sort the laundry into whites, colors, and delicates.
- Load the washing machine with one sorted load.
- Add detergent and fabric softener (if desired).
- Start the washing machine.
- Once the wash cycle is complete, transfer the laundry to the dryer.
- Dry the laundry according to the fabric care instructions.
- Fold or hang the clean laundry immediately to prevent wrinkles.
- Quick Dishwash or Load the Dishwasher:
- Rinse food particles off the dishes.
- Load the dishwasher according to the manufacturer’s instructions.
- Add dishwasher detergent.
- Start the dishwasher.
- If handwashing, fill the sink with hot, soapy water.
- Wash the dishes with a sponge or dishcloth.
- Rinse the dishes thoroughly.
- Dry the dishes with a clean dish towel.
- Put the dishes away.
Bathroom Blitz: Keeping Your Bathroom Fresh
Bathrooms can get grimy quickly, so a little daily maintenance goes a long way.
- Wipe Down Sink and Counter: After each use, wipe down the sink and counter to prevent water spots and toothpaste splatters.
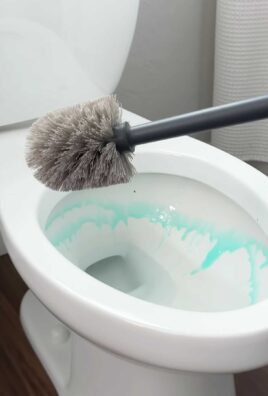
- Swish and Flush the Toilet: A quick swish with the toilet brush keeps the bowl clean.
- Hang Up Towels: Properly hanging towels helps them dry faster and prevents mildew.
Step-by-Step Instructions for the Bathroom Blitz
- Wipe Down Sink and Counter:
- Keep a spray bottle of bathroom cleaner and a microfiber cloth handy.
- Spray the sink and counter with the cleaner.
- Wipe down the surfaces with the cloth.
- Dry with a clean section of the cloth.
- Swish and Flush the Toilet:
- Keep a toilet brush near the toilet.
- Swish the brush around the inside of the toilet bowl.
- Flush the toilet.
- Rinse the brush under the running water after flushing.
- Return the brush to its holder.
- Hang Up Towels:
- Make sure there are hooks or towel bars available.
- Hang wet towels neatly on the hooks or bars.
- Ensure towels are spread out to allow for proper air circulation and drying.
Living Room Love: Maintaining a Comfortable Space
The living room is often the heart of the home, so keeping it tidy is essential.
- Fluff Pillows and Blankets: Make the couch look inviting by fluffing pillows and folding blankets.
- Straighten Up: Put away any items that are out of place, such as books, magazines, or toys.
- Empty Trash Cans: Empty any small trash cans in the living room.
Step-by-Step Instructions for Living Room Love
- Fluff Pillows and Blankets:
- Pick up each pillow and fluff it by squeezing and shaking it.
- Arrange the pillows neatly on the couch or chairs.
- Fold blankets neatly and drape them over the back of the couch or store them in a basket.
- Straighten Up:
- Scan the room for any items that are out of place.
- Return books to shelves, magazines to racks, and toys to their designated storage areas.
- Clear any clutter from coffee tables and other surfaces.
- Empty Trash Cans:
- Gather any small trash cans from the living room.
- Empty the trash cans into a larger trash receptacle.
- Replace the trash bags in the small trash cans.
Kitchen Deep Dive (Mini Version): Preventing Food Buildup
While you’re already wiping down the counters, a few extra steps can prevent bigger messes later.
- Clean Up Spills Immediately: Don’t let spills sit and harden. Wipe them up right away.
- Wipe Down the Stovetop: After cooking, wipe down the stovetop to remove grease and food splatters.
- Take Out the Trash (If Needed): If the kitchen trash can is full, take it out.
Step-by-Step Instructions for the Kitchen Deep Dive (Mini Version)
- Clean Up Spills Immediately:
- Grab a clean cloth or paper towel.
- Wipe up the spill immediately, working from the outside in to prevent spreading.
- If the spill is sticky or greasy, use a multi-purpose cleaner.
- Wipe Down the Stovetop:
- Wait for the stovetop to cool down slightly.
- Spray the stovetop with a stovetop cleaner or a mixture of baking soda and water.
- Wipe down the surface with a sponge or cloth, scrubbing gently to remove any stuck-on food.
- Rinse with a clean, damp cloth.
- Dry with a clean cloth.
- Take Out the Trash (If Needed):
- Check the kitchen trash can to see if it’s full.
- If it’s full, remove the trash bag.
- Tie the trash bag securely.
- Take the trash bag outside to the designated trash receptacle.
- Replace the trash bag in the kitchen trash can.
Conclusion
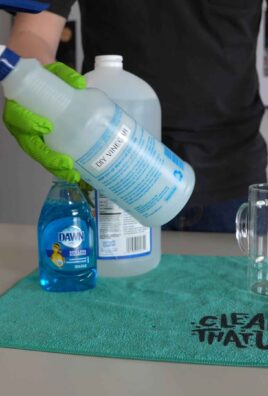
So, there you have it! Transforming your daily house cleaning routine with these simple yet effective DIY tricks isn’t just about saving money; it’s about reclaiming your time and creating a healthier, happier living space. We’ve shown you how to conquer dust bunnies with homemade dusting sprays, banish grime with all-natural cleaners, and keep your home smelling fresh without harsh chemicals. These aren’t just quick fixes; they’re sustainable solutions that can revolutionize your approach to household chores.
The beauty of these DIY methods lies in their adaptability. Feel free to experiment with different essential oil combinations to create signature scents that reflect your personality. For instance, if you prefer a calming atmosphere, lavender and chamomile essential oils are excellent choices for your cleaning solutions. If you need a more invigorating scent, try lemon and eucalyptus. You can also adjust the ratios of ingredients to suit your specific needs and preferences. Have a particularly stubborn stain? Add a bit more vinegar or baking soda to your cleaning paste. Is your wood furniture extra dry? Increase the amount of olive oil in your furniture polish.
Don’t be afraid to get creative! Consider infusing your DIY cleaning solutions with herbs like rosemary or thyme for added antibacterial properties and a delightful aroma. You can also use citrus peels to create natural cleaning agents that are both effective and eco-friendly. The possibilities are endless, and the best part is that you’re in complete control of what goes into your home.
Remember, a clean home is a happy home, and these DIY cleaning tricks are the perfect way to achieve that without breaking the bank or exposing yourself to harmful chemicals. By incorporating these simple strategies into your daily routine, you’ll not only keep your house sparkling clean but also create a more sustainable and healthy environment for yourself and your family.
We strongly encourage you to try these DIY cleaning solutions and experience the difference for yourself. We are confident that you’ll be amazed at how effective and easy they are to use. Once you’ve given them a try, we’d love to hear about your experience! Share your tips, tricks, and variations in the comments below. Let’s build a community of DIY cleaning enthusiasts who are passionate about creating clean, healthy, and happy homes. Your insights could inspire others to embrace these sustainable cleaning practices and transform their own daily routines. So, go ahead, give these DIY tricks a try and let us know what you think! We can’t wait to hear from you.
Frequently Asked Questions (FAQs)
1. Are these DIY cleaning solutions safe for all surfaces?
It’s crucial to test any DIY cleaning solution on an inconspicuous area before applying it to the entire surface. While most of the recipes are generally safe, certain materials like marble, granite, and some types of wood can be sensitive to acidic ingredients like vinegar and lemon juice. For these surfaces, consider using milder solutions like baking soda paste or diluted dish soap. Always read the manufacturer’s instructions for your specific surfaces and err on the side of caution. If you’re unsure, consult a professional cleaner.
2. Can I use any type of essential oil in these recipes?
While most essential oils are safe to use in cleaning solutions, it’s important to choose high-quality, pure essential oils. Avoid synthetic fragrances or diluted oils, as they may not have the same cleaning properties and could potentially damage surfaces. Some essential oils, like tea tree and eucalyptus, have strong antibacterial and antifungal properties, making them ideal for cleaning. Others, like lavender and chamomile, offer a calming aroma. Research the properties of each essential oil before using it to ensure it’s suitable for your needs. Also, be mindful of allergies and sensitivities. If you or someone in your household is allergic to a particular essential oil, avoid using it in your cleaning solutions.
3. How long can I store these DIY cleaning solutions?
The shelf life of DIY cleaning solutions depends on the ingredients used. Solutions containing water or other perishable ingredients should be stored in the refrigerator and used within a week or two. Solutions containing mostly vinegar, alcohol, or essential oils can be stored at room temperature for several months. Always label your cleaning solutions with the date they were made to keep track of their freshness. If you notice any changes in color, odor, or consistency, discard the solution.
4. Can I use these DIY cleaning solutions if I have pets or children?
While these DIY cleaning solutions are generally safer than commercial cleaners, it’s still important to take precautions when using them around pets and children. Keep cleaning solutions out of reach of children and pets. Avoid using essential oils that are known to be toxic to pets, such as tea tree oil. When cleaning, ensure that the area is well-ventilated to prevent inhalation of fumes. After cleaning, rinse surfaces thoroughly with water to remove any residue. If you’re concerned about potential sensitivities, consult with your veterinarian or pediatrician before using these solutions.
5. What are some alternatives to vinegar in these recipes?
If you’re not a fan of the smell of vinegar, or if you’re concerned about using it on certain surfaces, there are several alternatives you can use. Lemon juice is a great substitute for vinegar in many cleaning recipes. It has similar acidic properties and a pleasant citrus scent. Baking soda is another versatile cleaning agent that can be used in place of vinegar. It’s a mild abrasive that’s effective at removing stains and odors. You can also use hydrogen peroxide as a disinfectant and stain remover. However, be careful when using hydrogen peroxide on colored surfaces, as it can cause fading.
6. How can I make my own dusting cloths?
Creating your own dusting cloths is a simple and sustainable way to reduce waste. You can use old t-shirts, towels, or flannel fabric to make dusting cloths. Simply cut the fabric into squares or rectangles and hem the edges to prevent fraying. You can also add a few drops of essential oil to your dusting cloths for a pleasant scent. Store your dusting cloths in a clean container or bag.
7. What is the best way to clean a microwave using DIY methods?
Cleaning a microwave with DIY methods is easy and effective. Simply combine equal parts water and vinegar in a microwave-safe bowl. Microwave the mixture for 5-10 minutes, or until the microwave is steamy. Let the mixture sit for a few minutes to loosen any grime. Then, carefully remove the bowl and wipe down the inside of the microwave with a clean cloth. You can also add a few drops of lemon juice to the water for a fresh scent.
8. How can I naturally deodorize my home?
There are many ways to naturally deodorize your home. You can place bowls of baking soda around your home to absorb odors. You can also simmer a pot of water with citrus peels, cinnamon sticks, or cloves to create a pleasant aroma. Another option is to use an essential oil diffuser to disperse your favorite scents throughout your home. Regularly opening windows and doors to ventilate your home is also an effective way to remove odors.
9. What’s the best way to clean windows with a DIY solution?
For sparkling clean windows, mix equal parts white vinegar and water in a spray bottle. Add a few drops of dish soap for extra cleaning power. Spray the solution onto your windows and wipe them down with a clean microfiber cloth or paper towel. For streak-free results, wipe the windows in a circular motion and then dry them with a clean, dry cloth.
10. How can I make my own laundry detergent?
Making your own laundry detergent is a great way to save money and reduce your exposure to harsh chemicals. Combine equal parts washing soda, borax, and grated bar soap (such as castile soap) in a container. Use 1-2 tablespoons of the mixture per load of laundry. You can also add a few drops of essential oil for a pleasant scent.

Leave a Comment