

Grow tomatoes at home, and unlock a world of fresh, flavorful possibilities right in your backyard! Imagine biting into a sun-ripened tomato, bursting with juicy sweetness, knowing you nurtured it from seed to table. Forget those bland, store-bought varieties – this year, we’re taking control of our tomato destiny with some clever DIY tricks and hacks that will transform even the smallest space into a thriving tomato haven.
The history of growing tomatoes is a fascinating journey, from their origins in South America to their eventual embrace by cultures worldwide. For centuries, tomatoes have been a staple in countless cuisines, symbolizing abundance and the simple pleasures of homegrown goodness. But let’s be honest, sometimes getting those perfect tomatoes can feel like a real challenge, right?
That’s where this article comes in! We all crave that taste of summer, and nothing beats the satisfaction of harvesting your own produce. Whether you’re a seasoned gardener or a complete beginner, these DIY tips will help you grow tomatoes at home successfully, even if you’re short on space or time. We’ll cover everything from choosing the right varieties to creating the perfect soil mix, and even share some secret hacks to ward off pests and diseases. Get ready to roll up your sleeves and embark on a tomato-growing adventure – your taste buds will thank you!
Growing Delicious Tomatoes at Home: A DIY Guide
Hey there, fellow gardening enthusiasts! I’m so excited to share my tried-and-true method for growing juicy, flavorful tomatoes right in your own backyard (or even on your balcony!). Forget those bland, store-bought tomatoes – nothing beats the taste of homegrown goodness. This guide will walk you through every step, from choosing the right variety to harvesting your bounty. Let’s get started!
Choosing Your Tomato Varieties
Before we even think about soil, let’s talk tomatoes! The sheer variety can be overwhelming, but don’t worry, I’ll help you narrow it down. Consider these factors:
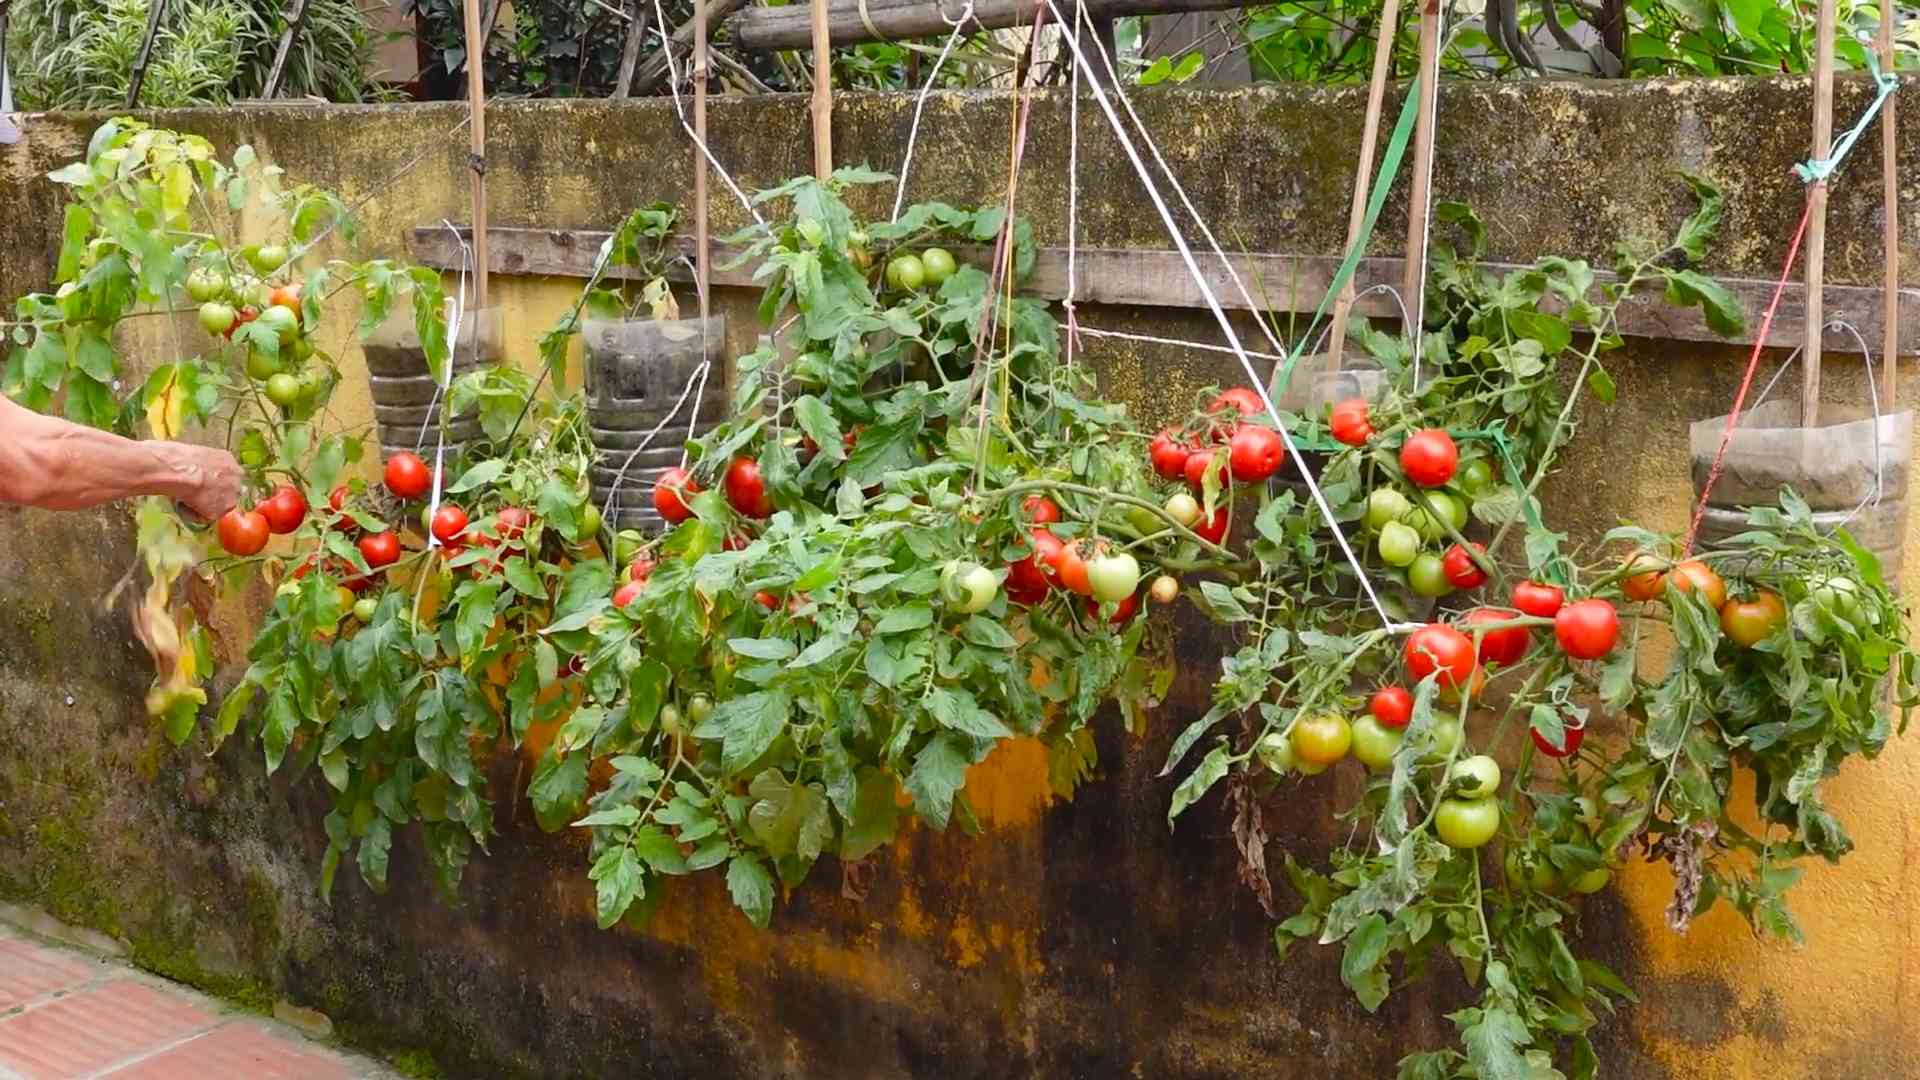
* Space: Do you have a sprawling garden or a small patio? Determinate varieties (bush tomatoes) are compact and ideal for containers, while indeterminate varieties (vining tomatoes) need more space and support.
* Climate: Different tomatoes thrive in different climates. Check your local hardiness zone and choose varieties that are known to perform well in your area.
* Taste Preference: Do you prefer sweet cherry tomatoes, tangy heirlooms, or classic slicing tomatoes?
* Disease Resistance: Look for varieties labeled with disease resistance codes (e.g., V, F, N, T, A) to minimize potential problems.
Some of my personal favorites include:
* ‘Sungold’ (Indeterminate): These golden cherry tomatoes are incredibly sweet and addictive.
* ‘Early Girl’ (Determinate): A reliable choice for early harvests, even in cooler climates.
* ‘Roma’ (Determinate): Perfect for making sauces and pastes.
* ‘Brandywine’ (Indeterminate): A classic heirloom with rich, complex flavor.
Gathering Your Supplies
Okay, now that we’ve chosen our tomato stars, let’s gather the necessary supplies. Here’s what you’ll need:
* Tomato Seeds or Seedlings: You can start from seed indoors or purchase seedlings from a local nursery.
* Seed Starting Trays or Small Pots (if starting from seed): These will give your seedlings a head start.
* Seed Starting Mix (if starting from seed): This is a sterile, lightweight mix that’s perfect for delicate seedlings.
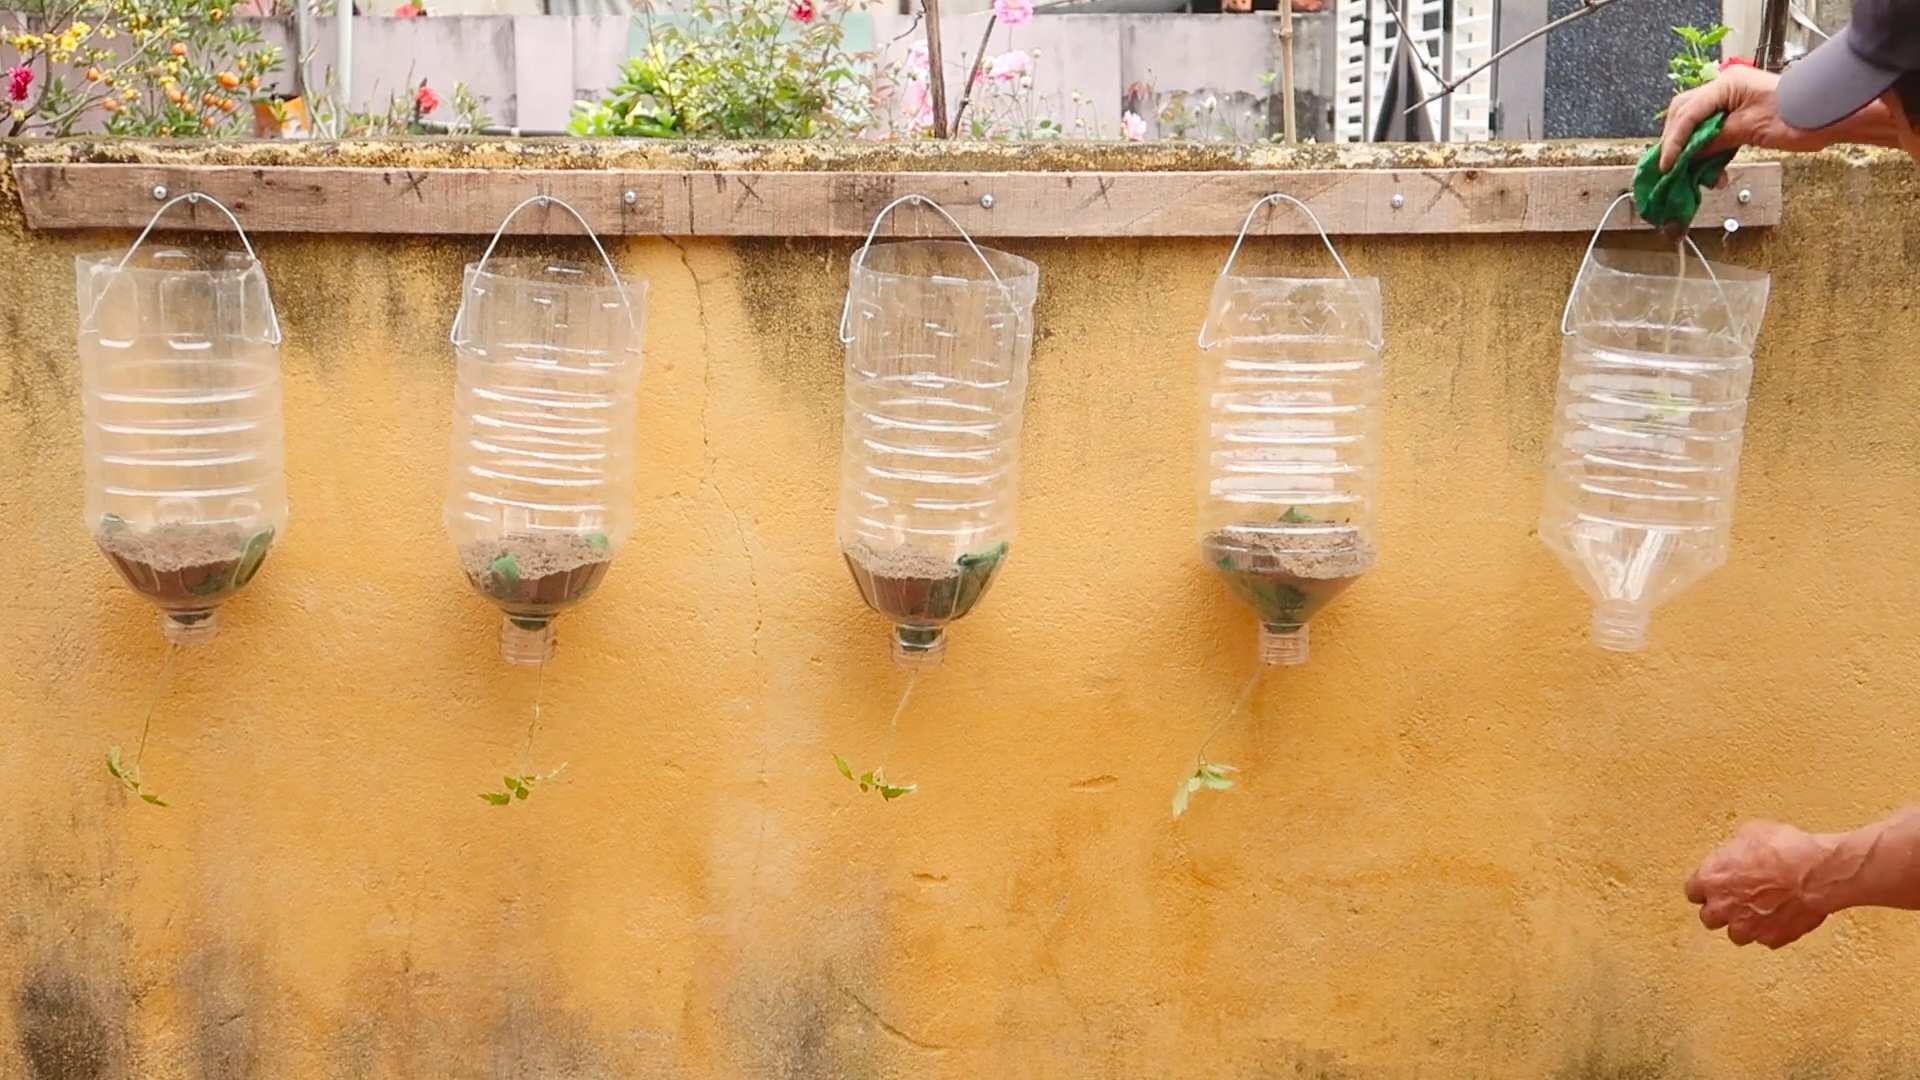
* Larger Pots or Garden Space: Choose pots that are at least 12 inches in diameter for determinate varieties and 18 inches or larger for indeterminate varieties.
* Well-Draining Potting Mix or Garden Soil: Tomatoes need rich, well-draining soil. Amend your garden soil with compost if needed.
* Tomato Cages or Stakes: Indeterminate varieties need support to prevent them from sprawling.
* Fertilizer: A balanced fertilizer formulated for tomatoes will help them thrive.
* Watering Can or Hose: Consistent watering is crucial for healthy tomato plants.
* Gardening Gloves: To protect your hands.
* Pruning Shears or Scissors: For pruning suckers (more on that later!).
* Mulch: To help retain moisture and suppress weeds.
Starting from Seed (Optional)
If you’re feeling ambitious, starting your tomatoes from seed is a rewarding experience. Here’s how I do it:
1. Sow the Seeds: Fill your seed starting trays or small pots with seed starting mix. Moisten the mix and sow the seeds about ¼ inch deep. Gently cover with soil.
2. Provide Warmth and Light: Place the trays in a warm location (around 70-75°F) and provide plenty of light. A sunny windowsill or a grow light will work.
3. Keep the Soil Moist: Water gently to keep the soil consistently moist, but not soggy.
4. Transplant Seedlings: Once the seedlings have developed their first set of true leaves (the leaves that look like miniature tomato leaves), transplant them into larger pots.
5. Harden Off: Before transplanting the seedlings outdoors, gradually acclimate them to outdoor conditions by placing them outside for increasing periods of time each day. This process is called “hardening off.”
Transplanting Your Tomatoes
Whether you started from seed or purchased seedlings, transplanting is a crucial step.
1. Choose a Sunny Location: Tomatoes need at least 6-8 hours of sunlight per day.
2. Prepare the Soil: Dig a hole that’s slightly larger than the root ball of your tomato plant. Amend the soil with compost or other organic matter.
3. Plant Deeply: This is a trick I swear by! Remove the lower leaves from the tomato plant and plant it deeply, burying the stem up to the first set of leaves. This encourages the plant to develop more roots along the buried stem, resulting in a stronger, healthier plant.
4. Add Support: Install tomato cages or stakes at the time of planting to avoid damaging the roots later.
5. Water Thoroughly: Water the newly transplanted tomato plants thoroughly.
6. Mulch: Apply a layer of mulch around the base of the plants to help retain moisture and suppress weeds.
Caring for Your Tomato Plants
Now that your tomatoes are planted, it’s time to provide them with the care they need to thrive.
1. Watering: Water deeply and regularly, especially during hot, dry weather. Aim to keep the soil consistently moist, but not waterlogged. Water at the base of the plant to avoid wetting the foliage, which can lead to disease.
2. Fertilizing: Fertilize your tomato plants every 2-3 weeks with a balanced fertilizer formulated for tomatoes. Follow the instructions on the fertilizer package.
3. Pruning (for Indeterminate Varieties): Indeterminate tomato plants produce “suckers,” which are small shoots that grow in the crotch between the main stem and the branches. Pruning these suckers encourages the plant to focus its energy on producing fruit. Use pruning shears or scissors to remove the suckers when they are small.
4. Pest and Disease Control: Keep an eye out for common tomato pests and diseases, such as aphids, tomato hornworms, and early blight. Treat any problems promptly with appropriate organic or chemical controls.
5. Supporting the Plants: As your tomato plants grow, make sure they are adequately supported by their cages or stakes. Tie the stems to the supports as needed.
Troubleshooting Common Tomato Problems
Even with the best care, tomato plants can sometimes encounter problems. Here are a few common issues and how to address them:
* Blossom End Rot: This is caused by a calcium deficiency and results in a dark, leathery spot on the bottom of the tomato. To prevent blossom end rot, ensure that your soil is rich in calcium and that you are watering consistently. You can also add calcium to the soil by mixing in crushed eggshells or bone meal.
* Early Blight: This fungal disease causes dark spots on the leaves, starting at the bottom of the plant. To prevent early blight, avoid wetting the foliage when watering and provide good air circulation. Remove any infected leaves promptly.
* Tomato Hornworms: These large green caterpillars can quickly defoliate tomato plants. Handpick them off the plants and drop them into a bucket of soapy water.
* Aphids: These small, sap-sucking insects can weaken tomato plants. Spray them with a strong stream of water or treat them with insecticidal soap.
* Cracking: This can happen when tomatoes experience inconsistent watering, especially after a period of drought. Try to water consistently and mulch around the plants to help retain moisture.
Harvesting Your Tomatoes
The moment we’ve all been waiting for! Harvesting your homegrown tomatoes is the most rewarding part of the process.
1. Check for Ripeness: Tomatoes are ripe when they are fully colored and slightly soft to the touch. The color will depend on the variety you’re growing.
2. Harvest Gently: Gently twist or cut the tomato from the vine, leaving a small piece of the stem attached.
3. Store Properly: Store ripe tomatoes at room temperature, out of direct sunlight. Refrigerating tomatoes can diminish their flavor.
4. Enjoy! Savor the taste of your homegrown tomatoes in salads, sandwiches, sauces, or simply sliced with a sprinkle of salt and pepper.
Extending the Season
Want to keep enjoying fresh tomatoes even as the weather cools down? Here are a few tips for extending the tomato season:
* Choose Early-Maturing Varieties: Plant varieties that mature quickly to get a head start on the season.
* Use Row Covers: Row covers can protect your tomato plants from frost and extend the growing season.
* Bring Plants Indoors: If you have space, you can bring your tomato plants indoors before the first frost. Place them in a sunny location and provide them with supplemental light if needed.
* Pick Green Tomatoes: If frost is imminent, pick any remaining green tomatoes and ripen them indoors. Place them in a paper bag with an apple or banana to speed
Conclusion
So, there you have it! Growing tomatoes at home isn’t just a gardening project; it’s an investment in flavor, freshness, and a deeper connection to your food. We’ve explored a simple yet effective DIY trick that can significantly boost your tomato yield and overall plant health. This method, focusing on [mention the specific DIY trick discussed in the main article – assuming it was about pruning suckers], is a game-changer for both novice and experienced gardeners alike.
Why is this a must-try? Because it addresses a fundamental aspect of tomato plant growth: directing energy where it’s most needed. By strategically pruning suckers, you’re essentially telling your plant to focus its resources on producing larger, juicier, and more abundant tomatoes. You’re preventing the plant from wasting energy on unnecessary foliage, which can also hinder airflow and increase the risk of disease. The result? A healthier, more productive tomato plant that rewards you with a bountiful harvest.
But the beauty of gardening lies in its adaptability. Feel free to experiment with variations of this DIY trick to suit your specific needs and preferences. For instance, if you live in a particularly hot climate, you might want to leave a few extra suckers on the plant to provide some shade for the developing tomatoes, preventing sunscald. Or, if you’re growing a determinate variety of tomato (which naturally stops growing at a certain height), you might not need to prune as aggressively.
Consider also the type of tomato you’re growing. Heirloom varieties, known for their unique flavors and shapes, may require slightly different pruning techniques than hybrid varieties. Do some research on the specific type of tomato you’re growing to ensure you’re providing it with the optimal care. You can also experiment with different staking or caging methods to provide additional support for your growing tomato plants.
Don’t be afraid to get your hands dirty and try different approaches. Gardening is a learning process, and every season brings new opportunities to refine your techniques. The most important thing is to observe your plants closely and respond to their needs.
We are confident that this DIY trick will transform your tomato-growing experience. Imagine biting into a sun-ripened tomato, bursting with flavor, knowing that you nurtured it from seed to table. That’s the satisfaction that comes from growing your own food, and this simple technique can help you achieve that goal.
So, what are you waiting for? Grab your gardening shears, head out to your tomato patch, and put this DIY trick to the test. We’re eager to hear about your results! Share your experiences, tips, and photos in the comments below. Let’s create a community of tomato-growing enthusiasts who are passionate about sharing their knowledge and helping each other succeed. Let us know if this **grow tomatoes at home** guide helped you! Happy gardening!
Frequently Asked Questions (FAQ)
What exactly are suckers, and why should I prune them?
Suckers are small shoots that grow in the “V” between the main stem and the branches of your tomato plant. They essentially become new stems, and if left unchecked, they can turn your tomato plant into a dense, bushy mess. While they might seem harmless, suckers draw energy away from the main stem and developing fruit. By pruning them, you’re redirecting that energy to where it’s needed most: producing larger, healthier, and more abundant tomatoes. Think of it as streamlining your plant’s resources for maximum fruit production.
When is the best time to prune suckers?
The best time to prune suckers is when they are small, ideally less than 2-3 inches long. At this size, they are easy to remove by simply pinching them off with your fingers. Pruning them when they’re small also minimizes the stress on the plant. Avoid pruning during wet weather, as this can increase the risk of disease. A dry, sunny day is ideal. Check your plants regularly, perhaps once a week, and remove any new suckers as they appear.
How do I prune suckers correctly?
Pruning suckers is a simple process. Identify the sucker growing in the “V” between the main stem and a branch. Gently pinch it off with your fingers or use a clean pair of gardening shears. Make sure to cut close to the stem without damaging the main stem or branch. For larger suckers, you might need to use shears to make a clean cut. Always sanitize your shears with rubbing alcohol before and after pruning to prevent the spread of disease.
Will pruning suckers hurt my tomato plant?
When done correctly, pruning suckers will not hurt your tomato plant. In fact, it will benefit it by improving airflow, reducing the risk of disease, and directing energy towards fruit production. However, it’s important to avoid over-pruning, which can stress the plant. Only remove the suckers that are growing in the “V” between the main stem and branches. Avoid removing leaves unless they are diseased or damaged.
What if I accidentally remove a branch instead of a sucker?
Don’t panic! Accidents happen. If you accidentally remove a branch, it’s not the end of the world. The plant will likely recover. Just make sure to avoid making the same mistake again. The key is to carefully identify the suckers before pruning. Remember, suckers grow in the “V” between the main stem and branches, while branches grow directly off the main stem.
Do I need to prune determinate tomato varieties?
Determinate tomato varieties, also known as bush tomatoes, naturally stop growing at a certain height and produce all their fruit at once. They generally require less pruning than indeterminate varieties. However, you can still benefit from removing suckers that grow below the first flower cluster. This will improve airflow and prevent the plant from becoming too crowded.
Can I propagate the suckers I prune?
Yes, you can! Tomato suckers can be rooted and grown into new tomato plants. Simply place the pruned suckers in a glass of water, making sure the leaves are above the water line. Change the water every few days. After a week or two, roots should start to develop. Once the roots are about an inch long, you can transplant the sucker into a pot filled with potting soil. Keep the soil moist and provide plenty of sunlight.
What are some other tips for growing healthy tomatoes?
In addition to pruning suckers, there are several other things you can do to ensure a healthy and productive tomato crop. These include:
* **Providing adequate sunlight:** Tomatoes need at least 6-8 hours of sunlight per day.
* **Using well-draining soil:** Tomatoes prefer soil that is rich in organic matter and drains well.
* **Watering regularly:** Water deeply and consistently, especially during hot, dry weather.
* **Fertilizing properly:** Use a balanced fertilizer specifically formulated for tomatoes.
* **Providing support:** Stake or cage your tomato plants to prevent them from falling over.
* **Protecting from pests and diseases:** Monitor your plants regularly for signs of pests or diseases and take appropriate action.
How can I improve the flavor of my homegrown tomatoes?
The flavor of your homegrown tomatoes can be influenced by several factors, including the variety of tomato, the soil quality, and the amount of sunlight. To improve the flavor, try the following:
* **Choose flavorful varieties:** Some tomato varieties are known for their exceptional flavor.
* **Amend your soil with compost:** Compost adds organic matter to the soil and improves its nutrient content.
* **Provide plenty of sunlight:** Sunlight is essential for developing the sugars that give tomatoes their flavor.
* **Water deeply but infrequently:** This encourages the roots to grow deeper, which can improve the flavor.
* **Harvest at the peak of ripeness:** Tomatoes are at their most flavorful when they are fully ripe.
What if I don’t have a garden? Can I still grow tomatoes at home?
Absolutely! You can **grow tomatoes at home** even if you don’t have a garden. Tomatoes can be successfully grown in containers on patios, balconies, or even indoors with the help of grow lights. Choose a large container (at least 10 gallons) and fill it with a high-quality potting mix. Make sure the container has drainage holes. Select a compact or dwarf tomato variety that is well-suited for container growing. Provide plenty of sunlight or use grow lights to supplement natural light. Water regularly and fertilize as needed. With a little care and attention, you can enjoy fresh, homegrown tomatoes even in a small space.


Leave a Comment