

Living Room Deep Cleaning Guide: Is your living room looking a little… lived in? Don’t worry, you’re not alone! We all know that feeling when the heart of our home, the place where we relax, entertain, and make memories, starts to feel more like a dust bunny convention. But fear not, because I’m here to share a comprehensive guide to transform your living room from drab to dazzling!
For generations, the living room has been a central gathering space. Think back to the grand salons of the past, where families and friends would congregate to share stories, music, and laughter. While our modern living rooms might look a little different, the purpose remains the same: a place for connection and comfort. But a cluttered and unclean living room can hinder that sense of peace and relaxation. That’s why mastering the art of a deep clean is so important.
Let’s face it, life gets busy, and deep cleaning often falls to the bottom of the to-do list. But neglecting this essential task can lead to a build-up of allergens, dust mites, and general grime, impacting your health and well-being. Plus, who doesn’t feel better in a clean and organized space? This Living Room Deep Cleaning Guide will provide you with the step-by-step instructions and insider tips you need to tackle even the most daunting cleaning challenges. I’ll show you how to efficiently and effectively deep clean every nook and cranny, leaving you with a sparkling, inviting living room you’ll be proud to show off!

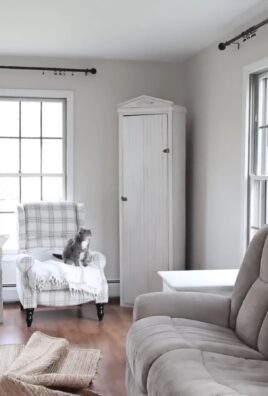
Living Room Deep Cleaning: From Chaos to Cozy!
Okay, friends, let’s face it: our living rooms often bear the brunt of daily life. Spills, crumbs, dust bunnies – they all accumulate faster than we’d like to admit. But fear not! I’m here to guide you through a deep clean that will transform your living room from a disaster zone to a haven of relaxation. Get ready to roll up your sleeves and rediscover the joy of a truly clean space!
What You’ll Need: Your Cleaning Arsenal
Before we dive in, let’s gather our supplies. Having everything on hand will make the process much smoother. Here’s what I recommend:
* Microfiber cloths: These are my go-to for dusting and wiping surfaces. They’re super absorbent and won’t scratch.
* All-purpose cleaner: Choose one you love the scent of!
* Wood cleaner (if applicable): For your wooden furniture.
* Glass cleaner: For windows, mirrors, and glass tables.
* Upholstery cleaner: Essential for tackling stains on your sofa and chairs.
* Vacuum cleaner with attachments: A must for carpets, rugs, and upholstery.
* Baking soda: A natural deodorizer and gentle abrasive.
* White vinegar: Another cleaning powerhouse!
* Rubber gloves: To protect your hands.
* Bucket: For mixing cleaning solutions.
* Sponges: For scrubbing.
* Old toothbrush: Perfect for getting into tight corners and grout.
* Lint roller: For removing pet hair and lint from upholstery.
* Trash bags: For decluttering as we go.
* Duster with an extension pole: To reach high places like ceiling fans and light fixtures.
* Steam cleaner (optional): For deep cleaning carpets and upholstery.
Phase 1: Decluttering – The Foundation of Clean
Before we even think about cleaning, we need to declutter. Trust me, it makes a huge difference!
1. Clear the Surfaces: Start by removing everything from your coffee table, side tables, shelves, and any other surfaces. This includes books, magazines, remotes, decorative items, and anything else that doesn’t belong there.
2. Sort and Purge: Go through the items you’ve removed. Decide what to keep, what to donate, and what to toss. Be honest with yourself! If you haven’t used something in months, it’s probably time to let it go.
3. Put Things Away: Return the items you’re keeping to their designated spots. If something doesn’t have a home, find one! This is a great opportunity to organize your storage solutions.
4. Trash and Donate: Dispose of the trash and gather the items you’re donating. Get them out of the house as soon as possible to avoid cluttering up another area.
Phase 2: Dusting – Reaching for the Heights
Now that we’ve decluttered, it’s time to tackle the dust. Starting from the top down prevents dust from settling on surfaces we’ve already cleaned.
1. Ceiling Fans and Light Fixtures: Use your duster with an extension pole to remove dust from ceiling fans and light fixtures. Be careful not to knock anything down! You can also use a damp cloth to wipe down the blades of the ceiling fan.
2. Crown Molding and Trim: Dust the crown molding, baseboards, and any other trim in the room. Again, the duster with an extension pole is your friend here.
3. Shelves and Bookcases: Dust the shelves and bookcases, paying attention to the tops of books and decorative items. You might want to remove the items and dust them individually for a more thorough clean.
4. Electronics: Use a dry microfiber cloth to dust your TV screen, stereo equipment, and other electronics. Avoid using liquid cleaners on screens, as they can damage them.
5. Window Treatments: Dust your blinds, curtains, or drapes. You can use a vacuum cleaner with a brush attachment for this. If your curtains are washable, consider taking them down and washing them according to the care instructions.
Phase 3: Surface Cleaning – Making Things Shine
With the dusting done, we can move on to cleaning the surfaces.
1. Windows and Mirrors: Spray your glass cleaner onto windows and mirrors and wipe them clean with a microfiber cloth. For streak-free results, use a clean, dry cloth for the final wipe.
2. Coffee Table and Side Tables: Wipe down your coffee table and side tables with an all-purpose cleaner or wood cleaner, depending on the material. Pay attention to any spills or stains.
3. Shelves and Bookcases: Wipe down the shelves and bookcases with an all-purpose cleaner.
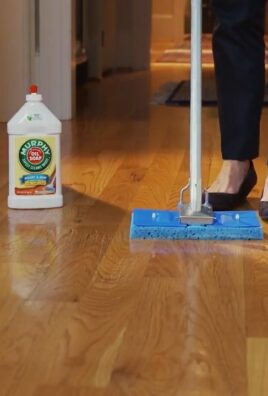
4. Hard Floors: Sweep or vacuum your hard floors to remove any loose dirt and debris. Then, mop them with a floor cleaner appropriate for the type of flooring you have.
5. Baseboards: Wipe down the baseboards with an all-purpose cleaner. An old toothbrush can be helpful for getting into tight corners.
Phase 4: Upholstery Cleaning – Reviving Your Furniture
This is where things get a little more involved, but it’s so worth it!
1. Vacuuming: Start by vacuuming your sofa, chairs, and any other upholstered furniture. Use the crevice tool to get into tight spaces and the brush attachment to remove pet hair and lint.
2. Spot Cleaning: Treat any stains with an upholstery cleaner. Always test the cleaner in an inconspicuous area first to make sure it doesn’t damage the fabric. Follow the instructions on the cleaner carefully.
3. Deep Cleaning (Optional): If you have a steam cleaner, you can use it to deep clean your upholstery. This will help to remove dirt, allergens, and odors. Be sure to follow the instructions on the steam cleaner carefully. If you don’t have a steam cleaner, you can rent one or hire a professional upholstery cleaner.
4. Deodorizing: Sprinkle baking soda on your upholstery and let it sit for at least 30 minutes (or even overnight) to absorb odors. Then, vacuum it up.
Phase 5: Carpet and Rug Cleaning – A Fresh Foundation
Don’t forget about your carpets and rugs! They can trap a lot of dirt and allergens.
1. Vacuuming: Vacuum your carpets and rugs thoroughly. Go over high-traffic areas multiple times.
2. Spot Cleaning: Treat any stains with a carpet cleaner. Again, test the cleaner in an inconspicuous area first.
3. Deep Cleaning (Optional): If you have a steam cleaner, you can use it to deep clean your carpets and rugs. This will help to remove dirt, allergens, and odors. If you don’t have a steam cleaner, you can rent one or hire a professional carpet cleaner.
4. Deodorizing: Sprinkle baking soda on your carpets and rugs and let it sit for at least 30 minutes (or even overnight) to absorb odors. Then, vacuum it up.
Phase 6: Finishing Touches – The Little Things That Matter
Now that the major cleaning is done, let’s focus on the finishing touches that will really make your living room shine.
1. Arrange Furniture: Arrange your furniture in a way that is both functional and aesthetically pleasing.
2. Style Your Surfaces: Place your decorative items back on your coffee table, side tables, and shelves. Be mindful of creating a balanced and uncluttered look.
3. Fluff Pillows and Blankets: Fluff your pillows and fold your blankets neatly.
4. Add Fresh Flowers or Plants: A vase of fresh flowers or a potted plant can add a touch of life and freshness to your living room.
5. Light a Candle or Diffuse Essential Oils: Create a relaxing and inviting atmosphere with a scented candle or essential oil diffuser.
Bonus Tip: Maintaining Your Clean Living Room
The key to keeping your living room clean is to maintain it regularly. Here are a few tips:
* Daily: Tidy up clutter and wipe up spills immediately.
* Weekly: Vacuum carpets and rugs, dust surfaces, and clean hard floors.
* Monthly: Deep clean upholstery and carpets (if needed).
And that’s it! You’ve successfully deep cleaned your living room. Now, sit back, relax, and enjoy your sparkling clean space! I hope this guide has been helpful. Happy cleaning!

Conclusion
So, there you have it! Transforming your living room from a haven of accumulated dust and clutter to a sparkling sanctuary is entirely within your reach. This deep cleaning guide isn’t just about tidying up; it’s about reclaiming your space and creating an environment that promotes relaxation, productivity, and overall well-being. We’ve covered everything from decluttering strategies and furniture revitalization to window washing techniques and floor care secrets.
The beauty of this guide lies in its adaptability. Feel free to tailor the steps to suit your specific needs and preferences. For instance, if you’re dealing with particularly stubborn stains on your upholstery, consider using a specialized stain remover designed for your fabric type. Always test in an inconspicuous area first! Or, if you’re looking to add a touch of aromatherapy to your cleaning routine, incorporate essential oils into your cleaning solutions. Lavender, lemon, and eucalyptus are all excellent choices for creating a fresh and inviting atmosphere.
Don’t underestimate the power of a truly clean living room. It’s more than just aesthetics; it’s about creating a healthier and more enjoyable living environment for you and your loved ones. A deep clean eliminates allergens, reduces dust mites, and improves air quality, all of which contribute to a better quality of life.
Remember, consistency is key. While a deep clean might seem daunting at first, breaking it down into manageable tasks and incorporating regular maintenance will make the process much easier in the long run. Aim to declutter and surface clean weekly, and schedule a more thorough deep clean every few months.
We truly believe that this living room deep cleaning guide will empower you to transform your space. But the real magic happens when you put these tips into action. So, roll up your sleeves, gather your supplies, and get ready to experience the joy of a sparkling clean living room.
We’re eager to hear about your experiences! Share your before-and-after photos, cleaning tips, and any variations you’ve tried in the comments below. Let’s create a community of clean living enthusiasts and inspire each other to maintain beautiful and healthy homes. What worked best for you? Did you discover any new cleaning hacks? Your insights could be invaluable to other readers. Don’t be shy – share your story!
Frequently Asked Questions (FAQ)
What’s the best way to tackle a really cluttered living room before I even start cleaning?
The key to conquering a cluttered living room is to declutter strategically. Start by dividing your belongings into three categories: items to keep, items to donate or sell, and items to discard. Be honest with yourself about what you truly need and use. A helpful tip is to use the “one-year rule”: if you haven’t used an item in the past year, it’s likely time to let it go. Once you’ve decluttered, invest in storage solutions like baskets, shelves, and ottomans to keep your belongings organized and out of sight. Remember, a clutter-free space is much easier to clean and maintain.
How often should I deep clean my living room?
The frequency of deep cleaning depends on several factors, including the size of your household, the presence of pets, and your lifestyle. As a general guideline, aim to deep clean your living room every 3-6 months. However, if you have pets or allergies, you may need to deep clean more frequently. Regular maintenance cleaning, such as vacuuming, dusting, and wiping down surfaces, should be done weekly to prevent dirt and grime from building up.
What are some eco-friendly cleaning solutions I can use in my living room?
There are many eco-friendly cleaning solutions you can use to clean your living room without harming the environment or your health. Vinegar is a versatile cleaner that can be used to clean windows, floors, and countertops. Baking soda is a natural deodorizer and abrasive cleaner that can be used to remove stains and scrub surfaces. Lemon juice is a natural disinfectant and degreaser. You can also purchase eco-friendly cleaning products from your local grocery store or online retailer. Look for products that are biodegradable, non-toxic, and free of harsh chemicals.
How do I clean delicate fabrics like velvet or silk upholstery?
Cleaning delicate fabrics requires extra care to avoid damaging the material. Always check the manufacturer’s instructions before cleaning any upholstery. For velvet, gently vacuum the surface with a soft brush attachment to remove dust and debris. For stains, blot the area with a clean, damp cloth and a mild detergent solution. Avoid rubbing, as this can damage the fibers. For silk, it’s best to consult a professional upholstery cleaner. They have the expertise and equipment to clean silk without causing damage.
What’s the best way to remove pet hair from my living room furniture and carpets?
Pet hair can be a challenge to remove, but there are several effective methods. A rubber glove or a damp sponge can be used to wipe down furniture and carpets, attracting pet hair like a magnet. Vacuum cleaners with pet hair attachments are also very effective. For carpets, consider using a carpet rake to loosen embedded pet hair before vacuuming. You can also use a lint roller to remove pet hair from clothing and furniture. Regular grooming of your pets will also help to reduce the amount of pet hair in your living room.
How can I prevent dust from accumulating in my living room so quickly?
Preventing dust accumulation requires a multi-pronged approach. First, regularly dust your living room with a microfiber cloth, which traps dust more effectively than traditional cloths. Second, vacuum your carpets and rugs at least once a week. Third, consider using an air purifier to remove dust and allergens from the air. Fourth, keep windows and doors closed as much as possible to prevent dust from entering your living room. Finally, declutter your living room to reduce the number of surfaces that can collect dust.
My wooden furniture has water stains. How can I remove them?
Water stains on wooden furniture can be unsightly, but they can often be removed with a few simple tricks. Try using a hairdryer on a low setting to gently heat the stained area. The heat can help to evaporate the moisture trapped in the wood. You can also try rubbing the stain with a cloth dampened with mayonnaise or petroleum jelly. Let it sit for a few hours, then wipe it away with a clean cloth. For more stubborn stains, you may need to use a furniture polish or a specialized stain remover. Always test any cleaning solution in an inconspicuous area first.
What’s the best way to clean my living room windows for a streak-free shine?
Achieving streak-free windows requires the right technique and cleaning solution. Use a mixture of equal parts white vinegar and water in a spray bottle. Spray the windows and wipe them down with a clean microfiber cloth. Avoid using paper towels, as they can leave streaks. For stubborn dirt and grime, you can add a few drops of dish soap to the cleaning solution. Wipe the windows dry with a separate, clean microfiber cloth. Clean your windows on a cloudy day to prevent the cleaning solution from drying too quickly and leaving streaks.
How do I get rid of lingering odors in my living room?
Lingering odors can be caused by a variety of factors, including pets, cooking, and moisture. To eliminate odors, start by identifying the source. Clean any spills or messes immediately. Open windows and doors to ventilate the room. Place bowls of baking soda or activated charcoal in the living room to absorb odors. You can also use an air freshener or essential oil diffuser to create a pleasant scent. For persistent odors, consider hiring a professional cleaning service.
What are some simple ways to maintain a clean living room after a deep clean?
Maintaining a clean living room after a deep clean is all about establishing good habits. Make it a habit to declutter daily, putting away items as soon as you’re finished using them. Wipe down surfaces regularly to prevent dust and grime from building up. Vacuum or sweep the floors at least once a week. Encourage family members to participate in keeping the living room clean. By incorporating these simple habits into your daily routine, you can keep your living room looking its best.
Leave a Comment