

Grow Bitter Melon Easily, even if you think you don’t have a green thumb! Have you ever dreamt of harvesting your own vibrant, knobbly bitter melons right from your backyard? It might sound intimidating, but trust me, it’s more achievable than you think! This DIY guide is packed with simple tricks and hacks that will transform your garden into a bitter melon haven.
Bitter melon, also known as bitter gourd or karela, has a rich history deeply rooted in Asian cuisine and traditional medicine. For centuries, it’s been celebrated for its unique flavor and potential health benefits. From stir-fries to juices, this fascinating fruit has found its way into countless dishes and remedies across cultures. But beyond its culinary and medicinal uses, growing your own bitter melon is incredibly rewarding.
Why should you embark on this bitter melon adventure? Well, for starters, you’ll have access to fresh, organic produce right at your fingertips. Plus, you’ll gain a deeper appreciation for the journey from seed to table. More importantly, mastering how to grow bitter melon easily allows you to control the growing environment, ensuring your harvest is free from harmful pesticides and chemicals. So, let’s dive in and unlock the secrets to a bountiful bitter melon harvest!
Grow Bitter Melon Like a Pro: My Foolproof DIY Guide
Hey there, fellow gardening enthusiasts! I’m so excited to share my tried-and-true method for growing bitter melon, also known as karela, at home. It might seem intimidating at first, but trust me, with a little patience and these simple steps, you’ll be harvesting your own delicious (and slightly bitter!) gourds in no time. I’ve learned a lot over the years, and I’m here to guide you through the entire process, from seed to harvest.
Getting Started: What You’ll Need
Before we dive into the nitty-gritty, let’s gather our supplies. Here’s a checklist of everything you’ll need to successfully grow bitter melon:
* Bitter Melon Seeds: Choose a variety that suits your climate and taste preferences. You can find these online or at your local garden center. I personally prefer the long, light green varieties.
* Seed Starting Trays or Small Pots: These will be used to germinate the seeds indoors.
* Seed Starting Mix: A light, well-draining mix is crucial for healthy seedling development.
* Larger Pots or a Garden Bed: Once the seedlings are strong enough, they’ll need a permanent home. Make sure your pots are at least 12 inches in diameter, or prepare a sunny spot in your garden.
* Well-Draining Soil: Bitter melon thrives in soil that’s rich in organic matter and drains well. Amend your garden soil with compost or aged manure.
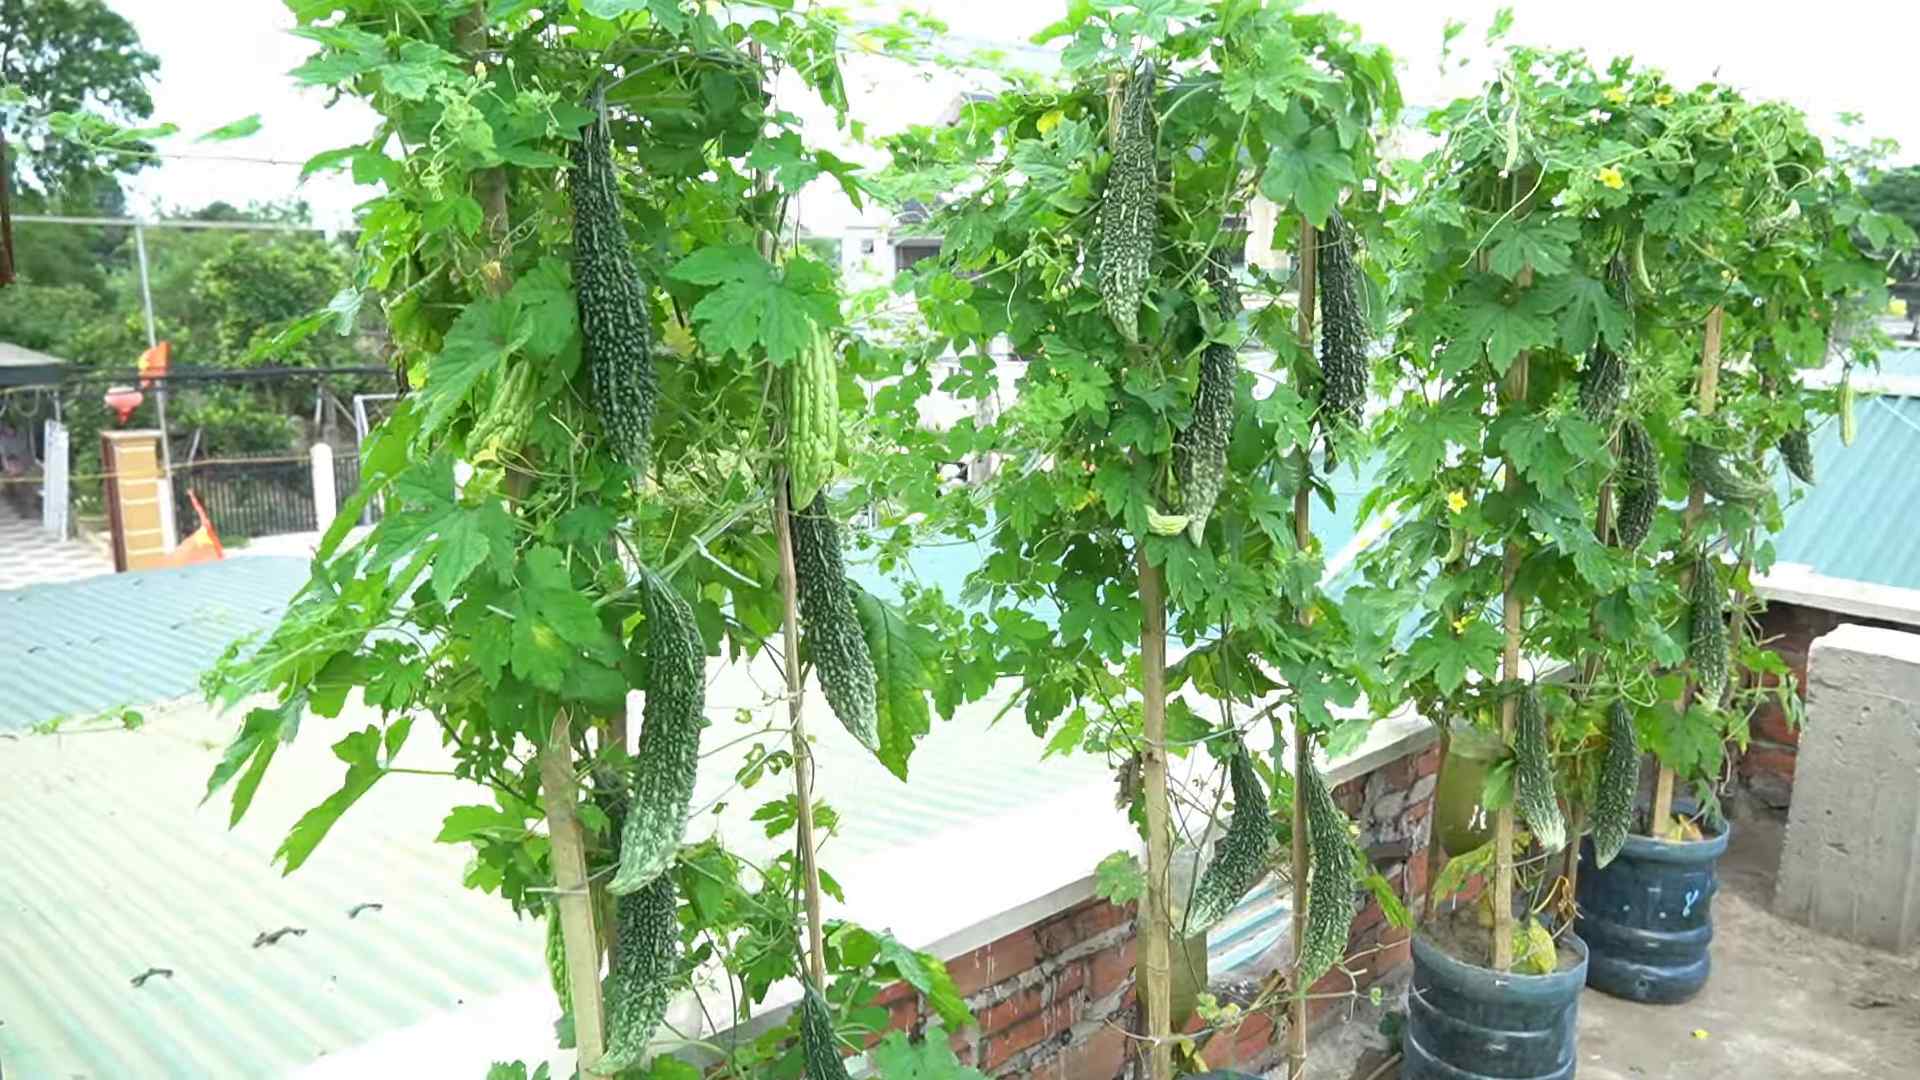
* Trellis or Support Structure: Bitter melon is a vine, so it needs something to climb on. A trellis, fence, or even a sturdy bamboo structure will work perfectly.
* Fertilizer: A balanced fertilizer, such as 10-10-10, will provide the necessary nutrients for healthy growth and fruit production.
* Watering Can or Hose: Regular watering is essential, especially during hot weather.
* Gardening Gloves: To protect your hands from dirt and potential irritants.
* Pruning Shears: For trimming and shaping the vines.
* Patience: Growing anything takes time and care!
Phase 1: Germinating Your Bitter Melon Seeds
Bitter melon seeds have a tough outer shell, so we need to give them a little head start to improve germination rates. Here’s how I do it:
1. Scarification: Gently nick the seed coat with a knife or sandpaper. Be careful not to damage the inner seed. This helps water penetrate the seed more easily.
2. Soaking: Soak the seeds in warm water for 24-48 hours. This further softens the seed coat and encourages germination. I usually change the water every 12 hours.
3. Planting: Fill your seed starting trays or small pots with seed starting mix. Make a small hole about 1/2 inch deep and place one seed in each hole. Cover the seeds with soil and gently water.
4. Warmth and Humidity: Bitter melon seeds need warmth to germinate. Place the trays in a warm location, such as on top of a refrigerator or near a sunny window. You can also use a heat mat. Cover the trays with a plastic dome or plastic wrap to create a humid environment.
5. Patience is Key: Germination can take anywhere from 7-21 days, depending on the temperature and seed quality. Keep the soil consistently moist but not waterlogged.
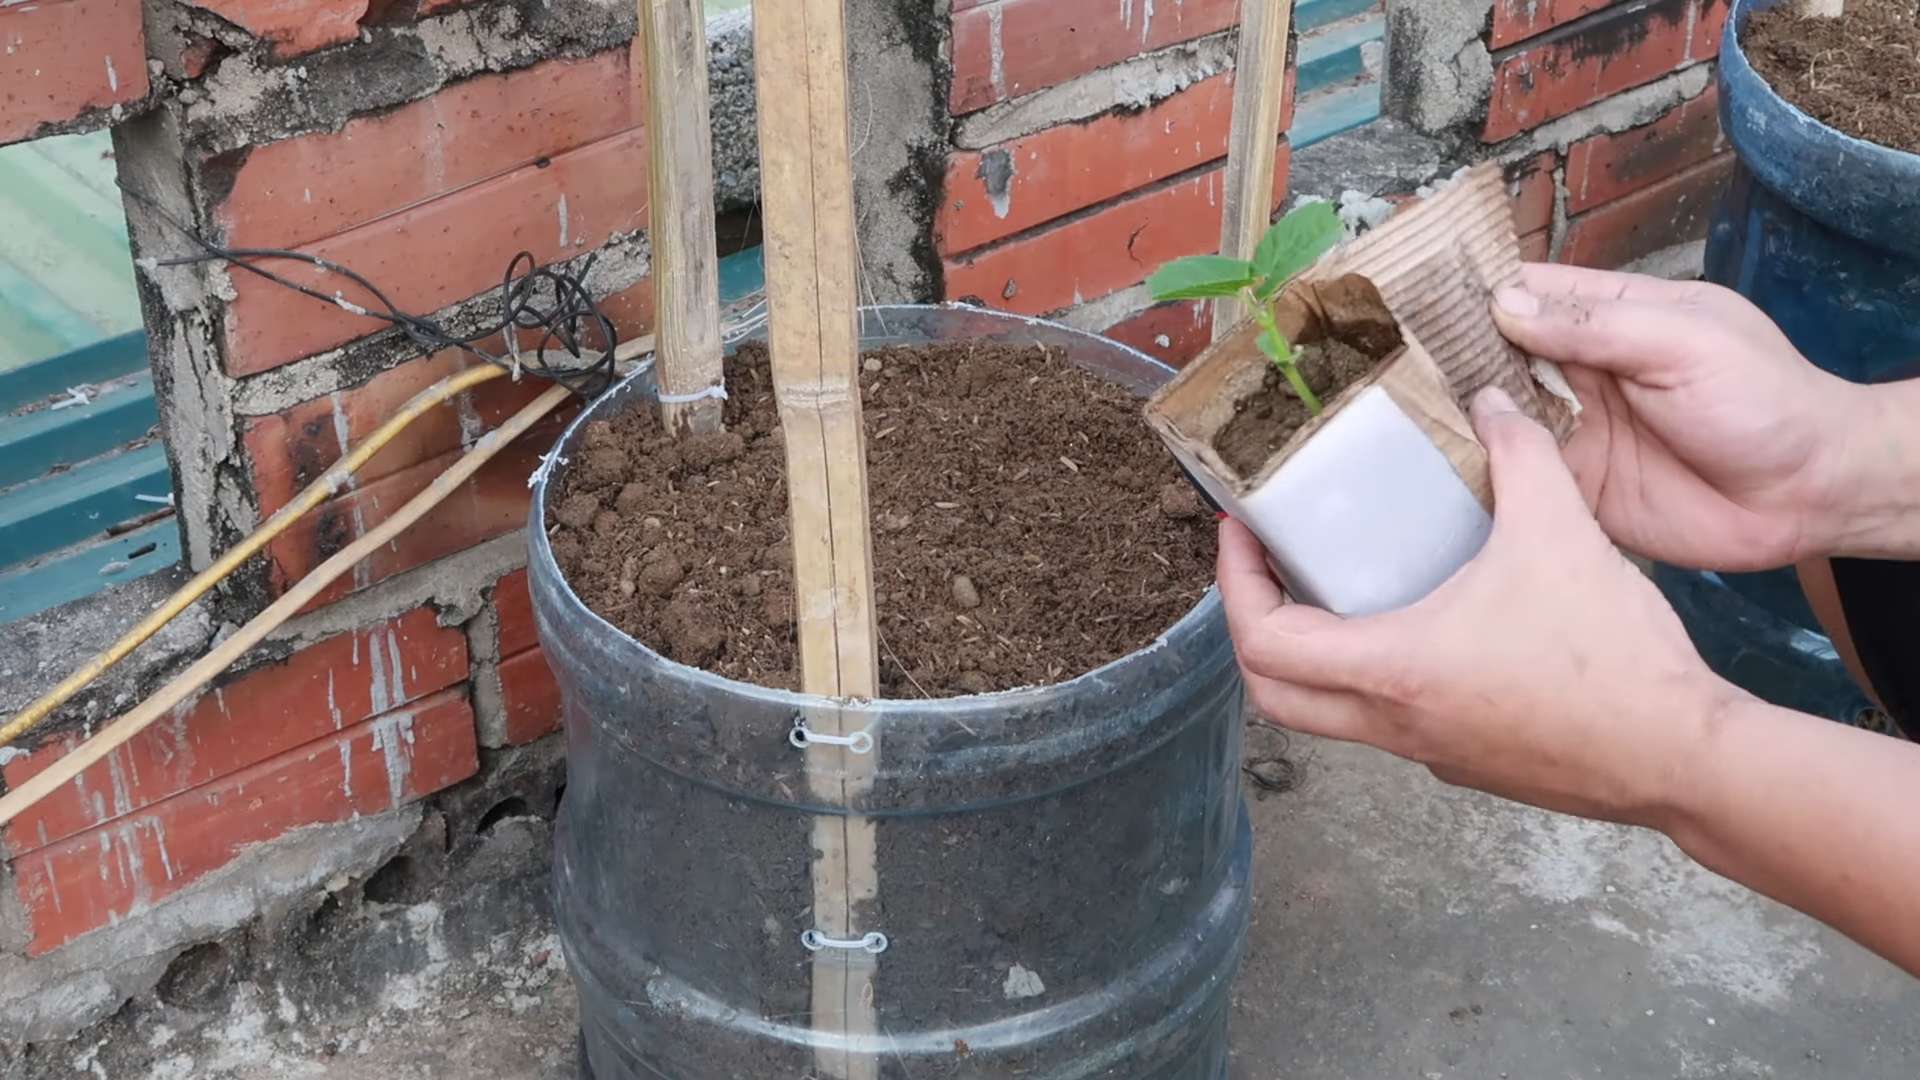
Phase 2: Transplanting Your Seedlings
Once your seedlings have developed a few sets of true leaves (usually after 2-3 weeks), it’s time to transplant them to their permanent home.
1. Hardening Off: Before transplanting, you need to “harden off” the seedlings. This means gradually exposing them to outdoor conditions to acclimate them to the sun, wind, and temperature changes. Start by placing the trays outdoors for a few hours each day, gradually increasing the time over a week.
2. Preparing the Soil: Choose a sunny location in your garden or prepare your larger pots. Bitter melon needs at least 6-8 hours of sunlight per day. Amend the soil with compost or aged manure to improve drainage and fertility.
3. Transplanting: Gently remove the seedlings from the trays or pots, being careful not to damage the roots. Dig a hole slightly larger than the root ball and place the seedling in the hole. Backfill with soil and gently water. Space the plants about 2-3 feet apart.
4. Adding Support: Immediately after transplanting, install your trellis or support structure. Bitter melon vines will start to climb as they grow.
Phase 3: Caring for Your Bitter Melon Plants
Now that your plants are in the ground, it’s time to provide them with the care they need to thrive.
1. Watering: Water regularly, especially during hot weather. Keep the soil consistently moist but not waterlogged. Avoid overhead watering, as this can lead to fungal diseases. I prefer to water deeply at the base of the plant.
2. Fertilizing: Fertilize every 2-3 weeks with a balanced fertilizer, such as 10-10-10. Follow the instructions on the fertilizer package. You can also use organic fertilizers, such as compost tea or fish emulsion.
3. Pruning: Prune the vines regularly to encourage branching and fruit production. Remove any yellowing or dead leaves. You can also pinch off the tips of the vines to promote bushier growth.
4. Pest and Disease Control: Keep an eye out for pests such as aphids, spider mites, and squash bugs. You can control these pests with insecticidal soap or neem oil. Bitter melon is also susceptible to fungal diseases such as powdery mildew. Prevent these diseases by providing good air circulation and avoiding overhead watering. I sometimes use a copper fungicide as a preventative measure.
5. Training the Vines: As the vines grow, gently guide them onto the trellis or support structure. You can use twine or plant clips to secure them.
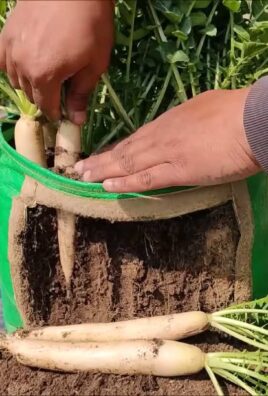
Phase 4: Harvesting Your Bitter Melon
The moment we’ve all been waiting for! Harvesting your own homegrown bitter melon is incredibly rewarding.
1. Timing: Bitter melon is typically ready to harvest about 2-3 months after planting. The fruits should be firm and green, with a slightly waxy coating. The size will vary depending on the variety.
2. Harvesting: Use pruning shears or a sharp knife to cut the fruit from the vine, leaving a short stem attached.
3. Enjoying Your Harvest: Bitter melon has a distinctively bitter taste, which some people find off-putting. However, there are many ways to prepare it to reduce the bitterness. Soaking the slices in salt water for 30 minutes before cooking can help. It’s commonly used in stir-fries, curries, and soups. I personally love it in a simple stir-fry with eggs and garlic.
Troubleshooting: Common Problems and Solutions
Even with the best care, you might encounter some challenges along the way. Here are some common problems and how to address them:
* Poor Germination: If your seeds aren’t germinating, make sure the soil is warm enough and consistently moist. You can also try scarifying and soaking the seeds for a longer period.
* Yellowing Leaves: Yellowing leaves can be a sign of overwatering, underwatering, or nutrient deficiency. Adjust your watering schedule and fertilize regularly.
* Lack of Fruit Production: Lack of fruit can be caused by insufficient sunlight, poor pollination, or nutrient deficiency. Make sure your plants are getting enough sunlight and fertilize regularly. You can also hand-pollinate the flowers by transferring pollen from the male flowers to the female flowers with a small brush.
* Pest Infestations: Regularly inspect your plants for pests and take action immediately if you find any. Insecticidal soap and neem oil are effective treatments for many common pests.
* Fungal Diseases: Prevent fungal diseases by providing good air circulation and avoiding overhead watering. Copper fungicide can be used as a preventative measure.
Extra Tips for Success
* Choose the Right Variety: Different varieties of bitter melon have different levels of bitterness. If you’re new to growing bitter melon, start with a less bitter variety.
* Improve Soil Drainage: Bitter melon needs well-draining soil. If your soil is heavy clay, amend it with compost, sand, or perlite.
* Provide Adequate Support: Bitter melon vines can grow quite long, so make sure your trellis or support structure is strong enough to support the weight of the vines and fruits.
* Harvest Regularly: Harvesting the fruits regularly encourages the plant to produce more.
* Don’t Be Afraid to Experiment: Gardening is all about learning and experimenting. Don’t be afraid to try different techniques and see what works best for you.
Growing bitter melon can be a rewarding experience. With a little care and attention, you can enjoy fresh, homegrown gourds
Conclusion
So, there you have it! Growing bitter melon easily at home is not only achievable but also incredibly rewarding. We’ve walked you through a simple yet effective DIY trick that bypasses common germination hurdles and sets your bitter melon plants up for vigorous growth and abundant harvests. Forget struggling with inconsistent results or relying solely on store-bought seedlings. This method empowers you to take control of your garden and enjoy the satisfaction of nurturing your own bitter melon from seed to table.
Why is this a must-try? Because it addresses the biggest challenge faced by many gardeners: the notoriously difficult germination of bitter melon seeds. By pre-treating the seeds with our recommended method, you significantly increase your chances of success, saving you time, money, and frustration. Imagine the joy of watching those stubborn seeds finally sprout, knowing you played a crucial role in their journey.
But the benefits don’t stop there. Growing your own bitter melon allows you to control the entire process, from soil quality to pest management. You can choose organic methods, ensuring that your harvest is free from harmful chemicals. Plus, you’ll have access to fresh, flavorful bitter melon whenever you need it, perfect for adding a unique and healthy twist to your culinary creations.
Looking for variations? Absolutely! Experiment with different types of bitter melon seeds. There are numerous varieties available, each with its own distinct flavor and appearance. Some are more bitter than others, while some have smoother skin or a different shape. Try growing a few different varieties side-by-side to discover your personal favorite.
Another variation involves the growing medium. While we recommend a well-draining potting mix, you can also experiment with different soil amendments, such as compost or aged manure, to further enrich the soil and provide your plants with the nutrients they need to thrive. Consider adding a trellis or other support structure to your garden. Bitter melon vines can grow quite long, and providing them with a sturdy support will help them stay healthy and productive.
Don’t be afraid to get creative with your growing setup. If you live in an area with a short growing season, you can start your seeds indoors a few weeks before the last frost. This will give your plants a head start and ensure that they have enough time to mature before the weather turns cold. You can also grow bitter melon in containers, making it a great option for those with limited space. Just be sure to choose a large container with good drainage.
We are confident that this DIY trick will revolutionize your bitter melon growing experience. It’s simple, effective, and yields impressive results. So, what are you waiting for? Grab some bitter melon seeds, follow our instructions, and get ready to enjoy a bountiful harvest.
We encourage you to try this method and share your experience with us. Post photos of your seedlings, tell us about any variations you tried, and let us know how this DIY trick helped you grow bitter melon easily. Your feedback is invaluable and will help us continue to improve our gardening tips and techniques. Happy gardening!
Frequently Asked Questions (FAQ)
1. What exactly makes bitter melon seeds so difficult to germinate?
Bitter melon seeds have a naturally hard seed coat that can inhibit water absorption and prevent the embryo from breaking through. This dormancy mechanism is designed to protect the seed in harsh conditions, but it can be frustrating for gardeners trying to cultivate them. The seed coat acts as a physical barrier, slowing down the germination process and leading to inconsistent results. Furthermore, some bitter melon varieties have a higher percentage of dormant seeds than others, making germination even more challenging. The key to successful germination lies in overcoming this seed coat barrier and providing the seed with the optimal conditions for sprouting.
2. Can I skip the scarification step and still expect good germination rates?
While it’s possible that some seeds might germinate without scarification, the chances of success are significantly lower. Scarification, which involves gently nicking or filing the seed coat, helps to break down this barrier and allows water to penetrate more easily. This process dramatically increases the germination rate and ensures that more of your seeds sprout successfully. Skipping this step is essentially leaving the seed to its own devices, which can result in delayed germination, uneven sprouting, or even complete failure. For best results, always scarify your bitter melon seeds before planting.
3. How long should I soak the seeds after scarification?
We recommend soaking the scarified seeds in warm water for 12-24 hours. This soaking period allows the seeds to fully hydrate, further softening the seed coat and stimulating the germination process. The warm water helps to activate enzymes within the seed that are essential for sprouting. Avoid soaking the seeds for longer than 24 hours, as this can lead to over-saturation and potentially cause the seeds to rot. A 12-24 hour soak is the sweet spot for optimal hydration and germination.
4. What type of soil is best for growing bitter melon?
Bitter melon thrives in well-draining soil that is rich in organic matter. A loamy soil is ideal, as it provides a good balance of drainage and water retention. Avoid heavy clay soils, as they can become waterlogged and suffocate the roots. Before planting, amend your soil with compost or aged manure to improve its fertility and drainage. A slightly acidic to neutral pH (around 6.0 to 7.0) is also preferred. Regular fertilization throughout the growing season will help to ensure that your plants receive the nutrients they need to produce a bountiful harvest.
5. How much sunlight does bitter melon need?
Bitter melon requires at least 6-8 hours of direct sunlight per day to thrive. Choose a planting location that receives plenty of sunlight throughout the day. If you are growing bitter melon indoors, use grow lights to supplement natural sunlight. Insufficient sunlight can lead to stunted growth, reduced flowering, and a smaller harvest. The more sunlight your bitter melon plants receive, the more vigorous and productive they will be.
6. How often should I water my bitter melon plants?
Water your bitter melon plants regularly, especially during hot and dry weather. Keep the soil consistently moist, but avoid overwatering, which can lead to root rot. Water deeply whenever the top inch of soil feels dry to the touch. Mulching around the plants can help to retain moisture and suppress weeds. During periods of heavy rainfall, you may need to reduce watering frequency. The key is to maintain a balance between adequate moisture and good drainage.
7. What are some common pests and diseases that affect bitter melon, and how can I prevent them?
Common pests that affect bitter melon include aphids, spider mites, and squash bugs. These pests can be controlled with insecticidal soap, neem oil, or by handpicking them off the plants. Diseases that can affect bitter melon include powdery mildew and downy mildew. These diseases can be prevented by ensuring good air circulation around the plants, avoiding overhead watering, and applying a fungicide if necessary. Regularly inspect your plants for signs of pests or diseases and take action promptly to prevent them from spreading.
8. When is the best time to harvest bitter melon?
Bitter melon is typically ready to harvest about 2-3 months after planting. The fruits should be firm and green, with a slightly waxy coating. Harvest them before they turn yellow or orange, as they will become more bitter as they ripen. Use a sharp knife or pruning shears to cut the fruits from the vine, leaving a short stem attached. Regular harvesting will encourage the plant to produce more fruits.
9. Can I grow bitter melon in containers?
Yes, bitter melon can be successfully grown in containers, making it a great option for those with limited space. Choose a large container (at least 10 gallons) with good drainage. Use a well-draining potting mix and provide the plants with plenty of sunlight and water. You will also need to provide a trellis or other support structure for the vines to climb on. Container-grown bitter melon may require more frequent fertilization than plants grown in the ground.
10. What are some creative ways to use bitter melon in cooking?
Bitter melon can be used in a variety of culinary dishes. It is commonly stir-fried, stuffed, or added to soups and stews. To reduce the bitterness, you can soak the sliced melon in salted water for about 30 minutes before cooking. Bitter melon pairs well with savory flavors, such as garlic, ginger, and soy sauce. It can also be used in salads or pickled. Experiment with different recipes and find your favorite way to enjoy this unique and healthy vegetable.
Leave a Comment