

Aloe vera leaf cuttings: sounds intimidating, right? But trust me, propagating aloe vera from leaf cuttings is easier than you think, and I’m here to show you how! Forget spending money on new aloe plants when you can create your own little aloe army with just a few simple steps.
Aloe vera has a rich history, dating back thousands of years. Ancient Egyptians revered it as the “plant of immortality,” using it for its medicinal properties and beauty benefits. Cleopatra herself was rumored to use aloe vera in her skincare routine! This succulent has been a staple in traditional medicine across cultures, from treating burns to soothing digestive issues. Now, you can harness its power right in your own home.
Why should you learn this DIY trick? Well, for starters, aloe vera is a fantastic plant to have around. It’s a natural air purifier, releasing oxygen and absorbing carbon dioxide. Plus, its gel is a miracle worker for sunburns, minor cuts, and dry skin. But more importantly, propagating aloe vera leaf cuttings is a sustainable and cost-effective way to expand your plant collection. Imagine having an endless supply of aloe vera to share with friends and family, all thanks to your green thumb! So, let’s dive in and unlock the secrets to successful aloe vera propagation!
Propagating Aloe Vera from Leaf Cuttings: A Comprehensive Guide
Hey there, plant enthusiasts! Ever wondered if you could multiply your aloe vera collection without buying new plants? Well, I’m here to tell you that you absolutely can! While propagating aloe vera from pups (those little baby plants that sprout around the base) is the most common and arguably easiest method, propagating from leaf cuttings is also possible, though it requires a bit more patience and a slightly different approach. Let’s dive into how you can successfully propagate aloe vera from leaf cuttings.
Understanding the Challenge
Before we get started, it’s important to understand that aloe vera leaf cuttings don’t root in the same way as many other succulents. They don’t readily produce roots directly from the cut end of the leaf. Instead, the goal is to encourage the cutting to produce a “pup,” a baby aloe plant, which will then develop its own root system. This process can take several weeks or even months, so be prepared for a bit of a waiting game.
What You’ll Need
* A healthy aloe vera plant: Choose a mature plant with plump, healthy leaves.
* A sharp, clean knife or pruning shears: Sterilize your cutting tool with rubbing alcohol to prevent infection.
* Well-draining potting mix: A cactus or succulent mix is ideal. You can also make your own by mixing regular potting soil with perlite and coarse sand.
* A small pot or container: Make sure it has drainage holes.
* Rooting hormone (optional): While not essential, rooting hormone can help stimulate pup development.
* A spray bottle with water.
* A warm, bright location with indirect sunlight.
Taking the Leaf Cutting
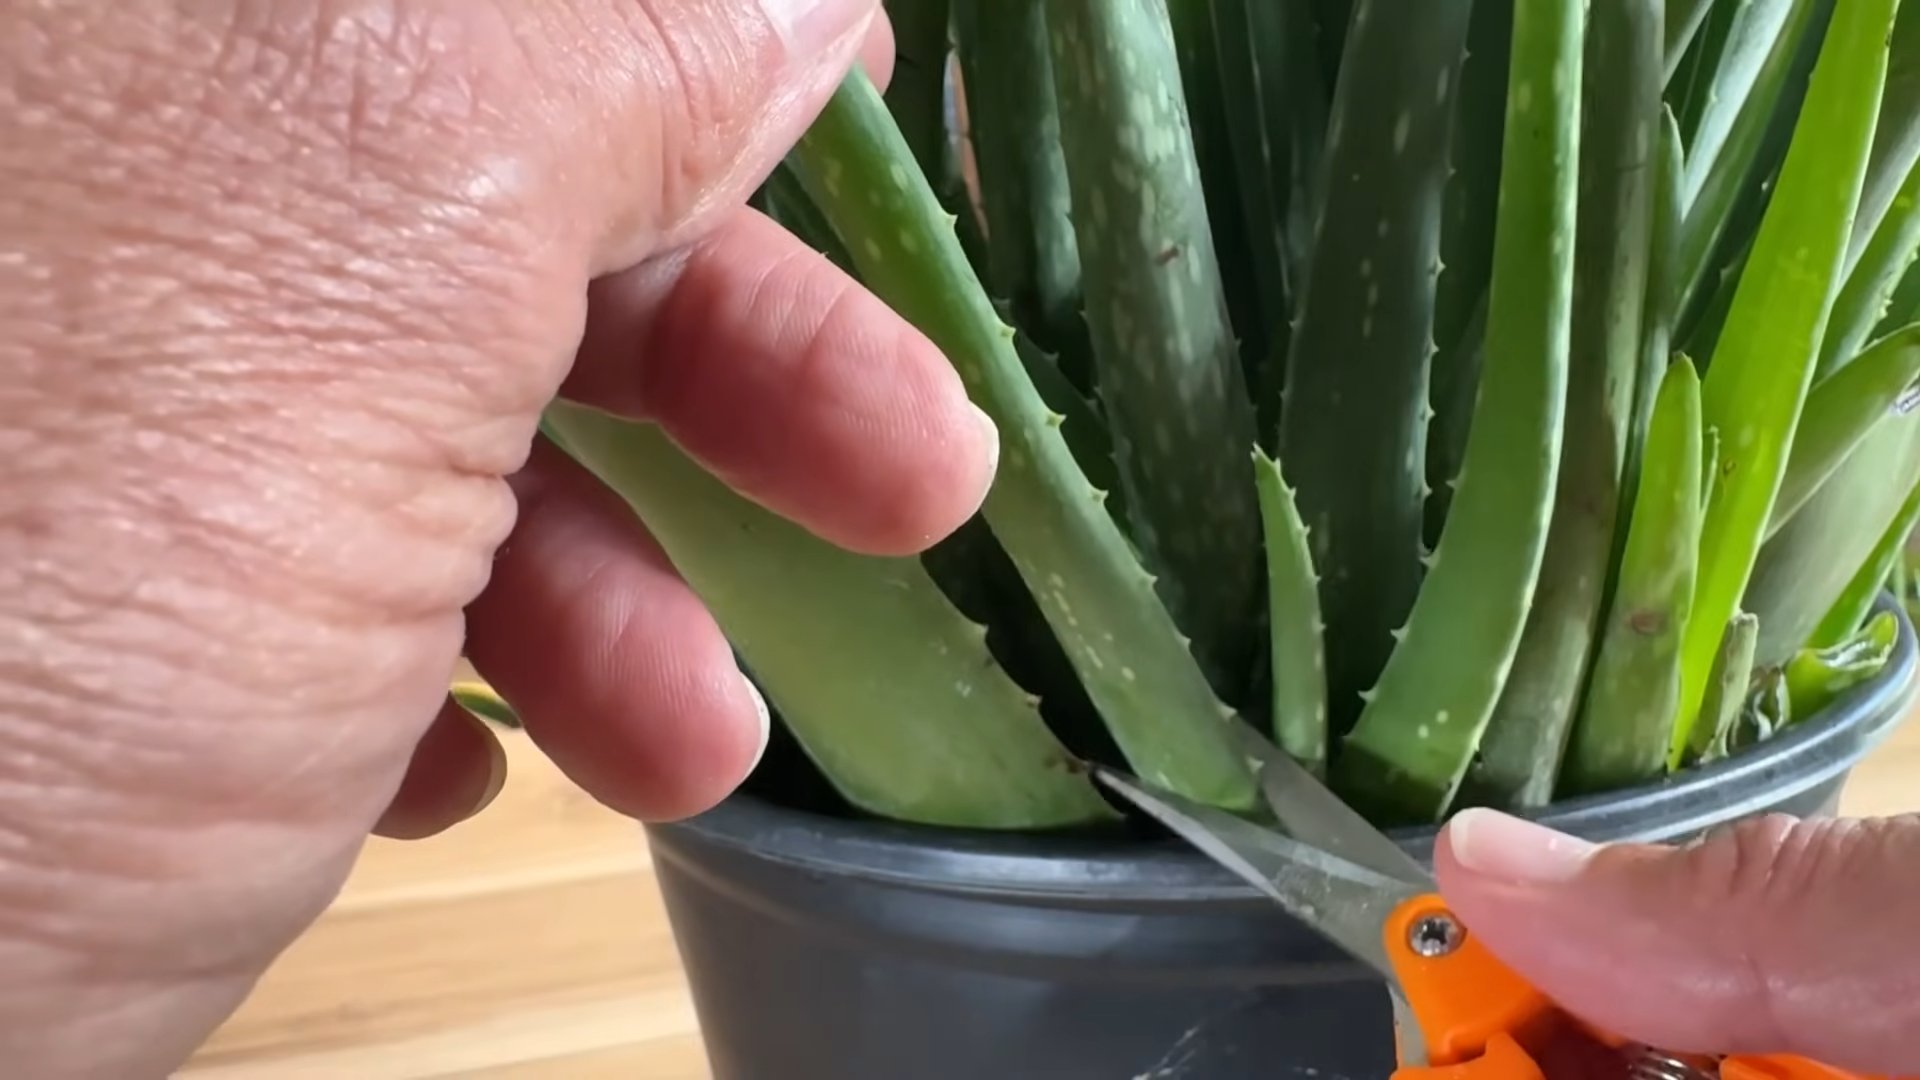
1. Selecting the Right Leaf: Choose a mature, healthy leaf from the lower part of your aloe vera plant. Avoid leaves that are damaged, discolored, or too young. A good leaf will be firm and plump.
2. Making the Cut: Using your sterilized knife or pruning shears, make a clean cut as close to the base of the plant as possible. Try to get as much of the leaf base as you can without damaging the main plant. A clean cut is crucial to prevent rot.
3. Callusing the Cutting: This is a vital step! Place the cut end of the leaf cutting in a dry, shaded area for several days, or even up to a week. This allows the cut surface to callus over, forming a protective layer that prevents rot when you plant it. You’ll know it’s ready when the cut end is dry and slightly hardened. I usually just lay mine on a paper towel on a shelf in my garage.
Planting the Cutting
1. Preparing the Pot: Fill your pot with the well-draining potting mix. Moisten the soil slightly, but don’t soak it. You want it damp, not dripping.
2. Applying Rooting Hormone (Optional): If you’re using rooting hormone, dip the calloused end of the leaf cutting into the powder or liquid. Follow the instructions on the product label.
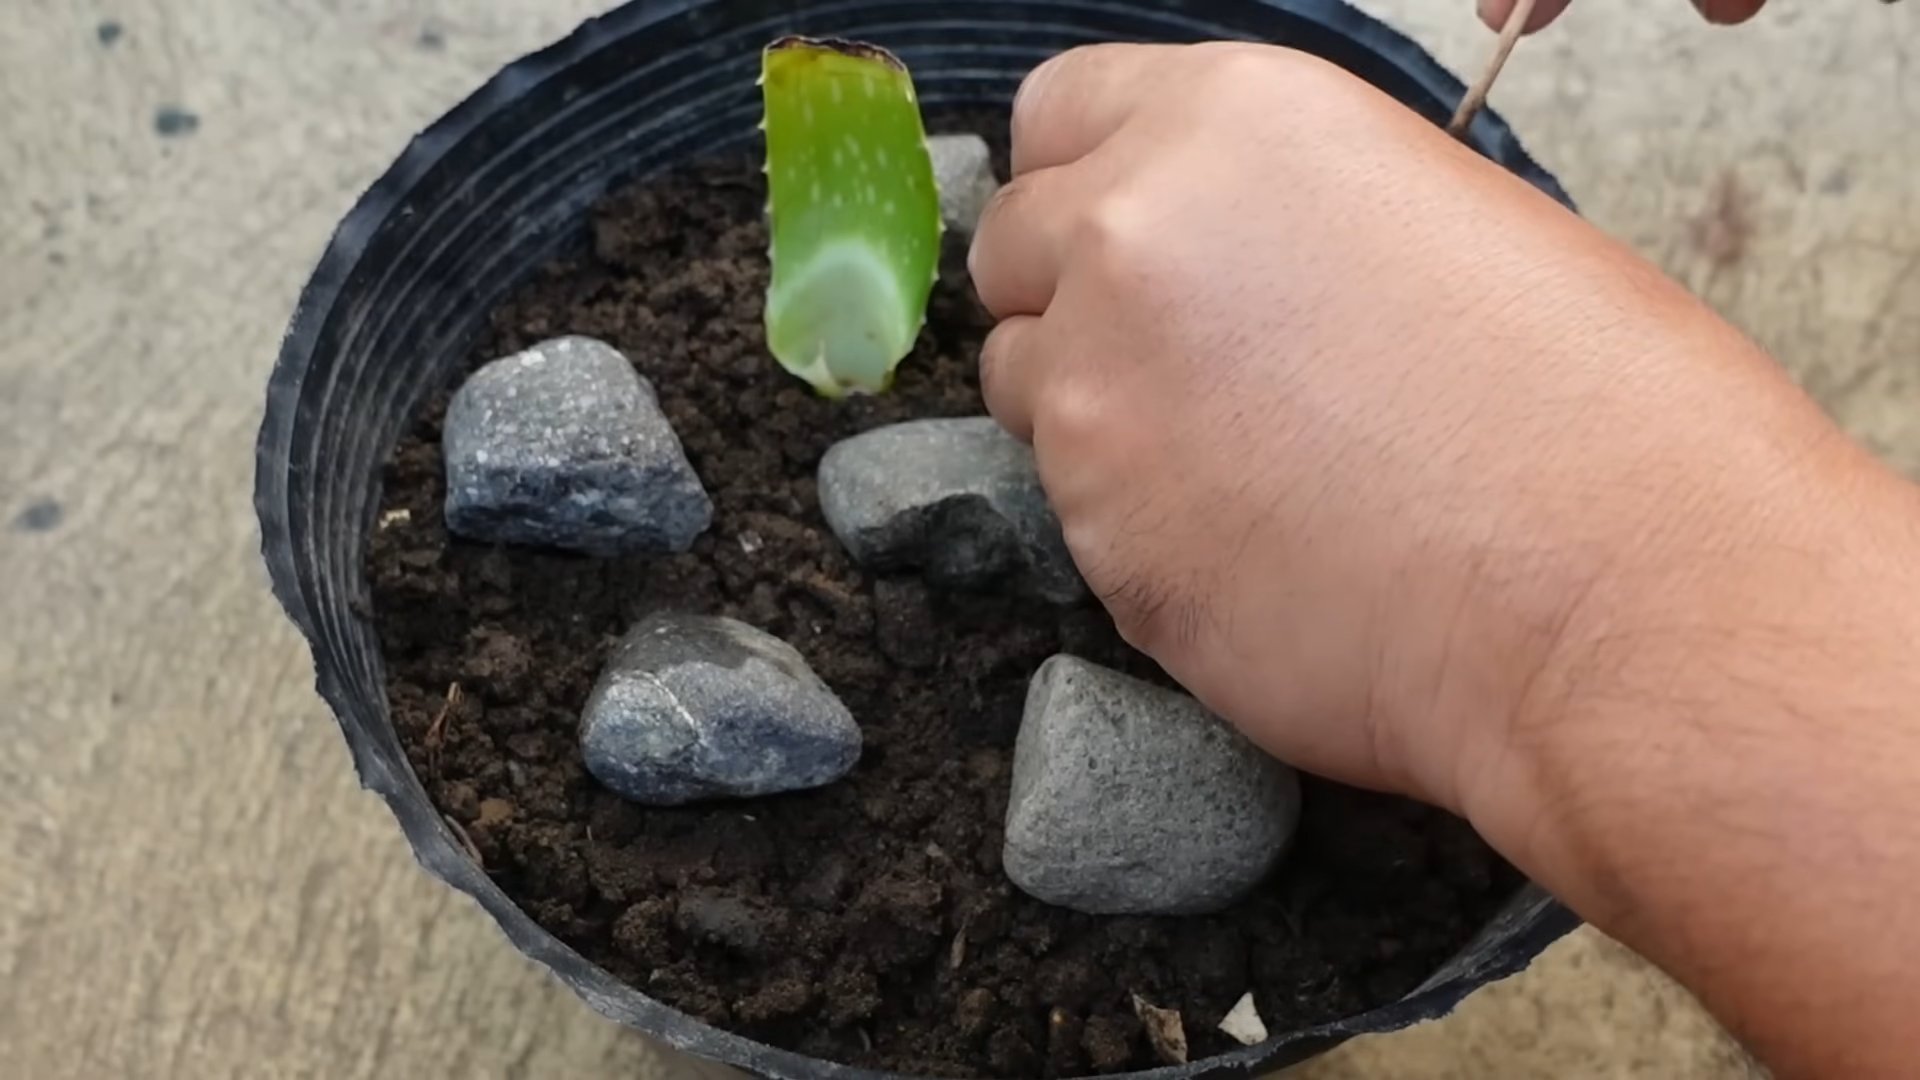
3. Planting the Cutting: Insert the calloused end of the leaf cutting into the potting mix, burying it about 1-2 inches deep. You can use a small stick or pencil to create a hole in the soil first to avoid damaging the calloused end.
4. Securing the Cutting: Aloe vera leaves can be a bit top-heavy, so you might need to support the cutting to keep it upright. You can use small pebbles, chopsticks, or even toothpicks to prop it up.
Caring for the Cutting
1. Location, Location, Location: Place the pot in a warm, bright location with indirect sunlight. Avoid direct sunlight, as it can scorch the leaf. A windowsill facing east or west is usually a good choice.
2. Watering: Water sparingly! Aloe vera is a succulent and doesn’t like to be overwatered. Allow the soil to dry out completely between waterings. When you do water, use a spray bottle to lightly moisten the soil around the base of the cutting. Avoid getting water on the leaf itself, as this can promote rot. I usually mist the soil every week or two, depending on how quickly it dries out.
3. Patience is Key: Now comes the hard part: waiting. It can take several weeks or even months for a pup to develop. During this time, be patient and continue to provide the right conditions. Don’t be tempted to dig up the cutting to check for roots, as this can disturb the process.
4. Signs of Success: The first sign that your cutting is producing a pup will be the appearance of a tiny new plant emerging from the base of the leaf cutting, near the soil line. It will look like a miniature version of the parent plant.
Transplanting the Pup
1. Waiting for Growth: Once the pup has grown to a reasonable size (a few inches tall) and has developed its own root system, it’s time to transplant it into its own pot.
2. Carefully Removing the Pup: Gently remove the entire cutting from the pot. You may need to carefully tease the roots apart from the original leaf cutting.
3. Potting the Pup: Plant the pup in its own pot filled with well-draining potting mix. Water it lightly and place it in a bright location with indirect sunlight.
4. Caring for the New Plant: Care for your new aloe vera plant as you would any other aloe vera plant. Water sparingly, allow the soil to dry out between waterings, and provide plenty of indirect sunlight.
Troubleshooting
* Rotting: If the leaf cutting starts to rot, it’s likely due to overwatering or poor drainage. Remove the cutting from the pot, cut off any rotted portions, allow the cut end to callus again, and replant in fresh, well-draining potting mix.
* No Pup Development: If you’ve waited several months and still haven’t seen any signs of pup development, it could be due to a number of factors, such as insufficient light, improper watering, or a lack of nutrients. Try moving the cutting to a brighter location, adjusting your watering schedule, or adding a diluted fertilizer to the soil.
* Leaf Drying Out: It’s normal for the original leaf cutting to eventually dry out and shrivel up. This is because the pup is drawing nutrients from the leaf. Once the pup is established, you can remove the dried-up leaf.
Alternative Method: Water Propagation (Advanced)
While soil propagation is generally recommended, some gardeners have had success with water propagation of aloe vera leaf cuttings. This method is a bit more challenging and requires careful monitoring to prevent rot.
1. Callus the Cutting: As with soil propagation, allow the cut end of the leaf cutting to callus over for several days.
2. Prepare a Container: Fill a glass or jar with water. Make sure the water is clean and free of chlorine. You can use distilled water or let tap water sit out for 24 hours to allow the chlorine to evaporate.
3. Submerge the Cutting: Place the calloused end of the leaf cutting in the water, making sure that only the very tip of the cutting is submerged. You can use toothpicks or a rubber band to suspend the cutting in the water.
4. Change the Water Regularly: Change the water every few days to prevent the growth of bacteria and algae.
5. Monitor for Roots: Keep an eye on the cutting for signs of root development. It can take several weeks for roots to appear.
6. Transplant to Soil: Once the roots have grown to a reasonable size (about an inch or two long), transplant the cutting into a pot filled with well-draining potting mix.
Important Note: Water propagation can be risky for aloe vera, as the leaves are prone to rotting in water. Be sure to change the water frequently and monitor the cutting closely for any signs of rot. If rot develops, remove the affected portion of the leaf and try again with a fresh cutting.
Tips for Success
* Use a sharp, clean cutting tool: This will help prevent infection and promote faster healing.
* Allow the cutting to callus properly: This is essential to prevent rot.
* Use well-draining potting mix: Aloe vera doesn’t like to sit in wet soil.
* Water sparingly: Overwatering is a common cause of failure.
* Provide plenty of indirect sunlight: Aloe vera needs light to grow, but direct sunlight can scorch the leaves.
* Be patient: Propagating aloe vera from leaf cuttings can take time. Don’t give up if you don’t see results immediately.
* Experiment: Not all aloe vera varieties propagate equally well from leaf cuttings. Don’t be afraid to experiment with different techniques and see what works best for you.
Final Thoughts
Propagating aloe vera from leaf cuttings is a rewarding, albeit slightly challenging, project. With a little patience and the right techniques, you can
Conclusion
So, there you have it! Transforming aloe vera leaf cuttings into thriving new plants is not only incredibly rewarding but also a fantastic way to expand your succulent collection without breaking the bank. This DIY propagation method is a must-try for any plant enthusiast, regardless of experience level. It’s simple, cost-effective, and yields impressive results.
Why is this method so compelling? First and foremost, it allows you to multiply your existing aloe vera plants, providing you with more of this versatile and beneficial succulent. Imagine having a readily available supply of fresh aloe vera gel for soothing sunburns, moisturizing your skin, or even adding to your smoothies. Secondly, it’s a sustainable approach to gardening. Instead of discarding those seemingly unusable leaf cuttings, you’re giving them a new lease on life, reducing waste and contributing to a greener environment. Finally, it’s a deeply satisfying experience to nurture a tiny cutting into a fully grown plant. Witnessing the roots emerge and the new growth appear is a testament to your patience and care.
But the fun doesn’t stop there! Feel free to experiment with different variations of this DIY trick. For example, you can try using different rooting mediums, such as perlite or vermiculite, to see which one works best for your specific environment. You could also experiment with different sizes of leaf cuttings, although smaller cuttings may be less likely to succeed. Consider using a rooting hormone to further encourage root development, especially if you’re working with a particularly stubborn variety of aloe vera. Another variation is to try propagating aloe vera from offsets, also known as “pups,” which are small plants that grow around the base of the mother plant. This method is often even easier than propagating from leaf cuttings.
We strongly encourage you to give this DIY aloe vera propagation method a try. It’s a fun and educational project that will not only expand your plant collection but also deepen your appreciation for the wonders of nature. Remember to be patient, provide the right conditions, and enjoy the process.
Once you’ve successfully propagated your aloe vera leaf cuttings, we’d love to hear about your experience! Share your tips, tricks, and photos in the comments section below. Let’s create a community of aloe vera enthusiasts who are passionate about sharing their knowledge and helping each other succeed. Did you encounter any challenges? What rooting medium did you find most effective? What are your favorite uses for aloe vera gel? Your insights could be invaluable to other readers who are just starting their propagation journey. Let’s all learn and grow together! This **DIY aloe vera** propagation method is a game changer.
Frequently Asked Questions (FAQ)
1. What type of aloe vera leaf is best for propagation?
The best leaves for propagation are mature, healthy leaves from a well-established aloe vera plant. Avoid using leaves that are damaged, discolored, or showing signs of disease. Choose leaves that are plump and firm, indicating that they are well-hydrated. The size of the leaf isn’t as crucial as its overall health, but larger leaves generally have more stored energy and are more likely to successfully root. It’s also important to use a clean, sharp knife or scissors when taking the cuttings to prevent infection.
2. How long does it take for aloe vera leaf cuttings to root?
The time it takes for aloe vera leaf cuttings to root can vary depending on several factors, including the temperature, humidity, and the specific variety of aloe vera. Generally, you can expect to see roots forming within 4-8 weeks. However, it’s important to be patient and avoid disturbing the cuttings too frequently. Check for root development by gently tugging on the cutting. If you feel resistance, it’s likely that roots have formed. Remember that some cuttings may take longer to root than others, so don’t give up too easily.
3. What is the best rooting medium for aloe vera leaf cuttings?
The best rooting medium for aloe vera leaf cuttings is a well-draining mix that allows for good air circulation. A common and effective mix is a combination of perlite and peat moss or coco coir. You can also use a cactus and succulent potting mix, which is specifically formulated to provide the drainage that aloe vera plants need. Avoid using regular potting soil, as it can retain too much moisture and lead to rot. The key is to provide a medium that is both well-draining and able to retain some moisture to encourage root development.
4. How often should I water aloe vera leaf cuttings?
Watering aloe vera leaf cuttings correctly is crucial for their success. Overwatering is a common mistake that can lead to rot. Water the cuttings sparingly, only when the rooting medium is completely dry to the touch. When you do water, make sure to thoroughly moisten the medium, but avoid letting the cuttings sit in standing water. The frequency of watering will depend on the temperature and humidity of your environment. In general, you’ll need to water more frequently in warmer, drier conditions and less frequently in cooler, more humid conditions.
5. What kind of light do aloe vera leaf cuttings need?
Aloe vera leaf cuttings need bright, indirect light to thrive. Avoid placing them in direct sunlight, as this can scorch the leaves. A location near a window that receives filtered sunlight is ideal. If you don’t have access to natural light, you can use a grow light to provide the necessary illumination. The goal is to provide enough light for the cuttings to photosynthesize and develop roots, without exposing them to harsh, direct sunlight that can damage them.
6. Can I use rooting hormone on aloe vera leaf cuttings?
Yes, you can use rooting hormone on aloe vera leaf cuttings to encourage root development. Rooting hormone contains auxins, which are plant hormones that promote root growth. To use rooting hormone, simply dip the cut end of the leaf cutting into the hormone powder or liquid before planting it in the rooting medium. While rooting hormone isn’t essential for aloe vera propagation, it can increase the success rate, especially for cuttings that are slow to root.
7. What are the signs that my aloe vera leaf cutting is rotting?
Signs that your aloe vera leaf cutting is rotting include discoloration (turning brown or black), softening of the leaf, and a foul odor. If you notice any of these signs, it’s important to remove the affected cutting immediately to prevent the rot from spreading to other cuttings. To avoid rot, make sure to use a well-draining rooting medium, water sparingly, and provide good air circulation.
8. Can I propagate aloe vera in water?
While it’s possible to propagate aloe vera in water, it’s generally not the preferred method. Aloe vera is a succulent that is adapted to dry conditions, and prolonged exposure to water can lead to rot. If you do choose to propagate in water, make sure to change the water frequently (every 1-2 days) to prevent the growth of bacteria and fungi. Once roots have formed, transplant the cutting into a well-draining potting mix as soon as possible.
9. What do I do after the aloe vera leaf cutting has rooted?
Once the aloe vera leaf cutting has rooted, it’s time to transplant it into a pot with well-draining potting mix. Choose a pot that is slightly larger than the root ball. Water the newly transplanted plant thoroughly, and then allow the soil to dry out completely before watering again. Place the plant in a location that receives bright, indirect light. As the plant grows, you can gradually increase the amount of sunlight it receives.
10. How do I care for my new aloe vera plant?
Caring for your new aloe vera plant is relatively easy. Water it sparingly, only when the soil is completely dry to the touch. Provide it with bright, indirect light. Fertilize it occasionally with a balanced fertilizer diluted to half strength. Repot it as needed when it outgrows its pot. With proper care, your new aloe vera plant will thrive and provide you with years of enjoyment and beneficial gel.

Leave a Comment