

Cardboard Fan DIY: Beat the heat and unleash your inner maker with this incredibly simple and satisfying project! Are you tired of sweltering summer days and sky-high electricity bills from running your AC non-stop? I know I am! That’s why I’m so excited to share this ingenious DIY hack that will keep you cool and comfortable without breaking the bank.
Humans have been seeking relief from the heat for centuries, employing everything from hand fans to elaborate cooling systems. While our ancestors may not have had cardboard, the ingenuity of creating a personal breeze is a timeless tradition. Think of ancient Egyptians fanning royalty with palm leaves – we’re essentially doing the same, just with a modern, eco-friendly twist!
This Cardboard Fan DIY is more than just a fun craft; it’s a practical solution for anyone looking to reduce their carbon footprint and save money. Whether you’re working from home, relaxing in the garden, or simply need a little extra airflow, this project is perfect. Plus, it’s a fantastic way to repurpose those cardboard boxes that seem to multiply overnight. So, grab your scissors, gather your cardboard, and let’s get crafting our way to a cooler, more sustainable summer!
DIY Cardboard Box Fan: Beat the Heat on a Budget!
Hey there, fellow DIY enthusiasts! Feeling the summer heat but don’t want to break the bank on a fancy air conditioner? I’ve got just the project for you: a surprisingly effective cardboard box fan! This is a fun, eco-friendly, and budget-conscious way to circulate air and stay cool. Plus, it’s a great project to do with kids (with adult supervision, of course!). Let’s get started!
What You’ll Need:
* A sturdy cardboard box (a medium-sized moving box works great – think around 18x18x16 inches)
* A box cutter or sharp utility knife
* A ruler or measuring tape
* A pencil or marker
* A small electric fan (a desk fan, around 6-8 inches in diameter, is ideal)
* Hot glue gun and glue sticks
* Cardboard scraps (for reinforcing and creating a funnel)
* Scissors
* Optional: Paint, markers, or decorative paper to personalize your fan!
* Safety glasses (recommended when cutting cardboard)
Planning and Preparation:
Before we dive into the construction, let’s talk strategy. The key to a successful cardboard box fan is creating a funnel effect. We want to concentrate the airflow from the small electric fan and direct it out of a larger opening. Think of it like a megaphone for air!
* Box Selection: Choose a box that’s in good condition. Avoid boxes that are crushed, water-damaged, or have too many holes. The sturdier the box, the better the airflow and the longer your fan will last.
* Fan Size: Make sure your electric fan isn’t too big for the box. You want enough space around the fan to create the funnel. A fan that’s too large will be difficult to mount and won’t create the desired airflow.
* Safety First: Cardboard can be surprisingly sharp when cut. Always use a sharp blade and cut away from yourself. Wear safety glasses to protect your eyes from flying cardboard dust.
Step-by-Step Instructions:
Okay, let’s get building!
1. Creating the Fan Opening:
This is where we’ll cut the hole for our electric fan to sit.
1. Measure the Fan: Place your electric fan on one of the larger sides of the cardboard box. Trace the outline of the fan’s housing (not the blades!) onto the cardboard. Add about 1/2 inch to this outline to allow for airflow and easy insertion/removal of the fan.
2. Cut the Hole: Using your box cutter or utility knife, carefully cut out the circle (or square, depending on your fan’s shape) that you traced. Take your time and make multiple passes with the blade rather than trying to force it through in one go. This will give you a cleaner cut.
3. Test Fit: Insert your electric fan into the hole. It should fit snugly but not be forced. If it’s too tight, carefully trim the edges of the hole until it fits comfortably.
2. Building the Airflow Funnel:
This is the most important part! The funnel will concentrate the airflow from the small fan and direct it out of the box.
1. Measure and Cut Cardboard Strips: Cut several strips of cardboard from your scrap pieces. The width of the strips will depend on the depth of your box and the size of your fan, but aim for strips that are between 4 and 6 inches wide. The length of the strips will vary depending on how much of the funnel you want to create.
2. Forming the Funnel: Starting from the inside of the box, around the fan opening, begin attaching the cardboard strips using your hot glue gun. Angle the strips inward, creating a cone-like shape that gradually narrows as it extends away from the fan.
3. Layering the Strips: Overlap the cardboard strips slightly as you glue them in place. This will create a stronger and more airtight funnel.
4. Sealing the Gaps: Once you’ve created the basic funnel shape, use smaller pieces of cardboard to fill in any gaps or cracks. The goal is to create a smooth, continuous surface that will efficiently direct the airflow.
5. Reinforcing the Funnel: For added strength, especially if you’re using thinner cardboard, consider adding a second layer of cardboard strips to the outside of the funnel.
3. Creating the Output Vent:
Now we need to create the opening where the concentrated air will exit the box.
1. Choose the Location: Select the opposite side of the box from the fan opening. This will be the side where the air will be blown out.
2. Cut the Vent: Using your box cutter or utility knife, cut a large opening in this side of the box. The size of the opening will depend on the size of your box and how much airflow you want. A good starting point is to cut a square or rectangle that’s about half the size of the box side.
3. Optional: Add a Grill: To prevent objects from accidentally being sucked into the fan, you can create a simple grill using cardboard strips. Cut several strips of cardboard and glue them across the opening, creating a grid pattern.
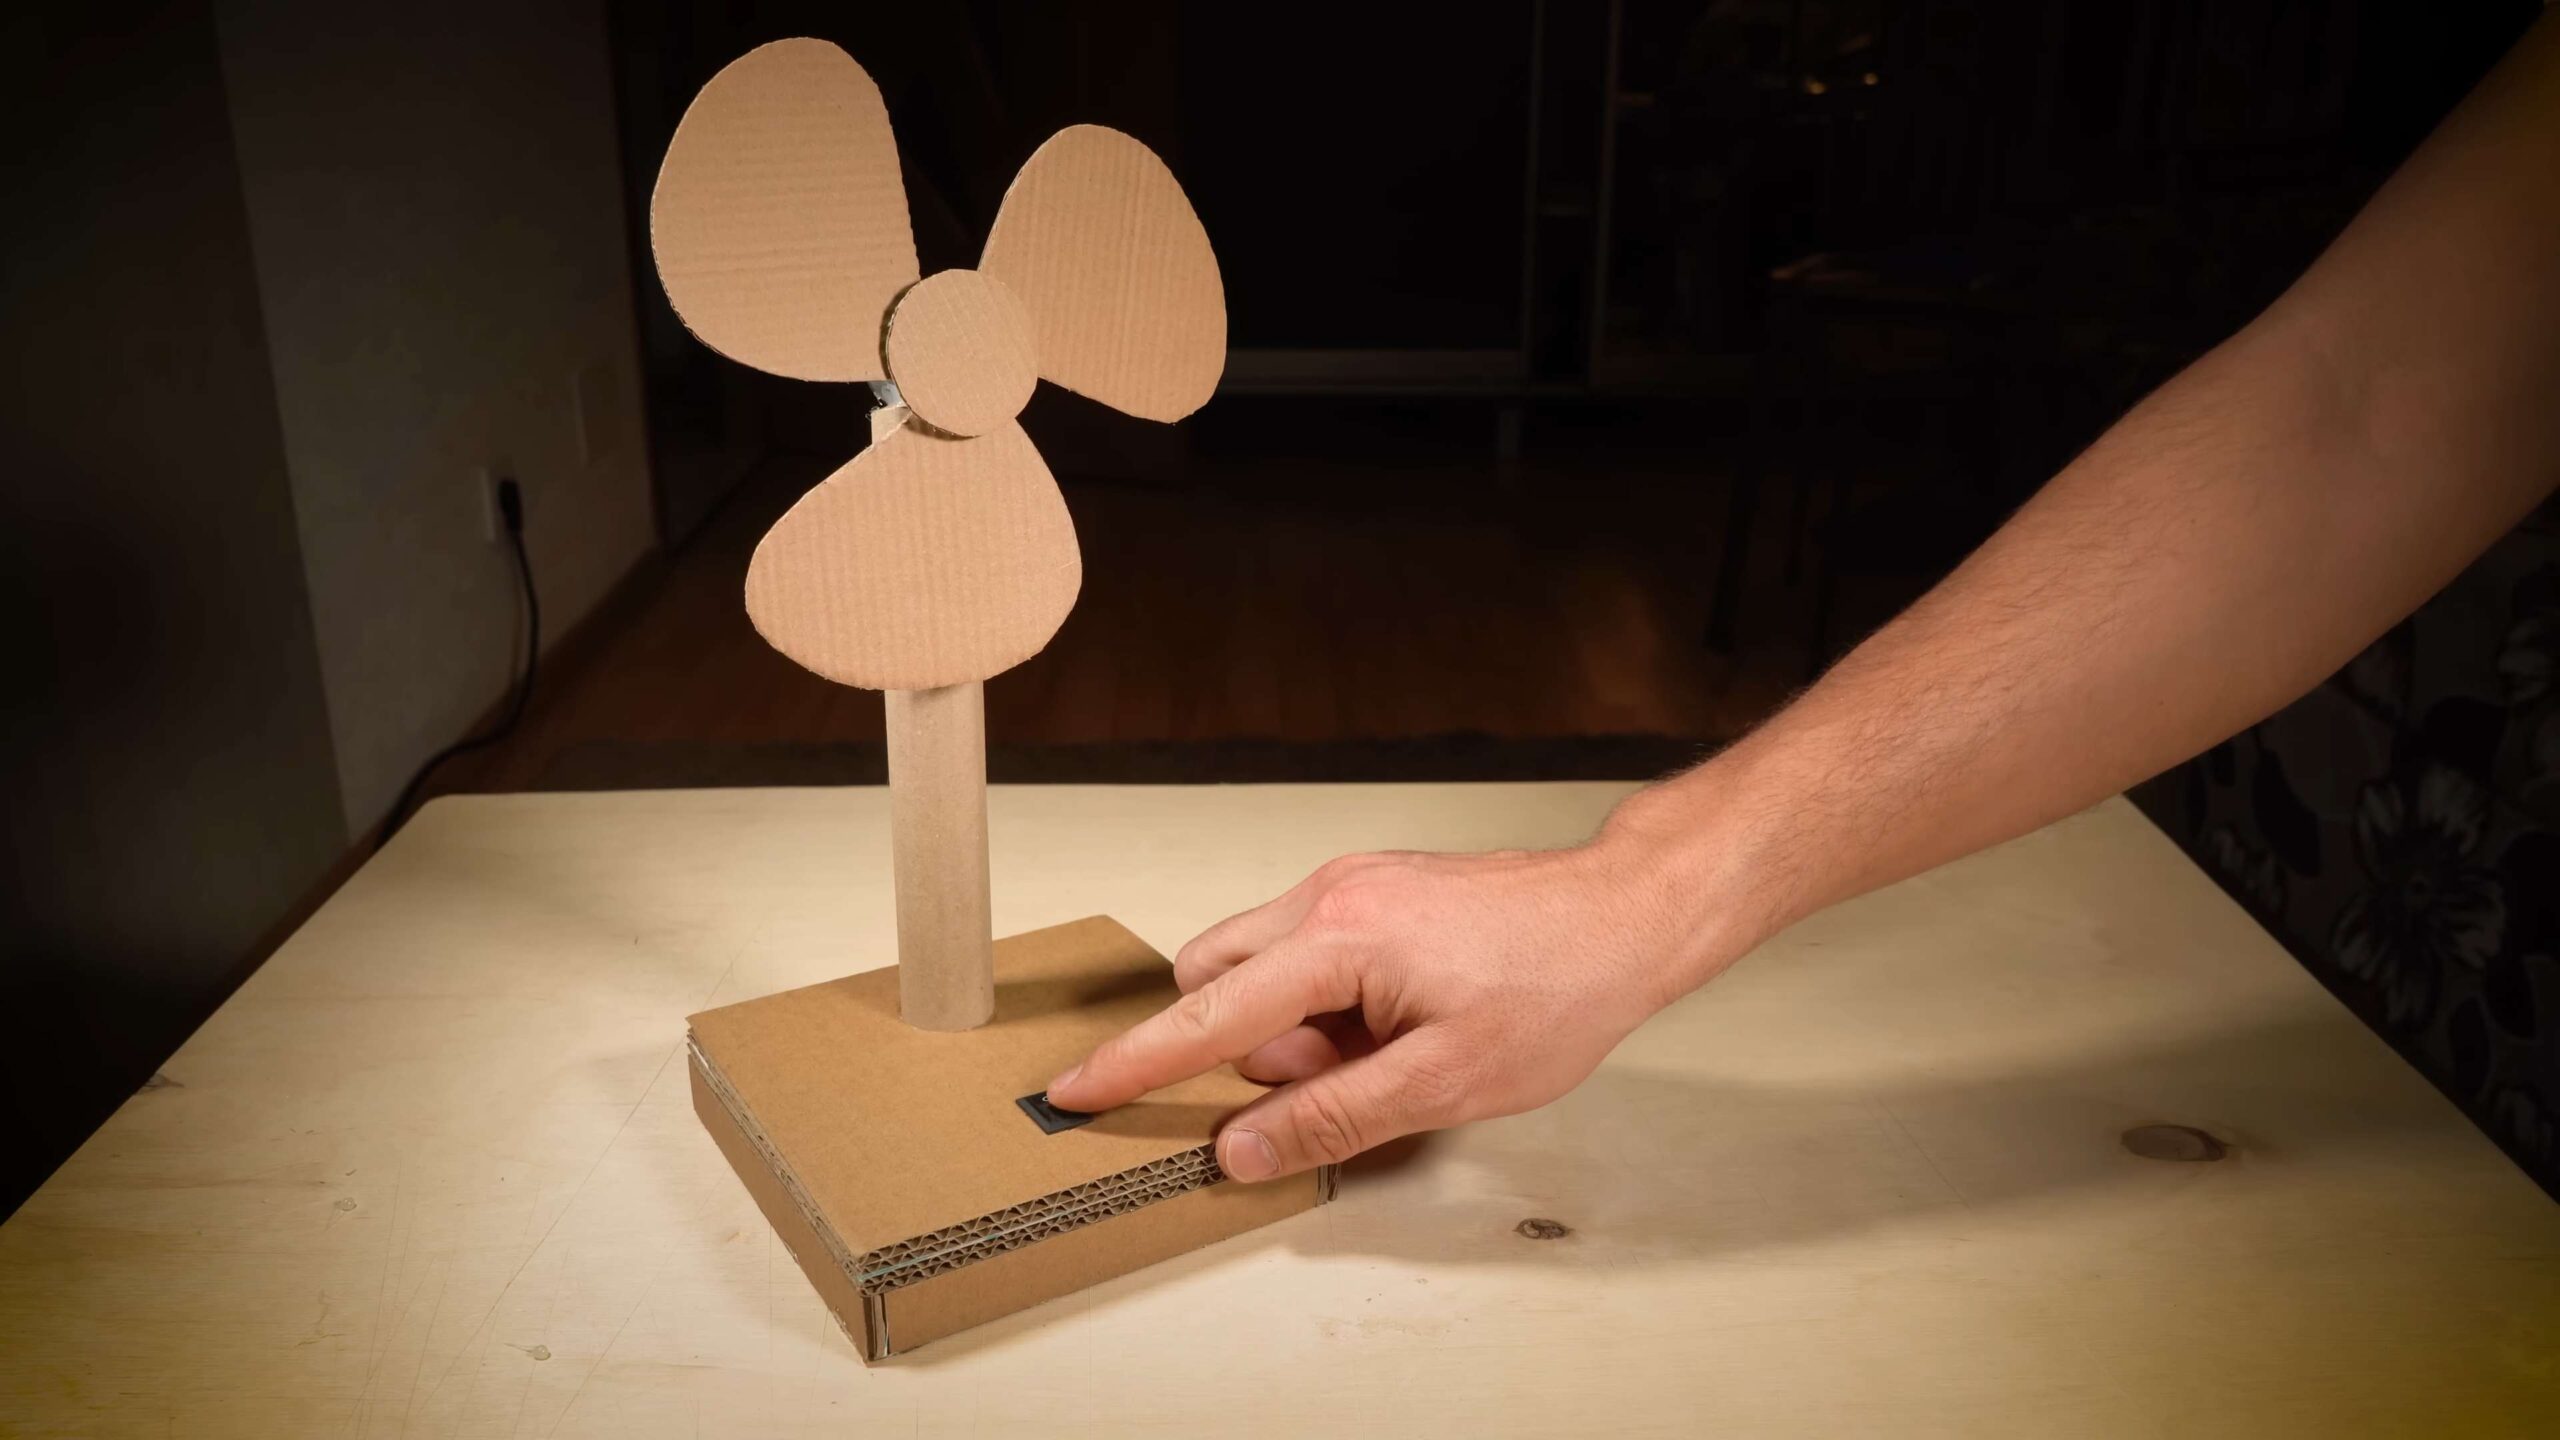
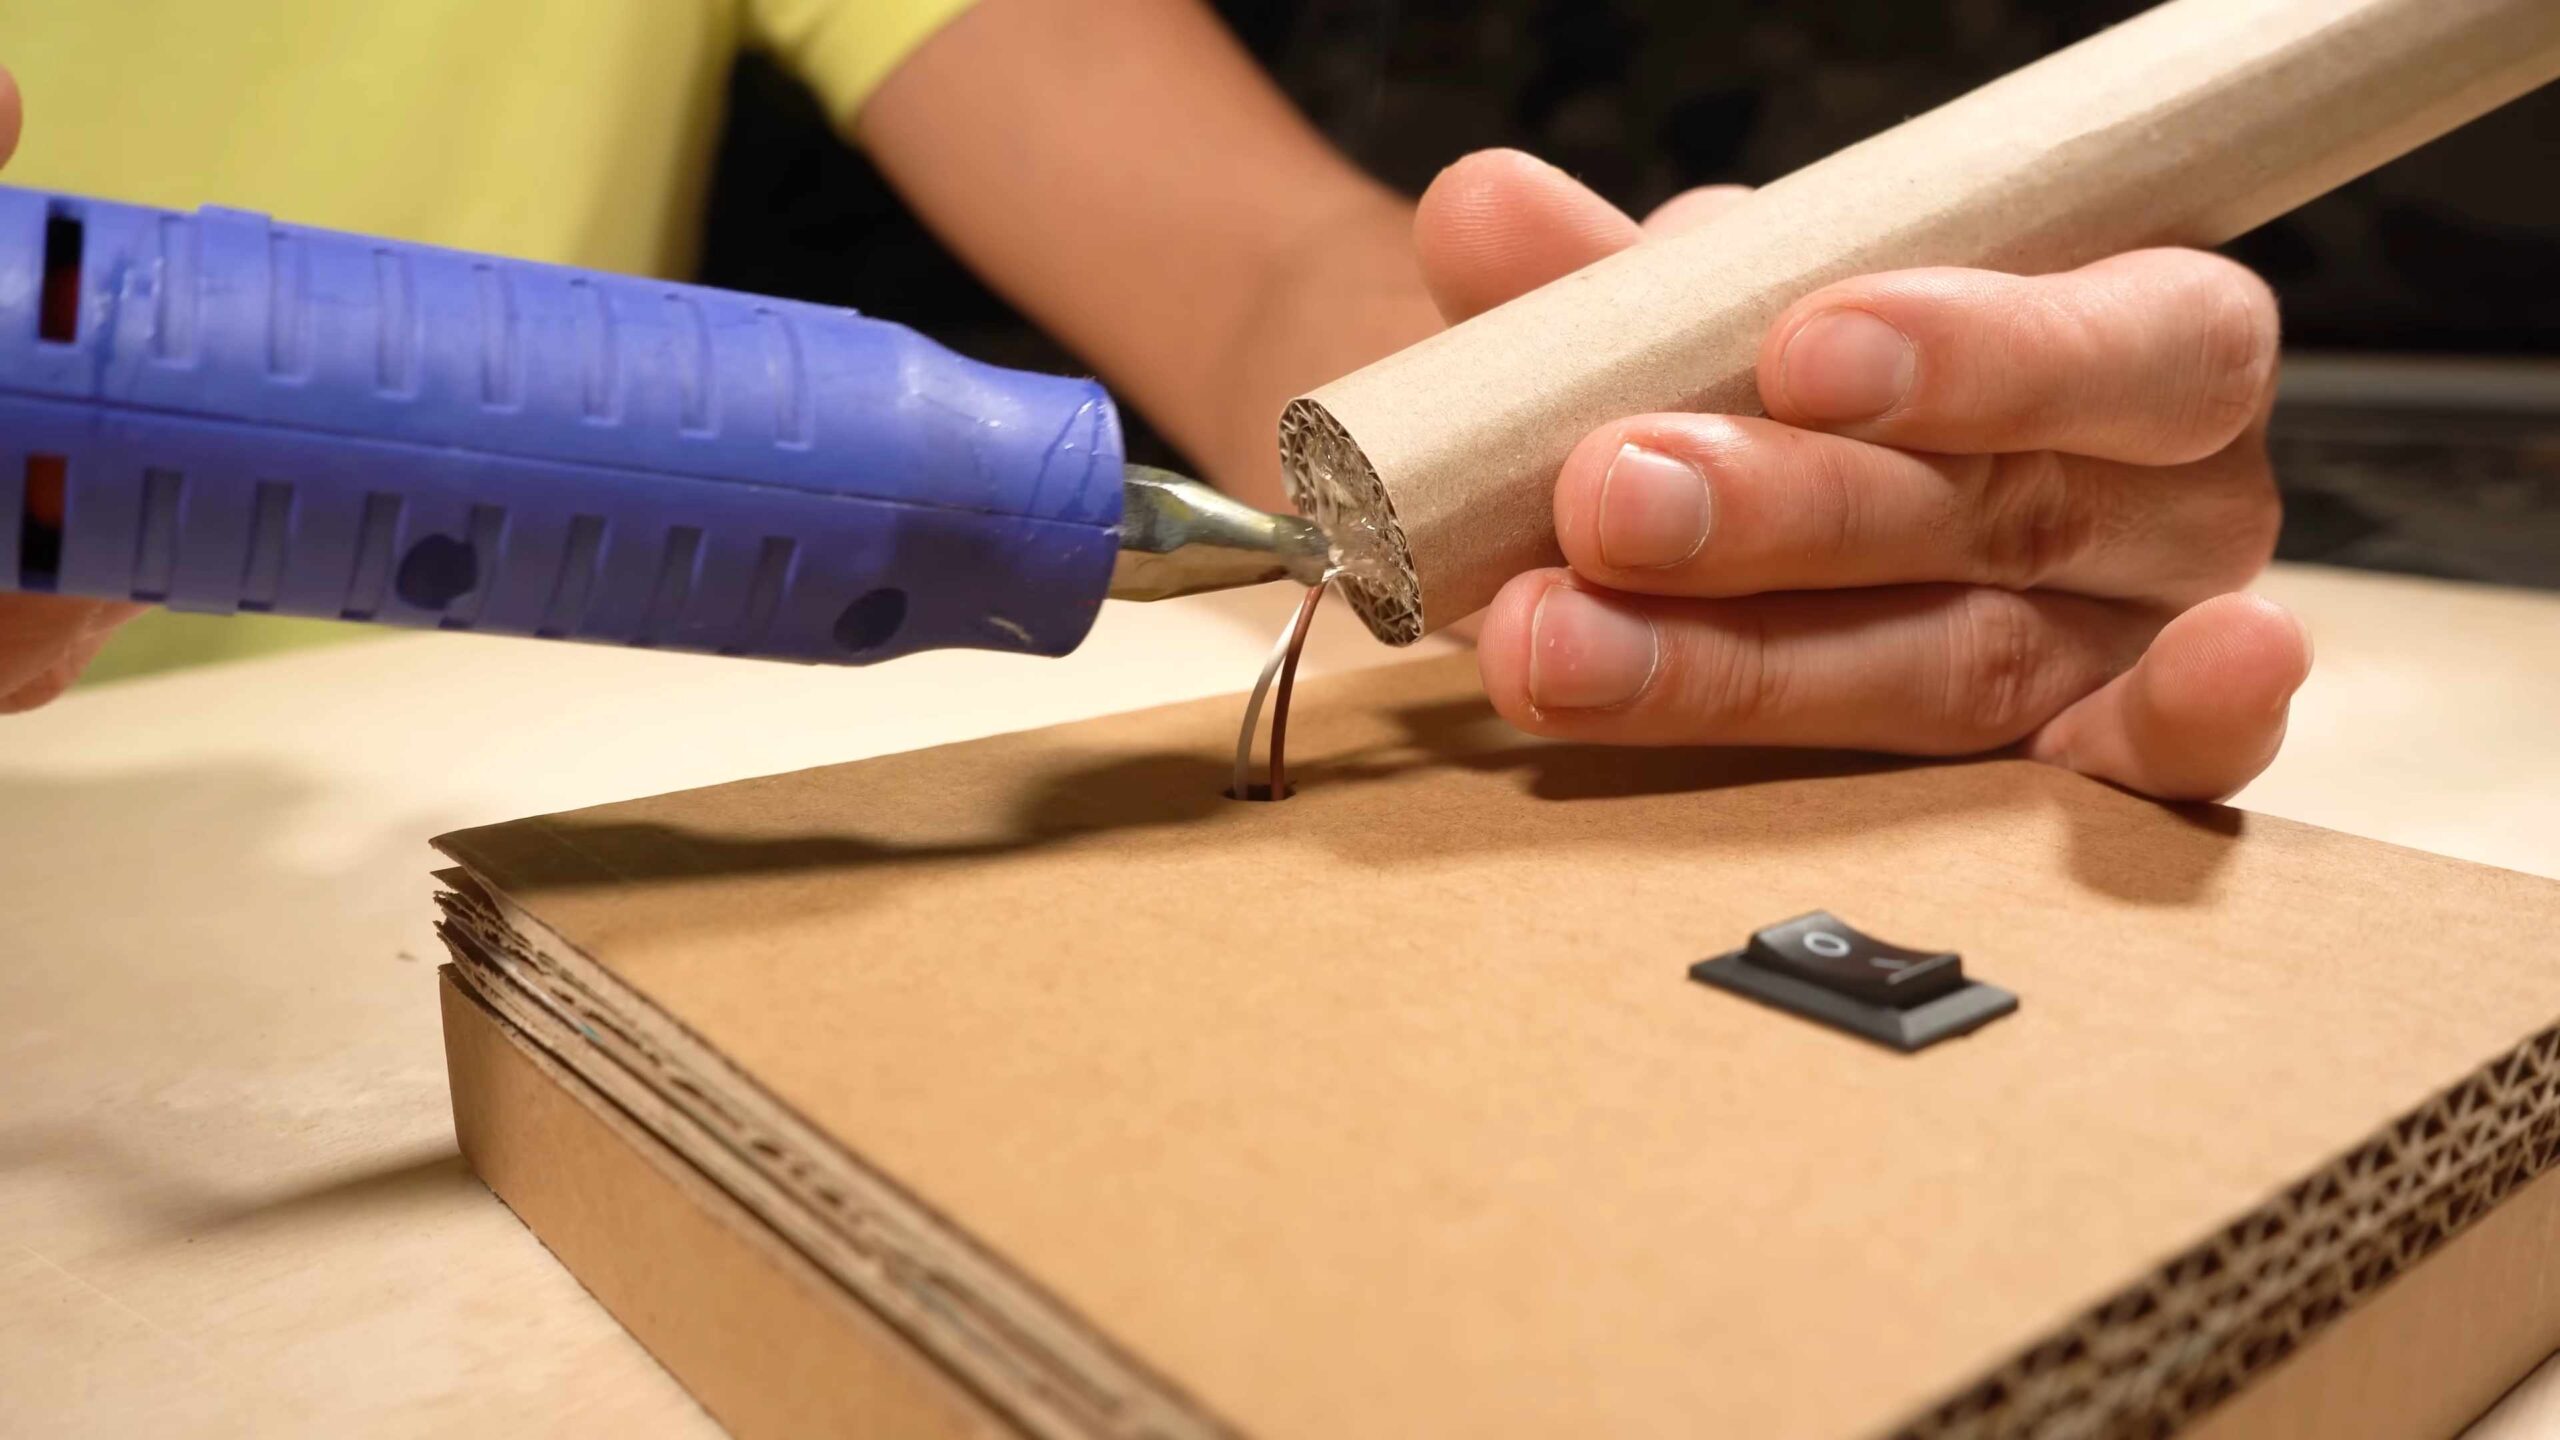
4. Securing the Electric Fan:
We need to make sure the electric fan stays securely in place.
1. Position the Fan: Place the electric fan inside the box, with the blades facing the funnel.
2. Glue the Fan in Place: Using your hot glue gun, carefully glue the fan’s housing to the cardboard box around the opening. Be generous with the glue, but avoid getting glue on the fan blades or motor.
3. Reinforce the Mounting: For extra security, you can use cardboard scraps to create supports around the fan. Glue these supports to the box and to the fan’s housing.
5. Testing and Adjusting:
Before we declare victory, let’s test our creation!
1. Plug in the Fan: Plug in your electric fan and turn it on.
2. Observe the Airflow: Feel the airflow coming out of the vent. Is it strong and focused? If not, you may need to adjust the funnel or the size of the vent.
3. Adjust the Funnel: If the airflow is weak, try making the funnel narrower or longer. You can also try sealing any remaining gaps in the funnel.
4. Adjust the Vent: If the airflow is too strong, try making the vent larger.
5. Listen for Vibrations: If the fan is vibrating excessively, it may not be securely mounted. Add more glue or supports to stabilize it.
6. Optional: Decorating Your Fan:
Now for the fun part! Let’s personalize our cardboard box fan.
1. Paint the Box: Use acrylic paint to give your fan a fresh new look. You can choose a solid color or create a fun design.
2. Add Decorative Paper: Cover the box with decorative paper or wrapping paper. Use glue or tape to secure the paper in place.
3. Draw on the Box: Use markers or crayons to draw designs on the box.
4. Add Stickers: Decorate the box with stickers.
Tips and Tricks for Optimal Performance:
* Experiment with Funnel Design: The shape and size of the funnel are crucial for airflow. Try different designs to see what works best for your fan and box.
* Seal All Gaps: Any gaps or cracks in the box or funnel will reduce airflow. Make sure to seal them with tape or glue.
* Use a Fan with Multiple Speed Settings: This will allow you to adjust the airflow to your liking.
* Place the Fan Strategically: Position your cardboard box fan in a location where it can effectively circulate air throughout the room.
* Consider Adding Ice Packs: For extra cooling power, place a bowl of ice packs in front of the fan. The fan will blow the cool air throughout the room. (Be careful not to let the ice packs melt and drip water into the fan!)
* Safety First: Never leave the fan unattended, especially if children or pets are present. Make sure the fan is placed on a stable surface and that the cord is out of reach.
Troubleshooting:
* Weak Airflow: Check for gaps in the funnel, make sure the fan is securely mounted, and try adjusting the size of the vent.
* Excessive Noise: Make sure the fan blades are not hitting anything inside the box. Also, check for loose cardboard pieces that may be vibrating.
* Fan Overheating: If the fan starts to overheat, turn it off immediately and let it cool down. Make sure the fan is not obstructed and that it has adequate ventilation.
And there you have it! Your very own DIY cardboard box fan. It’s not going to replace a high-end air conditioner, but it’s
Conclusion
So, there you have it! This cardboard fan DIY project isn’t just a fun craft; it’s a practical solution for staying cool on a budget, a creative outlet for upcycling, and a testament to the power of simple ingenuity. Forget expensive store-bought fans that guzzle electricity and take up valuable space. With a few readily available materials and a little bit of elbow grease, you can create a personalized cooling device that’s both effective and eco-friendly.
Why is this a must-try? Because it empowers you to take control of your comfort without breaking the bank. It’s a fantastic project for families, teaching children about resourcefulness and the joy of creating something with their own hands. Plus, it’s incredibly satisfying to use something you built yourself, especially when it’s providing a welcome breeze on a hot day.
But the fun doesn’t stop there! Feel free to experiment with different designs and embellishments. Try painting your cardboard fan with vibrant colors, adding glitter for a touch of sparkle, or even incorporating stencils to create intricate patterns. You could also explore different blade shapes to optimize airflow. A wider blade might move more air, while a narrower blade could be quieter. Consider adding a small, lightweight handle for easier portability.
For a more advanced version, you could even explore incorporating a small solar panel to power a miniature electric motor, creating a truly self-sufficient and eco-conscious cooling solution. Imagine the possibilities!
Ultimately, this cardboard fan DIY is about more than just making a fan; it’s about embracing creativity, resourcefulness, and a DIY spirit. It’s about finding simple solutions to everyday problems and having fun in the process.
We wholeheartedly encourage you to give this project a try. Don’t be afraid to experiment, get creative, and make it your own. And most importantly, we want to hear about your experience! Share your photos, tips, and variations in the comments below. Let’s build a community of DIY enthusiasts who are passionate about creating sustainable and affordable solutions. Your feedback will not only inspire others but also help us refine and improve this project for everyone. So, grab your cardboard, scissors, and glue, and let’s get crafting! Stay cool, stay creative, and stay tuned for more exciting DIY projects.
Frequently Asked Questions (FAQ)
1. What kind of cardboard is best for this DIY fan?
The best type of cardboard to use for this project is corrugated cardboard, which is the kind you typically find in shipping boxes. This type of cardboard is strong and durable, providing the necessary support for the fan blades. Avoid using thin or flimsy cardboard, as it may not be able to withstand the stress of being rotated and could easily bend or break. If you’re concerned about the appearance of the cardboard, you can always paint or cover it with decorative paper. Reusing cardboard boxes you already have is a great way to upcycle and reduce waste, making this project even more eco-friendly. Consider the size of the cardboard sheet as well; larger sheets will allow for bigger fan blades and potentially more airflow.
2. How can I make my cardboard fan spin faster or generate more airflow?
Several factors can influence the speed and airflow of your cardboard fan. First, ensure that the blades are properly balanced. Unevenly weighted blades can cause the fan to wobble and reduce its efficiency. You can adjust the balance by adding small pieces of cardboard or tape to the lighter blades. The angle of the blades also plays a crucial role. Experiment with different angles to find the optimal configuration for maximum airflow. A steeper angle will catch more air but may also require more force to rotate. The size and shape of the blades are also important. Larger blades will move more air, but they may also be heavier and require more power to spin. Consider using a more powerful motor or a different gear ratio to increase the fan’s speed. Finally, ensure that the fan is properly lubricated to reduce friction and allow it to spin freely.
3. What type of motor should I use for a motorized cardboard fan?
The ideal motor for a motorized cardboard fan depends on your desired power and budget. A small DC motor, such as those used in toys or electronics projects, is a good starting point. These motors are readily available and relatively inexpensive. Look for a motor with a voltage rating that matches your power source (e.g., a 9V battery or a USB power adapter). The motor’s RPM (revolutions per minute) will determine the fan’s speed. Experiment with different RPM values to find the optimal balance between airflow and noise. For a more powerful fan, consider using a larger DC motor or even a small brushless motor. Brushless motors are more efficient and durable than brushed motors, but they are also more expensive. You’ll also need a suitable power supply and a switch to control the motor. Remember to exercise caution when working with electricity and follow all safety guidelines.
4. How can I make my cardboard fan more durable and long-lasting?
To enhance the durability of your cardboard fan, consider applying a sealant or varnish to the cardboard surfaces. This will protect the cardboard from moisture and prevent it from warping or deteriorating over time. You can also reinforce the joints and connections with strong glue or tape. Consider using metal fasteners, such as screws or bolts, to secure the motor and other components. If you’re using a wooden dowel or other support structure, make sure it’s properly secured to the cardboard base. For a more professional finish, you can cover the cardboard with fabric or decorative paper. This will not only improve the fan’s appearance but also add an extra layer of protection. Regularly inspect the fan for any signs of wear and tear and make repairs as needed. With proper care and maintenance, your cardboard fan can provide years of reliable cooling.
5. Is this cardboard fan DIY project safe for children?
While this project can be a fun and educational activity for children, adult supervision is essential, especially when using sharp tools like scissors or knives. Ensure that children understand the importance of safety and follow all instructions carefully. When using glue, choose a non-toxic and child-safe adhesive. If you’re building a motorized fan, be extra cautious when working with electricity and ensure that all connections are properly insulated. Avoid using small parts that could be a choking hazard for young children. It’s also important to teach children about the dangers of sticking their fingers or objects into the fan while it’s running. Consider adding a safety guard or cage around the fan blades to prevent accidental injuries. With proper supervision and safety precautions, this project can be a rewarding and enjoyable experience for children of all ages.
6. Can I use different materials besides cardboard for this fan?
While cardboard is the primary material for this DIY project due to its availability and ease of use, you can certainly experiment with other materials. Thin sheets of wood, such as balsa wood or plywood, can provide a more durable and rigid alternative. Plastic sheets, such as acrylic or polycarbonate, can also be used, but they may be more difficult to cut and shape. Foam board is another option, but it may not be as strong as cardboard or wood. When choosing alternative materials, consider their weight, flexibility, and ease of cutting and shaping. You’ll also need to ensure that the materials are compatible with the glue or adhesive you’re using. Experimenting with different materials can lead to unique and innovative fan designs.
7. How do I troubleshoot if my cardboard fan isn’t working properly?
If your cardboard fan isn’t working as expected, there are several things you can check. First, ensure that all the connections are secure and that the motor is properly wired. If you’re using a battery, make sure it’s fully charged. If the fan is spinning slowly or not at all, check for any obstructions that may be blocking the blades. Make sure the blades are properly balanced and that they’re not rubbing against anything. If you’re using a motorized fan, check the motor’s specifications to ensure that it’s receiving the correct voltage and current. If the motor is overheating, it may be overloaded or damaged. Try reducing the load on the motor or replacing it with a more powerful one. If you’re still having problems, consult online resources or seek help from a knowledgeable friend or family member.
Leave a Comment