

Cardboard Safe DIY Combination Lock: Ever dreamt of having your own secret vault, a place where your treasures are safe from prying eyes? I know I have! Forget expensive safes and complicated security systems. We’re diving into the fascinating world of DIY with a project that’s both fun and functional: building your very own cardboard safe with a working combination lock!
The idea of securing valuables has been around for centuries. From ancient Egyptians using intricate locking mechanisms on tombs to medieval strongboxes protecting royal jewels, the desire to safeguard possessions is deeply ingrained in human history. While our cardboard safe might not be guarding pharaoh’s gold, it taps into that same primal urge for security and ingenuity.
Why would you need a cardboard safe DIY combination lock? Well, think about it. Maybe you want to keep your younger siblings out of your candy stash, protect your diary from curious eyes, or simply have a cool project to show off your crafting skills. This project is perfect for teaching basic engineering principles, problem-solving, and the satisfaction of creating something useful from simple materials. Plus, it’s a fantastic way to recycle those cardboard boxes piling up in your garage! So, grab your scissors, gather your cardboard, and let’s build a secure little haven together!
DIY Cardboard Safe with Combination Lock: A Step-by-Step Guide
Hey there, fellow DIY enthusiasts! Ever wanted to build your own secret safe? Well, today’s your lucky day! I’m going to walk you through creating a surprisingly secure cardboard safe, complete with a working combination lock. It’s a fantastic project for kids and adults alike, and it’s a great way to learn about simple mechanics and problem-solving. Let’s get started!
Materials You’ll Need:
Before we dive in, gather these materials. Trust me, having everything ready will make the process much smoother.
* Cardboard: Lots of it! Different thicknesses are helpful. You’ll need large pieces for the main box, thinner pieces for the internal mechanisms, and some sturdy pieces for the lock components. Cereal boxes, shipping boxes, and even pizza boxes can be repurposed.
* Ruler or Measuring Tape: Accuracy is key for the lock to function properly.
* Pencil: For marking measurements and drawing templates.
* Scissors and/or Utility Knife: A utility knife is great for cutting thicker cardboard, but be extremely careful! Adult supervision is a must if kids are involved. Scissors are perfect for thinner cardboard.
* Hot Glue Gun and Glue Sticks: This is our primary adhesive. Make sure you have enough glue sticks!
* Wooden Skewers or Dowels: These will act as axles for the combination dials.
* Drinking Straws: These will serve as guides for the skewers and help with smooth rotation.
* Rubber Bands: For creating tension in the locking mechanism.
* Paper Clips: For small connecting parts and levers.
* Small Magnets (Optional): Can be used for added security or a satisfying “click” when the lock engages.
* Paint or Markers (Optional): To decorate your safe and make it look awesome!
* Compass or Circle Cutter (Optional): For creating perfect circles for the combination dials.
Designing Your Safe:
Before you start cutting, it’s a good idea to plan out the dimensions of your safe. Consider what you want to store inside and how big you want the overall structure to be. I recommend sketching a simple design on paper, including the dimensions of the box, the door, and the location of the combination lock.
Building the Safe Box:
1. Cut the Cardboard Pieces: Based on your design, cut out the cardboard pieces for the sides, top, bottom, and back of the safe. Remember to be precise with your measurements!
2. Assemble the Box: Use the hot glue gun to assemble the box. Apply glue to the edges of the cardboard pieces and carefully join them together. Make sure the corners are square and the box is sturdy. Let the glue dry completely before moving on.
3. Cut and Attach the Door: Cut out a piece of cardboard for the door, slightly larger than the opening in the front of the box. Attach the door to the box using cardboard hinges. You can create hinges by folding a strip of cardboard and gluing it to both the door and the box. Make sure the door swings smoothly.
Creating the Combination Lock Mechanism:
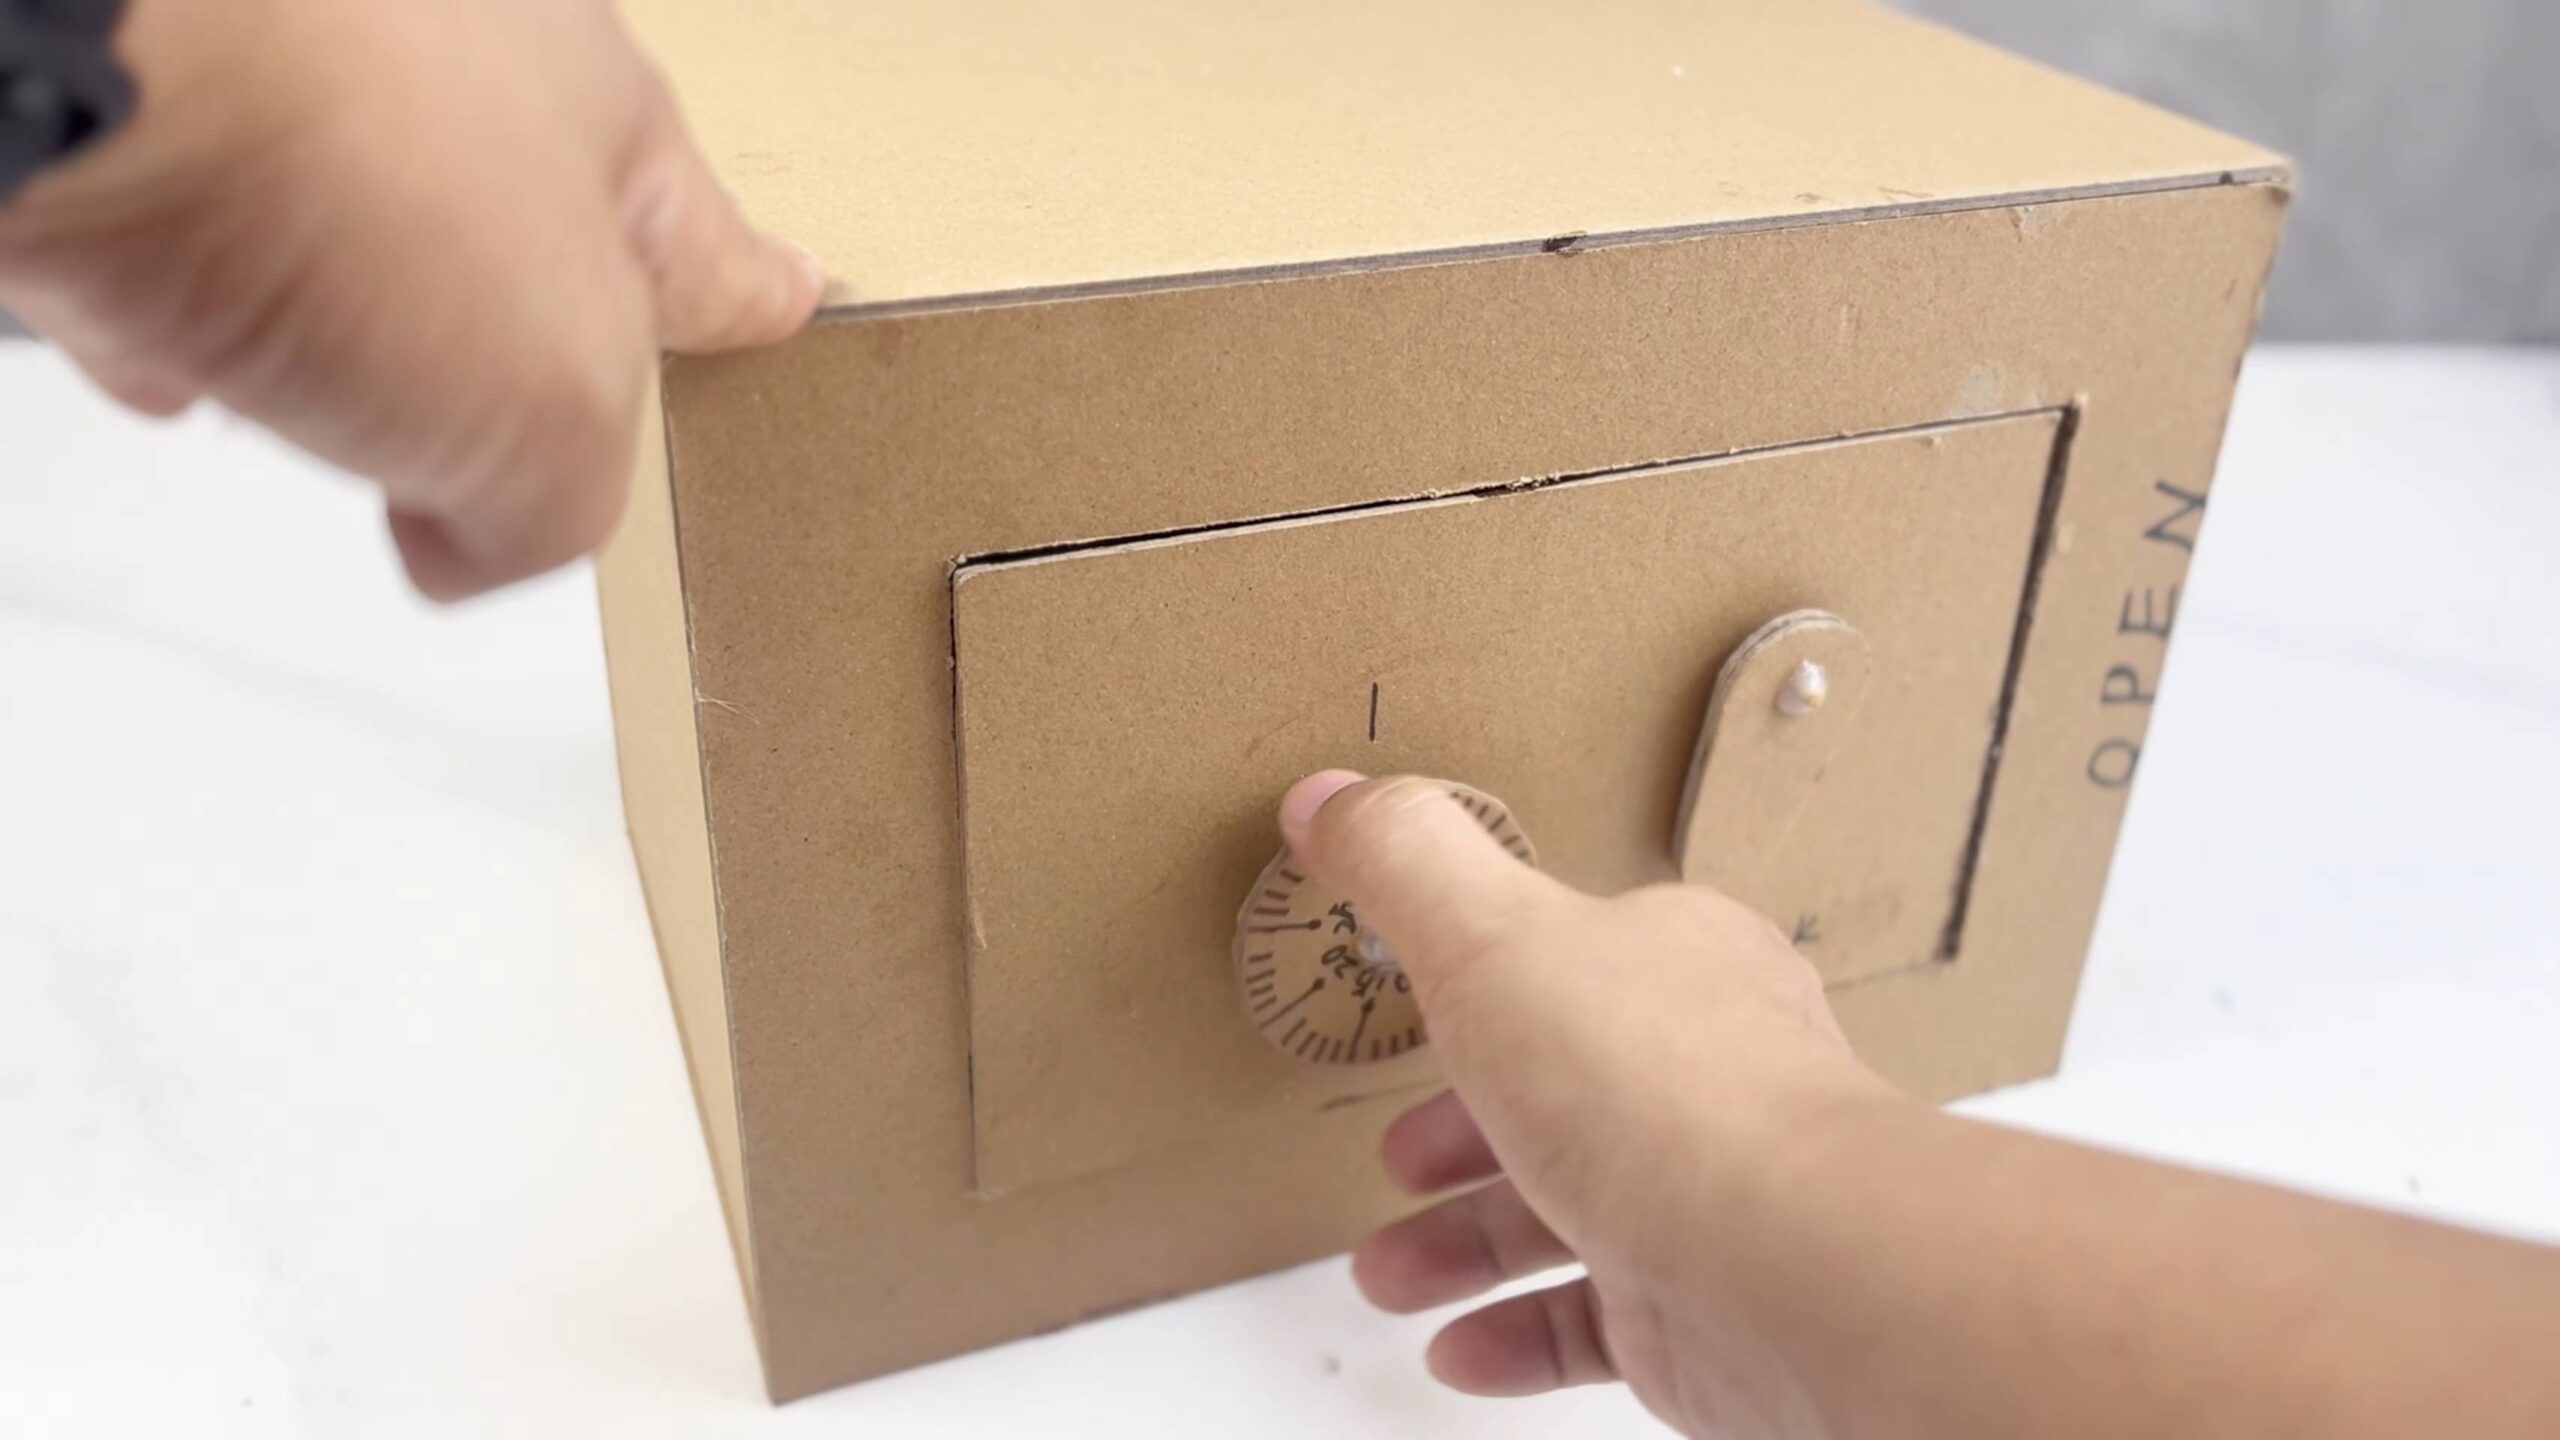
This is the heart of our project! The combination lock consists of several rotating dials, each with a specific number that needs to be aligned correctly for the lock to open.
1. Cut the Dials: Cut out several circular pieces of cardboard for the dials. The number of dials will determine the complexity of your combination. I recommend starting with three dials. Use a compass or circle cutter for perfectly round dials.
2. Mark the Numbers: Divide each dial into equal sections (e.g., 10 sections for numbers 0-9). Write the numbers clearly on each dial.
3. Create the Dial Holders: Cut out cardboard strips to create holders for the dials. These holders will keep the dials in place and allow them to rotate freely. The holders should be slightly wider than the dials.
4. Attach the Straw Guides: Cut short pieces of drinking straw and glue them to the inside of the dial holders. These straws will act as guides for the wooden skewers or dowels that will serve as the axles for the dials.
5. Assemble the Dials and Holders: Insert the wooden skewers through the straws and attach the dials to the skewers. Make sure the dials can rotate smoothly within the holders.
6. Mount the Dial Assembly: Attach the dial assembly to the front of the safe box. Make sure the dials are easily accessible and can be rotated without obstruction.
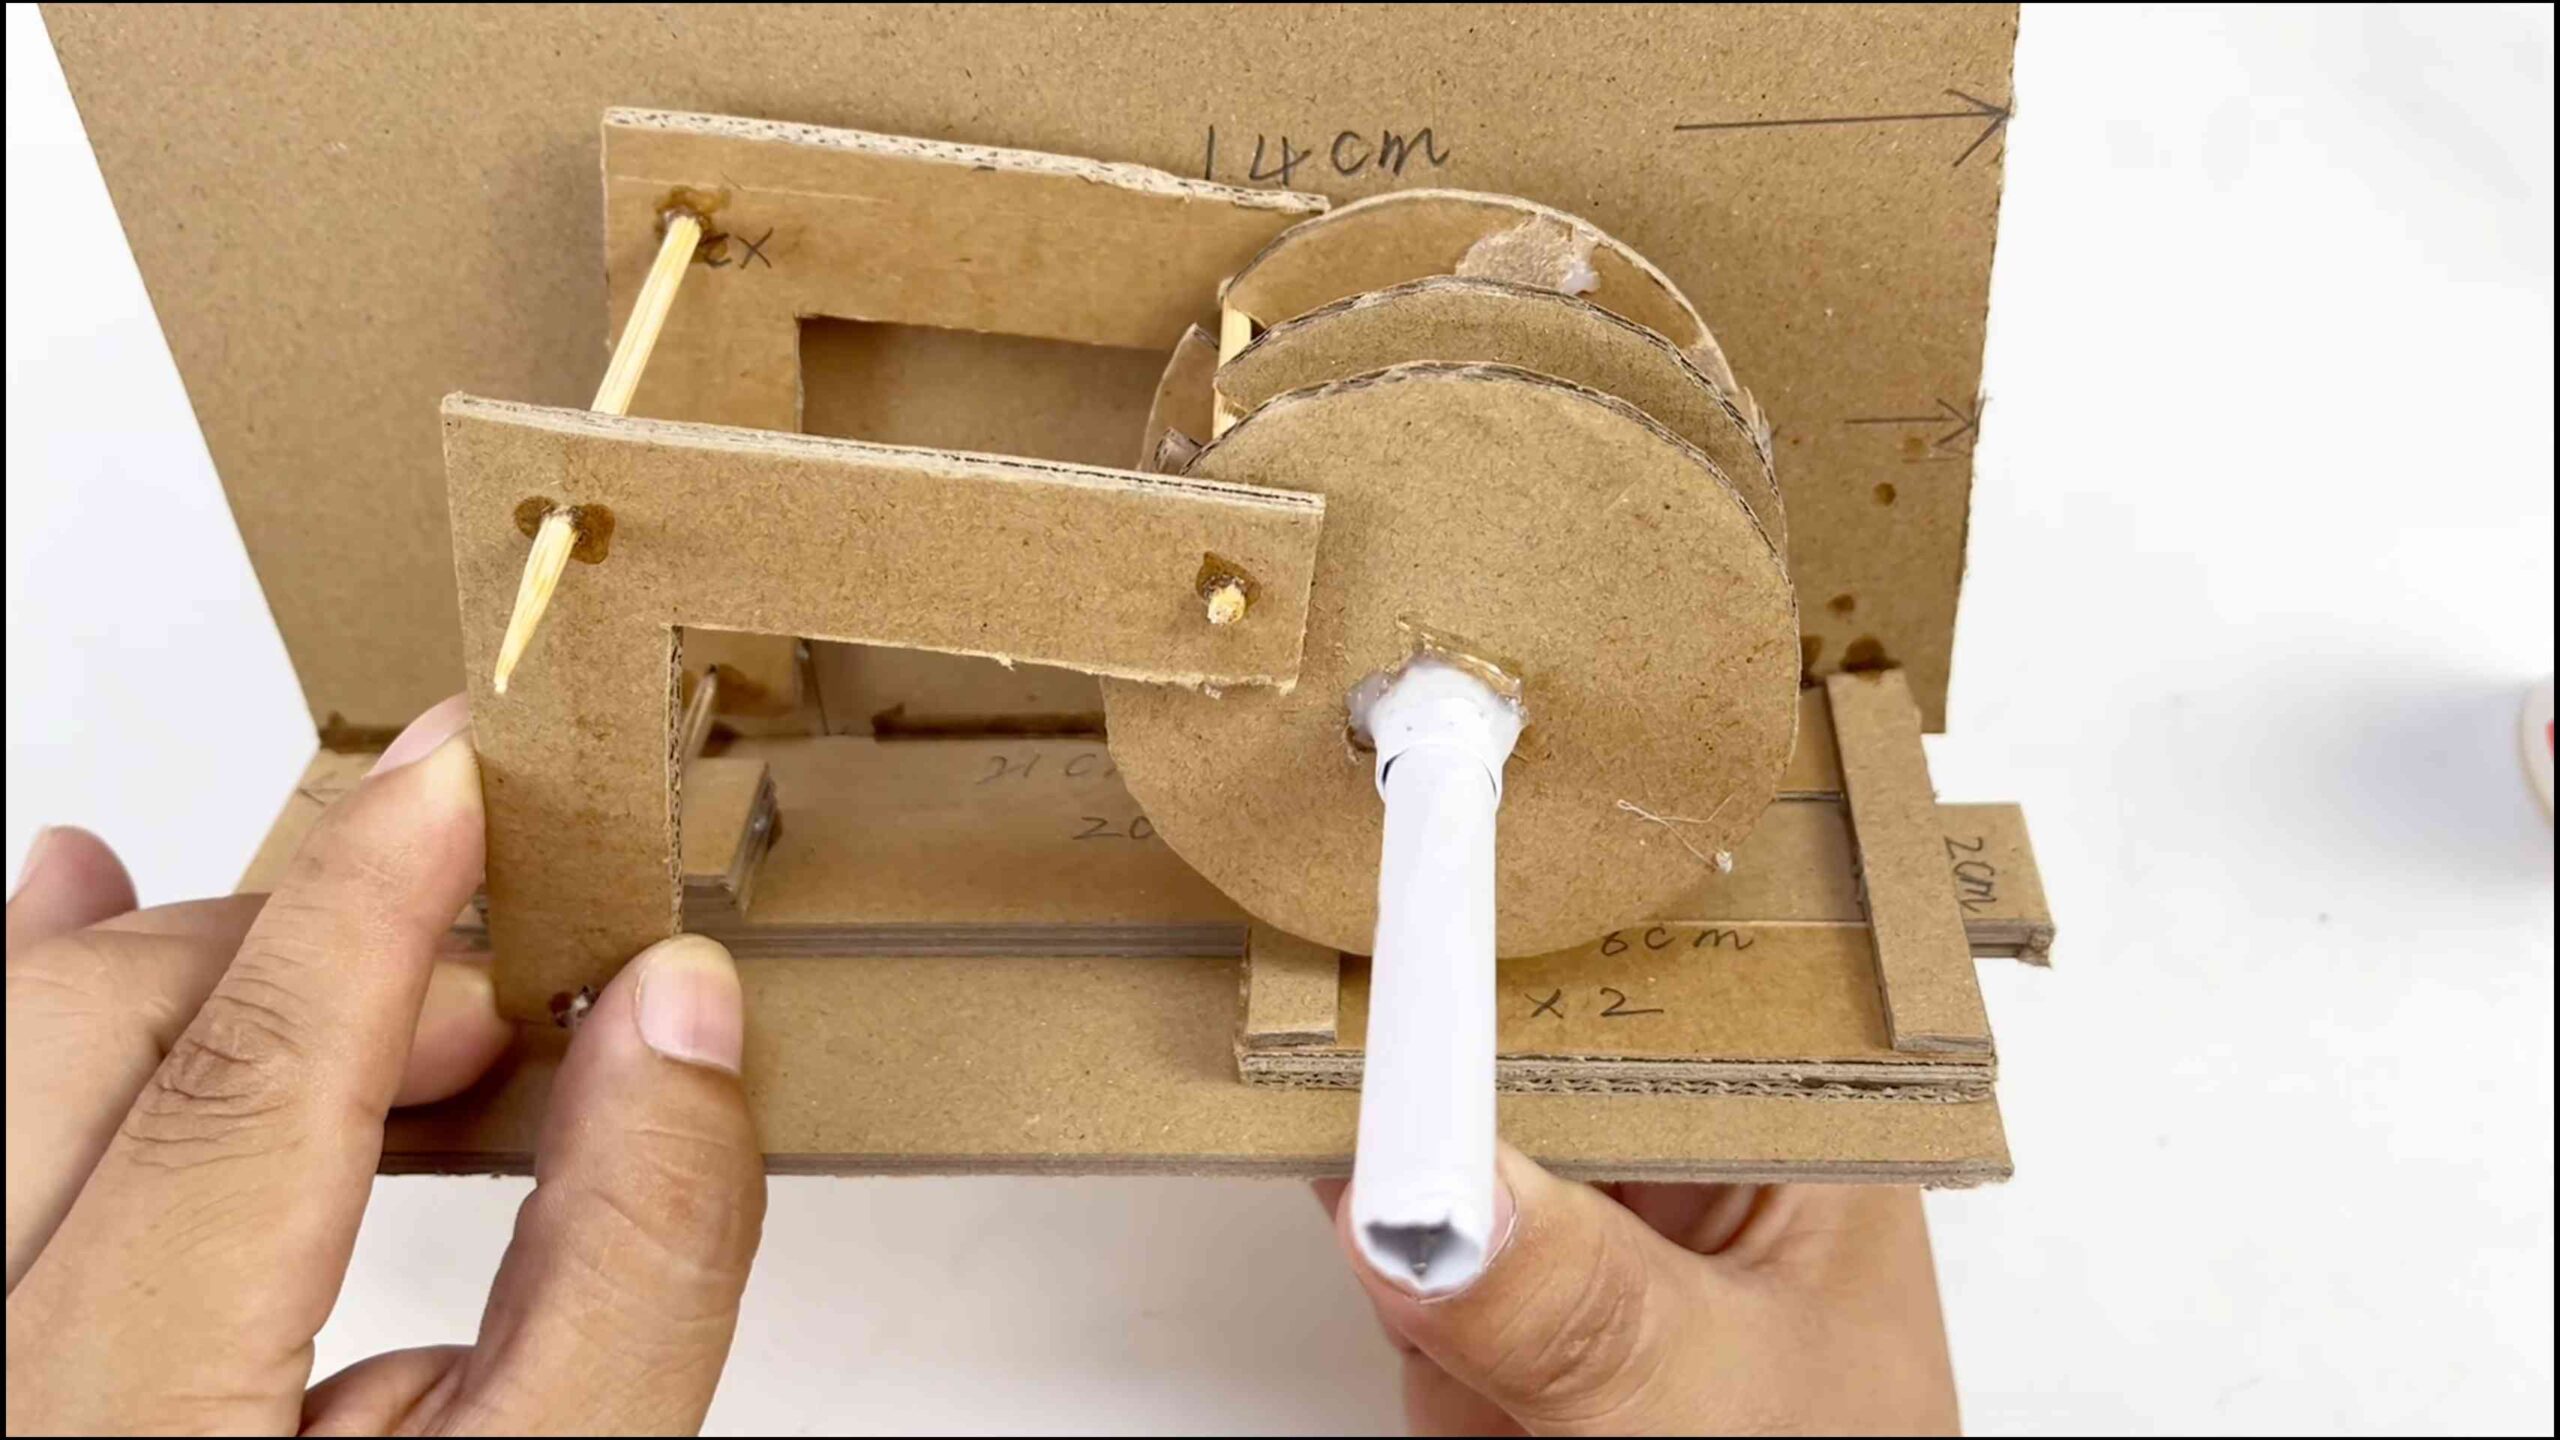
Building the Locking Mechanism:
This part is a bit tricky, but with patience, you can definitely pull it off! The locking mechanism will prevent the door from opening unless the correct combination is entered.
1. Create the Locking Bar: Cut a strip of cardboard to serve as the locking bar. This bar will slide into a slot on the door to keep it closed.
2. Create the Locking Slots: Cut small slots in the locking bar, one for each dial. The position of these slots will correspond to the correct combination for each dial.
3. Create the Levers: Cut small pieces of cardboard to act as levers. These levers will be connected to the dials and will engage with the locking bar when the correct combination is entered.
4. Attach the Levers to the Dials: Attach the levers to the wooden skewers, so that when the dials are rotated to the correct number, the levers will align with the slots in the locking bar. This is where precision is crucial!
5. Connect the Locking Bar to the Door: Attach the locking bar to the inside of the safe box, so that it can slide into a slot on the door.
6. Add Tension with Rubber Bands: Use rubber bands to create tension in the locking mechanism. This will ensure that the locking bar stays in place and the door remains locked until the correct combination is entered. Attach the rubber bands to the locking bar and to a fixed point inside the safe box.
7. Test the Locking Mechanism: Test the locking mechanism thoroughly to make sure it works correctly. Rotate the dials to different combinations and see if the door remains locked. Then, enter the correct combination and see if the locking bar disengages, allowing the door to open.
Fine-Tuning and Security Enhancements:
Now that you have a basic working safe, let’s add some finishing touches and security enhancements.
1. Adjust Lever Alignment: This is the most important step. If the levers are not perfectly aligned with the slots in the locking bar, the lock won’t work reliably. Carefully adjust the position of the levers until the lock opens smoothly and consistently with the correct combination.
2. Add Magnetic Closure (Optional): For a more secure and satisfying closure, you can add small magnets to the door and the safe box. This will help keep the door closed even if the locking mechanism is not fully engaged.
3. Reinforce Weak Points: Inspect your safe for any weak points, such as thin cardboard or poorly glued joints. Reinforce these areas with extra cardboard and glue.
4. Camouflage and Decoration: Now for the fun part! Decorate your safe to blend in with its surroundings or to make it look like something else entirely. You can paint it, cover it with paper, or even add fake wires and buttons to make it look like a high-tech device.
5. Conceal the Mechanism: Cover the internal locking mechanism with cardboard panels to prevent anyone from tampering with it. This will also make your safe look more professional.
Setting Your Combination:
Before you finalize everything, decide on your combination and make sure you remember it! Write it down somewhere safe (but not *in* the safe!). You can adjust the position of the levers on the dials to change the combination.
Troubleshooting Tips:
* Dials are Sticking: Make sure the dials are rotating freely within their holders. If they are sticking, try lubricating them with a small amount of graphite or silicone spray.
* Locking Bar is Not Engaging: Check the alignment of the levers and the slots in the locking bar. Make sure the levers are properly engaging with the slots when the correct combination is entered.
* Door is Not Staying Closed: Add more tension to the locking mechanism with additional rubber bands. You can also add magnets to the door and the safe box to help keep it closed.
* Cardboard is Tearing: Reinforce the weak points with extra cardboard and glue. You can also use tape to strengthen the cardboard.
Final Thoughts:
And there you have it! Your very own DIY cardboard safe with a combination lock. This project is a great way to learn about simple mechanics, problem-solving, and creativity. Remember to be patient and persistent, and don’t be afraid to experiment. With a little bit of effort, you can create a surprisingly secure and fun safe to protect your treasures. Have fun building!
Conclusion
So, there you have it! A fully functional, surprisingly secure, and undeniably fun DIY combination lock crafted entirely from cardboard. This isn’t just a craft project; it’s a testament to the power of ingenuity and a fantastic way to understand basic mechanical principles. Forget expensive lockboxes or complicated digital security systems for now. This project offers a tangible, hands-on learning experience that’s perfect for kids and adults alike.
Why is this cardboard safe DIY combination lock a must-try? Because it’s more than just a lock. It’s a lesson in problem-solving, a boost to creativity, and a satisfying accomplishment all rolled into one. It’s a project that encourages resourcefulness, turning everyday materials into something functional and impressive. Plus, it’s a fantastic conversation starter! Imagine the look on people’s faces when you tell them your valuables are secured by a cardboard combination lock.
But the fun doesn’t stop with the basic design. Feel free to experiment and personalize your lock. Consider these variations:
* **Camouflage it:** Decorate your lock to blend in with its surroundings. Paint it to look like a book, a box, or even a piece of furniture.
* **Increase the complexity:** Add more dials to increase the number of possible combinations, making it even harder to crack.
* **Incorporate a hidden compartment:** Build a secret compartment into the safe itself for extra security and intrigue.
* **Automate it (slightly):** If you’re feeling ambitious, explore adding a simple motorized mechanism to assist with the unlocking process. Think small gears and a battery-powered motor.
* **Add sound effects:** A small buzzer or chime could add a satisfying “click” when the correct combination is entered.
This project is not just about building a lock; it’s about unlocking your own potential for creativity and innovation. It’s about proving that you don’t need fancy tools or expensive materials to create something truly remarkable. It’s about the satisfaction of saying, “I built that!”
We wholeheartedly encourage you to give this DIY combination lock a try. It’s a rewarding project that’s sure to impress. And more importantly, we want to hear about your experience! Share your creations, modifications, and any challenges you encountered in the comments below. Let’s build a community of cardboard engineers and inspire each other with our ingenuity. Did you add extra security features? Did you find a clever way to camouflage your lock? We’re eager to see what you come up with! Don’t forget to share pictures and videos of your finished product. Let’s show the world the amazing things that can be accomplished with a little cardboard, creativity, and a whole lot of ingenuity. So, grab your cardboard, get crafting, and let the locking adventures begin!
Frequently Asked Questions (FAQ)
How secure is this cardboard combination lock, really?
While it’s not going to replace a high-security vault, this cardboard combination lock offers a surprising level of security, especially against casual attempts to open it. The more dials you add and the more complex the internal mechanism, the harder it becomes to crack. However, remember that it’s still made of cardboard, so it’s not impervious to brute force. Its primary value lies in its ingenuity, educational aspect, and ability to deter opportunistic theft. Think of it as a fun and engaging way to learn about security principles, rather than a foolproof security solution. For truly valuable items, a professionally manufactured safe is always recommended.
What kind of cardboard is best for this project?
Sturdy corrugated cardboard is ideal. Look for cardboard boxes that are thick and have well-defined corrugations. Thinner cardboard, like that used for cereal boxes, can work for some of the smaller components, but the main structure should be made from thicker material. Avoid using damp or damaged cardboard, as it will be weaker and more prone to tearing. Experiment with different types of cardboard to see what works best for each part of the lock. You might find that a combination of different thicknesses provides the optimal balance of strength and flexibility.
What tools do I need to build this lock?
The essential tools are relatively simple:
* A sharp craft knife or box cutter (adult supervision is required for children)
* A ruler or straight edge
* A pencil or pen for marking measurements
* A hot glue gun and glue sticks (adult supervision is required)
* Scissors (optional, for cutting smaller pieces)
* A compass (for drawing circles)
Optional but helpful tools include:
* A cutting mat to protect your work surface
* Clamps to hold pieces together while the glue dries
* Sandpaper to smooth rough edges
How long does it take to build this lock?
The time required will vary depending on your skill level, the complexity of your design, and the number of dials you incorporate. A basic lock with a few dials could take anywhere from 2 to 4 hours to complete. More complex designs could take significantly longer. It’s best to break the project down into smaller steps and work on it over several sessions. This will help prevent fatigue and ensure that you maintain accuracy.
What if my combination lock doesn’t work properly?
Troubleshooting is a key part of the learning process. Here are a few common issues and potential solutions:
* **Dials are too stiff:** Make sure the dials are not rubbing against each other or the surrounding cardboard. Sand down any rough edges and ensure there is enough clearance for them to rotate freely.
* **Combination is difficult to set:** Check that the numbers on the dials are aligned correctly with the internal mechanism. The glue might have shifted slightly during assembly.
* **Lock jams:** Inspect the internal mechanism for any obstructions or misalignments. A small piece of cardboard or glue could be interfering with the movement.
* **Cardboard tears:** Reinforce weak areas with extra cardboard or glue. Consider using a different type of cardboard for those sections.
Don’t be afraid to disassemble parts of the lock and rebuild them if necessary. This is a great way to learn from your mistakes and improve your design.
Can I make this lock weatherproof?
Cardboard is not naturally weatherproof, so this lock is best suited for indoor use. However, you can take steps to make it more resistant to moisture. Consider coating the cardboard with a sealant, such as varnish or polyurethane. This will help protect it from rain and humidity. However, keep in mind that even with a sealant, the lock will still be vulnerable to prolonged exposure to water.
Is this project suitable for children?
Yes, but adult supervision is essential, especially when using sharp tools like craft knives and hot glue guns. This project can be a fantastic learning experience for children, teaching them about engineering, problem-solving, and creativity. Adapt the complexity of the design to the child’s age and skill level. Start with a simpler version with fewer dials and gradually increase the difficulty as they gain experience.
Where can I find more inspiration and ideas for my cardboard combination lock?
The internet is a treasure trove of inspiration! Search for “cardboard engineering projects,” “DIY combination lock,” or “cardboard safe” on YouTube, Pinterest, and other online platforms. You’ll find countless tutorials, design ideas, and variations to inspire your own creation. Don’t be afraid to experiment and adapt existing designs to suit your own needs and preferences. Remember, the most important thing is to have fun and learn something new!

Leave a Comment