

Clean Coffee Grinder DIY: Is your morning cup tasting a little…off? Maybe it’s time to show your trusty coffee grinder some love! I know, cleaning appliances isn’t exactly glamorous, but trust me, a clean coffee grinder is the secret weapon to unlocking the full, rich flavor potential of your favorite beans. For centuries, coffee has been a ritual, a social connector, and a source of energy for people around the globe. From the bustling coffee houses of 17th-century Europe to the modern-day cafes on every corner, the perfect cup has always been the goal. And a key ingredient in achieving that perfection? A properly maintained grinder.
Let’s be honest, who actually enjoys taking apart their coffee grinder for a deep clean? It seems like a chore, right? But think about all those oils and residue building up inside. They can go rancid, affecting the taste of your freshly ground coffee and even shortening the lifespan of your grinder. That’s why I’m sharing this simple, effective, and surprisingly fun clean coffee grinder DIY method. It’s so easy, you’ll wonder why you haven’t been doing it all along! Plus, you’ll save money by avoiding expensive cleaning products and extending the life of your beloved coffee companion. So, grab your supplies, and let’s get grinding – towards a cleaner, tastier future!
DIY: Sparkling Clean Coffee Grinder in Minutes!
Hey coffee lovers! Are you noticing your morning brew tasting a little…off? Or maybe your grinder is starting to sound like it’s struggling? Chances are, it’s time for a good cleaning! A clean coffee grinder is essential for getting the best flavor from your beans and ensuring your grinder lasts longer. Don’t worry, you don’t need any fancy tools or harsh chemicals. I’m going to show you a super easy and effective way to clean your coffee grinder using just a few common household items. Let’s get started!
What You’ll Need
Before we dive in, let’s gather our supplies. This is a pretty simple process, so the list is short and sweet:
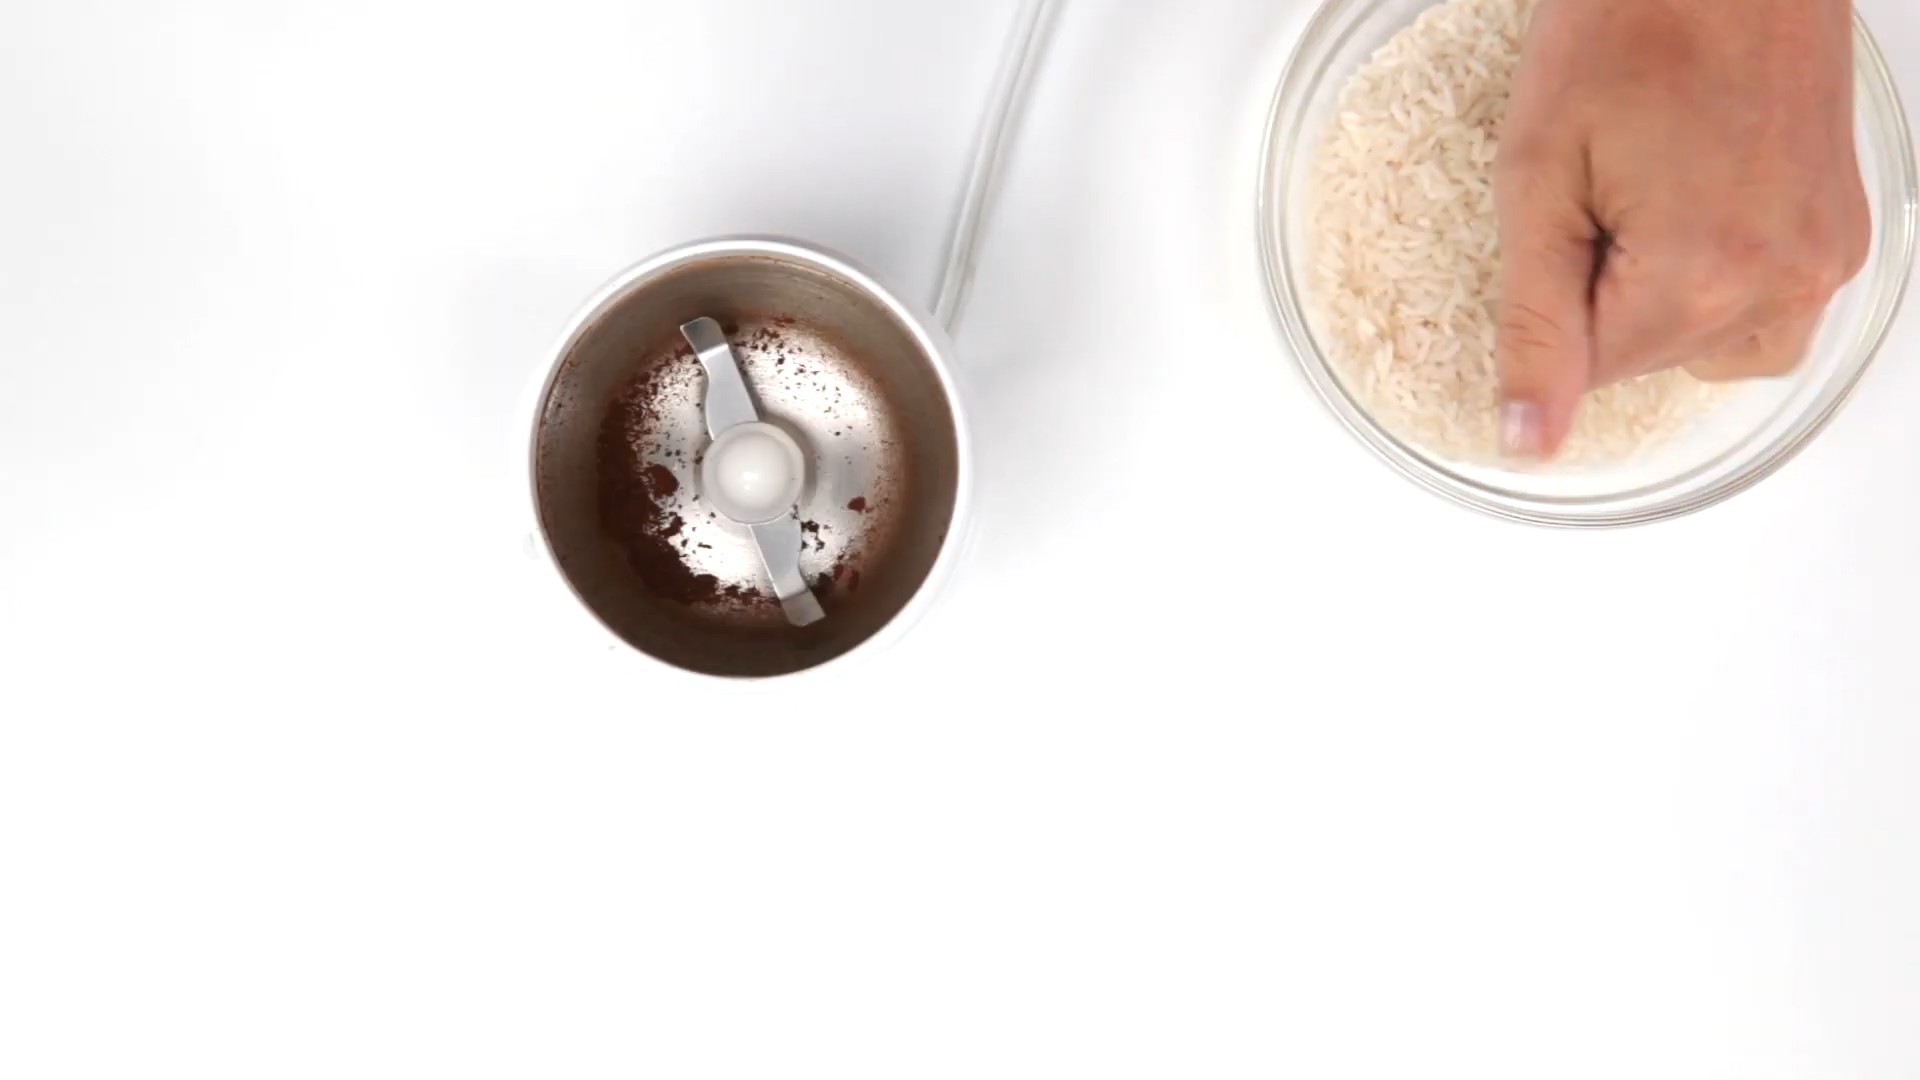
* Uncooked White Rice: This is our secret weapon! The rice acts as a gentle abrasive, dislodging coffee grounds and absorbing oils.
* Small Brush: A small cleaning brush, like a toothbrush (dedicated for cleaning only!), pastry brush, or even a small paintbrush, will help you get into those hard-to-reach areas.
* Clean Cloth or Paper Towels: For wiping down surfaces and removing any lingering dust or debris.
* Screwdriver (if needed): Some grinders require a screwdriver to remove the burrs for a more thorough cleaning. Check your grinder’s manual.
* Vacuum Cleaner (optional): A vacuum with a hose attachment can be helpful for sucking up loose grounds and dust.
Step-by-Step Cleaning Guide
Okay, now for the fun part! Follow these steps, and your coffee grinder will be sparkling clean in no time.
1. Unplug Your Grinder: Safety first! Always unplug your grinder before you start cleaning it. This prevents any accidental starts while you’re working.
2. Empty the Grinder: Remove any remaining coffee beans or grounds from the hopper and grinding chamber. You can use a spoon or your hand to scoop them out. Try to get as much out as possible.
3. Grind the Rice: Pour about ¼ cup of uncooked white rice into the hopper. Grind the rice just like you would coffee beans. I usually grind it on a medium setting. You’ll notice the rice turning into a fine powder.
4. Inspect the Rice Powder: Take a look at the rice powder after grinding. You’ll likely see it’s a bit discolored, which means it’s doing its job of absorbing oils and removing old coffee residue.
5. Discard the Rice Powder: Don’t use this rice powder for anything else! Toss it in the trash or compost bin.
6. Brush It Out: Now, use your small brush to thoroughly clean the grinding chamber, burrs (if accessible), and hopper. Pay close attention to any crevices or areas where coffee grounds tend to accumulate. I like to use a circular motion to loosen any stubborn particles.
7. Vacuum (Optional): If you have a vacuum cleaner with a hose attachment, use it to suck up any remaining rice powder and loose coffee grounds. This is especially helpful for getting into those tight spots.
8. Wipe It Down: Use a clean cloth or paper towel to wipe down all the surfaces of the grinder, both inside and out. This will remove any lingering dust or residue.
9. Reassemble (If Necessary): If you disassembled any parts of your grinder (like the burrs), carefully reassemble them according to the manufacturer’s instructions. Make sure everything is properly aligned and secured.
10. Test It Out: Plug your grinder back in and run it for a few seconds without any beans to make sure everything is working properly.
Deep Cleaning: Removing the Burrs (If Possible)
For a really thorough cleaning, you can remove the burrs from your grinder. However, this isn’t possible with all grinders, so check your grinder’s manual first. If you can remove the burrs, here’s how:
1. Consult Your Manual: This is crucial! Your grinder’s manual will provide specific instructions on how to remove the burrs safely and correctly.
2. Remove the Hopper: Take off the hopper to expose the burrs.
3. Identify the Locking Mechanism: Look for a locking mechanism that holds the burrs in place. This could be a screw, a clip, or a bayonet-style mount.
4. Loosen or Remove the Locking Mechanism: Use the appropriate tool (usually a screwdriver) to loosen or remove the locking mechanism.
5. Carefully Remove the Burrs: Gently pull the burrs out of the grinder. Be careful not to damage them.
6. Clean the Burrs: Use your small brush to thoroughly clean the burrs, removing any coffee grounds or residue. You can also use a damp cloth to wipe them down.
7. Clean the Grinding Chamber: With the burrs removed, you’ll have better access to the grinding chamber. Use your brush and vacuum (if available) to clean it thoroughly.
8. Reassemble: Carefully reassemble the burrs and locking mechanism according to your grinder’s manual. Make sure everything is properly aligned and secured.
Tips and Tricks for a Sparkling Clean Grinder
Here are a few extra tips to keep your coffee grinder in tip-top shape:
* Clean Regularly: I recommend cleaning your grinder every 1-2 weeks, depending on how often you use it. A quick cleaning after each use can also help prevent buildup.
* Don’t Use Water (Unless Specifically Instructed): Avoid using water to clean the inside of your grinder unless your grinder’s manual specifically allows it. Water can damage the burrs and other components.
* Use a Dedicated Brush: Keep a separate brush specifically for cleaning your coffee grinder. This will prevent cross-contamination with other cleaning products.
* Check for Blockages: Periodically check the grinder’s chute for any blockages. A clogged chute can affect the grinder’s performance.
* Consider Grinder Cleaning Tablets: There are also grinder cleaning tablets available that are specifically designed to remove coffee oils and residue. These can be a good option for a deeper clean. I’ve used Urnex Grindz in the past with good results.
* Store Properly: When not in use, store your grinder in a clean, dry place.
Troubleshooting Common Issues
Sometimes, even after cleaning, you might encounter a few issues. Here’s how to troubleshoot them:
* Grinder Still Smells Like Coffee: If your grinder still smells like coffee after cleaning, try grinding another batch of rice. You might need to repeat the process a few times to completely remove the odor.
* Grinder Sounds Louder Than Usual: If your grinder sounds louder than usual, it could be a sign that the burrs are misaligned or damaged. Check the burrs and reassemble them carefully. If the problem persists, you might need to replace the burrs.
* Grinder Isn’t Grinding Properly: If your grinder isn’t grinding properly, check for blockages in the chute or grinding chamber. Also, make sure the burrs are properly aligned and secured.
* Static Electricity: Static electricity can sometimes cause coffee grounds to cling to the grinder. Try wiping the grinder down with a damp cloth before grinding to reduce static.
Why Cleaning Your Grinder Matters
You might be thinking, “Is cleaning my coffee grinder really that important?” The answer is a resounding YES! Here’s why:
* Improved Flavor: Old coffee grounds and oils can build up in your grinder, affecting the flavor of your coffee. A clean grinder ensures that you’re getting the purest, most flavorful brew possible.
* Longer Grinder Life: Coffee oils can corrode the burrs and other components of your grinder over time. Regular cleaning helps prevent this corrosion and extends the life of your grinder.
* Consistent Grind: A clean grinder grinds more consistently, which is essential for achieving the perfect extraction.
* Prevents Clogging: Buildup of coffee grounds can clog the grinder, making it less efficient and potentially damaging the motor.
* Hygiene: Let’s face it, a clean grinder is just more hygienic!
So there you have it! A simple and effective way to clean your coffee grinder using just a few common household items. By following these steps and tips, you can keep your grinder in top condition and enjoy delicious, flavorful coffee for years to come. Happy brewing!
Conclusion
So, there you have it! This simple, yet incredibly effective, DIY trick for cleaning your coffee grinder is a game-changer. No more stale coffee flavors tainting your perfectly roasted beans. No more worrying about hidden oils and residue impacting the performance of your grinder. This method is quick, cost-effective, and uses ingredients you likely already have in your pantry.
Why is this a must-try? Because a clean coffee grinder is the foundation of a truly exceptional cup of coffee. Think about it: all that effort you put into sourcing high-quality beans, perfecting your brewing technique – it all hinges on the grinder. A dirty grinder introduces unwanted flavors and can even lead to inconsistent grind sizes, ultimately compromising the taste of your coffee. This DIY cleaning method eliminates those issues, allowing the true flavors of your coffee to shine through.
Beyond the basic white rice method, there are a few variations you can explore. For a deeper clean, especially if you suspect stubborn oil buildup, try adding a tablespoon of baking soda to the rice. The baking soda acts as a mild abrasive and helps to neutralize odors. Alternatively, some people prefer to use instant rice instead of regular rice, claiming it’s even more effective at absorbing oils. Experiment and see what works best for your grinder and your preferences.
Another variation to consider is the frequency of cleaning. While a deep clean every month or two is generally sufficient, you might want to clean your grinder more often if you use oily or flavored coffee beans. These beans tend to leave behind more residue, which can quickly accumulate and impact the taste of your coffee. A quick cleaning with rice after using oily beans can help prevent buildup and maintain the grinder’s performance.
We understand that trying new things can sometimes be daunting, but trust us, this DIY trick is worth it. The difference in the taste of your coffee will be noticeable, and you’ll be amazed at how much cleaner your grinder is. Plus, it’s a much more affordable and environmentally friendly alternative to using harsh chemicals or specialized cleaning products.
Don’t just take our word for it – give it a try! We’re confident that you’ll be thrilled with the results. And once you’ve experienced the joy of a truly clean coffee grinder, we encourage you to share your experience with us. Let us know what variations you tried, what kind of coffee you’re brewing, and how this DIY cleaning method has improved your coffee routine. Share your tips and tricks in the comments below, and let’s build a community of coffee lovers who appreciate the importance of a clean coffee grinder. Your feedback will help others discover the benefits of this simple yet powerful technique. So go ahead, clean your grinder, brew a delicious cup of coffee, and let us know what you think! This simple **clean coffee grinder DIY** will change your coffee experience.
Frequently Asked Questions (FAQ)
Why is it important to clean my coffee grinder?
Cleaning your coffee grinder is crucial for several reasons. Firstly, coffee beans contain oils that can accumulate over time, leading to rancidity and stale flavors that negatively impact the taste of your coffee. Secondly, residue buildup can affect the grinder’s performance, causing inconsistent grind sizes and potentially damaging the burrs or blades. Finally, a dirty grinder can harbor bacteria and mold, which can pose a health risk. Regular cleaning ensures optimal coffee flavor, grinder performance, and hygiene.
How often should I clean my coffee grinder?
The frequency of cleaning depends on how often you use your grinder and the type of coffee beans you use. As a general guideline, a deep clean every month or two is recommended for regular use. However, if you use oily or flavored coffee beans, you may need to clean your grinder more frequently, perhaps every week or two. A quick cleaning with rice after using oily beans can help prevent buildup. Pay attention to the taste of your coffee and the appearance of your grinder to determine the optimal cleaning schedule for your needs.
Can I use any type of rice for cleaning my coffee grinder?
While white rice is the most commonly recommended type of rice for cleaning coffee grinders, you can experiment with other types. Some people prefer to use instant rice, claiming it’s even more effective at absorbing oils due to its smaller particle size. However, avoid using brown rice, as it contains more oils and can potentially leave behind residue in your grinder. Regardless of the type of rice you choose, make sure it’s dry and uncooked.
Is it safe to grind rice in my coffee grinder?
Yes, it is generally safe to grind rice in your coffee grinder for cleaning purposes. Rice is a relatively soft grain and is unlikely to damage the burrs or blades of your grinder. However, it’s important to use plain, uncooked rice and avoid adding any seasonings or flavorings. After grinding the rice, thoroughly clean the grinder to remove any remaining rice particles.
What if I don’t have rice? Are there any alternative cleaning methods?
While rice is the most popular and effective DIY cleaning method, there are a few alternatives you can try. One option is to use coffee grinder cleaning tablets, which are specifically designed to remove coffee oils and residue. Another option is to use a soft brush or vacuum cleaner to remove loose grounds and debris. However, these methods may not be as effective as rice at absorbing oils and removing stubborn residue.
How do I clean a blade grinder versus a burr grinder?
The cleaning process is similar for both blade and burr grinders, but there are a few key differences. For blade grinders, simply grind the rice as you normally would, then wipe down the blades and interior with a clean, dry cloth. For burr grinders, you may need to disassemble the grinder to access the burrs for cleaning. Use a brush or vacuum cleaner to remove loose grounds, then grind the rice to absorb oils. Reassemble the grinder and wipe down the exterior.
What if my coffee grinder is very dirty or has a strong odor?
If your coffee grinder is particularly dirty or has a strong odor, you may need to take additional steps to clean it thoroughly. Try adding a tablespoon of baking soda to the rice when grinding to help neutralize odors and remove stubborn residue. You can also use a damp cloth with a mild detergent to wipe down the interior of the grinder, but be sure to dry it completely before using it again. For persistent odors, try leaving the grinder open to air out for a few days.
How can I prevent my coffee grinder from getting dirty in the first place?
The best way to keep your coffee grinder clean is to prevent it from getting dirty in the first place. Avoid using oily or flavored coffee beans, as they tend to leave behind more residue. Store your coffee beans in an airtight container to prevent them from releasing oils. And clean your grinder regularly, even if it doesn’t appear to be dirty, to prevent buildup from accumulating.
Will this DIY method void my coffee grinder’s warranty?
Using rice to clean your coffee grinder is generally considered a safe and acceptable practice, and it’s unlikely to void your warranty. However, it’s always a good idea to check your grinder’s manual or contact the manufacturer to confirm. Some manufacturers may have specific cleaning recommendations or warnings that you should be aware of.
Where can I share my experience with this DIY cleaning method?
We encourage you to share your experience with this DIY cleaning method in the comments section below. Let us know what variations you tried, what kind of coffee you’re brewing, and how this method has improved your coffee routine. Your feedback will help others discover the benefits of a clean coffee grinder. You can also share your experience on social media using relevant hashtags like #CleanCoffeeGrinder #DIYCoffee #CoffeeTips.


Leave a Comment