

Clean Kitchen Sink Naturally – sounds like a dream, right? I know, I know, the kitchen sink can be a breeding ground for grime and unpleasant odors. But what if I told you that you could ditch those harsh chemicals and achieve a sparkling clean sink using ingredients you probably already have in your pantry?
For generations, resourceful homemakers have relied on natural remedies to keep their homes fresh and clean. Think about it – before the advent of commercial cleaners, our grandmothers used vinegar, baking soda, and lemon juice to tackle everything from stubborn stains to lingering smells. This isn’t just about nostalgia; it’s about tapping into a wealth of knowledge that’s both effective and environmentally friendly.
Why should you embrace this DIY approach? Well, for starters, it’s gentler on your skin and the environment. Plus, it’s often more cost-effective than buying expensive cleaning products. But most importantly, learning how to clean kitchen sink naturally empowers you to create a healthier and more sustainable home. No more worrying about harmful chemicals lingering on your dishes or polluting your water supply. I’m going to show you some simple yet powerful tricks to keep your kitchen sink sparkling and smelling fresh, naturally!
DIY: Sparkling Clean Kitchen Sink, Naturally!
Okay, let’s face it, the kitchen sink is a battlefield. Food scraps, grease, coffee grounds – it sees it all! And while there are tons of harsh chemical cleaners out there, I prefer a more natural approach. Not only is it better for the environment, but it’s also gentler on your skin and won’t leave your kitchen smelling like a chemical factory. So, grab your supplies, and let’s get that sink sparkling!
What You’ll Need:
* Baking Soda
* White Vinegar
* Lemon (or Lemon Juice)
* Salt (Coarse Salt is best)
* Dish Soap (Natural Dish Soap preferred)
* Old Toothbrush or Scrub Brush
* Microfiber Cloth or Sponge
* Boiling Water (Be careful!)
* Ice Cubes (Optional, for stubborn odors)
* Essential Oils (Optional, for a fresh scent)
The Ultimate Natural Sink Cleaning Guide:
* Prep is Key: Clear the sink of all dishes, sponges, and anything else that might be lurking.
* Baking Soda Power: Baking soda is your best friend for gentle abrasion and odor absorption.
* Vinegar Fizz: Vinegar reacts with baking soda to create a powerful cleaning fizz.
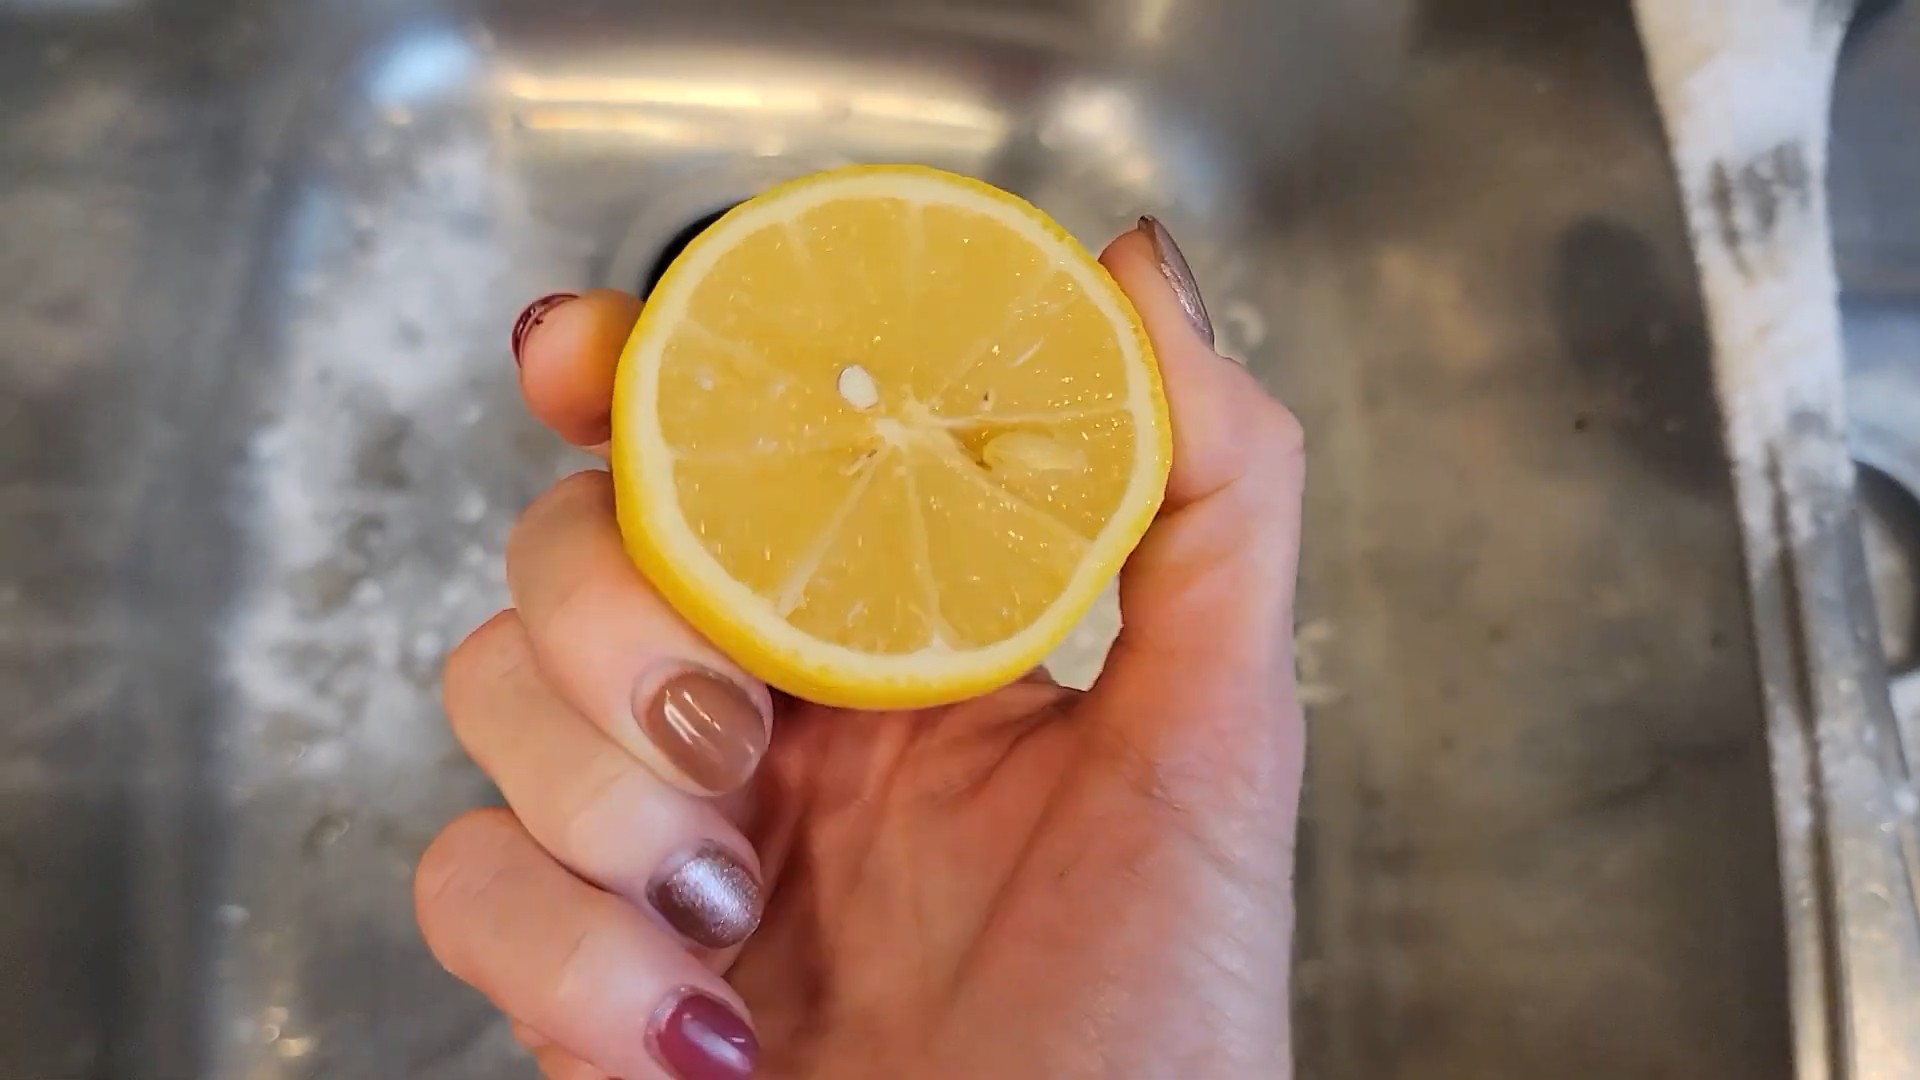
* Lemon Zest: Lemon adds a fresh scent and helps cut through grease.
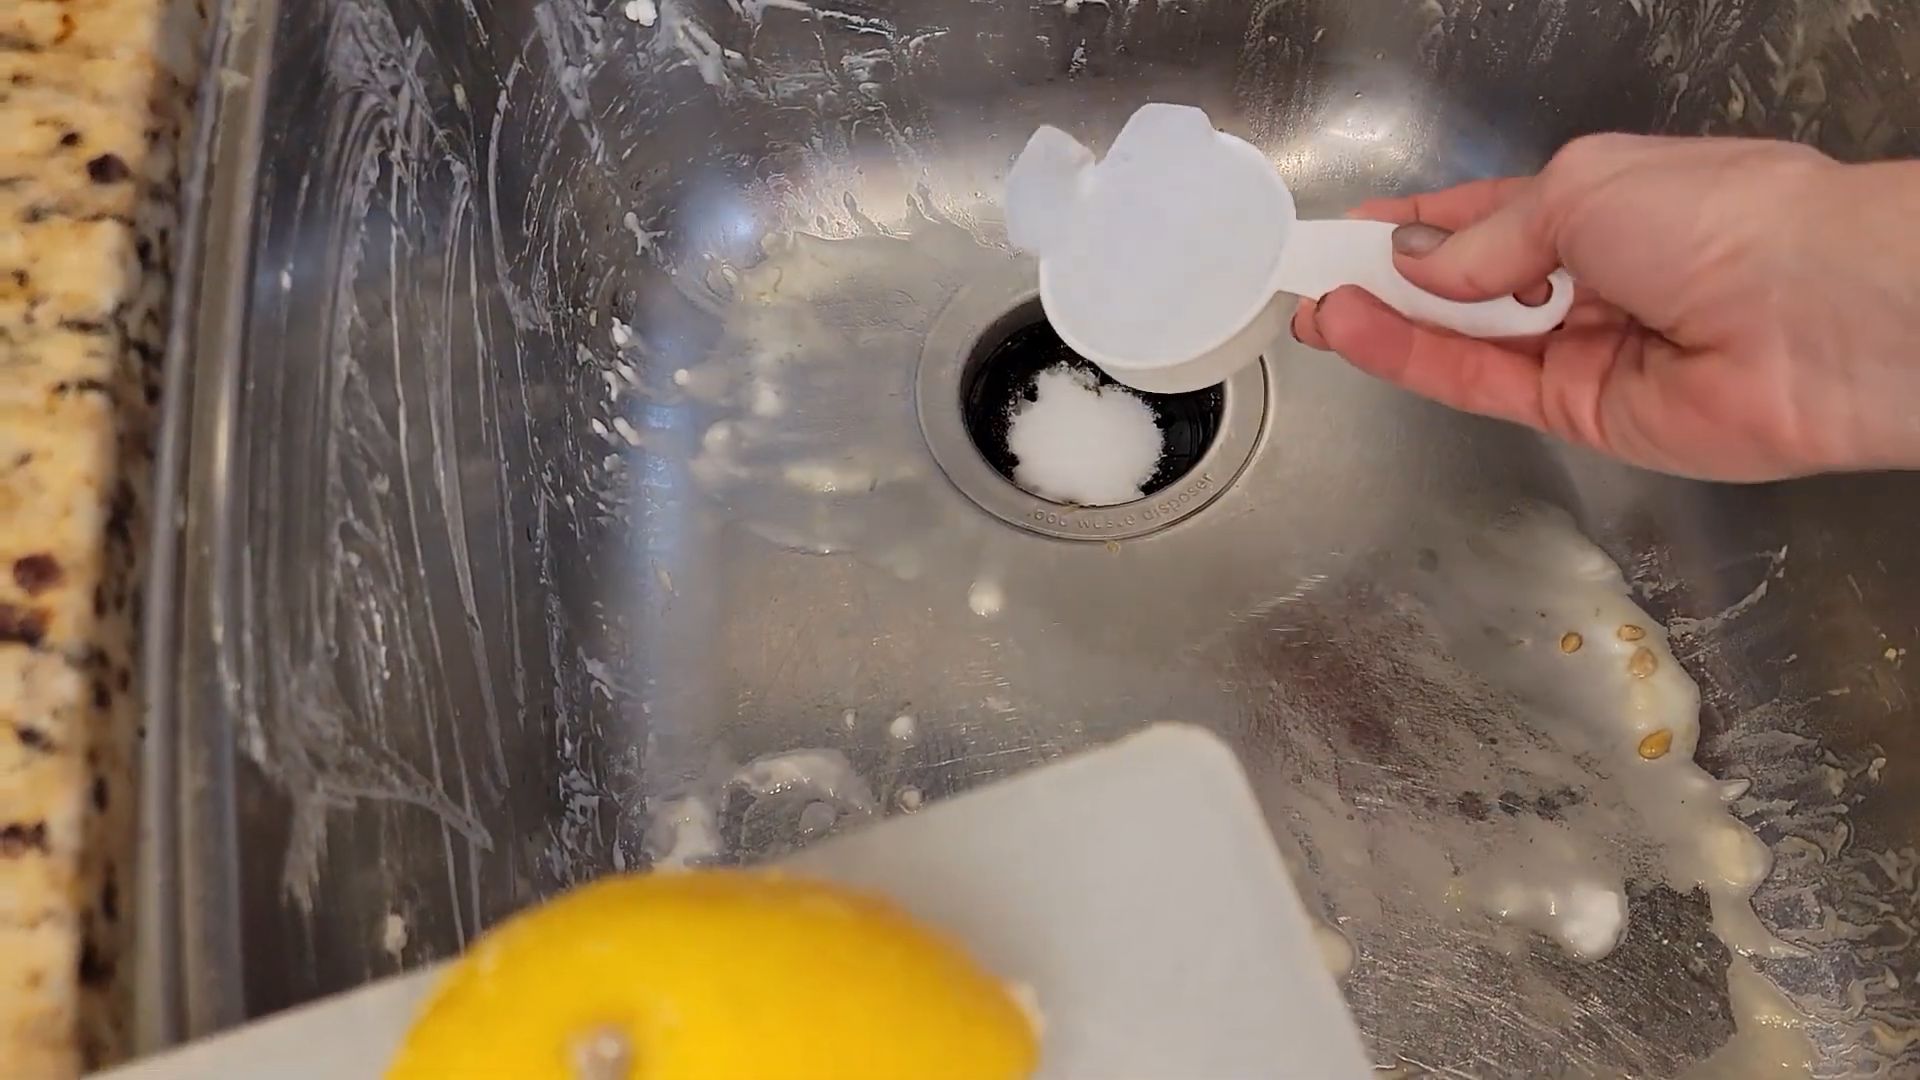
* Salt Scrub: Salt provides extra scrubbing power for tough stains.
* Boiling Water Flush: Boiling water helps dissolve grease and clear drains.
* Ice Cube Refresh: Ice cubes can help absorb lingering odors.
* Essential Oil Boost: A few drops of essential oil can leave your sink smelling amazing.
Step-by-Step Instructions:
1. Clear the Decks! First things first, make sure your sink is completely empty. Remove any dishes, sponges, dish racks, or anything else that might be in the way. This will give you a clear surface to work with. I usually toss everything into the dishwasher or a basin of soapy water to get it out of the way.
2. Baking Soda Blanket: Now, generously sprinkle baking soda all over the surface of your sink. Don’t be shy! Cover the entire sink, including the sides and the drain. Baking soda is a mild abrasive, so it will help loosen any stuck-on food or grime. It’s also a natural deodorizer, so it will help absorb any unpleasant odors. I usually use about half a cup, but you can adjust the amount depending on the size of your sink.
3. Vinegar Volcano: Next, slowly pour white vinegar over the baking soda. You’ll see it start to fizz and bubble – that’s the magic happening! The chemical reaction between the baking soda and vinegar helps to break down grease and grime. Let the mixture fizz for about 5-10 minutes. This gives it time to really work its way into any stubborn stains. I love watching the fizzing action – it’s like a mini science experiment in my kitchen!
4. Scrub-a-Dub-Dub: After the fizzing has subsided, grab your old toothbrush or scrub brush and start scrubbing! Pay special attention to areas that tend to accumulate grime, such as around the drain, the faucet, and any corners or crevices. The baking soda and vinegar mixture should have loosened most of the dirt and debris, making it easier to scrub away. I find that a toothbrush is particularly helpful for getting into those hard-to-reach spots.
5. Lemon Power (Optional, but Recommended!): Cut a lemon in half and use it to scrub the sink. The lemon juice will help to cut through grease and add a fresh, citrusy scent. You can also squeeze the lemon juice directly onto the sink surface. If you don’t have a lemon on hand, you can use lemon juice from a bottle, but fresh lemon is always best. The natural acids in lemon are fantastic for cleaning and disinfecting.
6. Salt Scrub for Stubborn Spots: For any stubborn stains or grime that just won’t budge, sprinkle some coarse salt onto the affected areas and scrub again. The salt will act as an extra abrasive, helping to remove even the most persistent dirt. Be careful not to scrub too hard, as you don’t want to scratch your sink. I usually use sea salt or kosher salt for this step.
7. Rinse and Repeat (If Necessary): Rinse the sink thoroughly with warm water. If you still see any lingering dirt or grime, repeat steps 2-6. Sometimes, a second round of cleaning is necessary, especially if your sink is particularly dirty. Don’t be discouraged if it takes a little extra effort – the results will be worth it!
8. Boiling Water Flush (Drain Cleaning Time!): Carefully pour a kettle of boiling water down the drain. This will help to flush out any grease or debris that may be clogging the drain. Be extremely careful when handling boiling water to avoid burns. I usually stand back a bit while pouring to avoid any splashes. This step is crucial for preventing drain clogs and keeping your sink smelling fresh.
9. Dish Soap Finish: Now, squirt a small amount of natural dish soap onto a microfiber cloth or sponge and wipe down the entire sink. This will remove any remaining residue and leave your sink sparkling clean. I prefer to use a natural dish soap that is free of harsh chemicals.
10. Dry and Shine: Finally, dry the sink thoroughly with a clean microfiber cloth. This will prevent water spots and leave your sink looking shiny and new. I always keep a stack of microfiber cloths handy for cleaning tasks like this.
11. Ice Cube Odor Absorber (Optional): If your sink still has a lingering odor, fill it with ice cubes and let them sit for about 30 minutes. The ice cubes will help to absorb any remaining odors. This is a great trick for getting rid of stubborn smells like garlic or onions.
12. Essential Oil Scent Boost (Optional): For an extra touch of freshness, add a few drops of your favorite essential oil to a damp cloth and wipe down the sink. I love using lemon, lavender, or tea tree oil. Essential oils not only smell great, but they also have antibacterial properties.
Maintaining Your Sparkling Sink:
* Rinse After Each Use: Make it a habit to rinse your sink after each use to prevent food and grime from building up.
* Wipe Down Regularly: Wipe down your sink with a damp cloth and a little dish soap every day to keep it clean and shiny.
* Avoid Harsh Chemicals: Stick to natural cleaning methods to avoid damaging your sink and harming the environment.
* Address Clogs Promptly: If you notice your drain is starting to clog, address it promptly to prevent a major backup. You can use a drain snake or a natural drain cleaner to clear the clog.
* Protect Your Sink: Use a sink protector or mat to prevent scratches and dents.
Dealing with Specific Sink Issues:
* Hard Water Stains: If you have hard water, you may notice white, chalky stains on your sink. To remove these stains, soak a cloth in white vinegar and place it over the affected area for about 30 minutes. Then, scrub with a non-abrasive cleaner and rinse thoroughly.
* Rust Stains: Rust stains can be removed with a paste of baking soda and water. Apply the paste to the stain, let it sit for about 30 minutes, and then scrub with a non-abrasive cleaner.
* Grease Buildup: Grease buildup can be a common problem in kitchen sinks. To remove grease, pour a cup of baking soda down the drain, followed by a cup of white vinegar. Let it fizz for about 30 minutes, and then flush with boiling water.
* Food Odors: To eliminate food odors, grind a few lemon or orange peels in your garbage disposal. You can also pour a cup of baking soda down the drain, followed by a cup of white vinegar. Let it fizz for about 30 minutes, and then flush with boiling water.
By following these simple steps, you can keep your kitchen sink sparkling clean and fresh without using harsh chemicals. It’s a win-win for you and the environment! Happy cleaning!
Conclusion
So, there you have it! A simple, effective, and eco-friendly way to clean your kitchen sink naturally, banishing grime and unpleasant odors without resorting to harsh chemicals. This DIY trick isn’t just about cleaning; it’s about embracing a more sustainable lifestyle, one sparkling sink at a time. The satisfaction of knowing you’re using ingredients you likely already have in your pantry, and avoiding potentially harmful substances, is truly rewarding.
Why is this a must-try? Because it works! It’s gentle on your sink’s finish, tough on grease and buildup, and leaves behind a fresh, clean scent. Plus, it’s incredibly cost-effective compared to commercial cleaners. You’ll be amazed at how easily you can achieve a gleaming sink with just a few simple steps.
Looking for variations? Absolutely! For extra scrubbing power, add a tablespoon of baking soda to your lemon half before scrubbing. If you have a particularly stubborn stain, create a paste of baking soda and water, apply it to the stain, let it sit for a few minutes, and then scrub. For a different scent, try using orange or grapefruit peels instead of lemon. The citrus oils are fantastic for cutting through grease and leaving a refreshing aroma. Another variation is to use white vinegar instead of lemon juice for descaling and disinfecting. Just be sure to rinse thoroughly afterward. You can also add a few drops of your favorite essential oil, like tea tree or lavender, to the baking soda paste for added antibacterial and fragrance benefits.
Don’t be afraid to experiment and find what works best for your sink and your preferences. The beauty of this DIY method is its adaptability. You can tailor it to your specific needs and create a cleaning routine that’s both effective and enjoyable.
We wholeheartedly encourage you to give this DIY trick a try. You’ll be surprised at how easy and effective it is to clean your kitchen sink naturally. Ditch the harsh chemicals and embrace a greener, cleaner approach.
Once you’ve tried it, we’d love to hear about your experience! Share your results, any variations you tried, and any tips you discovered in the comments below. Let’s build a community of eco-conscious cleaners and share our knowledge to make our homes healthier and our planet a little bit greener. Your feedback is invaluable and helps us all learn and improve. So, go ahead, give it a whirl, and let us know what you think! We’re confident you’ll be thrilled with the results.
Frequently Asked Questions
Q: Is this DIY cleaning method safe for all types of kitchen sinks?
A: Generally, yes, this method is safe for most common kitchen sink materials, including stainless steel, porcelain, and ceramic. However, it’s always a good idea to test a small, inconspicuous area first, especially if you have a more delicate or unusual sink material like copper or natural stone. The acidity of lemon juice or vinegar could potentially etch or damage certain surfaces. If you’re unsure, consult your sink manufacturer’s recommendations. For stainless steel, always scrub in the direction of the grain to avoid scratching. For porcelain, avoid using abrasive scrub brushes that could dull the finish.
Q: How often should I clean my kitchen sink using this method?
A: The frequency depends on how often you use your sink and how quickly it gets dirty. As a general guideline, cleaning your sink with this DIY method once or twice a week is a good starting point. If you notice buildup or odors more frequently, you may need to clean it more often. Conversely, if your sink stays relatively clean, you can reduce the frequency. Regular cleaning will prevent the buildup of grime and bacteria, making it easier to maintain a sparkling clean sink.
Q: Can I use this method to unclog a slow-draining sink?
A: While this method can help prevent clogs by removing grease and buildup, it’s not a primary solution for unclogging a severely blocked drain. For minor clogs, pouring baking soda followed by vinegar down the drain can sometimes help dissolve the blockage. Let it fizz for about 30 minutes, then flush with hot water. However, for more significant clogs, you may need to use a plunger, drain snake, or a commercial drain cleaner (though we always recommend trying natural solutions first). Prevention is key, so regularly flushing your drain with hot water and avoiding pouring grease down the sink can help prevent clogs in the first place.
Q: What if I don’t have lemons? Can I use something else?
A: Yes, you can definitely substitute lemons with other citrus fruits like oranges, grapefruits, or limes. They all contain citric acid, which is effective at cutting through grease and grime. You can also use white vinegar as an alternative. Vinegar is a powerful disinfectant and descaler. Simply dilute the vinegar with water (a 1:1 ratio is a good starting point) and use it to wipe down your sink. Be sure to rinse thoroughly afterward to remove the vinegar smell.
Q: My sink has a really bad odor. Will this method get rid of it?
A: Yes, this method is effective at eliminating most sink odors. The combination of baking soda and lemon (or other citrus) helps neutralize odors and kill bacteria that can cause unpleasant smells. For particularly stubborn odors, you can try pouring a cup of baking soda down the drain, followed by a cup of vinegar. Let it fizz for about 30 minutes, then flush with hot water. You can also try grinding lemon or orange peels in your garbage disposal to freshen it up. If the odor persists, there may be a deeper issue, such as a buildup of food particles in the drainpipe, which may require professional cleaning.
Q: Can I use this method on a cast iron sink?
A: While you *can* use this method on a cast iron sink, proceed with caution. Cast iron sinks are prone to rust, and the acidity of lemon juice or vinegar can potentially exacerbate this issue. If you choose to use this method, be sure to rinse the sink thoroughly with water afterward and dry it completely. You may also want to apply a thin layer of mineral oil to the sink to help protect it from rust. Alternatively, you can use a milder cleaning solution, such as a paste of baking soda and water, to clean your cast iron sink.
Q: Is it safe to use this method if I have a septic system?
A: Yes, this DIY cleaning method is generally safe for septic systems. The ingredients used – baking soda, lemon juice, and vinegar – are all natural and biodegradable, and they won’t harm the beneficial bacteria in your septic tank. However, it’s always a good idea to avoid pouring large quantities of any cleaning solution down the drain at once. Instead, use smaller amounts and flush with plenty of water. If you have any concerns, consult with a septic system professional.
Q: What kind of scrub brush should I use?
A: The type of scrub brush you use depends on the material of your sink. For stainless steel, a soft-bristled brush or sponge is best to avoid scratching. For porcelain or ceramic, you can use a slightly more abrasive brush, but avoid anything too harsh that could dull the finish. For cast iron, use a non-abrasive brush or sponge to prevent rust. Microfiber cloths are also a great option for cleaning sinks, as they are gentle yet effective at removing dirt and grime.
Q: Can I add essential oils to this cleaning mixture?
A: Absolutely! Adding a few drops of your favorite essential oil can enhance the cleaning power and fragrance of this DIY method. Tea tree oil is a great choice for its antibacterial properties, while lemon, orange, or grapefruit essential oils can boost the citrus scent and degreasing power. Lavender or eucalyptus essential oils can add a calming and refreshing aroma. Just be sure to use pure essential oils and add them sparingly, as some essential oils can be irritating to the skin.


Leave a Comment