

Cleaning hacks for busy homes are a lifesaver, aren’t they? I know I’m always on the lookout for ways to make my cleaning routine faster and more efficient. Let’s face it, in today’s fast-paced world, who has hours to spend scrubbing and polishing? We all crave a sparkling clean home, but the thought of the time and effort involved can be daunting.
The desire for a clean and organized living space isn’t new. Throughout history, different cultures have developed their own unique cleaning methods and traditions. From ancient Roman bathhouses to the meticulous cleaning rituals of Japanese homes, the pursuit of cleanliness has always been a part of human civilization. But what *is* new is the sheer volume of information (and misinformation!) available to us today.
That’s why I’ve put together this collection of simple yet effective cleaning hacks for busy homes. These aren’t your grandma’s cleaning tips (although some of those are pretty great too!). These are practical, time-saving solutions designed to fit into your busy schedule. Whether you’re a working professional, a busy parent, or simply someone who prefers spending their free time doing something other than cleaning, these DIY tricks will help you maintain a clean and comfortable home without sacrificing your precious time. Get ready to reclaim your weekends and enjoy a cleaner, happier home!
DIY Cleaning Hacks for Busy Homes: Reclaim Your Sanity!
Hey there, fellow busy bees! I totally get it. Between work, family, and trying to squeeze in a little “me time,” cleaning often falls to the bottom of the to-do list. But fear not! I’ve compiled some of my favorite DIY cleaning hacks that are quick, effective, and won’t break the bank. Let’s get started!
Hack 1: Microwave Magic: The Steam Clean Powerhouse
Is your microwave looking like a Jackson Pollock painting gone wrong? This hack is a game-changer. Forget scrubbing for hours; steam is your new best friend.
What you’ll need:
* 1 cup of water
* 1 tablespoon of white vinegar or lemon juice (vinegar is stronger, lemon smells nicer!)
* Microwave-safe bowl
* Sponge or cloth
Step-by-step instructions:
1. Combine the ingredients: In your microwave-safe bowl, mix the water and vinegar (or lemon juice). I usually opt for lemon juice because I love the fresh scent it leaves behind.
2. Microwave it: Place the bowl in the microwave and heat on high for 5-5 minutes. You want the water to boil and create a good amount of steam. The steam will loosen all the grime and splatters.
3. Let it sit: Don’t open the microwave immediately! Let the steam work its magic for another 2-3 minutes. This is crucial for softening the stubborn bits.
4. Wipe it clean: Carefully remove the bowl (it will be hot!). Use your sponge or cloth to wipe down the inside of the microwave. You’ll be amazed at how easily the dirt comes off. For really tough spots, you might need a little extra elbow grease, but it’ll still be way easier than scrubbing from the get-go.
5. Dry it off: Once you’ve wiped everything clean, use a dry cloth to dry the inside of the microwave. Voila! A sparkling clean microwave in minutes.
Hack 2: Grout Gone Good: Baking Soda and Vinegar to the Rescue
Grimey grout lines can make even the cleanest bathroom look dingy. This simple paste will brighten those lines right up.
What you’ll need:
* Baking soda
* White vinegar
* Old toothbrush or grout brush
* Spray bottle (optional)
* Water
Step-by-step instructions:
1. Create the paste: In a small bowl, mix baking soda and vinegar until you form a thick paste. It will fizz, that’s normal! I usually start with about ½ cup of baking soda and slowly add vinegar until I get the right consistency.
2. Apply the paste: Using your old toothbrush or grout brush, apply the paste to the grout lines. Make sure you really get into those crevices.
3. Let it sit: Allow the paste to sit on the grout for at least 10-15 minutes. For really stubborn stains, you can let it sit for up to 30 minutes.
4. Scrub-a-dub-dub: After the paste has had time to work, scrub the grout lines with your toothbrush or grout brush. You should see the grime lifting away.
5. Rinse it off: Rinse the grout lines with water. You can use a spray bottle for this or simply wipe them down with a damp cloth. Make sure you remove all traces of the baking soda paste.
6. Dry it off: Dry the area with a clean cloth. Admire your sparkling clean grout!
Hack 3: Shower Head Detox: Vinegar Soak for a Powerful Spray
Is your shower head spraying in weird directions or just not as powerful as it used to be? Mineral buildup is likely the culprit. This vinegar soak will dissolve that buildup and restore your shower head to its former glory.
What you’ll need:
* White vinegar
* Plastic bag (a Ziploc bag works great)
* Rubber band or twist tie
Step-by-step instructions:
1. Fill the bag: Pour enough white vinegar into the plastic bag to completely submerge the shower head.
2. Secure the bag: Carefully place the bag over the shower head, making sure the shower head is fully immersed in the vinegar. Use a rubber band or twist tie to secure the bag to the shower head.
3. Let it soak: Let the shower head soak in the vinegar for at least 30 minutes, or even better, overnight. The longer it soaks, the more mineral buildup will dissolve. I usually do this before I go to bed so it can work its magic while I sleep.
4. Remove the bag: Carefully remove the bag from the shower head.
5. Rinse and wipe: Run the shower for a few minutes to flush out any remaining vinegar and loosened mineral deposits. Wipe down the shower head with a clean cloth.
6. Enjoy your powerful shower: Enjoy your revitalized shower head and the powerful, even spray!
Hack 4: Blinds Be Gone Dust: Sock It To ‘Em!
Dusting blinds can be a real pain. This hack makes it quick and easy.
What you’ll need:
* Old sock (clean, of course!)
* White vinegar or all-purpose cleaner
* Spray bottle
Step-by-step instructions:
1. Prepare the sock: Lightly dampen the sock with white vinegar or your favorite all-purpose cleaner. I prefer vinegar because it’s a natural cleaner and doesn’t leave any residue.
2. Slip it on: Slip the sock over your hand, like a glove.
3. Dust away: Use your sock-covered hand to dust the blinds. Simply run your fingers along each slat, wiping away the dust. The sock will trap the dust, preventing it from scattering around the room.
4. Wash the sock: Once you’ve finished dusting, remove the sock and wash it. You can reuse it for future dusting sessions.
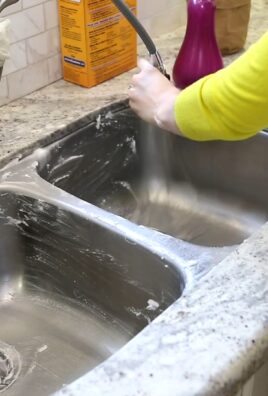
Hack 5: Garbage Disposal Refresh: Citrus Power!
Is your garbage disposal smelling a little funky? This citrus hack will freshen it right up.
What you’ll need:
* Citrus peels (lemon, lime, orange, grapefruit – any combination works!)
* Ice cubes
* Salt (optional)
Step-by-step instructions:
1. Gather your citrus peels: Save your citrus peels after you’ve eaten the fruit.
2. Add ice and salt (optional): Place a handful of ice cubes and a tablespoon of salt (if using) into the garbage disposal. The ice helps to scrub the disposal blades, and the salt acts as a mild abrasive.
3. Add the citrus peels: Add the citrus peels to the garbage disposal.
4. Run the disposal: Turn on the cold water and run the garbage disposal for about 30 seconds. The citrus peels will help to freshen the disposal and remove any lingering odors.
5. Repeat as needed: Repeat this process as needed to keep your garbage disposal smelling fresh.
Hack 6: Mattress Refresher: Baking Soda Deodorizer
Mattresses can harbor dust mites and absorb odors over time. This simple baking soda treatment will freshen your mattress and help eliminate those unwanted smells.
What you’ll need:
* Baking soda
* Vacuum cleaner with upholstery attachment
* Essential oil (optional, for added fragrance)
* Sifter or strainer (optional, for even distribution)
Step-by-step instructions:
1. Strip the bed: Remove all bedding, including sheets, blankets, and pillows. Wash the bedding according to the manufacturer’s instructions.
2. Sprinkle baking soda: Generously sprinkle baking soda over the entire surface of the mattress. If you want to add a pleasant scent, mix a few drops of your favorite essential oil (like lavender or eucalyptus) into the baking soda before sprinkling. A sifter or strainer can help distribute the baking soda evenly.
3. Let it sit: Allow the baking soda to sit on the mattress for at least 30 minutes, or even better, for several hours. The longer it sits, the more odors and moisture it will absorb. I usually leave it on for a few hours while I’m doing other chores.
4. Vacuum thoroughly: Using the upholstery attachment of your vacuum cleaner, thoroughly vacuum the entire surface of the mattress. Make sure to get into all the crevices and seams.
5. Flip and repeat (optional): If desired, flip the mattress and repeat the process on the other side.
6. Remake the bed: Once you’ve thoroughly vacuumed the mattress, remake the bed with fresh, clean bedding. Enjoy your refreshed and odor-free mattress!
Hack 7: Stainless Steel Shine: Olive Oil Magic
Fingerprints and smudges on stainless steel
Conclusion
So, there you have it! This simple yet incredibly effective DIY cleaning hack is a game-changer for anyone struggling to keep a busy home sparkling. We’ve shown you how to create a powerful, all-purpose cleaner using ingredients you likely already have in your pantry. Forget spending a fortune on commercial cleaning products filled with harsh chemicals. This method is not only budget-friendly and eco-conscious, but it’s also surprisingly effective at tackling grime, grease, and everyday messes.
The beauty of this DIY cleaning solution lies in its versatility. While we’ve provided a base recipe, feel free to experiment with different essential oils to customize the scent and add extra cleaning power. For instance, lemon essential oil is fantastic for cutting through grease in the kitchen, while lavender oil can create a calming and refreshing aroma in bathrooms. Tea tree oil is a natural disinfectant, making it ideal for cleaning surfaces that come into contact with food.
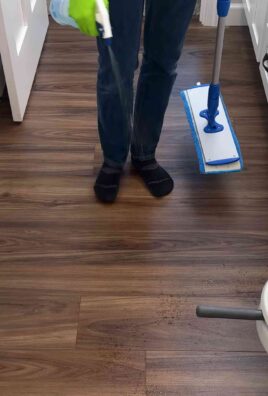
Why is this DIY cleaning hack a must-try? Because it simplifies your cleaning routine, saves you money, and allows you to control the ingredients you’re using in your home. You’ll be amazed at how effective this simple solution is at tackling a wide range of cleaning tasks, from wiping down countertops to mopping floors. Plus, knowing you’re using a non-toxic cleaner is a huge peace of mind, especially if you have children or pets.
Don’t be afraid to adjust the ratios of ingredients to suit your specific needs and preferences. If you have particularly stubborn stains, you might want to increase the amount of vinegar or baking soda in your mixture. Always test the cleaner on an inconspicuous area first to ensure it doesn’t damage the surface.
We’re confident that once you try this DIY cleaning hack, you’ll wonder how you ever lived without it. It’s a simple, effective, and sustainable way to keep your busy home clean and fresh. So, ditch the expensive store-bought cleaners and give this method a try. You won’t be disappointed!
We encourage you to try this cleaning hacks and share your experiences with us! Let us know in the comments section below how it worked for you, what variations you tried, and any tips you have for making it even better. We’re always eager to learn from our readers and create a community of DIY cleaning enthusiasts. Happy cleaning!
Frequently Asked Questions (FAQ)
What exactly makes this DIY cleaner so effective?
The effectiveness of this DIY cleaner stems from the synergistic action of its ingredients. Vinegar, a mild acid, is excellent at cutting through grease, dissolving mineral deposits, and killing bacteria. Baking soda, a mild alkali, acts as a gentle abrasive, helping to scrub away dirt and grime. The combination of these two ingredients creates a powerful cleaning solution that is effective on a wide range of surfaces. Essential oils, besides adding a pleasant scent, can also contribute to the cleaning power of the solution, with some oils possessing antibacterial, antifungal, or antiviral properties.
Can I use this DIY cleaner on all surfaces?
While this DIY cleaner is generally safe for most surfaces, it’s always a good idea to test it on an inconspicuous area first, especially on delicate or porous materials. Avoid using it on natural stone surfaces like marble or granite, as the vinegar can etch the stone over time. It’s also best to avoid using it on waxed wood furniture, as it can strip the wax finish. For these surfaces, a gentler cleaning solution, such as a mixture of water and mild dish soap, is recommended. Always check the manufacturer’s instructions for cleaning specific surfaces.
How long does this DIY cleaner last?
This DIY cleaner typically lasts for several weeks when stored in an airtight container in a cool, dark place. The essential oils can help to preserve the solution and prevent bacterial growth. However, it’s always a good idea to make a fresh batch every month or so to ensure optimal cleaning power. If you notice any changes in the color, smell, or consistency of the cleaner, it’s best to discard it and make a new batch.
What essential oils are best to use in this DIY cleaner?
The best essential oils to use in this DIY cleaner depend on your personal preferences and the specific cleaning tasks you’re tackling. Some popular choices include:
* **Lemon:** Excellent for cutting through grease and leaving a fresh, citrusy scent.
* **Lavender:** Provides a calming and relaxing aroma, making it ideal for bathrooms and bedrooms.
* **Tea Tree:** A natural disinfectant with antibacterial and antifungal properties, perfect for cleaning surfaces that come into contact with food.
* **Eucalyptus:** Has a strong, invigorating scent and is known for its antiseptic properties.
* **Peppermint:** Provides a refreshing and energizing aroma and can help to repel insects.
* **Orange:** Similar to lemon, great for cutting grease and leaving a pleasant scent.
Feel free to experiment with different essential oils to find your favorite combinations.
Can I use this DIY cleaner to clean my toilet?
Yes, this DIY cleaner can be used to clean your toilet. Simply pour some of the solution into the toilet bowl, let it sit for a few minutes, and then scrub with a toilet brush. The vinegar will help to dissolve mineral deposits and kill bacteria, while the baking soda will act as a gentle abrasive. For extra cleaning power, you can add a few drops of tea tree essential oil.
Is this DIY cleaner safe for pets and children?
Yes, this DIY cleaner is generally safe for pets and children, as it doesn’t contain any harsh chemicals or toxic ingredients. However, it’s still important to keep the cleaner out of reach of children and pets to prevent accidental ingestion. If your pet or child does ingest the cleaner, contact your veterinarian or doctor immediately. Also, be mindful of the essential oils you use, as some essential oils can be toxic to pets. Always research the safety of essential oils before using them around animals.
Can I use this DIY cleaner in a spray bottle?
Absolutely! In fact, using a spray bottle is the most convenient way to apply this DIY cleaner to surfaces. Make sure to use a clean, empty spray bottle and label it clearly to avoid confusion. When spraying the cleaner, hold the bottle a few inches away from the surface and spray evenly. Wipe the surface clean with a damp cloth or sponge.
What if I don’t have vinegar? Can I substitute it with something else?
While vinegar is a key ingredient in this DIY cleaner, you can substitute it with lemon juice in a pinch. Lemon juice has similar acidic properties to vinegar and can be effective at cutting through grease and dissolving mineral deposits. However, lemon juice may not be as effective as vinegar at killing bacteria.
My DIY cleaner smells too strongly of vinegar. How can I fix this?
If your DIY cleaner smells too strongly of vinegar, you can try adding more essential oils to mask the scent. You can also try diluting the cleaner with water to reduce the concentration of vinegar. Another option is to let the cleaner sit for a few days, as the vinegar scent will dissipate over time.

Leave a Comment