

DIY Canvas Art: Unleash your inner artist and transform your living space with stunning, personalized masterpieces! Have you ever looked at a blank canvas and felt a surge of creative energy, only to be intimidated by the thought of expensive art supplies or a lack of formal training? Well, fear not, my friend! This guide is your passport to a world of accessible and rewarding DIY projects that will have you creating gallery-worthy art in no time.
The desire to adorn our homes with beautiful imagery is as old as civilization itself. From ancient cave paintings to the Renaissance masters, art has always been a powerful form of expression and a reflection of our culture. While we might not all be Michelangelos, the spirit of creativity resides within each of us, just waiting to be awakened. And what better way to tap into that potential than through the joy of DIY Canvas Art?
In today’s world, where mass-produced decor often lacks personality, creating your own art is a fantastic way to inject individuality and warmth into your home. Plus, let’s be honest, those generic prints from big box stores can be a bit… well, boring! This article is packed with easy-to-follow tricks and hacks that will empower you to create unique pieces that reflect your personal style and taste. Whether you’re looking to add a pop of color to your living room, create a calming atmosphere in your bedroom, or simply explore your creative side, these DIY canvas art ideas will inspire you to pick up a brush (or a sponge, or even a potato!) and start creating!
DIY Canvas Art: Unleash Your Inner Artist (Even if You Think You Don’t Have One!)
Okay, so you’re staring at a blank wall, feeling uninspired, and thinking about dropping a small fortune on some generic art from a big box store? Stop right there! I’m here to tell you that creating your own stunning canvas art is easier (and way more fun!) than you think. Plus, it’s a fantastic way to personalize your space and express your unique style. Trust me, even if you haven’t picked up a paintbrush since elementary school, you can do this. Let’s dive in!
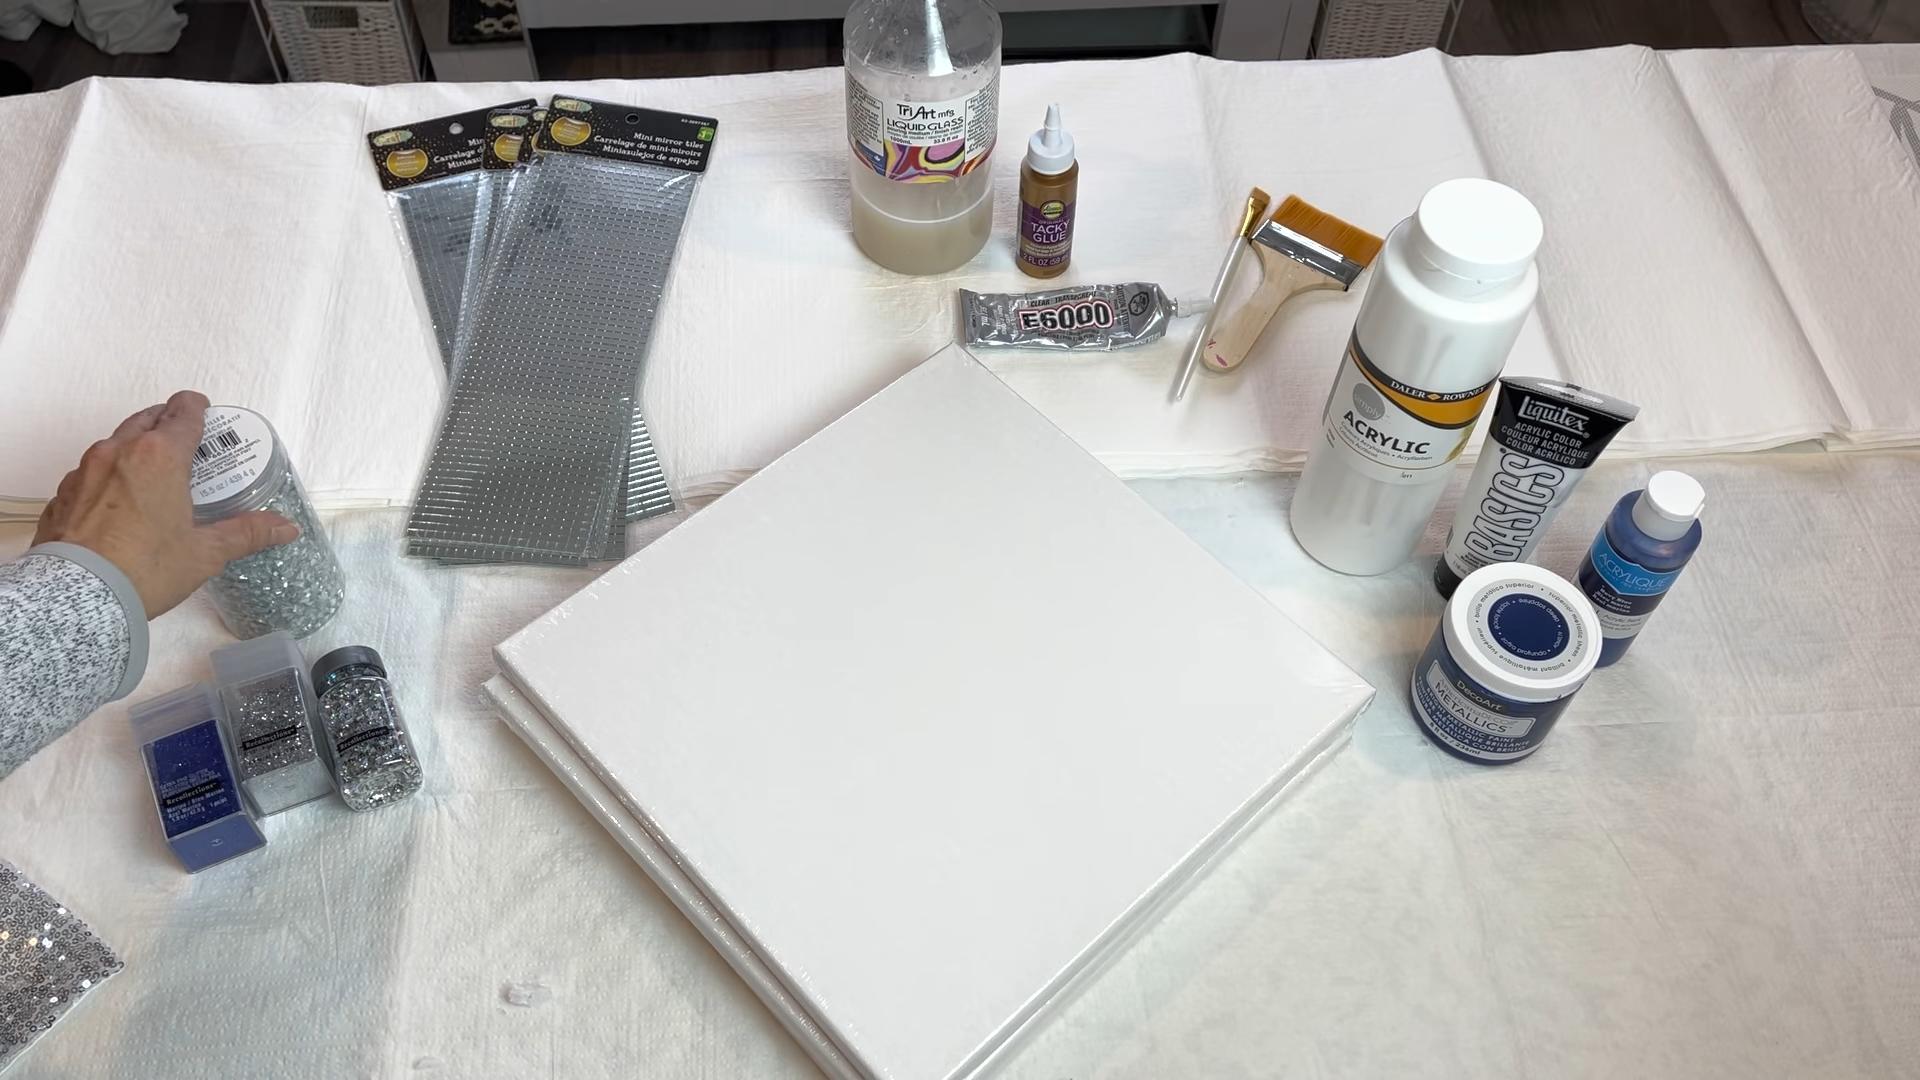
Materials You’ll Need:
Before we get started, let’s gather our supplies. Don’t worry, you probably have some of this stuff lying around already!
* Canvas: Choose the size that best suits your space. Pre-stretched canvases are readily available at craft stores and online. For beginners, I recommend starting with a smaller size like 12×16 inches or 16×20 inches.
* Acrylic Paints: Acrylics are your best friend for DIY canvas art. They’re affordable, easy to work with, and dry quickly. Get a variety of colors that you love! A basic set with primary colors (red, blue, yellow), white, and black is a great starting point. You can always mix them to create custom shades.
* Paintbrushes: A selection of different sized brushes is essential. You’ll want a large brush for covering the canvas, medium brushes for general painting, and small, fine-tipped brushes for details.
* Palette: A palette is where you’ll mix your paints. You can use a disposable paper palette, a plastic palette, or even a ceramic plate.
* Water Container: For rinsing your brushes.
* Paper Towels or Rags: For cleaning up spills and dabbing excess paint.
* Palette Knife (Optional): A palette knife can be used to create interesting textures and effects.
* Masking Tape (Optional): For creating clean lines and geometric designs.
* Ruler or Measuring Tape (Optional): If you’re planning a design with precise measurements.
* Drop Cloth or Newspaper: To protect your work surface.
* Hair Dryer (Optional): To speed up the drying process.
* Easel (Optional): An easel can make painting more comfortable, but it’s not essential. You can easily work on a flat surface.
* Varnish or Sealer (Optional): To protect your finished artwork and give it a professional look.
Choosing Your Design: Inspiration is Everywhere!
The hardest part for many people is deciding what to paint! Don’t let this paralyze you. Here are some ideas to get your creative juices flowing:
* Abstract Art: This is a great option for beginners because there are no rules! Experiment with different colors, shapes, and textures.
* Geometric Patterns: Use masking tape to create clean lines and geometric designs.
* Nature-Inspired Art: Paint landscapes, flowers, trees, or animals.
* Inspirational Quotes: Write your favorite quote or saying on the canvas.
* Color Blocking: Divide the canvas into sections and paint each section a different color.
* Fluid Art/Pour Painting: This technique involves pouring acrylic paint onto the canvas and letting it flow. It’s messy but incredibly fun!
* Copy a Masterpiece: Choose a painting you admire and try to recreate it. This is a great way to learn about different techniques.
* Personalized Art: Paint something that’s meaningful to you, like your pet, your favorite place, or a portrait of a loved one.
Browse Pinterest, Instagram, and art websites for inspiration. Don’t be afraid to experiment and try new things! The most important thing is to have fun.
Step-by-Step Guide: Creating Your Masterpiece
Alright, let’s get down to business! I’m going to walk you through the basic steps of creating your own canvas art. Remember, there’s no right or wrong way to do this. Let your creativity guide you!
1. Prepare Your Workspace:
* Cover your work surface with a drop cloth or newspaper to protect it from paint splatters.
* Gather all your materials and arrange them within easy reach.
* If you’re using an easel, set it up in a well-lit area.
2. Prime Your Canvas (Optional):
* Most pre-stretched canvases are already primed, but if you’re using a raw canvas, you’ll need to prime it with gesso.
* Gesso is a white acrylic primer that creates a smooth surface for painting.
* Apply a thin, even coat of gesso to the canvas using a wide brush.
* Let the gesso dry completely before moving on to the next step.
3. Sketch Your Design (Optional):
* If you’re planning a more complex design, it can be helpful to sketch it out on the canvas first.
* Use a pencil to lightly sketch your design. Don’t press too hard, as you don’t want the pencil lines to show through the paint.
* You can also use stencils or transfer paper to transfer your design to the canvas.
4. Start Painting!
* Squeeze a small amount of each color onto your palette.
* Dip your brush into the paint and apply it to the canvas.
* Start with the background colors first.
* Use a large brush to cover large areas of the canvas.
* Use smaller brushes for details.
* Don’t be afraid to experiment with different brushstrokes and techniques.
* If you make a mistake, don’t worry! You can always paint over it.
* Let each layer of paint dry completely before adding another layer. This will prevent the colors from mixing and becoming muddy.
* Use a hair dryer to speed up the drying process if you’re impatient (like me!).
5. Adding Texture (Optional):
* If you want to add texture to your painting, you can use a palette knife, a sponge, or even your fingers.
* Apply thick layers of paint to create raised areas.
* Use a palette knife to create interesting patterns and textures.
* Experiment with different techniques to see what you like best.
6. Creating Geometric Designs with Masking Tape:
* This is a fun and easy way to create clean lines and geometric patterns.
* Apply masking tape to the canvas in the desired pattern.
* Make sure the tape is firmly adhered to the canvas to prevent paint from bleeding underneath.
* Paint over the taped areas with your desired colors.
* Let the paint dry completely before carefully removing the tape.
* You’ll be left with crisp, clean lines.
7. Fluid Art/Pour Painting Technique:
* This technique is all about letting the paint flow and create its own unique patterns.
* Mix your acrylic paints with a pouring medium (like Floetrel) to make them more fluid.
* Pour the paints onto the canvas in layers or in a random pattern.
* Tilt the canvas to allow the paints to flow and mix together.
* You can also use a straw or a heat gun to manipulate the paint.
* Let the painting dry completely. This can take several days.
* The results are always surprising and beautiful!
8. Adding Details and Finishing Touches:
* Once the paint is dry, take a step back and assess your artwork.
* Add any final details or finishing touches.
* Use a fine-tipped brush to add small details, like highlights or shadows.
* Sign your name on the canvas.
9. Varnish or Seal Your Artwork (Optional):
* Varnishing your artwork will protect it from dust, dirt, and UV damage.
* It will also enhance the colors and give it a professional look.
* Choose a varnish that is specifically designed for acrylic paints.
* Apply the varnish according to the manufacturer’s instructions.
* Let the varnish dry completely before hanging your artwork.
Tips and Tricks for Success:
* Don’t be afraid to experiment! The best way to learn is by trying new things.
* Start with simple designs. As you gain confidence, you can move on to more complex projects.
* Use high-quality materials. This will make a big difference in the final result.
* Clean your brushes regularly. This will prevent the paint from drying and ruining your brushes.
* Let your paint dry completely between layers. This will prevent the colors from mixing and becoming muddy.
* Have fun! Painting should be a relaxing and enjoyable experience.
Cleaning Up:
* Wash your brushes thoroughly with soap and water.
* Clean your palette and any other tools you used.
* Dispose of any paint-soaked paper towels
Conclusion
So, there you have it! Transforming your blank walls into personalized masterpieces doesn’t require a hefty art budget or years of formal training. This DIY canvas art trick is a game-changer for anyone looking to inject creativity and personality into their living space without breaking the bank. It’s simple, adaptable, and incredibly rewarding.
Why is this a must-try? Because it empowers you to be the artist. You’re not limited by pre-made designs or the constraints of what’s available in stores. You control the colors, the patterns, and the overall aesthetic, ensuring that your artwork perfectly complements your existing decor and reflects your unique style. Imagine the satisfaction of telling guests, “I made that!” when they admire your stunning wall art.
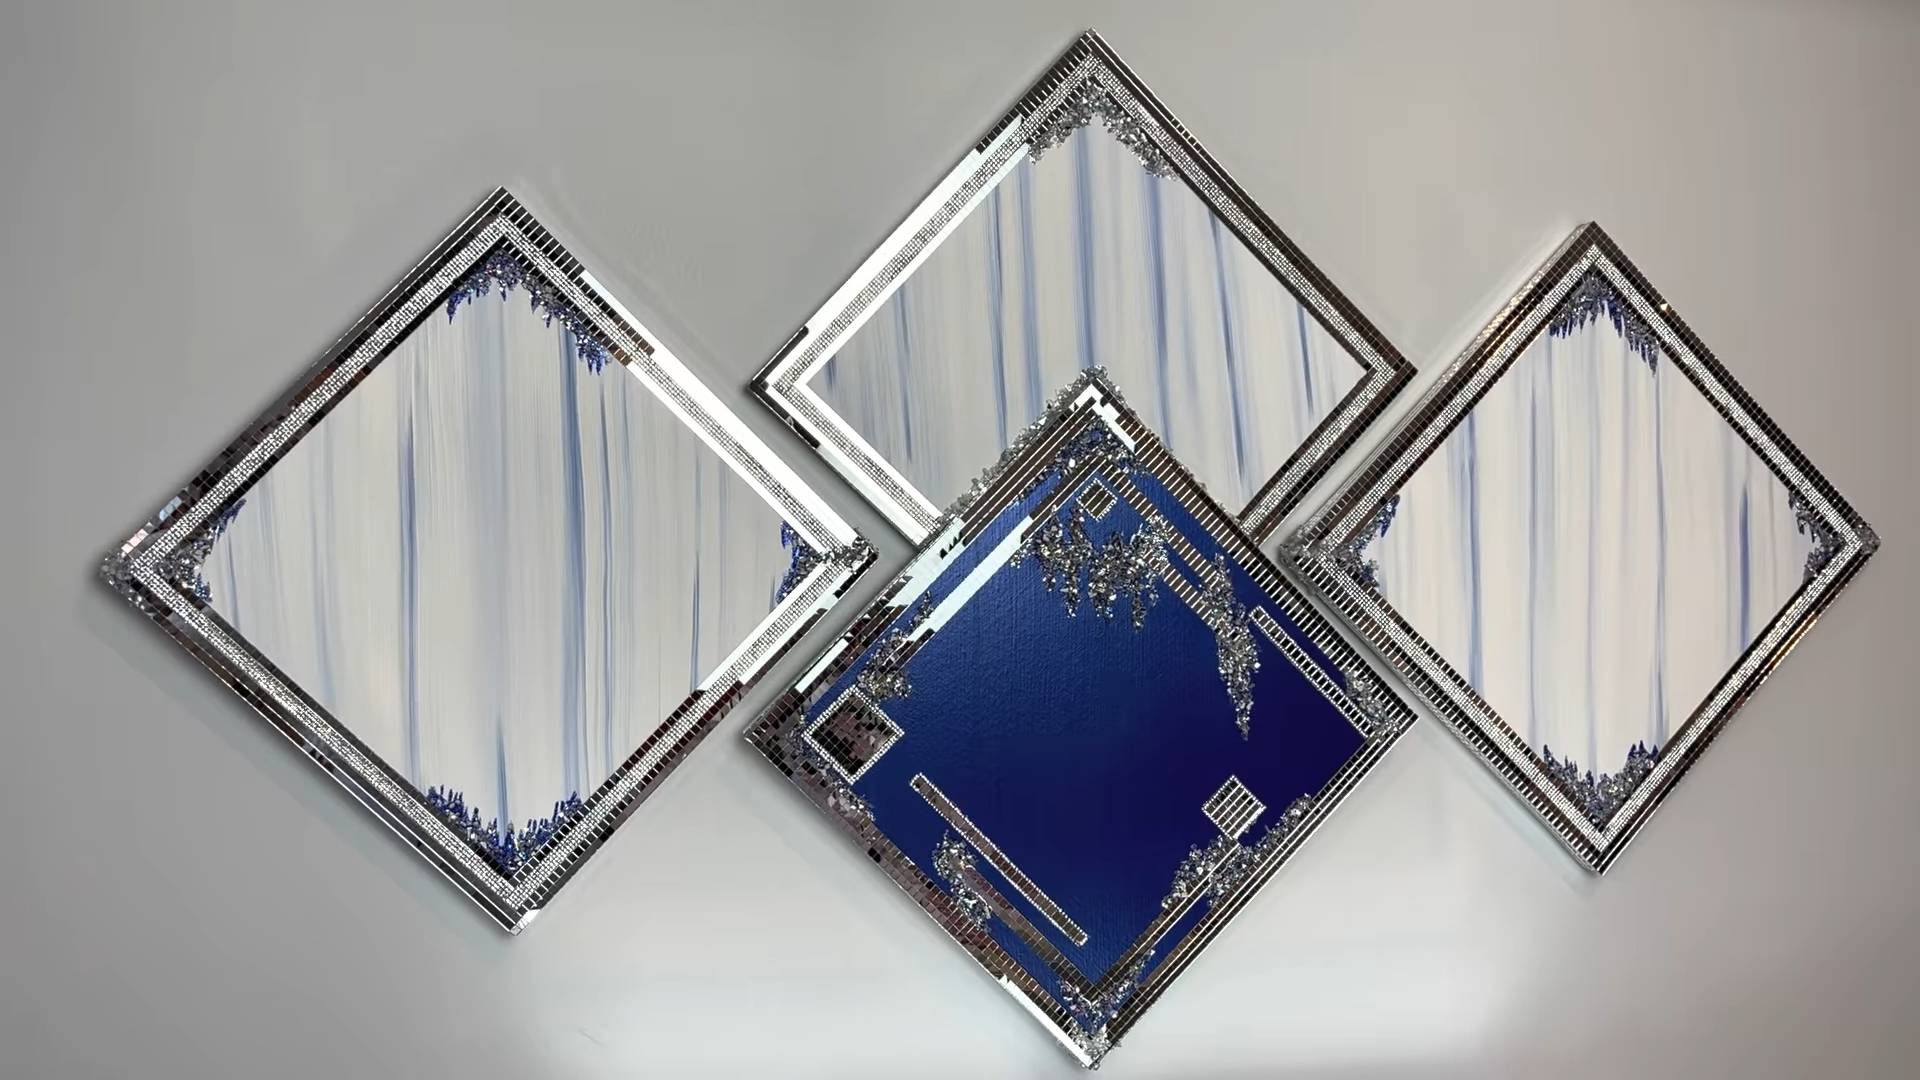
Beyond the basic technique, the possibilities for variation are truly endless. Experiment with different textures by adding fabric scraps, dried flowers, or even textured paint. Try using stencils to create intricate patterns or geometric designs. For a more abstract look, explore pouring techniques or create a marbled effect with different colors of acrylic paint. Consider using metallic paints or glitter for a touch of glamour. You could even incorporate personal photos or mementos into your canvas art for a truly sentimental piece. Think about using different sizes and shapes of canvases to create a gallery wall that’s both visually appealing and deeply personal.
Don’t be afraid to get messy and embrace the imperfections. Remember, the beauty of DIY lies in its unique character. Each brushstroke, each color choice, tells a story. This isn’t about achieving perfection; it’s about expressing yourself and creating something beautiful that you can be proud of.
We wholeheartedly encourage you to give this DIY canvas art trick a try. Gather your supplies, unleash your inner artist, and transform your blank canvases into stunning works of art. We’re confident that you’ll be amazed at what you can create.
And most importantly, we want to see your creations! Share your finished DIY canvas art projects with us on social media using [Your Hashtag Here]. We can’t wait to see the incredible and unique ways you’ve personalized your space. Let’s inspire each other and spread the joy of DIY art! This is more than just a craft; it’s a way to express yourself, add beauty to your surroundings, and create lasting memories. So, grab a canvas, some paint, and let your imagination run wild! You won’t regret it.
Frequently Asked Questions (FAQ)
What kind of paint should I use for DIY canvas art?
Acrylic paint is generally the best choice for DIY canvas art. It’s affordable, readily available, dries quickly, and is water-based, making it easy to clean up. You can find acrylic paints in a wide range of colors and finishes, from matte to glossy. Other options include oil paints (which require more time to dry and special solvents for cleaning) and watercolor paints (which are best suited for smaller canvases and more delicate designs). For beginners, acrylics are definitely the way to go. Consider using different types of acrylic paints, such as heavy body acrylics for texture or fluid acrylics for pouring techniques.
Do I need to prime the canvas before painting?
Most pre-stretched canvases come pre-primed with gesso, which is a white paint-like substance that creates a smooth, even surface for painting. If your canvas is already primed, you don’t need to do anything else. However, if you’re using an unprimed canvas, or if you want to add an extra layer of protection, you can apply a coat or two of gesso before you start painting. This will help the paint adhere better and prevent it from soaking into the canvas. You can find gesso at most art supply stores.
How do I prevent the paint from cracking on the canvas?
Cracking can occur if the paint is applied too thickly or if the canvas is not properly stretched. To prevent cracking, apply thin, even layers of paint and allow each layer to dry completely before applying the next. Make sure your canvas is tightly stretched on its frame. If you’re using a pre-stretched canvas, check to see if the canvas is loose. If it is, you can tighten it by gently tapping the corners of the frame with a hammer. Using high-quality paints can also help prevent cracking.
What if I make a mistake? Can I fix it?
Absolutely! One of the great things about acrylic paint is that it’s relatively easy to fix mistakes. If you make a mistake while the paint is still wet, you can simply wipe it off with a damp cloth. If the paint has already dried, you can paint over it with a new layer of paint. For more stubborn mistakes, you can try sanding down the area with fine-grit sandpaper before repainting. Don’t be afraid to experiment and learn from your mistakes. That’s all part of the DIY process!
How do I protect my finished canvas art?
Once your DIY canvas art is complete and the paint is completely dry, you can protect it with a coat of varnish or sealant. This will help to protect the paint from dust, dirt, and UV damage, and it will also make the colors more vibrant. You can find varnish and sealant at most art supply stores. Choose a varnish that is specifically designed for acrylic paint. Apply the varnish in thin, even layers, following the manufacturer’s instructions.
What are some easy DIY canvas art ideas for beginners?
There are tons of easy DIY canvas art ideas for beginners! Some popular options include:
* **Abstract art:** Simply splatter or pour paint onto the canvas and let it dry.
* **Geometric patterns:** Use tape to create geometric shapes and then paint inside the lines.
* **Silhouette art:** Paint a solid background and then stencil a silhouette onto the canvas.
* **Quote art:** Write your favorite quote on the canvas using paint or markers.
* **Nature-inspired art:** Paint simple landscapes, flowers, or trees.
The key is to start with something simple and build your skills from there. Don’t be afraid to experiment and have fun!
How do I hang my DIY canvas art?
There are several ways to hang your DIY canvas art. You can use picture hanging strips, which are easy to apply and remove without damaging your walls. You can also use nails or screws to hang the canvas. If you’re using nails or screws, make sure to use the appropriate size and type for your wall. For heavier canvases, you may need to use wall anchors. You can also purchase canvas hanging kits, which include all the necessary hardware for hanging your canvas art. Consider the weight of your canvas and the type of wall you’re hanging it on when choosing a hanging method.
Can I use other materials besides paint on my canvas?
Absolutely! Get creative and experiment with different materials. You can use fabric scraps, paper, beads, buttons, dried flowers, or anything else that inspires you. You can glue these materials onto the canvas using a strong adhesive. You can also incorporate mixed media techniques, such as collage or assemblage, into your DIY canvas art. The possibilities are endless!
How do I clean my paint brushes?
Cleaning your paint brushes properly is essential for keeping them in good condition. For acrylic paint, simply rinse your brushes with water immediately after use. If the paint has dried on the brushes, you can soak them in warm water with a mild soap. You can also use a brush cleaner specifically designed for acrylic paint. Be sure to rinse the brushes thoroughly after cleaning and allow them to air dry. Store your brushes upright to prevent the bristles from bending.
Where can I find inspiration for my DIY canvas art?
Inspiration is everywhere! Look around you and pay attention to the colors, patterns, and textures that you find appealing. Browse art galleries, museums, and online art platforms for ideas. Check out DIY blogs and social media for tutorials and inspiration. Don’t be afraid to draw inspiration from nature, fashion, or even your own personal experiences. The most important thing is to find something that resonates with you and inspires you to create.
Leave a Comment