

DIY Cup Key Holder: Tired of losing your keys in the abyss of your entryway? I know I am! We’ve all been there, frantically searching under cushions and in pockets, only to be late for that important meeting or appointment. But what if I told you there’s a charming, practical, and incredibly easy solution that you can create yourself?
The concept of a key holder, while seemingly modern, actually has roots that stretch back centuries. Think of the old-fashioned key cabinets in grand estates, or even the simple hooks used by blacksmiths to keep track of their tools. While those might have been purely functional, we’re taking it a step further by adding a touch of personality and upcycling to the mix!
This DIY Cup Key Holder project isn’t just about organization; it’s about adding a unique, handcrafted element to your home decor. It’s a fantastic way to repurpose those adorable teacups you’ve been hoarding (or maybe that one lonely teacup from a broken set!). Plus, in a world of mass-produced items, creating something with your own hands is incredibly satisfying. You’ll not only have a designated spot for your keys, but also a conversation starter that reflects your creativity and resourcefulness. So, let’s ditch the key chaos and dive into this simple, yet stylish, DIY project!
DIY Upcycled Cup Key Holder: A Charming & Functional Project
Hey there, fellow DIY enthusiasts! Are you tired of losing your keys? Do you have a collection of adorable teacups or coffee mugs that are just gathering dust? Well, I have the perfect solution for you: a DIY upcycled cup key holder! This project is not only incredibly practical, but it also adds a touch of vintage charm to your entryway. Plus, it’s a fantastic way to give those forgotten cups a new lease on life. Let’s get started!
Materials You’ll Need
Before we dive in, let’s gather all the necessary materials. Trust me, having everything on hand will make the process much smoother.
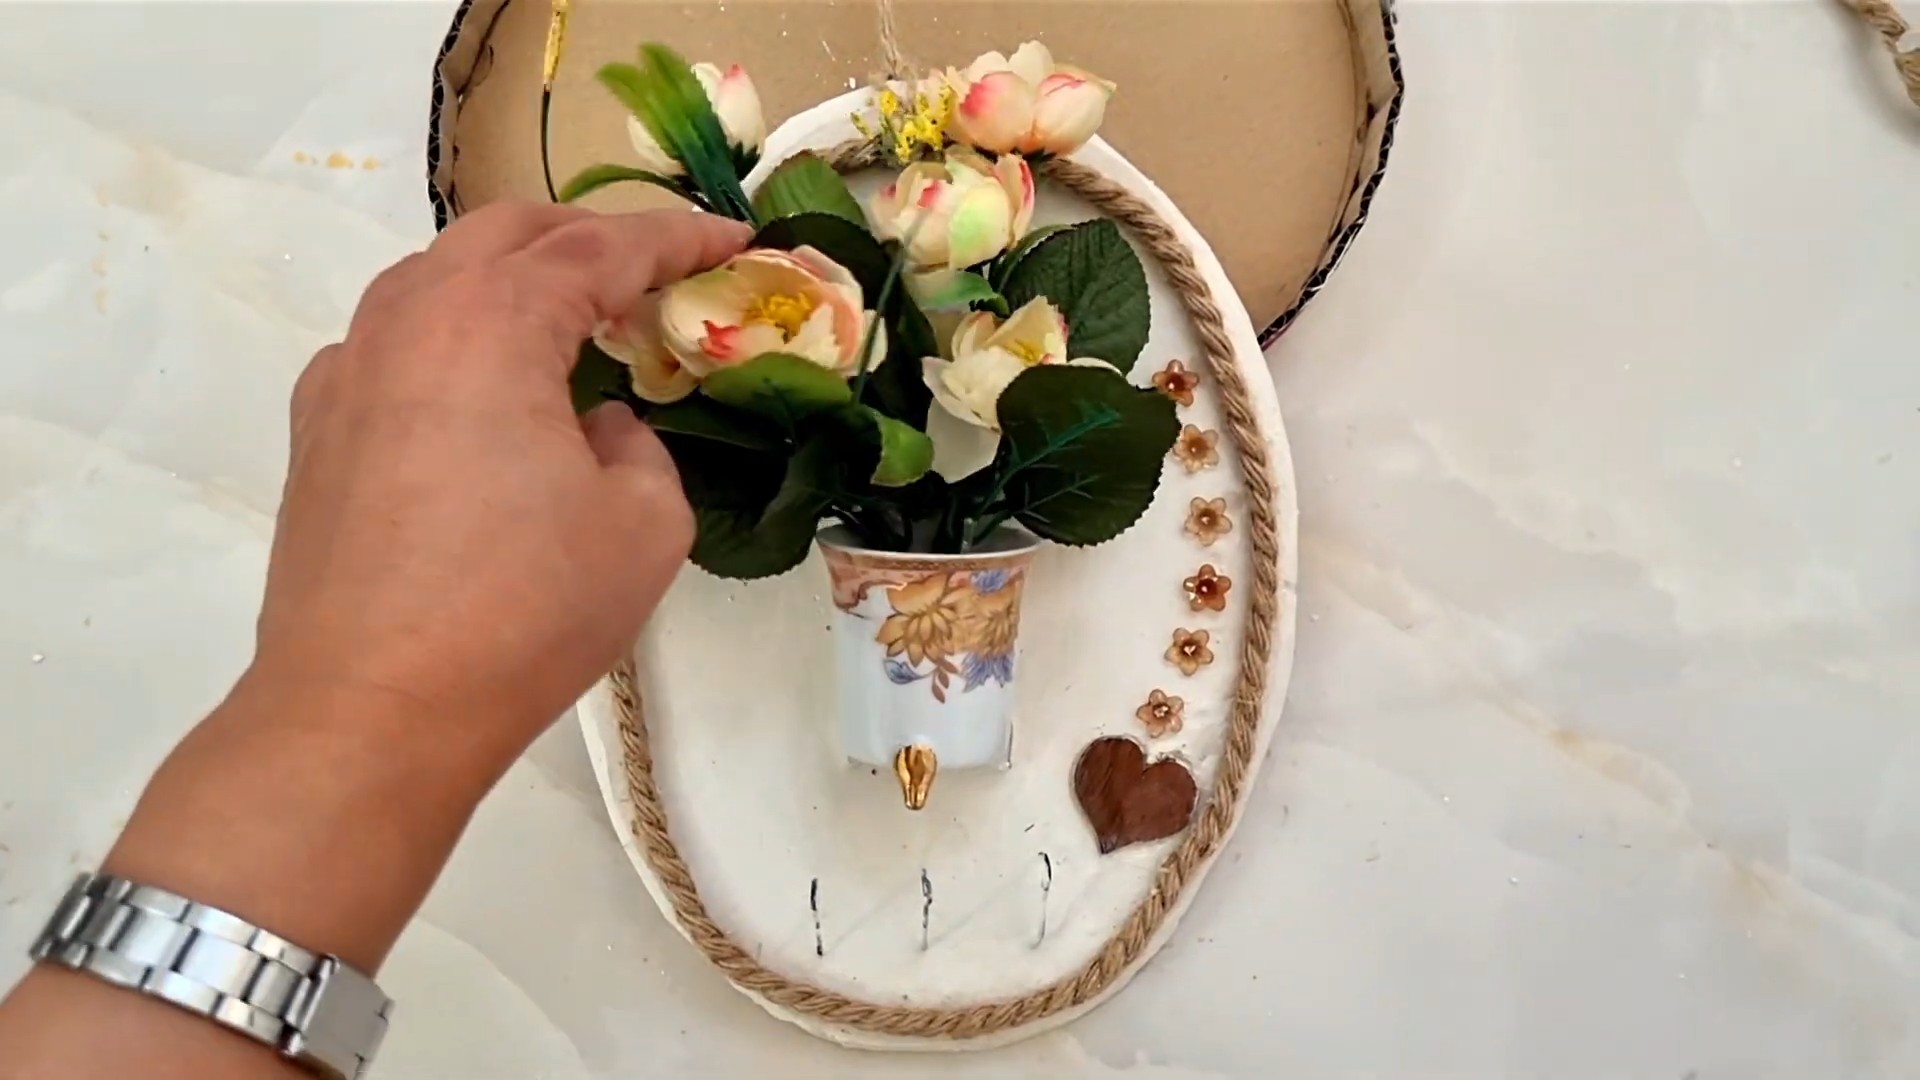
* **Teacups or Coffee Mugs:** Choose cups that you love and that are sturdy enough to hold keys. Mismatched cups can add a quirky, eclectic vibe! I personally love using vintage teacups from thrift stores.
* **Small Wooden Board:** This will serve as the base for your key holder. The size will depend on how many cups you want to use. I recommend measuring your cups and spacing them out on the board before cutting.
* **Decorative Knobs or Hooks:** These will be attached to the bottom of the board to hold your keys. You can find a wide variety of knobs and hooks at hardware stores or online. I like to use vintage-inspired knobs for a cohesive look.
* **Strong Adhesive:** You’ll need a strong adhesive to securely attach the cups to the wooden board. I recommend using epoxy or a construction adhesive specifically designed for bonding ceramics to wood.
* **Screws:** For attaching the knobs or hooks to the wooden board. Make sure the screws are the appropriate length for the thickness of your board.
* **Paint or Stain (Optional):** If you want to customize the look of your wooden board, you’ll need paint or stain. Choose a color that complements your cups and your home decor.
* **Sandpaper (Optional):** If you’re using reclaimed wood, you may want to sand it down to create a smoother surface.
* **Picture Hanging Hardware:** To hang your finished key holder on the wall. D-rings or sawtooth hangers work well.
Tools You’ll Need
Now, let’s talk about the tools you’ll need to bring this project to life.
* **Measuring Tape:** For measuring the wooden board and spacing the cups.
* **Pencil:** For marking where to attach the cups and knobs.
* **Saw (Optional):** If you need to cut the wooden board to size. A hand saw or a power saw will work.
* **Drill:** For drilling pilot holes for the screws and for attaching the picture hanging hardware.
* **Screwdriver:** For tightening the screws.
* **Clamps (Optional):** To hold the cups in place while the adhesive dries.
* **Paintbrush or Rags (Optional):** For applying paint or stain.
* **Safety Glasses:** To protect your eyes from dust and debris.
* **Gloves:** To protect your hands from the adhesive and paint.
Step-by-Step Instructions
Alright, let’s get down to the nitty-gritty! Here’s a detailed guide on how to create your very own upcycled cup key holder.
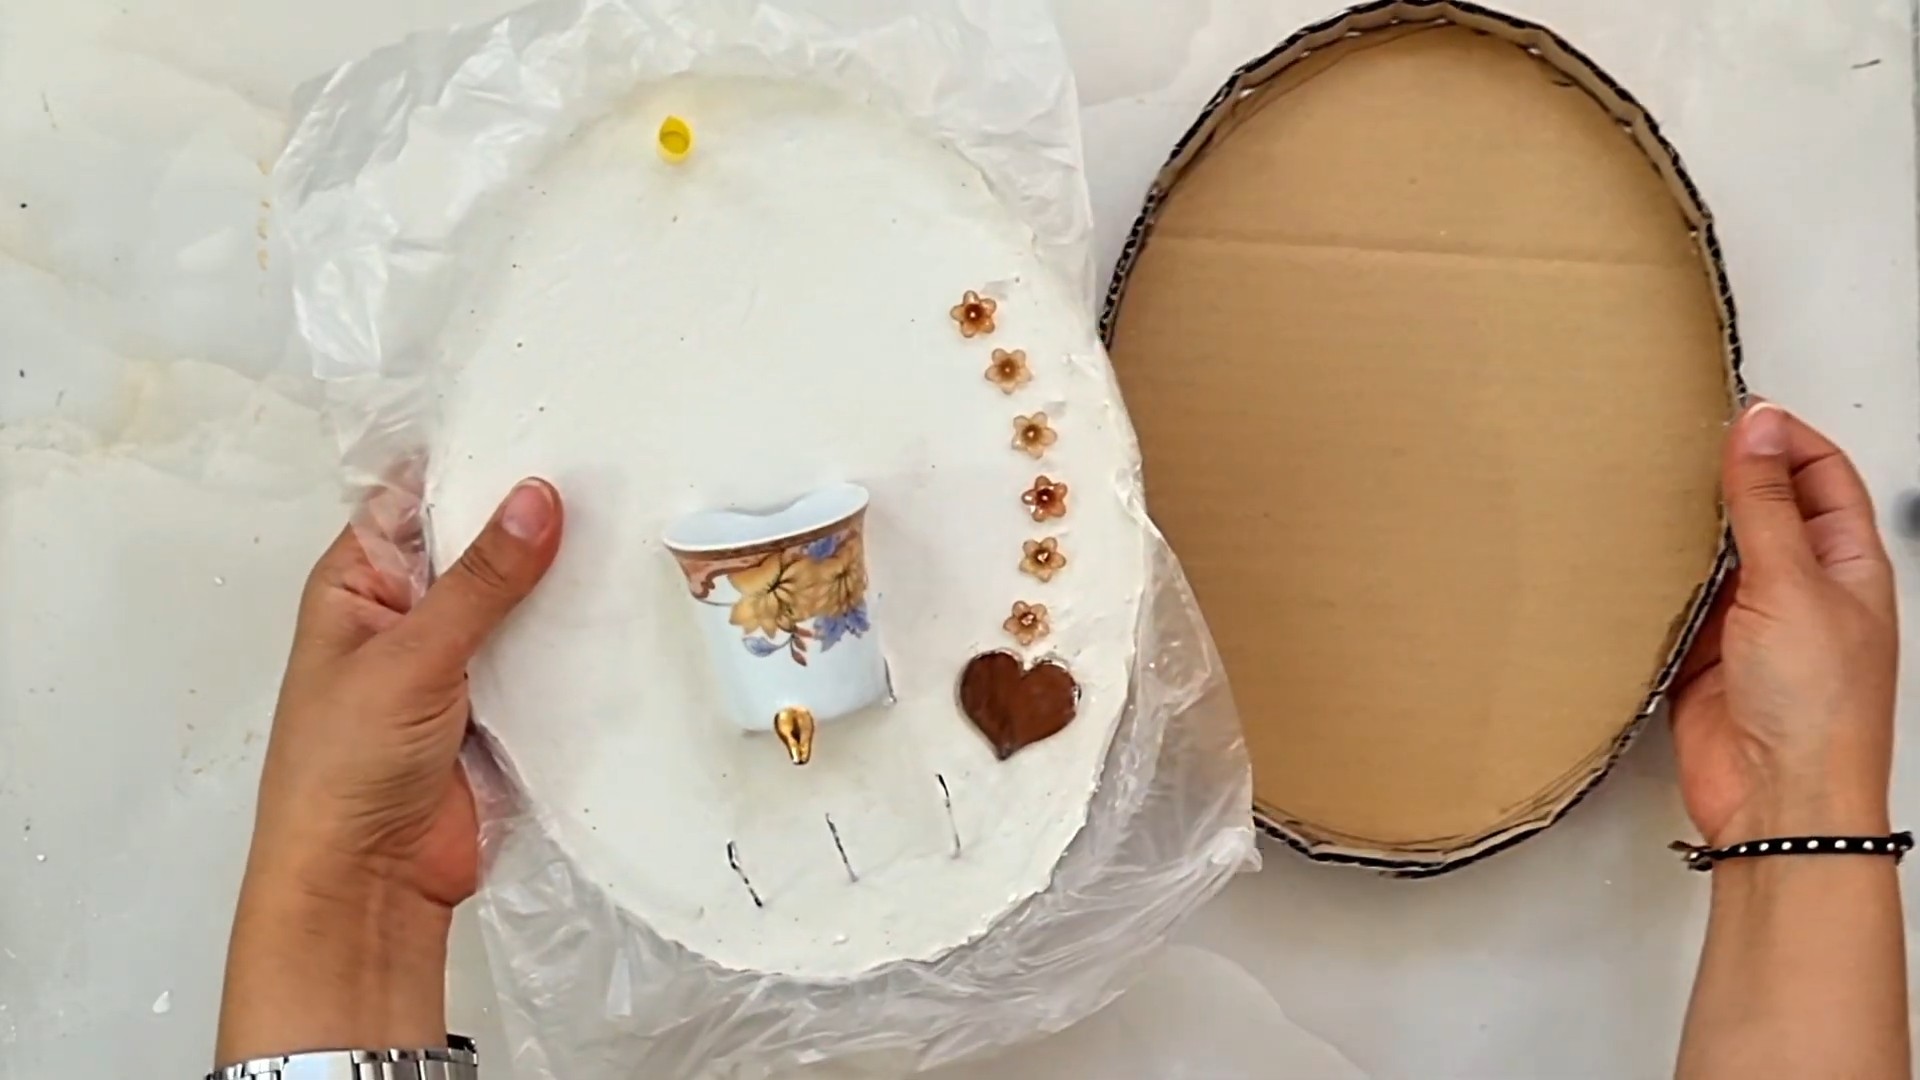
1. Prepare the Wooden Board
1. **Measure and Cut:** First, measure the space where you plan to hang your key holder. Then, decide how many cups you want to use and how much space you want between them. Based on these measurements, cut the wooden board to the appropriate size. I usually aim for a board that’s a few inches wider than the combined width of the cups.
2. **Sand (Optional):** If you’re using reclaimed wood or if the board has any rough edges, sand it down with sandpaper to create a smooth surface. This will also help the paint or stain adhere better.
3. **Paint or Stain (Optional):** If you want to customize the look of the board, now’s the time to paint or stain it. Apply a thin, even coat of paint or stain, and let it dry completely according to the manufacturer’s instructions. I often use a distressed paint technique for a rustic look.
2. Attach the Cups
1. **Plan the Placement:** Before you start gluing, arrange the cups on the board to determine the best placement. Make sure they’re evenly spaced and that they won’t interfere with each other. Use a pencil to mark the center of each cup on the board.
2. **Apply Adhesive:** Apply a generous amount of adhesive to the bottom of each cup. Be sure to use an adhesive that’s specifically designed for bonding ceramics to wood. I find that epoxy works best for a strong, permanent bond.
3. **Attach the Cups to the Board:** Carefully place each cup onto the board, aligning it with the pencil marks. Press down firmly to ensure good contact between the cup and the board.
4. **Clamp (Optional):** If you have clamps, use them to hold the cups in place while the adhesive dries. This will help ensure a strong bond. If you don’t have clamps, you can use heavy objects to weigh down the cups.
5. **Let the Adhesive Dry:** Allow the adhesive to dry completely according to the manufacturer’s instructions. This is crucial for ensuring that the cups are securely attached to the board. I usually wait at least 24 hours.
3. Attach the Knobs or Hooks
1. **Mark the Placement:** Decide where you want to attach the knobs or hooks to the bottom of the board. I usually space them evenly apart, leaving enough room for keys to hang without bumping into each other. Use a pencil to mark the screw holes.
2. **Drill Pilot Holes:** Use a drill to create pilot holes for the screws. This will make it easier to screw in the knobs or hooks and prevent the wood from splitting. Make sure the pilot holes are slightly smaller than the screws.
3. **Attach the Knobs or Hooks:** Screw the knobs or hooks into the pilot holes. Tighten the screws until the knobs or hooks are securely attached to the board.
4. Add Hanging Hardware
1. **Determine Placement:** Decide where you want to attach the picture hanging hardware to the back of the board. I usually place them near the top corners, ensuring that the key holder will hang straight.
2. **Attach Hanging Hardware:** Attach the D-rings or sawtooth hangers to the back of the board using screws. Make sure the screws are the appropriate length for the thickness of the board.
5. Finishing Touches
1. **Clean Up:** Once everything is dry and secure, clean up any excess adhesive or paint.
2. **Hang and Enjoy:** Hang your new upcycled cup key holder on the wall and enjoy!
Tips and Tricks for Success
Here are a few extra tips and tricks to help you create the perfect upcycled cup key holder:
* Choose Sturdy Cups: Select cups that are sturdy and can withstand the weight of keys. Avoid using delicate or fragile cups.
* Use a Strong Adhesive: A strong adhesive is essential for ensuring that the cups are securely attached to the board. I recommend using epoxy or a construction adhesive specifically designed for bonding ceramics to wood.
* Clamp the Cups: If possible, use clamps to hold the cups in place while the adhesive dries. This will help ensure a strong bond.
* Let the Adhesive Dry Completely: Allow the adhesive to dry completely according to the manufacturer’s instructions. This is crucial for ensuring that the cups are securely attached to the board.
* Customize the Design: Get creative with the design! You can paint or stain the board, use different types of cups, or add decorative elements like beads or buttons.
* Consider the Weight: Be mindful of the weight of the key holder, especially if you’re using heavy cups. Make sure the picture hanging hardware is strong enough to support the weight.
* Protect Your Walls: Add felt pads to the back of the key holder to protect your walls from scratches.
Alternative Ideas and Variations
Want to take this project to the next level? Here are a few alternative ideas and variations to inspire you:
* Use Different Types of Cups: Instead of teacups or coffee mugs, try using vintage measuring cups, small bowls, or even decorative planters.
* Add a Shelf: Attach a small shelf above the cups to create a space for mail, sunglasses, or other small items.
* Incorporate a Chalkboard: Paint a section of the board with chalkboard paint to create a space for writing notes or reminders.
* Use Different Types of Knobs or Hooks: Experiment with different styles of knobs or hooks to create a unique look. You can use vintage knobs, rustic hooks, or even repurposed hardware.
* Create a Themed Key Holder: Design a key holder that reflects your personal interests or hobbies. For example, you could create a beach-themed key holder using seashells and driftwood.
* Personalize with Monograms: Add monograms or initials to the cups or the board to
Conclusion
So, there you have it! Transforming ordinary cups into a charming and functional DIY cup key holder is not just a craft project; it’s a small revolution in home organization and a testament to the beauty of upcycling. Forget those generic, mass-produced key racks that lack personality. This DIY project allows you to create a unique piece that reflects your style and adds a touch of whimsy to your entryway, kitchen, or any space where you need to keep your keys readily accessible.
Why is this a must-try? Because it’s incredibly simple, budget-friendly, and customizable. You likely already have most of the materials on hand, making it a truly sustainable and cost-effective solution. Beyond the practical benefits, crafting this key holder is a therapeutic and rewarding experience. There’s something deeply satisfying about taking discarded items and giving them a new lease on life. Plus, it’s a fantastic conversation starter!
But the fun doesn’t stop there! Feel free to experiment with different cup styles, colors, and embellishments. Use vintage teacups for a shabby chic aesthetic, or opt for brightly colored mugs for a more modern and playful look. Consider adding small hooks inside the cups for hanging lanyards or dog leashes. You can even paint the cups with chalkboard paint to create a space for leaving notes or reminders. Get creative with the mounting board too! Use reclaimed wood for a rustic feel, or paint a piece of plywood with a bold geometric pattern. The possibilities are truly endless.
This DIY cup key holder project is more than just a way to organize your keys; it’s an opportunity to express your creativity, reduce waste, and add a personal touch to your home decor. It’s a project that’s perfect for crafters of all skill levels, from beginners to seasoned DIY enthusiasts.
We wholeheartedly encourage you to give this DIY trick a try. We’re confident that you’ll be delighted with the results. Not only will you have a stylish and functional key holder, but you’ll also have the satisfaction of knowing that you created something beautiful and useful with your own two hands.
Once you’ve completed your DIY cup key holder, we’d love to see your creations! Share your photos and experiences with us on social media using #DIYCupKeyHolder. We can’t wait to see your unique interpretations and inspire others to embrace the joy of DIY. Let’s transform our homes, one upcycled cup at a time!
Frequently Asked Questions
What kind of cups work best for this project?
Almost any type of cup can be used for this DIY project, but some are better suited than others. Mugs with sturdy handles are ideal, as the handles provide a convenient place to hang your keys. Teacups, while charming, may be more delicate and better suited for lighter items like small lanyards. Consider the weight of your keys when selecting your cups. Avoid using cups with cracks or chips, as they may be prone to breaking. Ceramic, porcelain, and even sturdy plastic cups can all work well. The key is to choose cups that you find aesthetically pleasing and that can safely support the weight of your keys.
How do I attach the cups to the mounting board?
There are several ways to attach the cups to the mounting board, depending on the type of cups and the desired level of permanence. For a strong and secure hold, epoxy glue is an excellent choice. Apply a generous amount of epoxy to the back of the cup and firmly press it onto the board. Hold it in place until the glue sets, following the manufacturer’s instructions. Another option is to use construction adhesive, which is also very strong and durable. For a less permanent solution, consider using strong double-sided tape or adhesive putty. These options are easier to remove if you want to reposition the cups later, but they may not be as reliable for heavier keychains. If your cups have handles, you can also use screws to attach them to the board. Drill a small pilot hole through the handle and into the board, then insert a screw. Be sure to use screws that are the appropriate length for the thickness of the board.
What type of mounting board should I use?
The type of mounting board you use will depend on your personal preferences and the overall aesthetic you’re aiming for. Reclaimed wood is a popular choice for a rustic or farmhouse-style key holder. It adds character and charm to the project. Plywood is a more affordable option that can be easily painted or stained to match your decor. MDF (medium-density fiberboard) is another smooth and paintable option. If you want a more modern look, consider using a piece of acrylic or metal. The size of the board will depend on the number of cups you want to use and the amount of space you have available. Be sure to choose a board that is sturdy enough to support the weight of the cups and keys.
Can I customize the key holder with paint or other embellishments?
Absolutely! Customization is what makes this DIY project so much fun. You can paint the cups with acrylic paint, chalkboard paint, or even spray paint. Consider using stencils to create patterns or designs. You can also add embellishments like beads, buttons, ribbons, or decoupage. Get creative and let your imagination run wild! If you’re using chalkboard paint, you can write notes or reminders on the cups. If you’re adding beads or buttons, use a strong adhesive to attach them securely. You can also decorate the mounting board with paint, stencils, or fabric. The possibilities are endless!
How do I ensure the key holder is securely mounted to the wall?
The most important thing is to use appropriate mounting hardware for your wall type. For drywall, use drywall anchors that are rated for the weight of the key holder and keys. For plaster walls, use plaster anchors. If you can locate a stud in the wall, you can screw the mounting board directly into the stud for a very secure hold. Use a level to ensure that the key holder is mounted straight. If you’re using screws, be sure to use screws that are the appropriate length for the thickness of the mounting board and the wall. If you’re using adhesive strips, follow the manufacturer’s instructions carefully. It’s always better to err on the side of caution and use more secure mounting hardware than you think you need.
What if I don’t have any old cups to use?
No problem! You can easily find inexpensive cups at thrift stores, garage sales, or dollar stores. You can also purchase new cups from craft stores or online retailers. Look for cups that are on sale or clearance to save money. You can even ask friends or family members if they have any unwanted cups that they’re willing to donate. The key is to find cups that you like and that are the right size and shape for your project.
Is this project suitable for children?
With adult supervision, this project can be a fun and educational activity for children. However, it’s important to take precautions to ensure their safety. Children should not handle sharp tools or hot glue guns. If you’re using paint, make sure it’s non-toxic and washable. Supervise children closely when they’re using glue or other adhesives. This project can be a great way to teach children about upcycling and creativity.
How do I clean the key holder once it’s finished?
The best way to clean the key holder is to dust it regularly with a soft cloth. If the cups get dirty, you can wipe them down with a damp cloth and mild soap. Avoid using harsh chemicals or abrasive cleaners, as they may damage the paint or finish. If you’ve used chalkboard paint, you can clean it with a damp cloth or chalkboard eraser.
Leave a Comment