

DIY Eggshell Bioplastic Bowl: Ever wondered if you could transform your breakfast leftovers into something beautiful and functional? I know I have! For centuries, humans have sought ways to repurpose materials, driven by necessity and ingenuity. From ancient pottery shards finding new life as building materials to modern-day upcycling trends, the desire to create something new from something old is deeply ingrained in our culture.
But what if I told you that those humble eggshells you toss away every morning hold the potential to become a stunning, eco-friendly bowl? That’s right! This DIY project isn’t just about crafting; it’s about embracing sustainability and reducing waste in a creative way. In a world grappling with environmental concerns, finding innovative ways to repurpose everyday items is more crucial than ever. This DIY eggshell bioplastic bowl project offers a tangible solution, allowing you to contribute to a greener planet while adding a unique, handmade piece to your home.
This project is perfect for anyone looking to reduce their environmental impact, explore their creative side, or simply add a touch of handmade charm to their home decor. Plus, it’s a fantastic conversation starter! Imagine the look on your guests’ faces when you tell them your beautiful bowl is made from recycled eggshells. So, are you ready to turn trash into treasure? Let’s dive in and discover the magic of eggshell bioplastic!
DIY Eggshell Bioplastic Bowl: A Sustainable and Stunning Project
Hey there, fellow DIY enthusiasts! Ever wondered what to do with all those leftover eggshells? Instead of tossing them, let’s transform them into something beautiful and eco-friendly: a bioplastic bowl! This project is surprisingly simple, incredibly rewarding, and a fantastic way to reduce waste. I’ll walk you through each step, making sure you end up with a unique and sustainable piece you can be proud of.
What is Bioplastic Anyway?
Before we dive in, let’s quickly touch on what bioplastic is. Unlike traditional plastics made from petroleum, bioplastics are derived from renewable biomass sources, like corn starch, vegetable oils, or, in our case, eggshells! They’re biodegradable under the right conditions, making them a much more environmentally friendly alternative.
Materials You’ll Need
To create your eggshell bioplastic bowl, gather these materials:
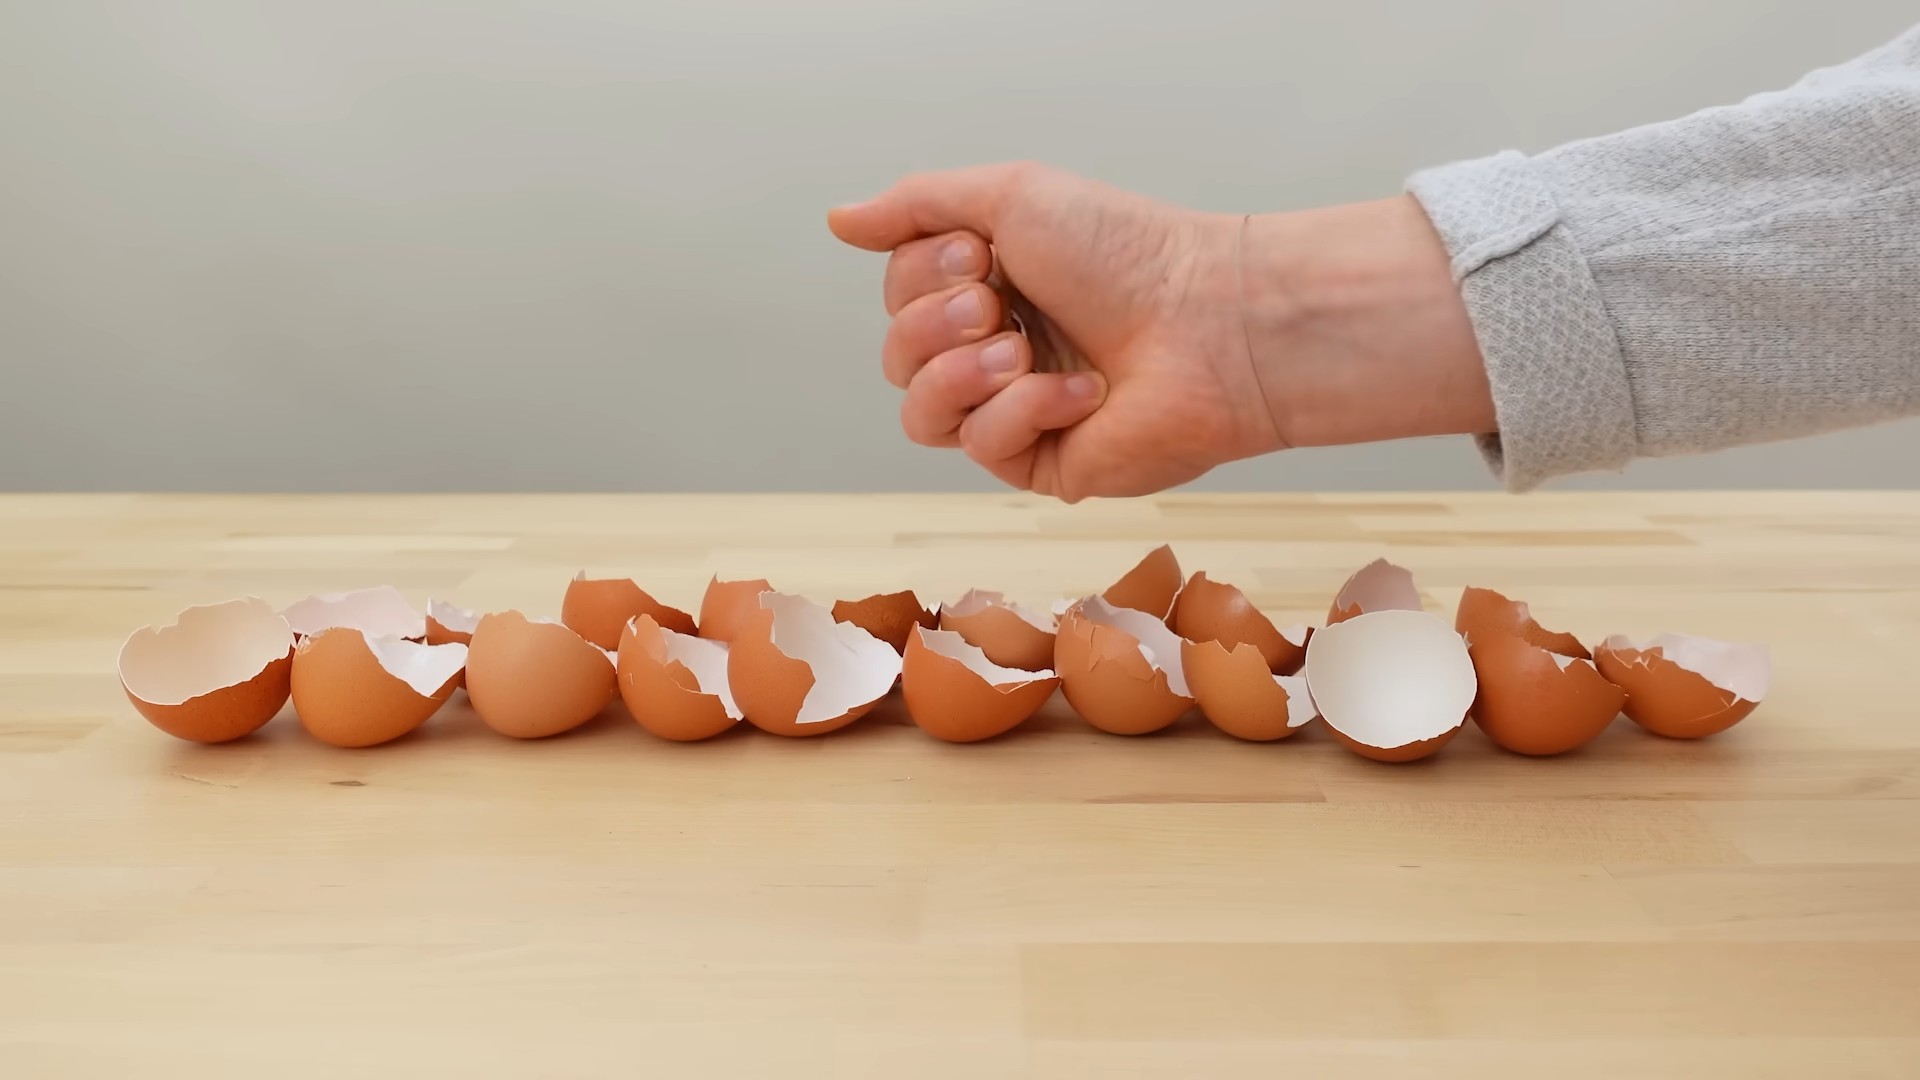
* Eggshells: Lots of them! Aim for at least 20-30 eggshells, depending on the size of the bowl you want to make. The more, the merrier!
* Cornstarch: This acts as a binder, holding everything together. You’ll need about 1/4 cup.
* Glycerin: This adds flexibility to the bioplastic, preventing it from becoming too brittle. You’ll need about 2 tablespoons. You can find this at most pharmacies or online.
* White Vinegar: This helps break down the eggshells and create a smoother mixture. You’ll need about 1/4 cup.
* Water: For mixing and cleaning.
* Food Coloring (Optional): If you want to add a pop of color to your bowl, grab your favorite food coloring.
* Mixing Bowls: You’ll need a couple of different sizes.
* Measuring Cups and Spoons: For accurate measurements.
* Blender or Food Processor: To grind the eggshells into a fine powder. A coffee grinder can also work in small batches.
* Baking Sheet: To dry the bioplastic.
* Parchment Paper: To line the baking sheet and prevent sticking.
* Bowl for Molding: Choose a bowl that’s the shape and size you want your bioplastic bowl to be. This will act as your mold.
* Plastic Wrap: To line the molding bowl.
* Sandpaper (Optional): For smoothing any rough edges after drying.
* Respirator or Dust Mask: To avoid inhaling eggshell dust during grinding.
* Gloves: To protect your hands.
Preparing the Eggshells
This is the most crucial part, so let’s get it right!
1. Clean the Eggshells: After cracking your eggs, rinse the shells thoroughly with water. Remove any remaining egg white or membrane. This is important to prevent any unpleasant smells later on.
2. Boil the Eggshells: Place the cleaned eggshells in a pot of boiling water for about 10-15 minutes. This will sterilize them and remove any lingering bacteria.
3. Dry the Eggshells: Drain the boiled eggshells and spread them out on a baking sheet lined with parchment paper. Let them dry completely. You can speed up the process by placing them in a low oven (around 200°F or 93°C) for about 30 minutes, but keep a close eye on them to prevent burning.
4. Grind the Eggshells: Once the eggshells are completely dry, it’s time to grind them into a fine powder. This is where your blender, food processor, or coffee grinder comes in handy. Work in small batches to ensure a consistent powder. Always wear a respirator or dust mask during this step to avoid inhaling the fine eggshell dust. The finer the powder, the smoother your bioplastic will be.
Making the Bioplastic Mixture
Now for the fun part – creating the bioplastic!
1. Combine Dry Ingredients: In a mixing bowl, combine the ground eggshell powder and cornstarch. Mix well to ensure they’re evenly distributed.
2. Add Wet Ingredients: In a separate bowl, mix together the glycerin, white vinegar, and water. If you’re using food coloring, add it to the wet ingredients at this stage.
3. Combine Wet and Dry: Gradually add the wet ingredients to the dry ingredients, mixing constantly. You want to achieve a smooth, paste-like consistency. If the mixture is too thick, add a little more water, one tablespoon at a time. If it’s too thin, add a little more eggshell powder or cornstarch.
4. Cook the Mixture: Pour the mixture into a saucepan and heat over medium-low heat, stirring constantly. This is important to prevent burning and ensure the mixture thickens properly. Continue stirring until the mixture becomes thick and translucent, similar to a pudding or thick glue. This should take about 5-10 minutes.
5. Cool Slightly: Remove the saucepan from the heat and let the mixture cool slightly for a few minutes. This will make it easier to handle.
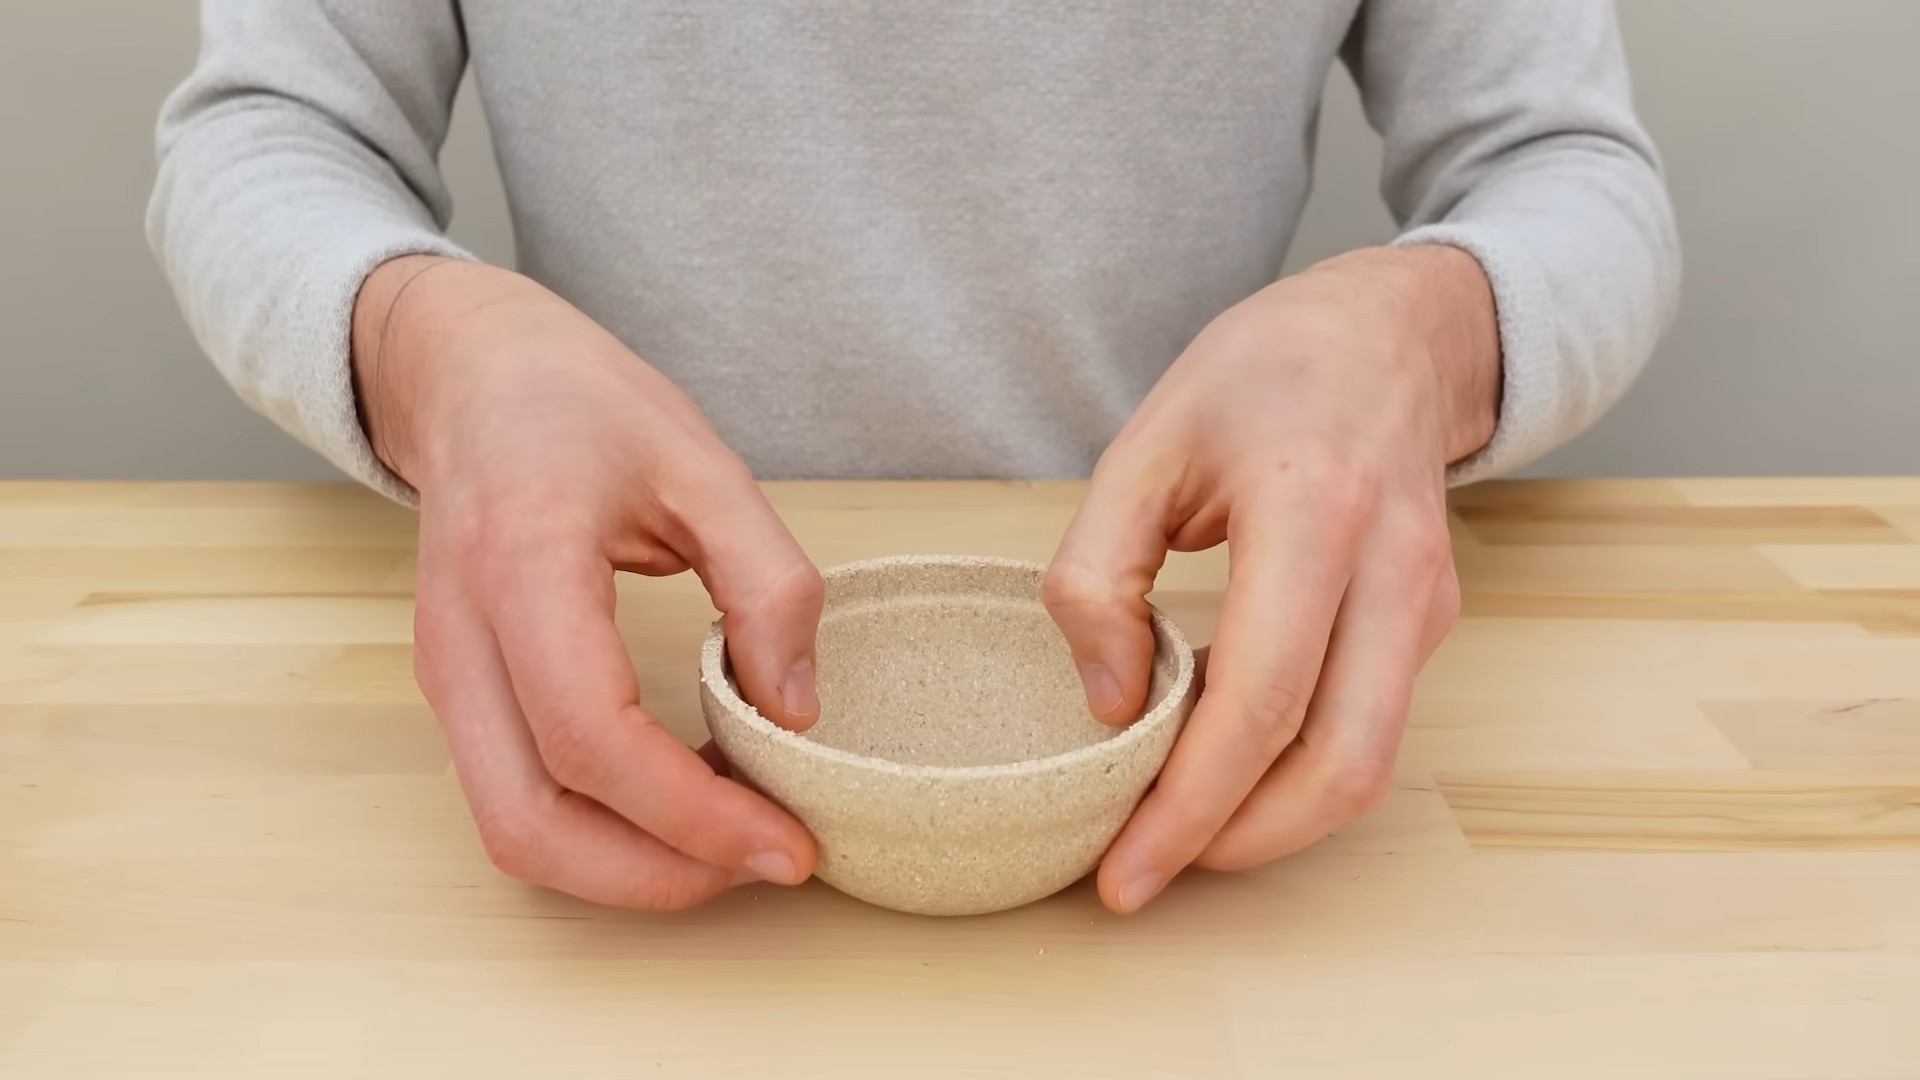
Molding the Bowl
Time to shape your creation!
1. Prepare the Mold: Line your chosen bowl with plastic wrap. This will prevent the bioplastic from sticking and make it easier to remove once it’s dry. Make sure the plastic wrap is smooth and wrinkle-free.
2. Apply the Bioplastic: Carefully spoon the bioplastic mixture into the lined bowl. Spread it evenly around the inside of the bowl, making sure to cover the entire surface. The thickness of the bioplastic will determine the strength of your final bowl, so aim for a consistent thickness of about 1/4 to 1/2 inch.
3. Smooth the Surface: Use your fingers or a spoon to smooth the surface of the bioplastic. This will give your bowl a more polished look.
4. Dry the Bowl: Now comes the waiting game. Let the bioplastic bowl dry completely. This can take anywhere from 24 to 72 hours, depending on the humidity and temperature. You can speed up the drying process by placing the bowl in a warm, dry place or using a fan. Be patient! If you try to remove the bowl before it’s completely dry, it may crack or break.
Finishing Touches
Almost there!
1. Remove from Mold: Once the bioplastic bowl is completely dry, carefully remove it from the mold. Gently peel away the plastic wrap.
2. Sand (Optional): If there are any rough edges or imperfections, you can use fine-grit sandpaper to smooth them out.
3. Seal (Optional): To make your bowl more water-resistant, you can apply a sealant. Look for a food-safe sealant if you plan to use the bowl for food.
4. Admire Your Creation: Congratulations! You’ve successfully created a beautiful and sustainable bioplastic bowl from eggshells.
Tips and Troubleshooting
* Cracking: If your bioplastic bowl cracks during drying, it could be due to several factors: the mixture was too dry, the drying process was too fast, or the bowl was too thin. Next time, try adding a little more glycerin to the mixture, drying the bowl more slowly, or making the bowl thicker.
* Stickiness: If the bioplastic remains sticky after drying, it could be due to too much glycerin. Try reducing the amount of glycerin in your next batch.
* Uneven Texture: If your bowl has an uneven texture, it could be due to poorly ground eggshells. Make sure to grind the eggshells into a very fine powder.
* Mold Growth: If you notice mold growing on your bioplastic, it could be due to insufficient sterilization of the eggshells. Make sure to boil the eggshells thoroughly before grinding them.
* Experiment! Don’t be afraid to experiment with different colors, shapes, and sizes. You can even add other natural materials to the mixture, such as coffee grounds or dried flowers.
Uses for Your Eggshell Bioplastic Bowl
While not suitable for hot liquids or heavy items, your eggshell bioplastic bowl can be used for a variety of purposes:
* Decorative Bowl: Display it as a unique and eco-friendly decorative piece.
* Jewelry Holder: Keep your rings, earrings, and necklaces organized.
* Key Holder: A convenient place to store your keys by the door.
* Small Plant Pot: Perfect for succulents or other small plants (make sure to add drainage holes).
* Dry Food Storage: Store dry snacks like nuts or candies.
This project is a testament to the fact that we can create beautiful and useful things from materials we often discard. I hope you enjoy making your own eggshell bioplastic bowl! Happy crafting!
Conclusion
So, there you have it! Transforming humble eggshells into a surprisingly durable and eco-friendly bioplastic bowl is not just a fun science experiment; it’s a tangible way to reduce waste and create something beautiful and functional. This DIY project offers a unique opportunity to explore the potential of sustainable materials right in your own kitchen.
Why is this a must-try? Beyond the sheer satisfaction of repurposing something destined for the trash, this DIY eggshell bioplastic bowl demonstrates the power of resourcefulness and the potential for everyday items to become something extraordinary. It’s a fantastic conversation starter, a great project to do with kids (with proper adult supervision, of course!), and a small but meaningful step towards a more sustainable lifestyle.
But the fun doesn’t stop there! Feel free to experiment with variations to personalize your bioplastic bowl. Consider adding natural dyes, like beetroot juice for a pink hue or spinach juice for a green tint, to the eggshell mixture before molding. You could also incorporate small, dried flowers or herbs for a decorative touch. For a smoother finish, try sanding the bowl lightly after it has completely dried. You can even experiment with different molds – think small ramekins, cookie cutters, or even custom-made forms. Remember to always use food-safe materials if you intend to use the bowl for edible items.
The possibilities are truly endless, and the only limit is your imagination. We encourage you to embrace the creative process and see what unique and beautiful creations you can conjure up from something as simple as eggshells.
We are confident that you’ll find this DIY project both rewarding and insightful. It’s a chance to connect with the materials around you, understand the science behind bioplastics, and contribute to a more sustainable future, one eggshell at a time.
So, gather your eggshells, prepare your workspace, and get ready to embark on this exciting DIY adventure. Don’t forget to document your process and share your creations with us! We’d love to see your unique takes on the DIY eggshell bioplastic bowl. Share your photos and experiences on social media using [Insert relevant hashtag here] and inspire others to join the movement towards sustainable crafting. Let’s show the world the amazing things we can create with a little ingenuity and a handful of eggshells! We can’t wait to see what you make!
Frequently Asked Questions (FAQ)
Q: What kind of glue should I use for the bioplastic?
A: The best type of glue to use is a non-toxic, water-based glue like PVA glue (also known as school glue or white glue). Avoid using super glue or other strong chemical adhesives, as they may not be food-safe and can affect the integrity of the bioplastic. Make sure the glue is clear-drying for the best aesthetic result.
Q: How many eggshells do I need to make one bowl?
A: The number of eggshells required will depend on the size of the bowl you’re aiming to create. As a general guideline, you’ll need approximately 6-8 eggshells for a small bowl (around 4-5 inches in diameter). It’s always a good idea to have a few extra on hand, just in case. Remember to thoroughly clean and dry the eggshells before crushing them.
Q: How do I clean the eggshells properly?
A: Cleaning the eggshells is crucial to prevent any unwanted odors or bacteria growth. After cracking the eggs, rinse the shells thoroughly under running water to remove any remaining egg white or yolk. Then, boil the eggshells in water for about 10-15 minutes to sanitize them. After boiling, drain the water and allow the eggshells to air dry completely before crushing them. You can also bake them in a low-temperature oven (around 200°F or 93°C) for about 15-20 minutes to ensure they are completely dry.
Q: Can I use colored eggshells (brown or blue) for this project?
A: Yes, you can absolutely use colored eggshells! The color of the eggshells will subtly affect the final color of your bioplastic bowl, adding a unique and natural aesthetic. Brown eggshells will create a slightly warmer tone, while blue or green eggshells (from certain chicken breeds) will add a cooler hue. Feel free to experiment with different combinations of eggshell colors to achieve your desired effect.
Q: How long does it take for the bioplastic bowl to dry completely?
A: The drying time will depend on several factors, including the thickness of the bioplastic layer, the humidity of your environment, and the type of glue used. Generally, it takes about 24-48 hours for the bowl to dry completely. To ensure proper drying, place the bowl in a well-ventilated area and avoid direct sunlight, which can cause cracking. You can also use a fan to circulate air around the bowl and speed up the drying process.
Q: Is the eggshell bioplastic bowl food-safe?
A: While the eggshell bioplastic bowl is made from natural materials, it’s generally not recommended for direct contact with food, especially wet or acidic foods. The porous nature of the bioplastic can potentially harbor bacteria, and the glue used may not be food-grade. However, you can use the bowl to hold dry goods like nuts, candies, or decorative items. If you wish to use it for food, consider lining it with parchment paper or a food-safe sealant.
Q: How durable is the eggshell bioplastic bowl? Will it break easily?
A: The durability of the eggshell bioplastic bowl will depend on the thickness of the bioplastic layer and the quality of the glue used. While it’s not as strong as traditional plastic, it can be surprisingly durable if made correctly. Avoid dropping the bowl or subjecting it to excessive pressure, as it can crack or break. To increase its durability, consider adding multiple layers of the eggshell mixture and allowing each layer to dry completely before adding the next.
Q: Can I add other materials to the eggshell mixture?
A: Yes, you can experiment with adding other natural materials to the eggshell mixture to enhance its texture, color, or strength. Some popular options include coffee grounds (for a textured, earthy look), dried flower petals (for a decorative touch), or natural fibers like shredded paper or cotton (for added strength). Just be sure to use materials that are clean, dry, and compatible with the glue you’re using.
Q: How do I dispose of the eggshell bioplastic bowl responsibly?
A: Since the bowl is made from mostly natural materials, it is more environmentally friendly than traditional plastic. However, it is not fully biodegradable in a typical home composting setting due to the glue content. The best way to dispose of it responsibly is to break it into smaller pieces and bury it in your garden or yard. Over time, the eggshells will decompose and enrich the soil. Alternatively, you can dispose of it in your regular trash, but keep in mind that it will eventually end up in a landfill.

Leave a Comment