

DIY Gem Vanity Tray: Ever feel like your makeup and jewelry are just scattered across your vanity, creating a chaotic mess? I know I have! It’s frustrating to spend precious minutes searching for that one earring or the perfect shade of lipstick. But what if I told you there’s a simple, elegant, and totally customizable solution?
Vanity trays have a rich history, dating back to the Victorian era when they were used to display perfumes and grooming essentials. They were a symbol of luxury and personal care, adding a touch of sophistication to any dressing table. Today, we can bring that same elegance into our homes with a modern, personalized twist.
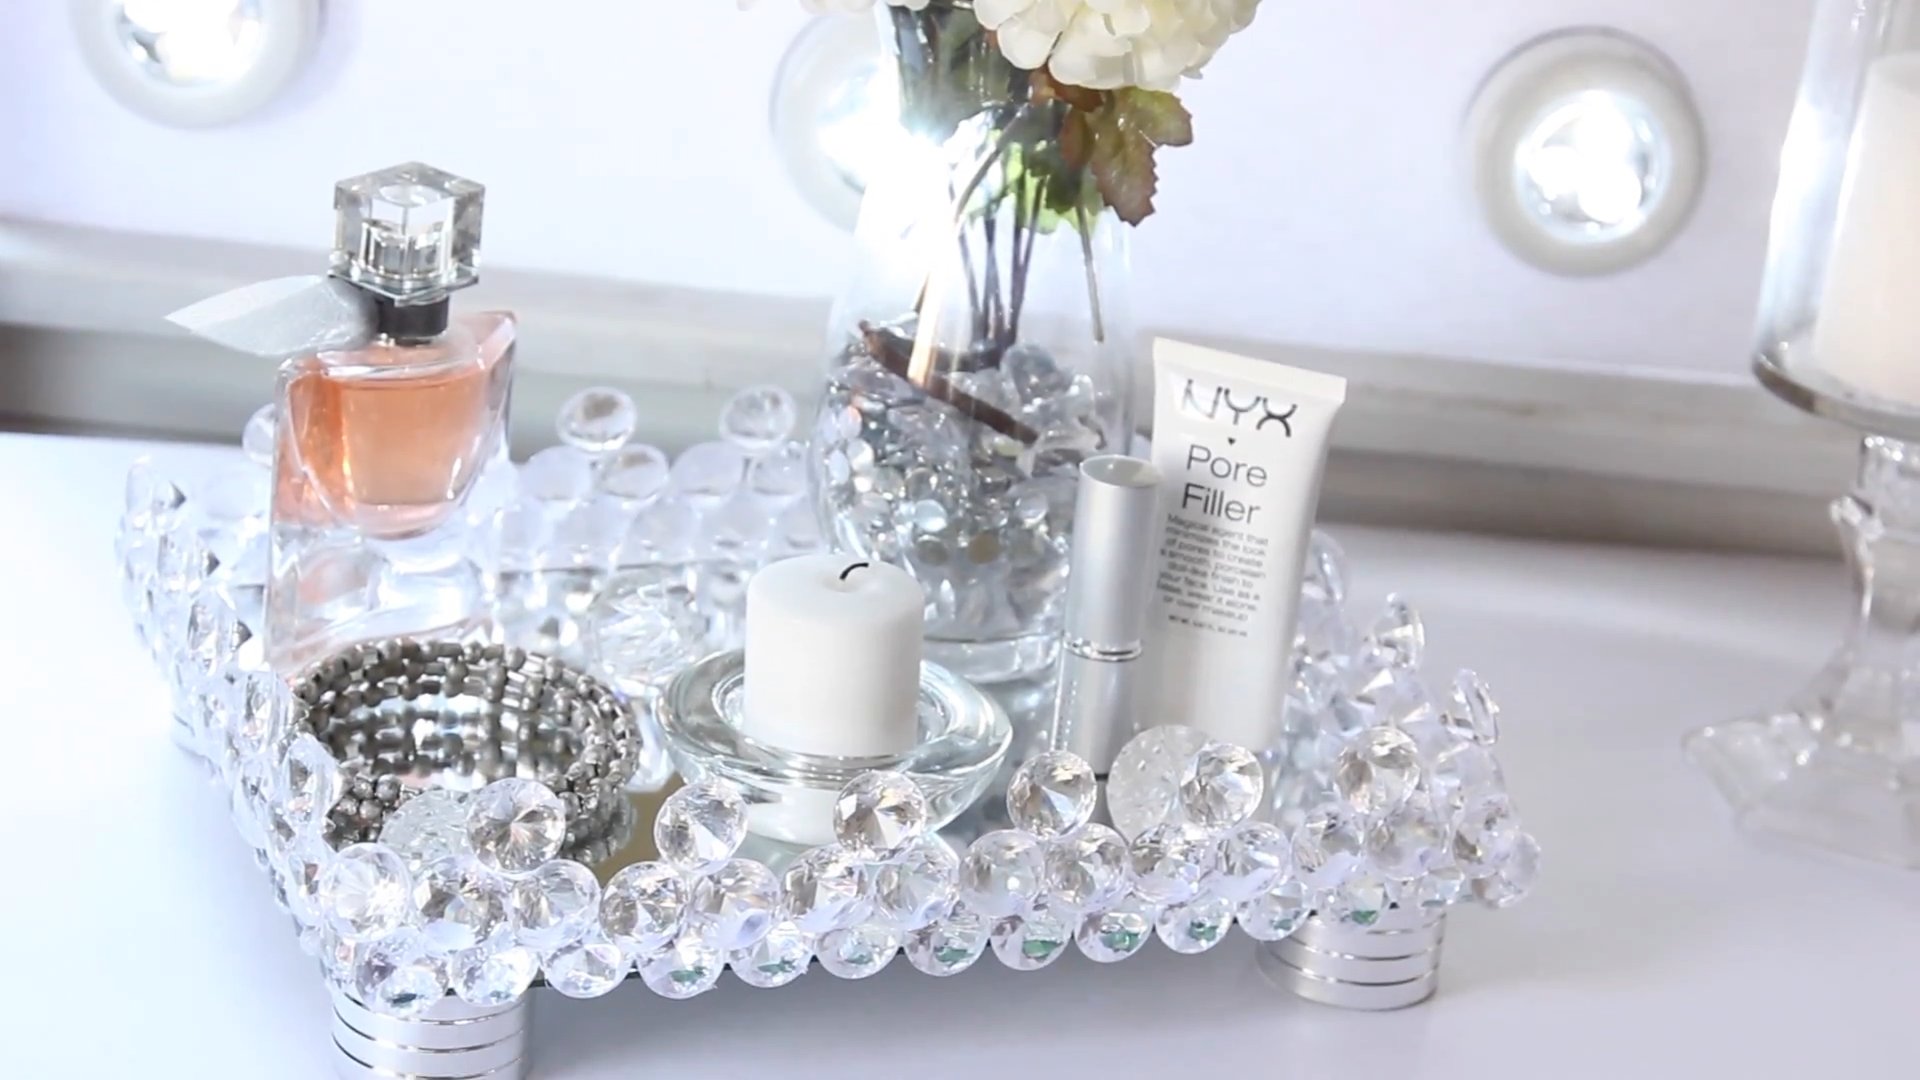
That’s where this DIY Gem Vanity Tray project comes in! Not only will it help you organize your beauty essentials, but it’ll also add a dazzling touch of personality to your space. Imagine a tray sparkling with your favorite colors and gems, reflecting your unique style. This isn’t just about organization; it’s about creating a beautiful and functional piece that you’ll love to use every day. Plus, it’s a fantastic way to upcycle old materials and unleash your creativity. Let’s get started and transform your vanity from cluttered to captivating!
DIY Gem Vanity Tray: Add Sparkle to Your Space!
Hey there, fellow DIY enthusiasts! I’m so excited to share this project with you – a gorgeous gem vanity tray that’s surprisingly easy to make and adds a touch of glam to any room. Whether you’re organizing your makeup, displaying jewelry, or just want a pretty accent piece, this tray is the perfect solution. Let’s get started!
Materials You’ll Need:
* A plain tray (I used a rectangular wooden tray from a craft store, but you can use any shape or material you like – metal, plastic, even glass!)
* Assorted gems, rhinestones, and beads (Get creative! I recommend a mix of sizes, shapes, and colors for a more dynamic look.)
* Strong adhesive (E6000 is my go-to for projects like this. It’s strong, durable, and dries clear.)
* Toothpicks or a small applicator (For precise glue application.)
* Pencil or marker (For marking guidelines, if needed.)
* Optional: Spray paint (If you want to change the color of your tray.)
* Optional: Clear sealant spray (To protect your finished tray and keep the gems secure.)
* Optional: Soft cloth (For wiping away excess glue.)
Planning Your Design:
Before you even think about gluing anything down, it’s a good idea to plan your design. This will save you a lot of headaches later!
* Consider your color scheme: What colors will complement your existing decor? Do you want a monochromatic look, or something more vibrant?
* Think about the arrangement: Will you create a symmetrical pattern, a random scattering of gems, or something in between?
* Do a dry run: Arrange the gems on the tray without glue to get a feel for the layout. Take a picture so you can refer back to it later. This is crucial!
* Mark guidelines (optional): If you’re going for a specific pattern, use a pencil or marker to lightly draw guidelines on the tray.
Step-by-Step Instructions:
Okay, let’s get down to the nitty-gritty! Here’s how to create your own dazzling gem vanity tray:
1. Prepare Your Tray: If you’re using a wooden tray, you might want to sand it down lightly to create a smoother surface for the adhesive. Wipe away any dust or debris with a clean cloth. If you’re planning to paint the tray, now’s the time to do it! Apply a few thin coats of spray paint, allowing each coat to dry completely before applying the next. This will give you a nice, even finish. Let the paint dry completely before moving on to the next step.
2. Apply Adhesive: This is where the magic happens! Squeeze a small amount of E6000 (or your chosen adhesive) onto the back of a gem. Use a toothpick or small applicator to spread the glue evenly. Be careful not to use too much, as it can ooze out from under the gem and create a messy look.
3. Place the Gems: Carefully place the gem onto the tray, pressing down gently to secure it. Refer to your planned design (or your dry-run photo) to ensure you’re placing the gems in the right spot.
4. Repeat, Repeat, Repeat: Continue applying adhesive and placing gems, working your way across the tray. I like to start with the larger gems first and then fill in the gaps with smaller ones. This helps create a balanced and visually appealing design.
5. Work in Sections: If you’re using a fast-drying adhesive, it’s best to work in small sections to prevent the glue from drying out before you can place the gems.
6. Clean Up Excess Glue: As you’re working, you might notice some glue seeping out from under the gems. Use a soft cloth or a cotton swab dipped in rubbing alcohol to gently wipe away any excess glue. Do this while the glue is still wet for best results.
7. Let it Dry Completely: This is the most important step! Allow the adhesive to dry completely before handling the tray. E6000 typically takes 24-72 hours to fully cure, so be patient! Resist the urge to touch or move the gems during this time.
8. Apply Sealant (Optional): Once the adhesive is completely dry, you can apply a clear sealant spray to protect your tray and keep the gems secure. This is especially helpful if you plan to use the tray frequently or if it will be exposed to moisture. Apply a few thin coats of sealant, allowing each coat to dry completely before applying the next.
Tips and Tricks for a Flawless Finish:
* Use a variety of gem sizes and shapes: This will add visual interest and dimension to your tray.
* Don’t be afraid to experiment: Try different arrangements and color combinations until you find something you love.
* Work in a well-ventilated area: E6000 has a strong odor, so it’s important to work in a well-ventilated area to avoid inhaling the fumes.
* Protect your work surface: Cover your work surface with newspaper or a drop cloth to protect it from glue spills.
* Use tweezers for small gems: Tweezers can be helpful for picking up and placing small gems, especially if you have large fingers like me!
* Consider the weight of the gems: If you’re using a lightweight tray, be mindful of the weight of the gems. Too many heavy gems could cause the tray to become unstable.
* Add a personal touch: Incorporate charms, buttons, or other embellishments that reflect your personality and style.
* If you mess up, don’t panic!: If you accidentally place a gem in the wrong spot, don’t worry! You can usually remove it with a craft knife or a heat gun. Just be careful not to damage the tray or the surrounding gems.
* Think about grout (advanced): For a super polished look, especially with closely packed gems, consider using a colored grout to fill the spaces between the gems. This requires more skill and patience, but the results can be stunning. Choose a grout color that complements your gems. Apply the grout carefully, making sure to fill all the gaps. Wipe away any excess grout with a damp sponge. Allow the grout to dry completely before sealing.
Alternative Design Ideas:
* Monogram Tray: Use gems to create your initials or a favorite word on the tray.
* Floral Design: Arrange the gems in the shape of flowers or leaves.
* Geometric Pattern: Create a symmetrical geometric pattern using different colored gems.
* Ombre Effect: Arrange the gems in a gradient of colors, from light to dark.
* Holiday Theme: Create a tray with a holiday theme, using red and green gems for Christmas, or pastel gems for Easter.
* Ocean Theme: Use blue, green, and white gems to create an ocean-inspired tray, adding seashells or starfish for extra flair.
Cleaning and Maintenance:
To keep your gem vanity tray looking its best, dust it regularly with a soft cloth. Avoid using harsh chemicals or abrasive cleaners, as these could damage the gems or the adhesive. If you need to clean the tray more thoroughly, use a damp cloth and a mild soap. Be sure to dry the tray completely after cleaning.
Troubleshooting:
* Gems falling off: If you notice gems falling off, reapply adhesive and press them back into place. Make sure the adhesive is fully cured before handling the tray.
* Glue not drying: If the glue isn’t drying, make sure you’re using the right type of adhesive and that you’re applying it in a well-ventilated area.
* Cloudy sealant: If the sealant is cloudy, you may have applied it too thickly or in humid conditions. Try applying a thinner coat of sealant in a dry environment.
I hope you enjoyed this DIY tutorial! I can’t wait to see what you create. Happy crafting!

Conclusion
So, there you have it! Creating your own DIY gem vanity tray is not just a fun craft project; it’s a transformative experience that elevates your everyday routine. Forget those mass-produced, generic trays that lack personality. This project empowers you to design a piece that perfectly reflects your unique style and adds a touch of personalized glamour to your space.
Why is this a must-try? Because it’s incredibly versatile, budget-friendly, and surprisingly simple. You’re not just buying a tray; you’re crafting a statement piece. Imagine the satisfaction of displaying your favorite perfumes, jewelry, or makeup brushes on a tray you created with your own hands. It’s a conversation starter, a reflection of your creativity, and a daily reminder that beauty can be found in the details.
But the beauty of this DIY project lies in its adaptability. Feel free to experiment with different base materials. While we’ve focused on a mirrored base for maximum sparkle, consider using a wooden tray for a more rustic chic vibe, or a ceramic tile for a sleek, modern look. The possibilities are endless!
And don’t limit yourself to just gems! Incorporate other embellishments like pearls, beads, rhinestones, or even small seashells for a beachy theme. Play with color palettes to match your existing decor. A monochromatic tray with varying shades of the same color can be incredibly elegant, while a vibrant, multi-colored tray can add a playful pop to your vanity.
For a more personalized touch, consider adding initial charms or small, meaningful trinkets to your tray. This makes it an especially thoughtful and unique gift for birthdays, holidays, or housewarmings. Imagine the delight of receiving a handcrafted vanity tray that’s been customized with their favorite colors and embellishments!
We encourage you to embrace your inner artist and give this DIY gem vanity tray a try. It’s a fantastic way to unwind, express your creativity, and add a touch of luxury to your daily life without breaking the bank.
Once you’ve created your masterpiece, we’d love to see it! Share your creations with us on social media using #DIYGemVanityTray. We can’t wait to see your unique designs and inspire others to embark on their own DIY journey. Let’s transform ordinary spaces into extraordinary havens of beauty, one gem at a time. So go ahead, gather your supplies, unleash your creativity, and create a vanity tray that’s as unique and dazzling as you are!
Frequently Asked Questions
What kind of glue should I use for attaching the gems?
The best type of glue for attaching gems to your vanity tray depends on the base material you’re using. For a mirrored or glass base, a clear-drying craft glue specifically designed for glass is ideal. These glues provide a strong bond and won’t cloud the surface. For wooden or ceramic bases, a multi-purpose craft glue or even a hot glue gun (used with caution) can work well. However, be mindful that hot glue can sometimes leave visible residue, so test it in an inconspicuous area first. Always read the glue manufacturer’s instructions for proper application and drying time. Consider using E6000 for a super strong and permanent hold, especially for heavier gems.
How do I clean my DIY gem vanity tray?
Cleaning your DIY gem vanity tray requires a gentle approach to avoid damaging the embellishments. Avoid harsh chemicals or abrasive cleaners. For a mirrored or glass base, use a soft, damp cloth with a mild glass cleaner. Gently wipe the surface, being careful not to snag the gems. For other base materials, use a soft, damp cloth with a mild soap solution. Dry the tray thoroughly with a clean, lint-free cloth. To remove dust from the gems, use a soft brush or a can of compressed air. Avoid submerging the tray in water, as this can loosen the glue and damage the embellishments.
What if the gems start to fall off?
If gems start to detach from your vanity tray, don’t panic! Simply re-glue them using the same type of glue you used initially. Clean the area where the gem was attached to remove any old glue residue. Apply a small amount of fresh glue to the back of the gem and press it firmly onto the base. Hold it in place for a few seconds until the glue starts to set. Allow the glue to dry completely before using the tray. To prevent gems from falling off in the future, ensure you’re using a strong adhesive and avoid placing heavy objects directly on the gems.
Can I use different sizes and shapes of gems?
Absolutely! In fact, using a variety of sizes and shapes of gems can add visual interest and texture to your vanity tray. Experiment with different combinations to create a unique and eye-catching design. Consider using larger gems as focal points and smaller gems to fill in the gaps. You can also incorporate different shapes, such as round, square, oval, or even teardrop-shaped gems, to add dimension and depth to your design. Don’t be afraid to get creative and play with different arrangements until you find a look that you love.
Where can I find the gems and other supplies?
You can find gems and other supplies for your DIY gem vanity tray at a variety of places. Craft stores like Michaels or Hobby Lobby are excellent sources for a wide selection of gems, glues, and base materials. Online retailers like Amazon and Etsy also offer a vast array of options, often at competitive prices. Dollar stores can be a great place to find inexpensive gems and other embellishments, especially if you’re on a budget. Flea markets and antique stores can also be treasure troves for unique and vintage gems. When shopping for gems, consider the size, shape, color, and material to ensure they complement your overall design.
How long does it take to make a DIY gem vanity tray?
The time it takes to make a DIY gem vanity tray depends on the size of the tray, the complexity of the design, and your personal crafting speed. A small, simple tray with a basic gem arrangement might take only a couple of hours to complete. A larger, more elaborate tray with intricate details could take several hours or even a few days. Be sure to factor in drying time for the glue, which can vary depending on the type of glue you’re using. It’s best to work in stages, allowing the glue to dry completely between each layer of gems. This will ensure a strong bond and prevent the gems from shifting or falling off.
Can I use this technique to decorate other items?
Definitely! The technique of attaching gems to a base can be applied to a wide variety of other items. Consider decorating picture frames, jewelry boxes, candle holders, or even clothing and accessories. The possibilities are endless! Just be sure to choose a base material that’s suitable for the gems and the adhesive you’re using. You can also adapt the design to fit the shape and size of the item you’re decorating. For example, you could create a gem-encrusted belt buckle or a sparkling phone case. Let your imagination run wild and see what other creative projects you can come up with!
Leave a Comment