

DIY Glass Bottle Glasses: Ever looked at a discarded glass bottle and thought, “There has to be a better use for this?” I know I have! Instead of letting those bottles clutter your recycling bin, why not transform them into something unique and functional? This guide will walk you through the surprisingly simple process of crafting your own stylish drinking glasses from repurposed glass bottles.
The art of repurposing isn’t new. Throughout history, resourceful individuals have found innovative ways to give new life to discarded materials. From ancient civilizations melting down broken pottery to create new tools, to the “make do and mend” ethos of wartime eras, the spirit of upcycling has always been a part of human ingenuity. Today, with a growing awareness of environmental sustainability, the practice of repurposing is more relevant than ever. And what better way to embrace this ethos than by creating your own DIY glass bottle glasses?
Why should you bother with this DIY project? Well, for starters, it’s incredibly satisfying to create something beautiful and useful from something that would otherwise be considered trash. Plus, it’s a fantastic way to reduce your environmental footprint. Imagine the conversations you’ll spark when you serve drinks in glasses you made yourself! Beyond the environmental and aesthetic benefits, crafting your own glasses allows you to customize them to your exact preferences – size, shape, even adding personalized designs. So, grab those empty bottles, and let’s get started on this fun and rewarding project!
DIY Glass Bottle Glasses: Upcycling Your Way to Unique Drinkware
Hey there, fellow DIY enthusiasts! Ever looked at a pile of empty glass bottles and thought, “There has to be a better use for these than the recycling bin?” Well, you’re in luck! Today, I’m going to walk you through the surprisingly satisfying process of turning those discarded bottles into stylish and unique drinking glasses. It’s a bit of a project, but trust me, the end result is totally worth it. Plus, you’ll be reducing waste and impressing your friends with your upcycling skills.
What You’ll Need: The Essential Toolkit
Before we dive in, let’s gather our supplies. Safety is paramount, so make sure you have everything ready before you start.
* Glass Bottles: Obviously! Choose bottles with smooth, cylindrical shapes for easier cutting. Wine bottles, beer bottles, or even some juice bottles can work. Make sure they are clean and dry.
* Glass Cutting Tool: A glass bottle cutter is essential. There are several types available, from simple scoring tools to more elaborate models with adjustable stands. I recommend a bottle cutter with a rotating base for consistent scoring.
* Safety Glasses: Protect your eyes from flying glass shards. Seriously, don’t skip this.
* Gloves: Heavy-duty work gloves will protect your hands from cuts and abrasions.
* Sandpaper: You’ll need a variety of grits, from coarse (around 80 grit) to fine (around 220 grit) and extra fine (400 grit and higher) for smoothing the edges.
* Water: You’ll need both hot and ice water for the thermal shock process.
* Large Pot or Container: Big enough to submerge the bottle in water.
* Ice: Lots of it!
* Towel: For drying and handling the bottles.
* Lighter or Candle: To heat the score line (optional, but helpful).
* Optional:
* Cutting Oil: Some people prefer to use cutting oil with their glass cutter.
* Diamond Hand Pad: For extra-fine smoothing and polishing.
* Cork Coasters: To protect surfaces from condensation.
Scoring the Bottle: The Foundation of Your Glass
This is the most crucial step, so take your time and be precise. A clean, even score line is key to a successful break.
1. Prepare the Bottle Cutter: If your bottle cutter has adjustable settings, adjust it to the desired height for your glass. Remember to measure carefully! I usually aim for around 4-5 inches for a standard drinking glass.
2. Position the Bottle: Place the bottle on the cutter, ensuring it’s firmly against the cutting wheel. If your cutter has a rotating base, make sure the bottle is centered.
3. Apply Pressure and Rotate: Apply consistent, moderate pressure to the bottle while rotating it against the cutting wheel. You should hear a light scratching sound. The goal is to create a single, continuous score line around the entire circumference of the bottle. Avoid going over the same line multiple times, as this can create a jagged edge.
4. Inspect the Score: Carefully examine the score line. It should be a clean, unbroken line all the way around the bottle. If there are any gaps or inconsistencies, you may need to re-score the bottle (but try to avoid overlapping the existing score).
Separating the Bottle: The Thermal Shock Method
This is where the magic happens! The thermal shock method uses rapid temperature changes to separate the bottle along the score line.
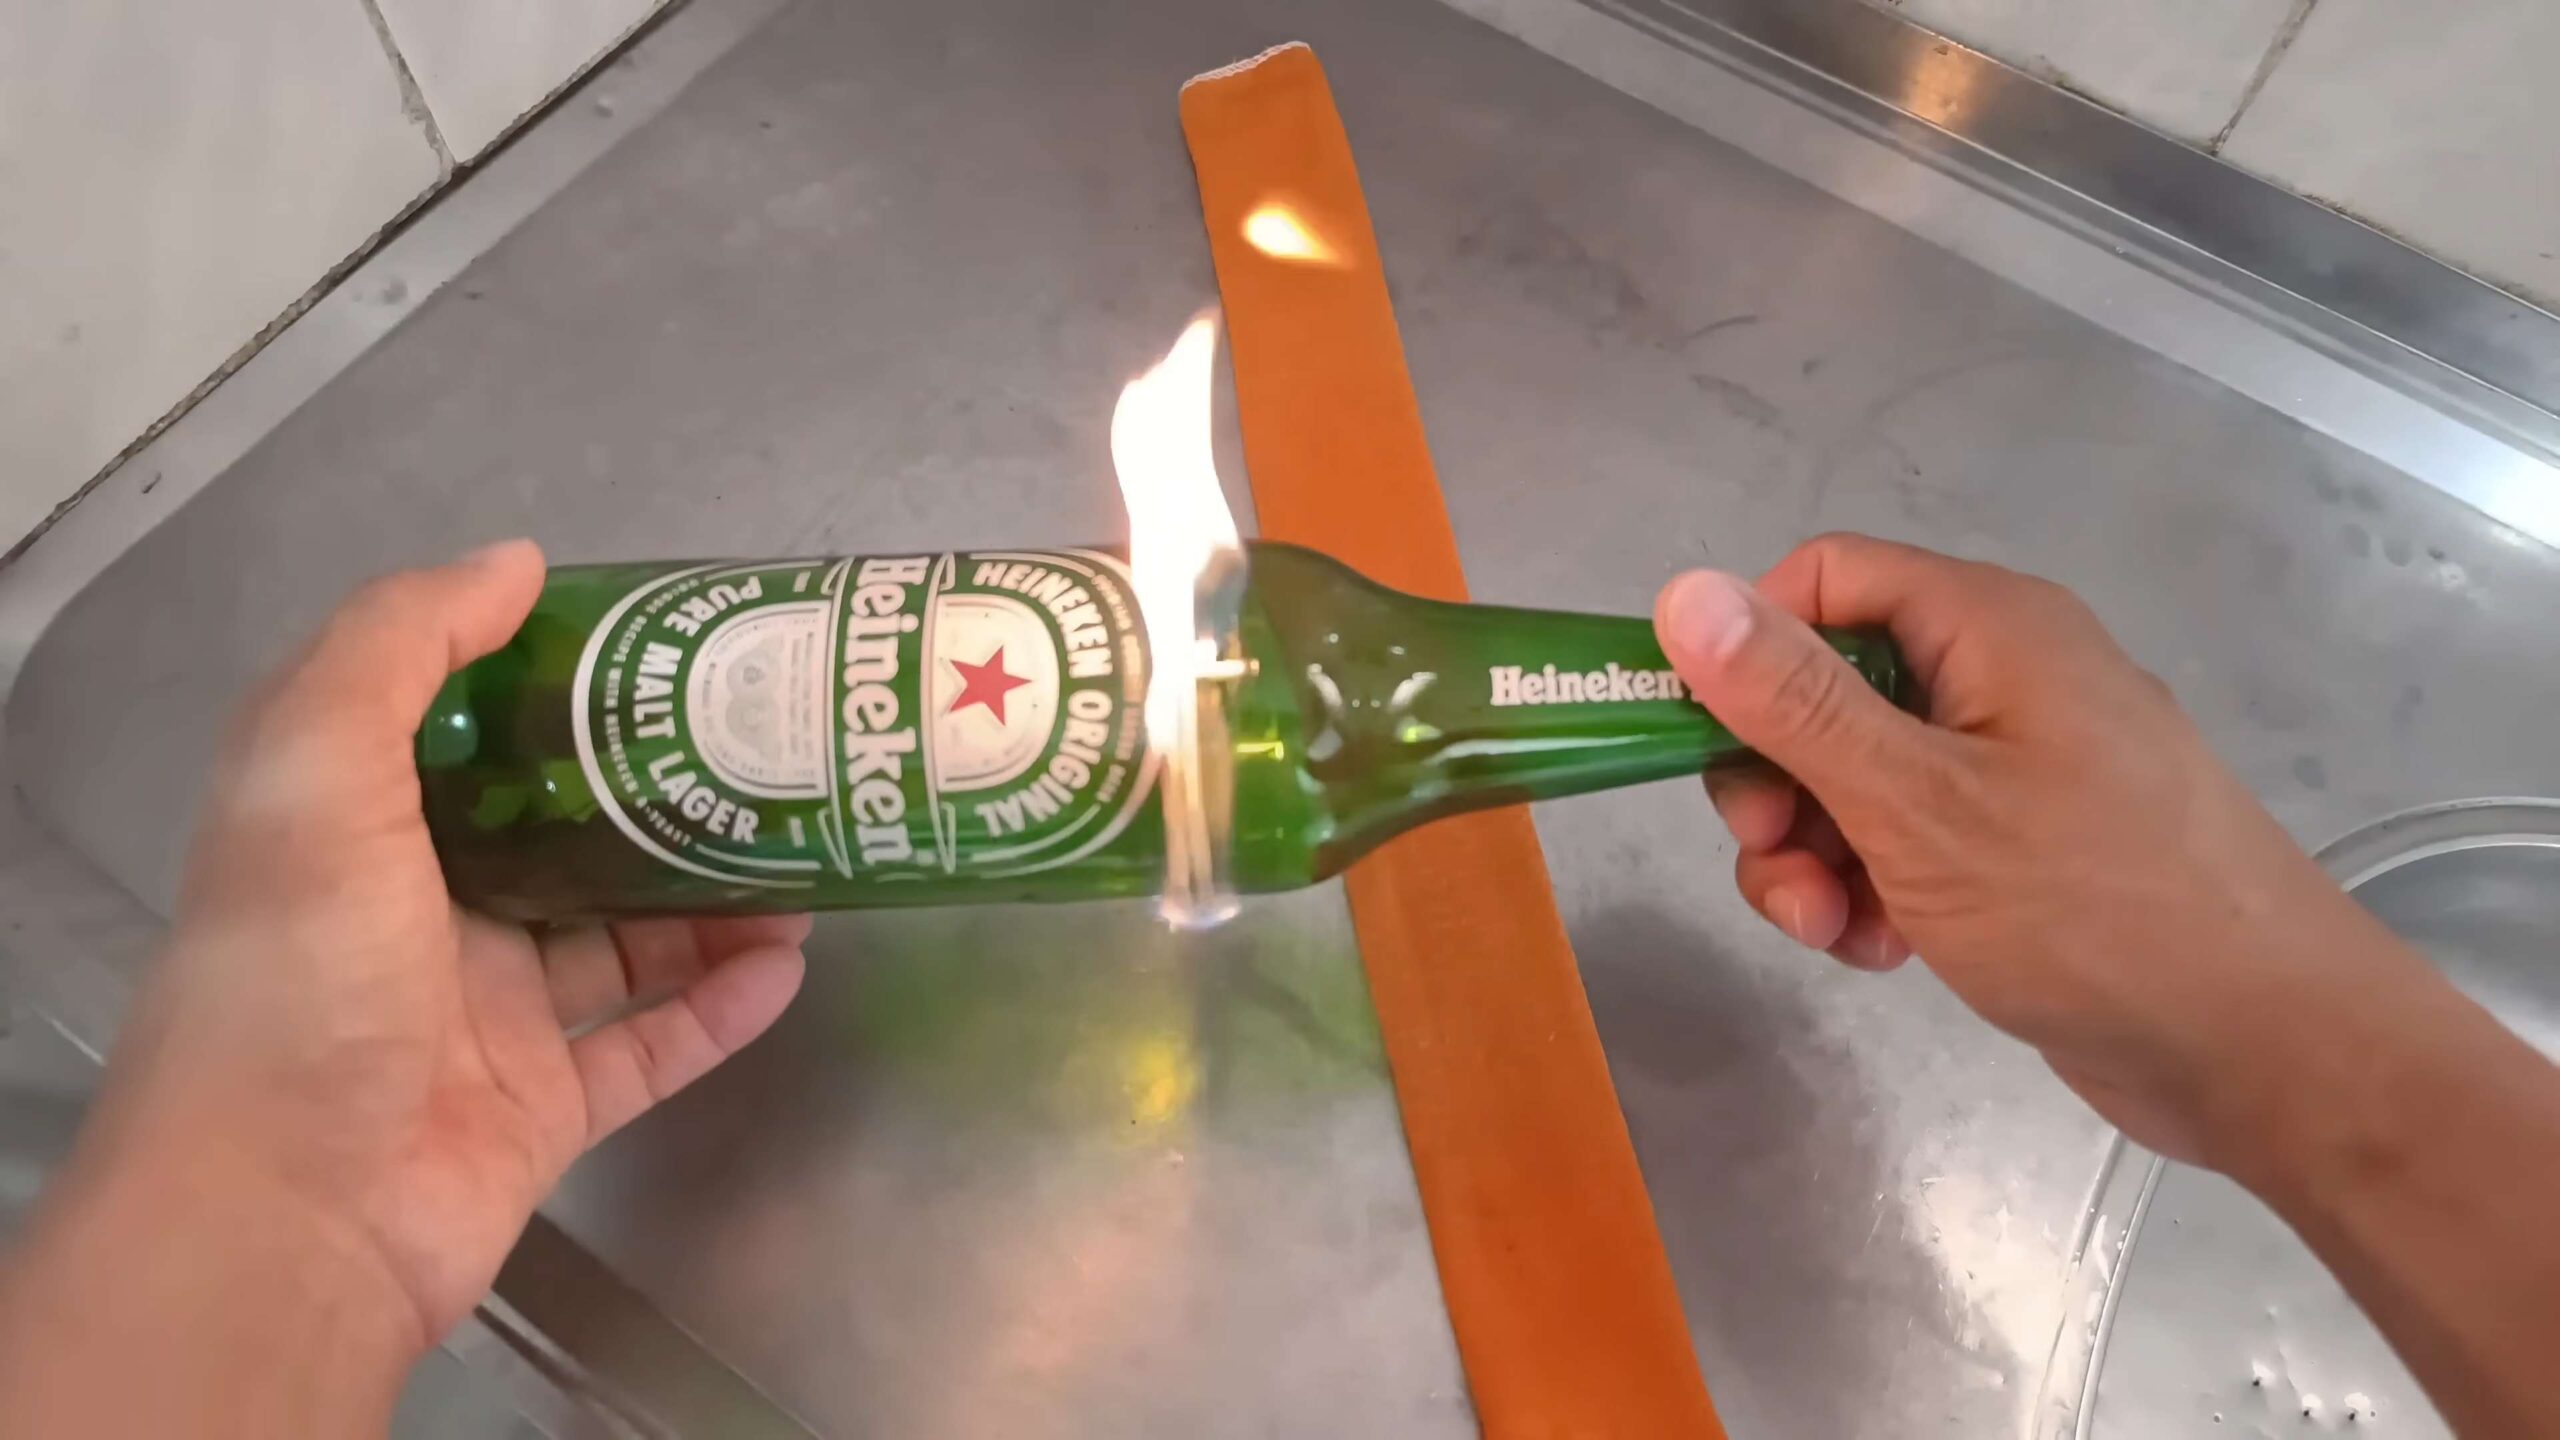
1. Heat the Score Line (Optional): Some people find that gently heating the score line with a lighter or candle helps to weaken the glass and encourage a clean break. If you choose to do this, move the flame slowly and evenly around the score line for a minute or two. Be careful not to overheat the glass.
2. Prepare the Hot and Cold Water: Fill your large pot or container with hot water (not boiling, but hot to the touch). Prepare a separate container with ice water.
3. Submerge in Hot Water: Carefully submerge the scored bottle in the hot water, making sure the score line is completely submerged. Let it sit for about 30 seconds to a minute.
4. Submerge in Ice Water: Quickly transfer the bottle to the ice water, again ensuring the score line is submerged. The rapid temperature change should cause the bottle to separate along the score line. You might hear a cracking sound.
5. Repeat if Necessary: If the bottle doesn’t separate on the first try, repeat steps 3 and 4, alternating between hot and cold water. Sometimes it takes a few cycles.
6. Gentle Separation: Once the bottle has separated, you may need to gently wiggle the top and bottom pieces to fully detach them. Be careful, as the edges may be sharp.
Smoothing the Edges: From Sharp to Safe
This is the most time-consuming part, but it’s essential for creating a safe and comfortable drinking glass.
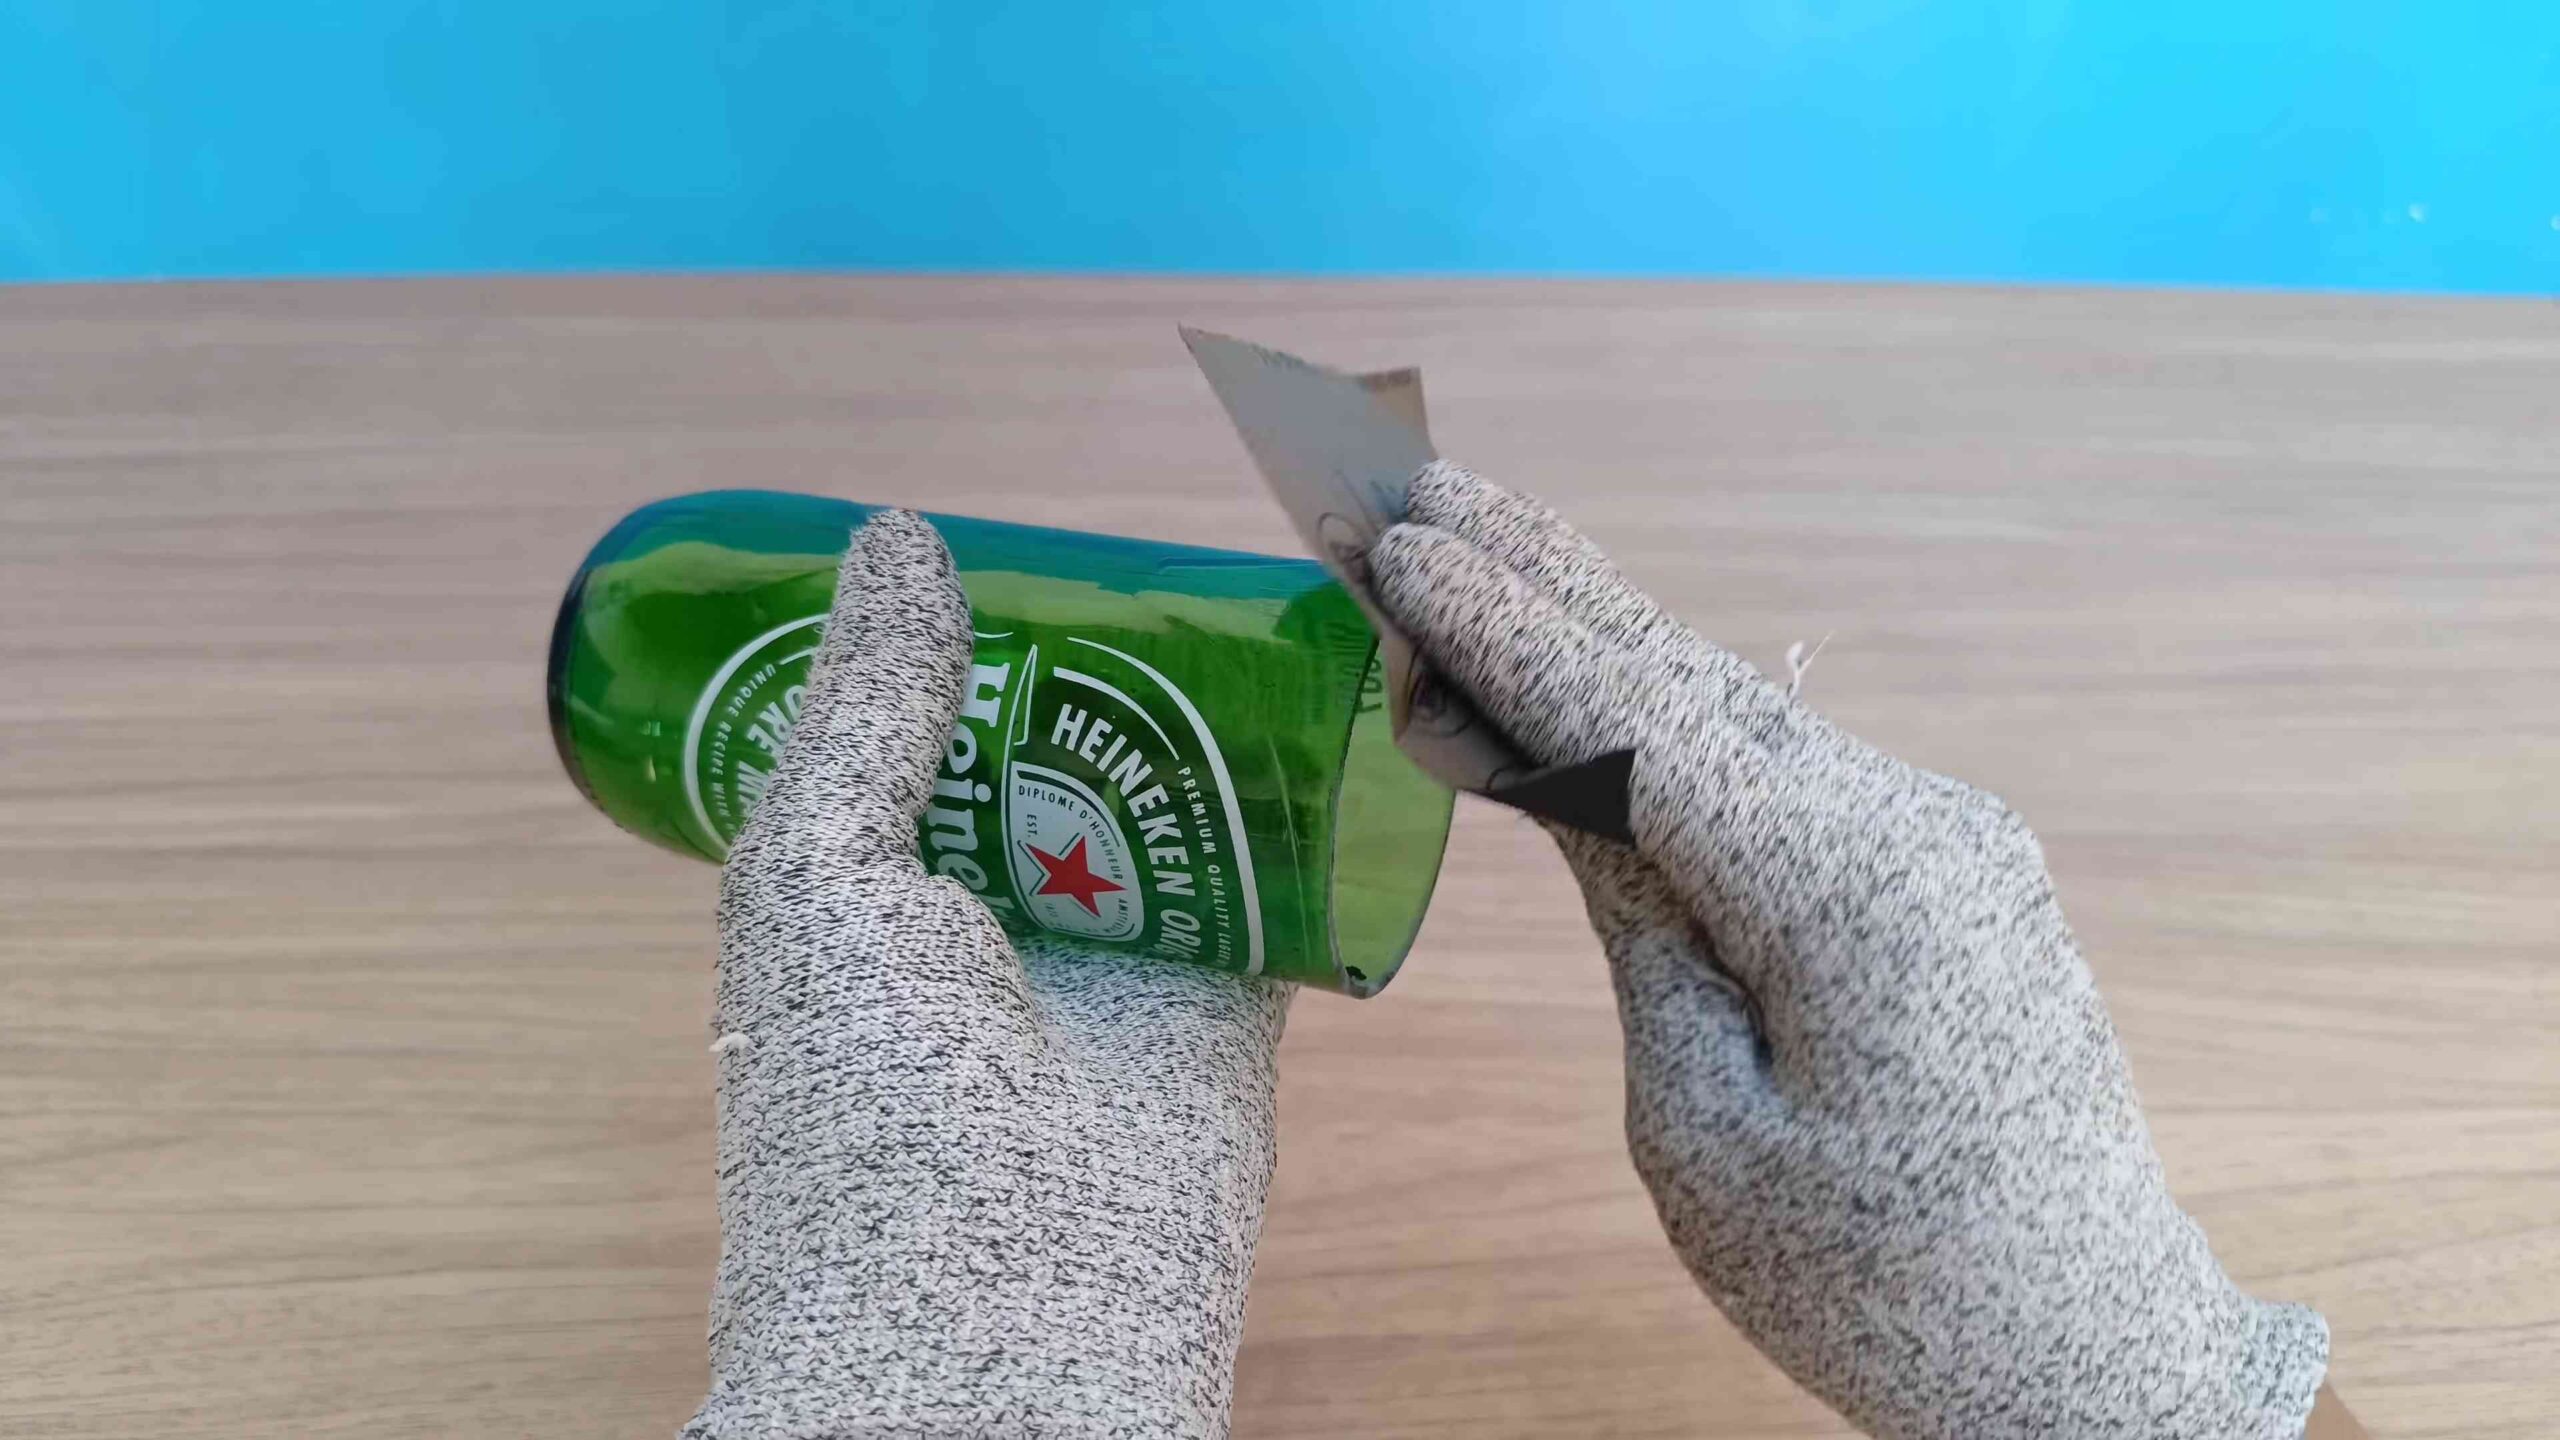
1. Initial Sanding (80 Grit): Start with the coarse 80-grit sandpaper. Wet the sandpaper and the edge of the glass. Sand the edge in a circular motion, applying moderate pressure. The goal is to remove the sharpest edges and create a more rounded shape. This step will take some time, so be patient.
2. Medium Sanding (120-180 Grit): Once you’ve removed the sharpest edges with the 80-grit sandpaper, switch to a medium-grit sandpaper (around 120-180 grit). Continue sanding in a circular motion, refining the shape and smoothing out any remaining rough spots.
3. Fine Sanding (220 Grit): Now, move on to the 220-grit sandpaper. This step will further smooth the edge and prepare it for the final polishing.
4. Extra Fine Sanding (400+ Grit): For the final sanding, use a very fine-grit sandpaper (400 grit or higher). This will give the edge a smooth, polished feel. You can even go up to 600 or 800 grit for an even smoother finish.
5. Diamond Hand Pad (Optional): If you want an extra-smooth and polished edge, you can use a diamond hand pad. These pads are designed for polishing glass and stone and can create a beautiful, professional-looking finish.
6. Rinse and Inspect: After each sanding step, rinse the glass thoroughly with water and inspect the edge. Look for any remaining sharp spots or rough areas. Continue sanding until the edge is smooth and comfortable to the touch.
Final Touches: Making it Your Own
Now that you have a beautifully smoothed glass, you can add some personal touches to make it truly unique.
1. Cleaning: Wash the glass thoroughly with soap and water to remove any remaining sanding residue.
2. Decoration (Optional): You can decorate your glass with paint, etching cream, or even glass beads. Get creative and let your personality shine!
3. Cork Coasters (Recommended): To protect your furniture from condensation, I highly recommend using cork coasters with your new glasses. You can buy pre-made coasters or even make your own.
Safety First! Important Considerations
Working with glass can be dangerous, so please keep these safety tips in mind:
* Always wear safety glasses and gloves.
* Work in a well-ventilated area.
* Be careful when handling broken glass.
* Dispose of glass shards properly.
* Supervise children closely if they are helping with the project.
* Inspect your finished glasses regularly for any cracks or chips. Discard any damaged glasses.
Troubleshooting: Common Issues and Solutions
* The bottle won’t separate: Make sure your score line is complete and even. Try heating the score line with a lighter or candle before submerging it in hot water. You may also need to repeat the hot/cold water cycle several times.
* The edge is chipping: You may be applying too much pressure when sanding. Try using a lighter touch and working in smaller sections.
* The edge is still sharp: Continue sanding with finer grits of sandpaper. You may also need to use a diamond hand pad for extra-fine smoothing.
* The glass breaks unevenly: This can happen if the bottle has imperfections or if the score line is not perfectly even. Try using a different bottle or re-scoring the bottle more carefully.
And there you have it! You’ve successfully transformed a discarded glass bottle into a stylish and unique drinking glass. With a little practice, you’ll be churning out these beauties in no time. Enjoy your new upcycled drinkware, and happy crafting!
Conclusion
So, there you have it! Transforming ordinary glass bottles into stylish and functional drinking glasses is not only a rewarding DIY project, but also a fantastic way to reduce waste and add a personal touch to your home. This DIY glass bottle glasses trick is a must-try for anyone looking to embrace sustainability, unleash their creativity, and impress their guests with unique, handcrafted drinkware.
Why is this a must-try? Because it’s more than just crafting; it’s about conscious consumption. Instead of tossing those empty wine, beer, or soda bottles into the recycling bin (or worse, the trash!), you’re giving them a new lease on life. You’re actively participating in a circular economy, reducing your environmental footprint, and creating something beautiful and useful in the process. Plus, think of the conversation starter these glasses will be!
But the beauty of this DIY project lies in its versatility. Feel free to experiment with different bottle shapes and sizes to create a diverse collection of glasses. Consider using colored bottles for a vibrant, eclectic look. You can even add decorative touches like etching, painting, or wrapping the base with twine for a rustic feel. For a more polished finish, explore techniques for smoothing the rims even further, perhaps using specialized polishing compounds.
Don’t be afraid to get creative with the finishing touches. You could try adding a frosted effect to the glass using etching cream for a sophisticated look. Or, if you’re feeling artistic, paint intricate designs on the outside of the glasses using glass-specific paints. You could even personalize them with names or initials, making them perfect gifts for friends and family.
Beyond drinking glasses, the same techniques can be adapted to create other useful items. Shorter bottles can be transformed into stylish pen holders or small vases. Larger bottles can be cut and repurposed as candle holders or even small planters. The possibilities are truly endless!
We understand that embarking on a DIY project can sometimes feel daunting, but we assure you that with a little patience and the right tools, this DIY glass bottle glasses project is achievable for crafters of all skill levels. Remember to prioritize safety throughout the process, especially when working with glass and cutting tools. Always wear appropriate safety gear, such as gloves and eye protection, and work in a well-ventilated area.
We are confident that you’ll find this DIY project both enjoyable and rewarding. So, gather your empty bottles, grab your tools, and get ready to transform trash into treasure! We can’t wait to see what you create.
We highly encourage you to try this DIY glass bottle glasses project and share your experience with us! Post photos of your finished glasses on social media using #DIYGlassBottleGlasses and tag us so we can admire your creations. We’re eager to see your unique designs and hear about any tips or tricks you discover along the way. Your feedback will not only inspire others but also help us refine and improve our instructions for future DIY enthusiasts. Let’s build a community of resourceful crafters together!
Frequently Asked Questions (FAQ)
Is it safe to drink from homemade glass bottle glasses?
Yes, it is generally safe to drink from homemade glass bottle glasses, but only if you take the necessary precautions to ensure the rims are smooth and free of any sharp edges. The most crucial step is properly sanding and polishing the cut edge of the bottle. Use progressively finer grits of sandpaper to remove any rough spots and then polish the edge to a smooth, rounded finish. If you are unsure about the safety of the rim, it’s best to err on the side of caution and use the glasses for decorative purposes only. Always inspect the glasses carefully before each use to ensure there are no chips or cracks.
What tools do I need to cut glass bottles safely?
The essential tools for cutting glass bottles safely include:
* A glass bottle cutter: This tool scores the glass, creating a line along which it will break.
* Safety glasses: Protect your eyes from glass shards.
* Gloves: Protect your hands from cuts.
* Sandpaper (various grits): Used to smooth the sharp edges of the cut glass.
* Water: Used to cool the glass during the cutting and sanding process.
* A heat source (optional): A candle or heat gun can help separate the bottle after scoring.
* A container of ice water: Used to create thermal shock and separate the bottle.
How do I smooth the edges of the glass after cutting?
Smoothing the edges of the glass is crucial for safety and aesthetics. Start with a coarse-grit sandpaper (around 120 grit) to remove any large imperfections or sharp edges. Wet the sandpaper and the glass to reduce friction and dust. Gradually move to finer grits (220, 400, 600, and even higher) to achieve a smooth, polished finish. Regularly rinse the glass and sandpaper to remove any glass particles. You can also use a polishing compound and a buffing wheel for an even smoother finish. Remember to take your time and be thorough to ensure a safe and comfortable drinking experience.
What types of bottles are best for making glasses?
Bottles with straight sides and consistent thickness are generally the easiest to cut and work with. Wine bottles, beer bottles, and some types of soda bottles are good candidates. Avoid bottles with intricate designs, significant curves, or very thin glass, as these can be more challenging to cut cleanly and safely. Clear glass is often preferred for its versatility, but colored glass can add a unique aesthetic touch.
Can I use a Dremel tool to smooth the edges?
Yes, a Dremel tool with a diamond grinding bit can be used to smooth the edges of the glass. This method can be faster and more efficient than hand sanding, especially for removing larger imperfections. However, it’s essential to use the Dremel tool with caution and at a low speed to avoid overheating the glass and causing it to crack. Always wear safety glasses and a dust mask when using a Dremel tool for glasswork. Keep the glass and the grinding bit wet to reduce friction and dust.
How can I decorate my DIY glass bottle glasses?
There are many ways to decorate your DIY glass bottle glasses. You can use glass paints to create colorful designs, etch the glass with stencils and etching cream, or wrap the base of the glasses with twine or ribbon for a rustic look. You can also add beads, charms, or other embellishments to personalize your creations. Be sure to use materials that are safe for contact with food and beverages if you plan to use the glasses for drinking.
What if the bottle doesn’t break cleanly after scoring?
If the bottle doesn’t break cleanly after scoring, try gently tapping along the score line with the handle of the glass cutter or another hard object. You can also try applying heat to the score line with a candle or heat gun, followed by a quick dip in ice water. This thermal shock can help to separate the glass. If the break is still uneven, you may need to re-score the bottle and repeat the process. In some cases, a slightly uneven break can be smoothed out during the sanding process.
How do I clean my DIY glass bottle glasses?
Clean your DIY glass bottle glasses as you would any other glassware. Hand washing is recommended, especially if you have added decorative elements that may be damaged by the dishwasher. Use warm, soapy water and a soft sponge or cloth to avoid scratching the glass. Rinse thoroughly and dry with a clean towel. Avoid using abrasive cleaners or scouring pads, as these can damage the surface of the glass.
Leave a Comment