

DIY Grout Cleaning with Toothbrush: Are you tired of staring at dingy, discolored grout lines that make your beautiful tiles look, well, not so beautiful? I know I am! It’s a common problem, and store-bought cleaners can be harsh, expensive, and sometimes just plain ineffective. But don’t despair! There’s a simple, budget-friendly solution hiding in your bathroom: your trusty toothbrush.
Grout cleaning has been a household chore for as long as we’ve had tiled surfaces. From ancient Roman mosaics to modern kitchens, keeping those grout lines sparkling has always been a challenge. While our ancestors might have used natural abrasives like sand or pumice, we have the advantage of modern tools and techniques – like the humble toothbrush! This isn’t just about aesthetics; clean grout also helps prevent mold and mildew growth, contributing to a healthier home environment.
Let’s face it, nobody enjoys scrubbing grout. It’s tedious and often feels like a losing battle. But with this DIY grout cleaning with toothbrush trick, I’m going to show you how to tackle those stubborn stains effectively and efficiently. You’ll be amazed at how much brighter and cleaner your tiles can look with just a little elbow grease and this simple tool. So, ditch the harsh chemicals and get ready to transform your bathroom or kitchen with this easy and affordable DIY solution!
DIY Grout Cleaning with a Toothbrush: A Deep Dive
Hey there, fellow DIY enthusiasts! Are you tired of staring at dingy, discolored grout lines in your bathroom or kitchen? I know I was! Store-bought grout cleaners can be harsh and expensive, and sometimes they just don’t cut it. That’s why I’m going to share my tried-and-true method for getting sparkling clean grout using a simple toothbrush and some common household ingredients. Trust me, it’s easier than you think, and the results are incredibly satisfying!
What You’ll Need
Before we dive in, let’s gather our supplies. This is a pretty low-budget project, which is always a win in my book!
* An old toothbrush (or several, depending on the size of your area)
* Baking soda
* White vinegar
* Spray bottle
* Warm water
* Dish soap (optional, but helpful for extra greasy areas)
* Rubber gloves (to protect your hands)
* Eye protection (especially if you’re using vinegar)
* Paper towels or a clean cloth
* Small bowl or container for mixing
Choosing Your Cleaning Solution
The beauty of this method is its versatility. You can tailor your cleaning solution to the severity of the grout stains and your personal preferences. Here are a few options I’ve found effective:
* Baking Soda Paste: This is my go-to for general cleaning. It’s gentle, abrasive enough to scrub away grime, and naturally deodorizing.
* Baking Soda and Vinegar: This combination creates a fizzing action that helps lift stubborn stains. Be careful, though, as the reaction can be a bit vigorous!
* Dish Soap and Water: For greasy grout, a simple solution of dish soap and warm water can work wonders.
* Baking Soda, Vinegar, and Dish Soap: This is the heavy-duty option for really tough stains. Use with caution and test in an inconspicuous area first.
Step-by-Step Grout Cleaning Guide
Alright, let’s get down to business! Here’s how I tackle grout cleaning with a toothbrush:
1. Prepare the Area
Before you start scrubbing, it’s important to prep the area. This will make the cleaning process more effective and prevent any accidental damage.
1. Clear the area: Remove any rugs, mats, or other items that might get in the way.
2. Sweep or vacuum: Get rid of any loose dirt, dust, or debris on the tile surface. This will prevent you from just pushing the dirt around while you’re scrubbing.
3. Ventilate the area: Open windows or turn on a fan to ensure good ventilation, especially if you’re using vinegar.
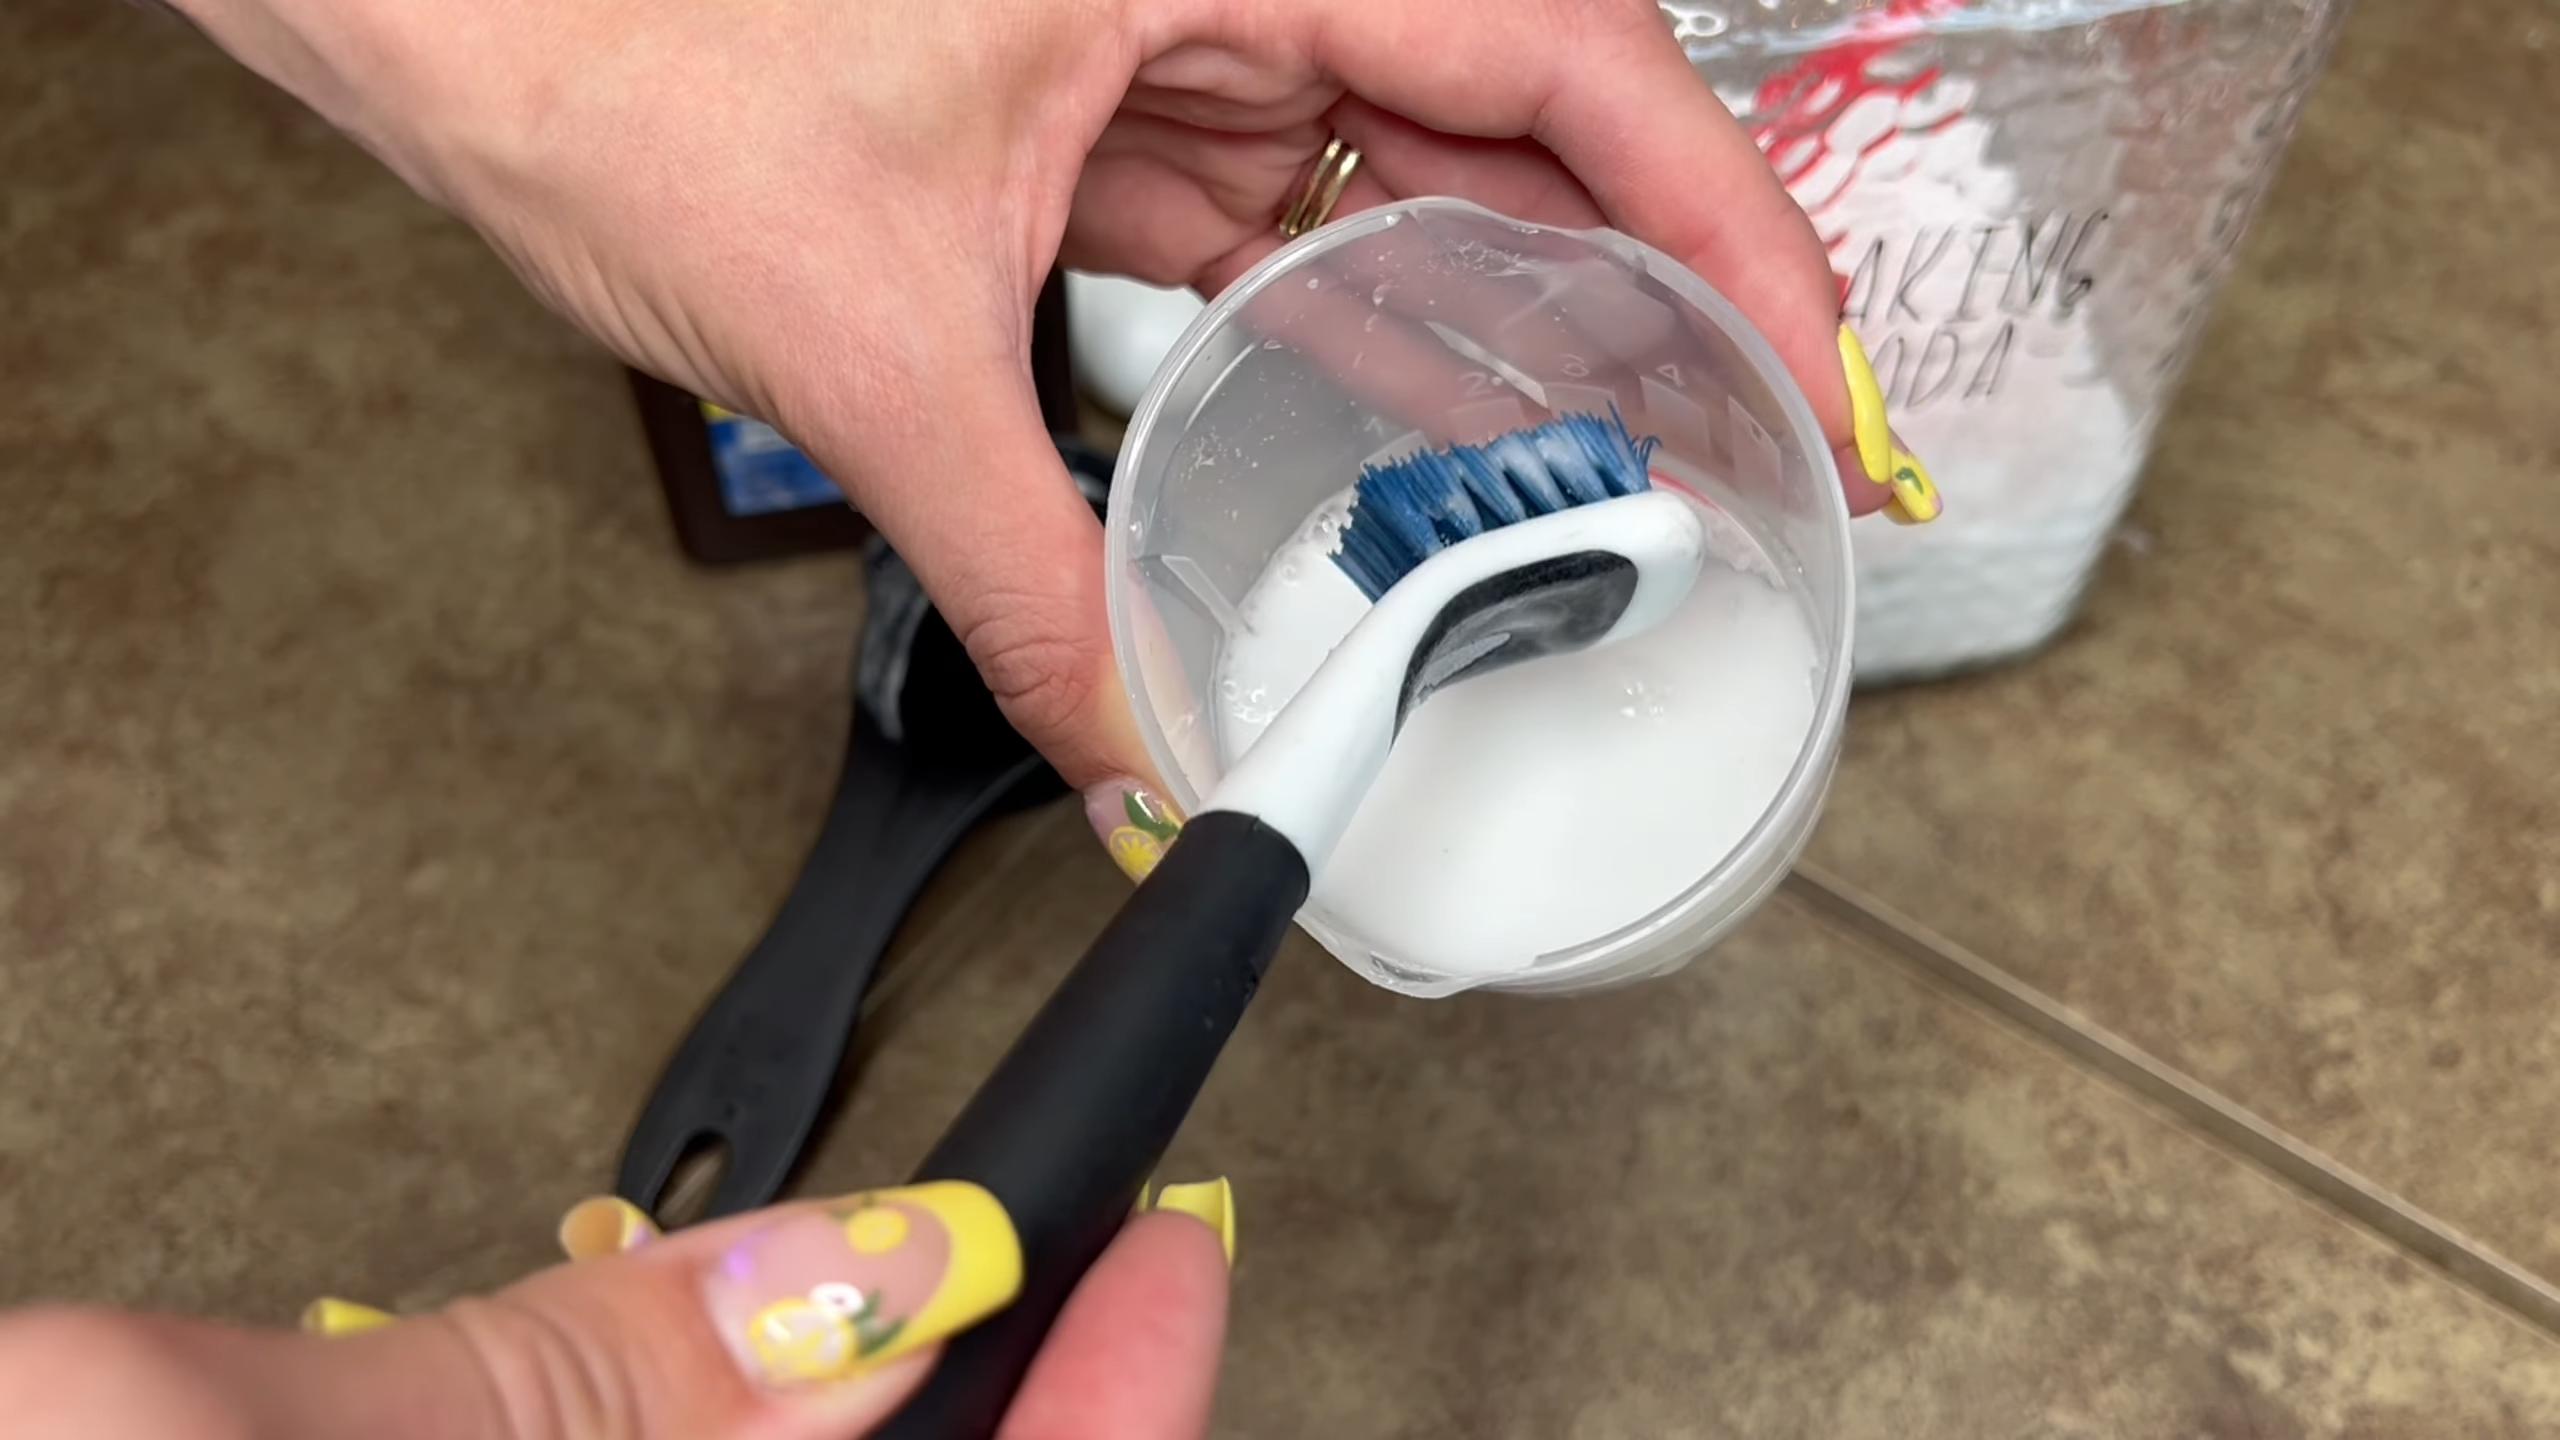
2. Mix Your Cleaning Solution
Now it’s time to whip up your chosen cleaning concoction. Here’s how I prepare each of the solutions I mentioned earlier:
1. Baking Soda Paste: In a small bowl, gradually add water to baking soda until you form a thick paste. You want it to be spreadable but not too runny.
2. Baking Soda and Vinegar: Sprinkle baking soda liberally over the grout lines. Then, pour or spray vinegar onto the baking soda. Let it fizz for a few minutes.
3. Dish Soap and Water: Mix a few drops of dish soap with warm water in a spray bottle.
4. Baking Soda, Vinegar, and Dish Soap: Sprinkle baking soda over the grout lines. Then, spray with a mixture of vinegar and a few drops of dish soap. Let it fizz.
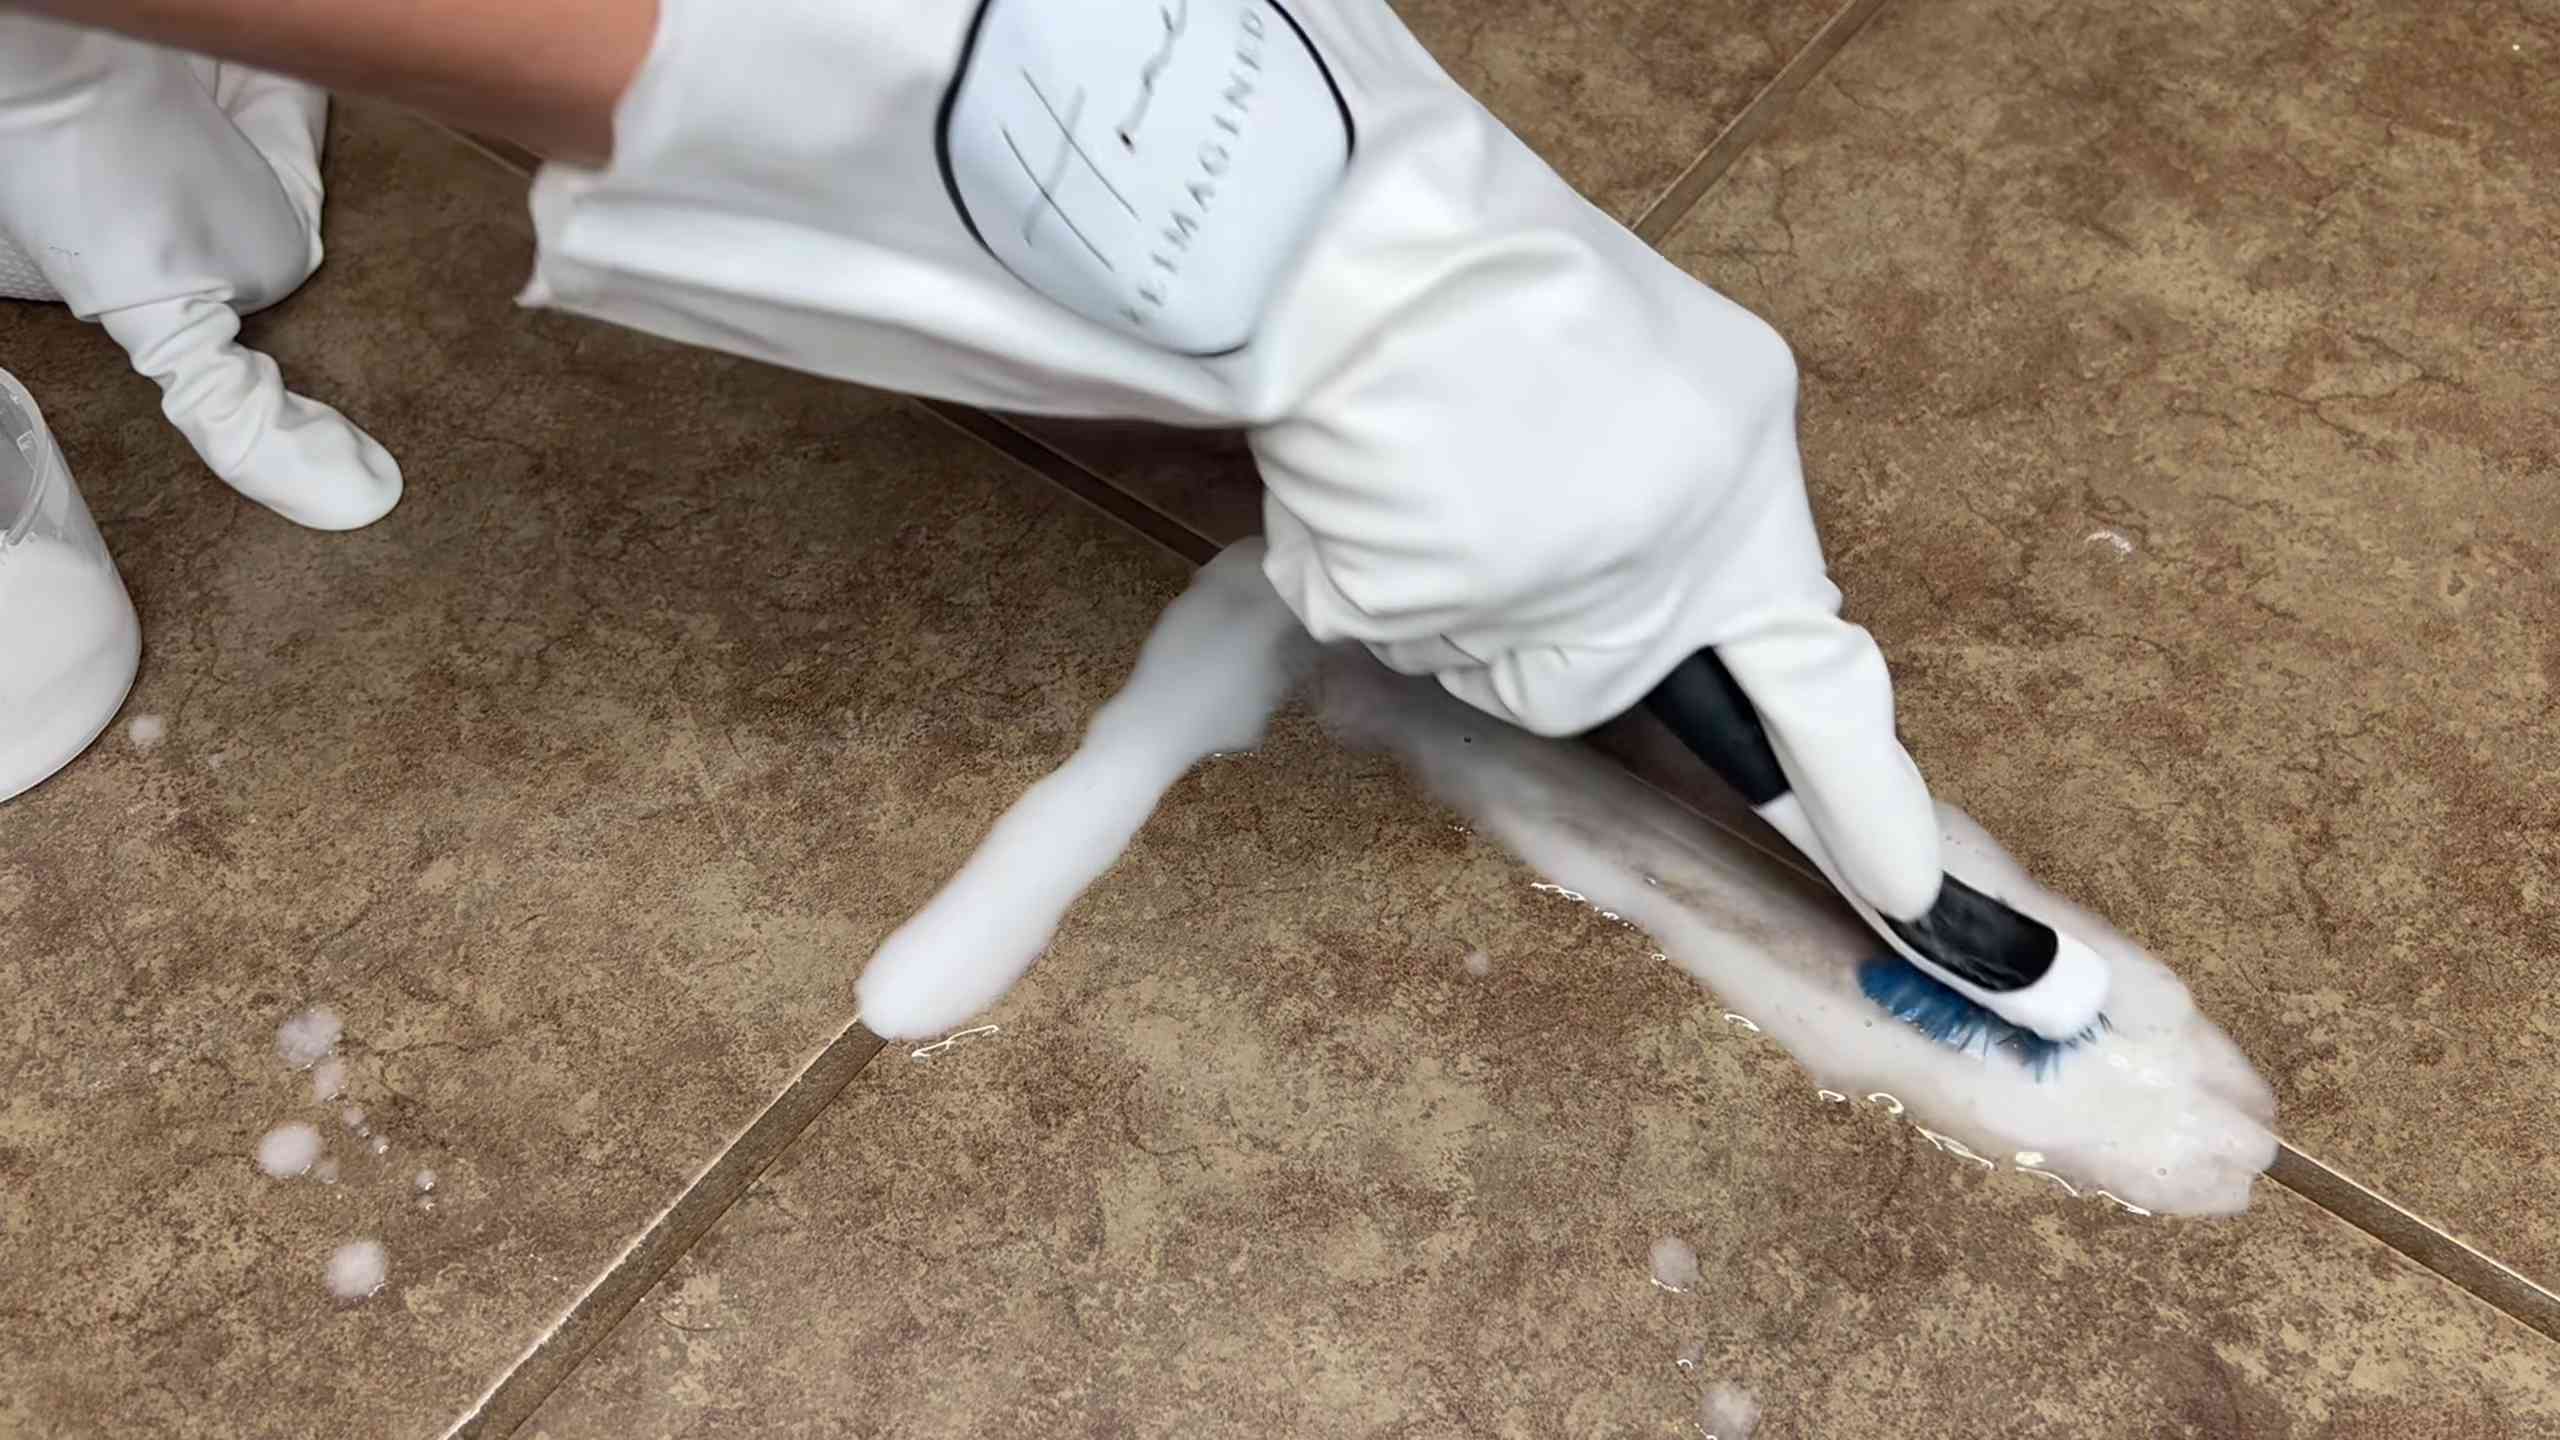
3. Apply the Cleaning Solution
Now comes the fun part – applying the cleaning solution to the grout lines!
1. Dip your toothbrush: Dip your toothbrush into the cleaning solution (or, if you’re using the baking soda and vinegar method, just proceed to the next step).
2. Scrub the grout: Using firm, circular motions, scrub the grout lines with the toothbrush. Pay extra attention to areas with stubborn stains or discoloration. Don’t be afraid to put some elbow grease into it!
3. Work in sections: I like to work in small sections to prevent the cleaning solution from drying out. This also helps me stay focused and ensure that I’m thoroughly cleaning each area.
4. Let it Sit (Optional)
For really tough stains, I like to let the cleaning solution sit on the grout for a few minutes before scrubbing. This gives the solution time to penetrate the stains and loosen them up.
1. Wait 5-10 minutes: Allow the cleaning solution to sit on the grout for 5-10 minutes.
2. Don’t let it dry completely: Make sure the solution doesn’t dry out completely, as this can make it harder to remove. If it starts to dry, spritz it with a little water.
5. Rinse and Wipe Clean
After scrubbing (and letting the solution sit, if you chose to), it’s time to rinse and wipe away the grime.
1. Rinse with water: Use a spray bottle or a damp cloth to rinse the grout lines with clean water. Make sure to remove all traces of the cleaning solution.
2. Wipe with a clean cloth: Use a clean cloth or paper towels to wipe the grout lines dry.
3. Inspect your work: Take a close look at the grout lines to see if you’ve removed all the stains. If not, repeat the process as needed.
6. Repeat as Needed
Sometimes, one round of cleaning isn’t enough to remove all the stains. Don’t be discouraged! Just repeat the process as needed until you’re satisfied with the results.
1. Reapply the solution: If you still see stains, reapply the cleaning solution and scrub again.
2. Try a different solution: If one solution isn’t working, try a different one. For example, if you started with baking soda paste, try the baking soda and vinegar method.
3. Be patient: Remember that grout cleaning can be a time-consuming process, especially if the grout is heavily stained. Be patient and persistent, and you’ll eventually get the results you want.
Dealing with Stubborn Stains
Sometimes, you’ll encounter stains that just won’t budge, no matter how hard you scrub. Don’t give up! Here are a few tips for dealing with stubborn stains:
* Magic Eraser: A magic eraser can be surprisingly effective at removing stubborn stains from grout. Just wet the eraser and gently rub it over the stained area.
* Hydrogen Peroxide: For light-colored grout, hydrogen peroxide can be used to bleach away stains. Apply hydrogen peroxide to the grout lines, let it sit for a few minutes, and then scrub with a toothbrush.
* Grout Pen: If all else fails, you can use a grout pen to cover up the stains. These pens are available in a variety of colors to match your grout.
Preventing Future Stains
Once you’ve got your grout looking sparkling clean, you’ll want to keep it that way! Here are a few tips for preventing future stains:
* Seal your grout: Sealing your grout will help prevent stains from penetrating the surface. You can purchase grout sealant at most home improvement stores.
* Wipe up spills immediately: The sooner you wipe up spills, the less likely they are to stain your grout.
* Clean regularly: Regular cleaning will help prevent dirt and grime from building up on your grout. I recommend cleaning your grout at least once a month.
Safety First!
Before you start cleaning, it’s important to take a few safety precautions:
* Wear rubber gloves: Rubber gloves will protect your hands from the cleaning solutions.
* Wear eye protection: Eye protection will protect your eyes from splashes.
* Ventilate the area: Good ventilation will help prevent you from inhaling harmful fumes.
* Test in an inconspicuous area: Before using any cleaning solution, test it in an inconspicuous area to make sure it doesn’t damage the tile or grout.
Final Thoughts
Cleaning grout with a toothbrush might seem like a tedious task, but trust me, the results are worth it! With a little elbow grease and the right cleaning solution, you can transform your dingy grout into sparkling clean grout. And the best part is, you can do it all with simple household ingredients and a trusty old toothbrush. So, grab your supplies and get scrubbing! You’ll be amazed at the difference it makes. Happy cleaning!
Conclusion
So, there you have it! This simple, yet incredibly effective, DIY grout cleaning with a toothbrush method is a game-changer for anyone battling dingy, stained grout. Forget spending a fortune on harsh chemicals or specialized cleaning tools. This approach is not only budget-friendly but also environmentally conscious, utilizing items you likely already have in your home.
Why is this a must-try? Because it delivers real results. The combination of baking soda and vinegar creates a powerful fizzing action that lifts dirt and grime from the porous surface of the grout. The toothbrush, with its small head and sturdy bristles, allows you to precisely target those hard-to-reach areas, ensuring a thorough and even clean. This method is particularly effective in bathrooms and kitchens, where grout is most susceptible to mold, mildew, and everyday spills.
But the beauty of this DIY grout cleaning solution lies in its adaptability. Feel free to experiment with variations to suit your specific needs and preferences. For instance, if you’re dealing with particularly stubborn stains, you can create a paste of baking soda and hydrogen peroxide instead of vinegar. This combination offers a stronger bleaching effect, ideal for lightening dark or discolored grout. Alternatively, for a more fragrant cleaning experience, add a few drops of your favorite essential oil, such as lemon or tea tree, to the baking soda paste. These oils not only provide a pleasant scent but also possess natural antibacterial properties, further enhancing the cleaning power.
Another variation involves pre-treating the grout with a steam cleaner before applying the baking soda paste. The steam helps to loosen embedded dirt and grime, making it easier for the cleaning solution to penetrate and lift away the stains. This is especially beneficial for heavily soiled grout lines.
Remember to always test any cleaning solution in an inconspicuous area first to ensure it doesn’t damage the surrounding tiles. And while this method is generally safe for most types of grout, it’s always best to err on the side of caution.
Ultimately, this DIY grout cleaning with a toothbrush is more than just a cleaning hack; it’s a way to reclaim the beauty of your tiled surfaces and create a healthier, more inviting living space. It’s about taking control of your cleaning routine and achieving professional-quality results without breaking the bank.
We wholeheartedly encourage you to give this DIY trick a try. You’ll be amazed at the difference it can make. And once you’ve experienced the satisfaction of sparkling clean grout, we’d love to hear about it! Share your before-and-after photos, your tips and tricks, and your overall experience in the comments below. Let’s build a community of grout-cleaning enthusiasts and help each other achieve grout perfection! Your insights could be invaluable to others who are struggling with the same cleaning challenges. So, grab your toothbrush, gather your supplies, and get ready to transform your grout from drab to fab!
Frequently Asked Questions (FAQ)
1. Is baking soda and vinegar safe to use on all types of grout?
While baking soda and vinegar are generally safe for most types of grout, it’s always a good idea to test the solution in an inconspicuous area first. Some types of grout, particularly those that are colored or sealed, may be more susceptible to discoloration or damage from acidic cleaners like vinegar. If you’re unsure about the type of grout you have, consult with a tile or grout specialist before proceeding. For epoxy grout, which is known for its durability and resistance to stains, this method is generally safe and effective. However, always test a small area first.
2. How often should I clean my grout using this method?
The frequency of cleaning depends on several factors, including the location of the grout, the amount of foot traffic, and the level of exposure to spills and stains. In high-traffic areas like kitchens and bathrooms, you may need to clean your grout every few weeks to prevent the buildup of dirt and grime. In less frequently used areas, you can clean your grout every few months. Regular maintenance, such as wiping up spills promptly and sweeping or vacuuming regularly, can help to extend the time between deep cleanings.
3. Can I use a different type of brush instead of a toothbrush?
Yes, you can use other types of brushes, but a toothbrush is often the most effective due to its small size and sturdy bristles. A grout brush, specifically designed for cleaning grout lines, is another excellent option. These brushes typically have a narrow head and angled bristles that allow you to reach deep into the grout lines. You can also use a small scrub brush with stiff bristles, but be careful not to apply too much pressure, as this could damage the grout or surrounding tiles. Avoid using abrasive brushes or scouring pads, as these can scratch the surface of the tiles.
4. What if the baking soda and vinegar mixture doesn’t remove all the stains?
If the baking soda and vinegar mixture doesn’t completely remove all the stains, there are a few things you can try. First, let the mixture sit on the grout for a longer period of time, up to 30 minutes, to allow it to penetrate deeper into the stains. You can also try creating a paste of baking soda and hydrogen peroxide, which has a stronger bleaching effect. Apply the paste to the grout, let it sit for 10-15 minutes, and then scrub with a toothbrush. For particularly stubborn stains, you may need to repeat the process several times. If all else fails, you can consider using a commercial grout cleaner specifically designed for removing tough stains. Always follow the manufacturer’s instructions carefully and test the cleaner in an inconspicuous area first.
5. How can I prevent grout from getting dirty in the first place?
Preventing grout from getting dirty is key to minimizing the need for frequent deep cleanings. Here are a few tips:
* Seal your grout: Applying a grout sealer creates a protective barrier that prevents dirt, grime, and liquids from penetrating the grout. Seal your grout every 6-12 months, or as recommended by the manufacturer.
* Wipe up spills promptly: The sooner you wipe up spills, the less likely they are to stain the grout.
* Sweep or vacuum regularly: Regular sweeping or vacuuming removes loose dirt and debris that can accumulate in the grout lines.
* Use mats and rugs: Place mats and rugs in high-traffic areas to trap dirt and prevent it from being tracked onto the tiled surfaces.
* Ventilate your bathroom: Proper ventilation in the bathroom helps to prevent the growth of mold and mildew, which can stain the grout.
6. Can I use this method on colored grout?
Using baking soda and vinegar on colored grout requires extra caution. While baking soda is generally mild, vinegar is acidic and could potentially cause fading or discoloration, especially with darker or more vibrant grout colors. It’s crucial to test the solution on a hidden area of the colored grout first. Apply the mixture, let it sit for a few minutes, and then wipe it away to see if there’s any color change. If you notice any fading or discoloration, discontinue use. As an alternative, consider using a pH-neutral cleaner specifically designed for colored grout. These cleaners are gentler and less likely to damage the color.
7. What is the best way to rinse the grout after cleaning?
After scrubbing the grout with the baking soda and vinegar mixture, it’s important to rinse it thoroughly to remove any residue. The best way to do this is to use clean water and a sponge or cloth. Wipe the grout lines several times to ensure that all the cleaning solution is removed. You can also use a spray bottle filled with clean water to rinse the grout. For larger areas, you can use a mop and bucket. After rinsing, dry the grout with a clean towel to prevent water spots.
8. Is there a natural alternative to vinegar for cleaning grout?
Yes, there are several natural alternatives to vinegar for cleaning grout. Lemon juice is a good option, as it contains citric acid, which has natural cleaning and disinfecting properties. You can use lemon juice in the same way as vinegar, by mixing it with baking soda to create a paste. Another alternative is hydrogen peroxide, which is a mild bleaching agent that can help to remove stains. You can use hydrogen peroxide alone or mix it with baking soda to create a paste. Tea tree oil is another natural option, as it has antibacterial and antifungal properties. Add a few drops of tea tree oil to a baking soda paste for a more fragrant and effective cleaning solution.
9. Can I use a power scrubber instead of a toothbrush?
While a power scrubber might seem like a faster and more efficient way to clean grout, it’s important to use caution. Power scrubbers can be abrasive and may damage the grout or surrounding tiles if used improperly. If you choose to use a power scrubber, select one with soft bristles and use it on a low setting. Avoid applying too much pressure, as this could scratch the surface of the tiles. Always test the power scrubber in an inconspicuous area first to ensure that it doesn’t cause any damage. For delicate or older tiles, it’s best to stick with a toothbrush or grout brush.
10. How do I deal with mold or mildew in my grout?
Mold and mildew are common problems in bathrooms and other damp areas. To deal with mold or mildew in your grout, start by creating a paste of baking soda and hydrogen peroxide. Apply the paste to the affected areas and let it sit for 10-15 minutes. Then, scrub

Leave a Comment