

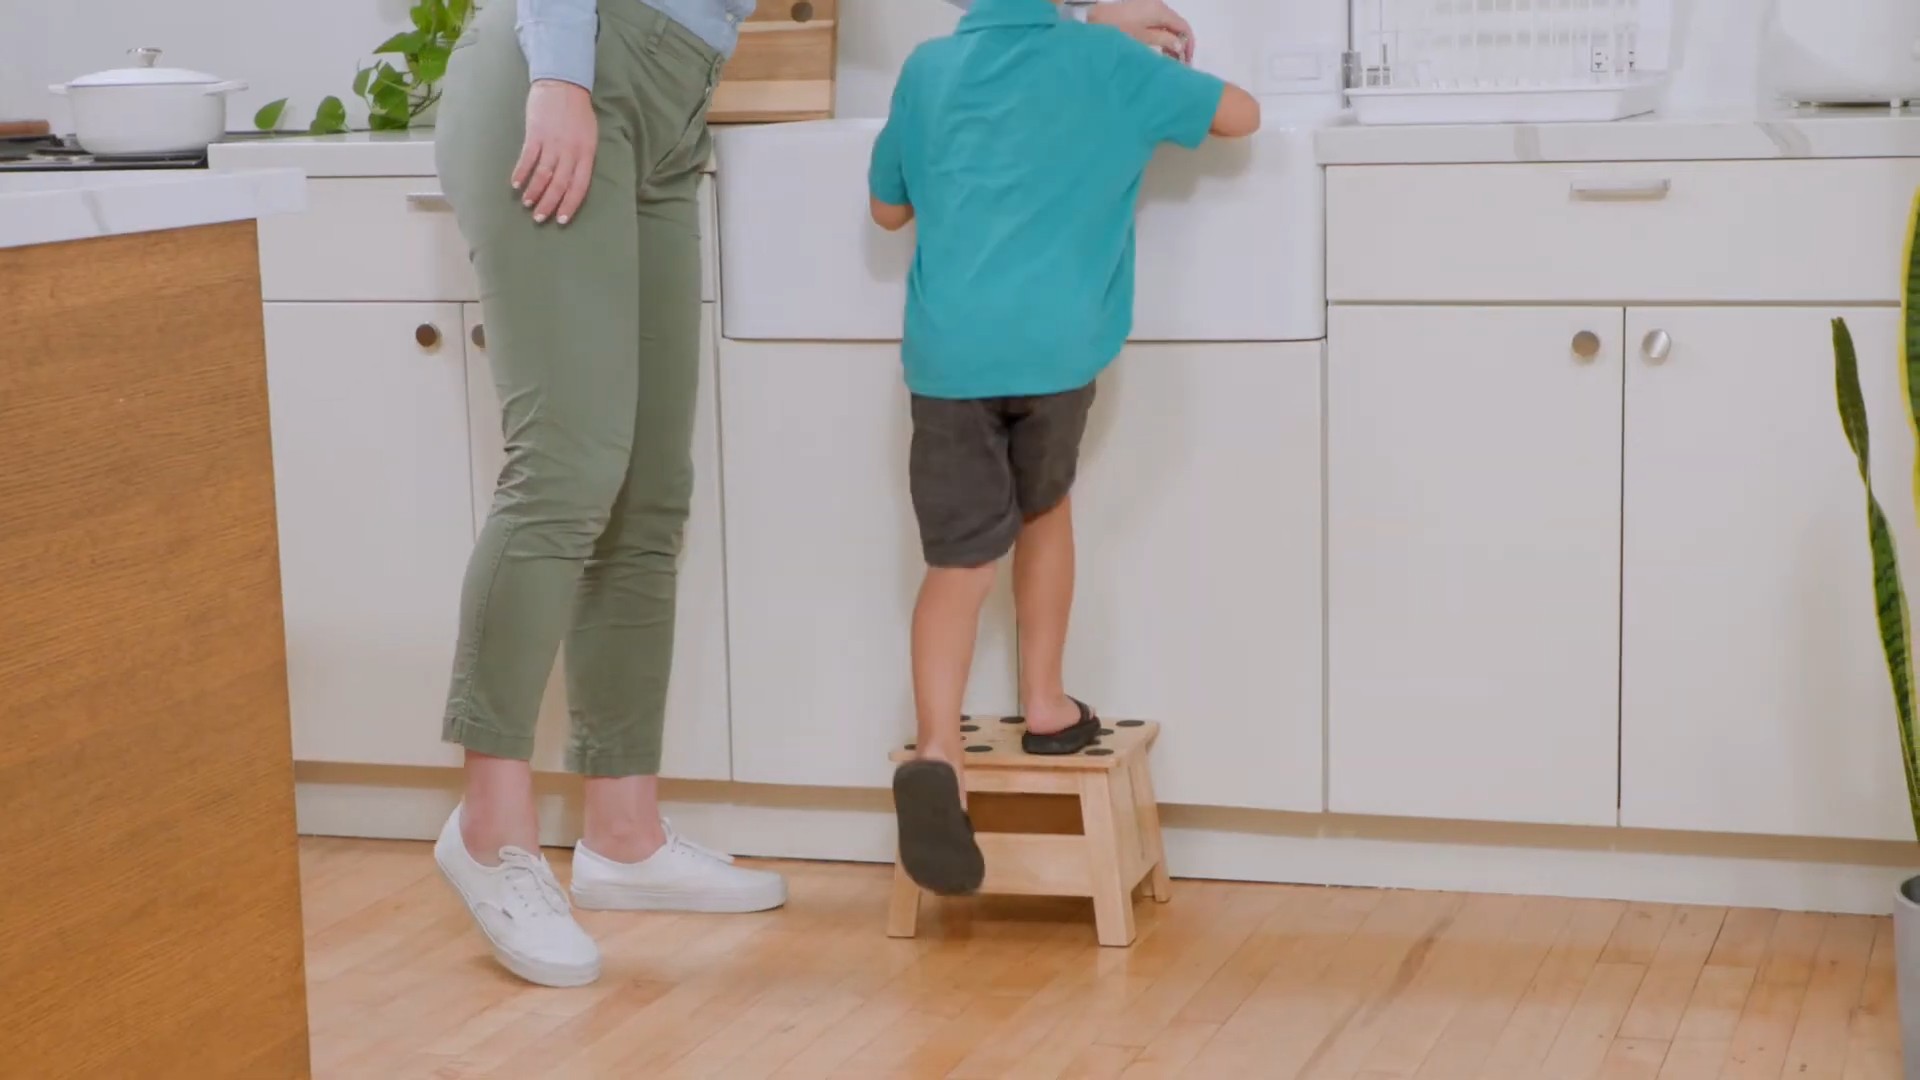
DIY Kids Step Stool: Ever feel like your little ones are constantly asking for help reaching things? I know I do! From grabbing a snack from the top shelf to reaching the sink to wash their hands, it seems like they’re always needing a boost. That’s where a DIY kids step stool comes in handy – and it’s a project that’s both practical and surprisingly fun to build!
Step stools have been around for ages, evolving from simple wooden blocks to more elaborate designs. Historically, they’ve been essential tools in homes, allowing children and adults alike to access higher spaces safely. Think about it – before built-in cabinets and perfectly sized furniture, a sturdy step stool was a necessity. Today, while we have more options, the charm and functionality of a handmade step stool remain undeniable.
But why build one yourself? Well, beyond the satisfaction of creating something with your own hands, a DIY kids step stool allows you to customize the size, design, and materials to perfectly suit your child’s needs and your home’s aesthetic. Plus, it’s a fantastic way to save money compared to buying a pre-made one, and you can ensure it’s built with safe, non-toxic materials. In this article, I’ll guide you through a simple and rewarding DIY project that will empower your kids and add a touch of handmade charm to your home. Let’s get building!
DIY Kids Step Stool: A Weekend Project for Little Helpers
Okay, friends, let’s build a super sturdy and adorable step stool for your little ones! This project is perfect for a weekend and will give your kids a boost when they need to reach the sink, help in the kitchen, or grab a book from a slightly-too-high shelf. I’ve designed this stool to be safe, durable, and customizable, so you can tailor it to your child’s needs and preferences.
Materials You’ll Need
Before we dive in, let’s gather our supplies. Here’s what you’ll need:
* Wood:
* Two pieces of 1×12 lumber, 24 inches long (for the sides)
* Two pieces of 1×12 lumber, 12 inches long (for the top steps)
* One piece of 1×4 lumber, 24 inches long (for the bottom support)
* Fasteners:
* Wood screws (1 1/4 inch and 2 inch)
* Wood glue
* Finishing:
* Sandpaper (various grits: 80, 120, 220)
* Primer
* Paint (child-safe, non-toxic) or stain
* Polyurethane (optional, for extra protection)
* Tools:
* Safety glasses
* Hearing protection
* Measuring tape
* Pencil
* Square
* Circular saw or hand saw
* Drill with drill bits
* Screwdriver or drill with screwdriver bits
* Clamps
* Sanding block or orbital sander
* Paintbrushes or rollers
* Rags
Planning and Cutting the Wood
Alright, let’s get started with the most important part: cutting the wood! Accuracy here is key to a stable and good-looking step stool.
1. Measure and Mark: Using your measuring tape and pencil, carefully measure and mark the dimensions on your lumber according to the materials list above. Double-check your measurements before cutting!
2. Cut the Sides: Cut the two 1×12 pieces to 24 inches long. These will be the sides of the step stool.
3. Cut the Steps: Cut the two 1×12 pieces to 12 inches long. These will be the top steps.
4. Cut the Bottom Support: Cut the 1×4 piece to 24 inches long. This will provide extra support at the bottom.
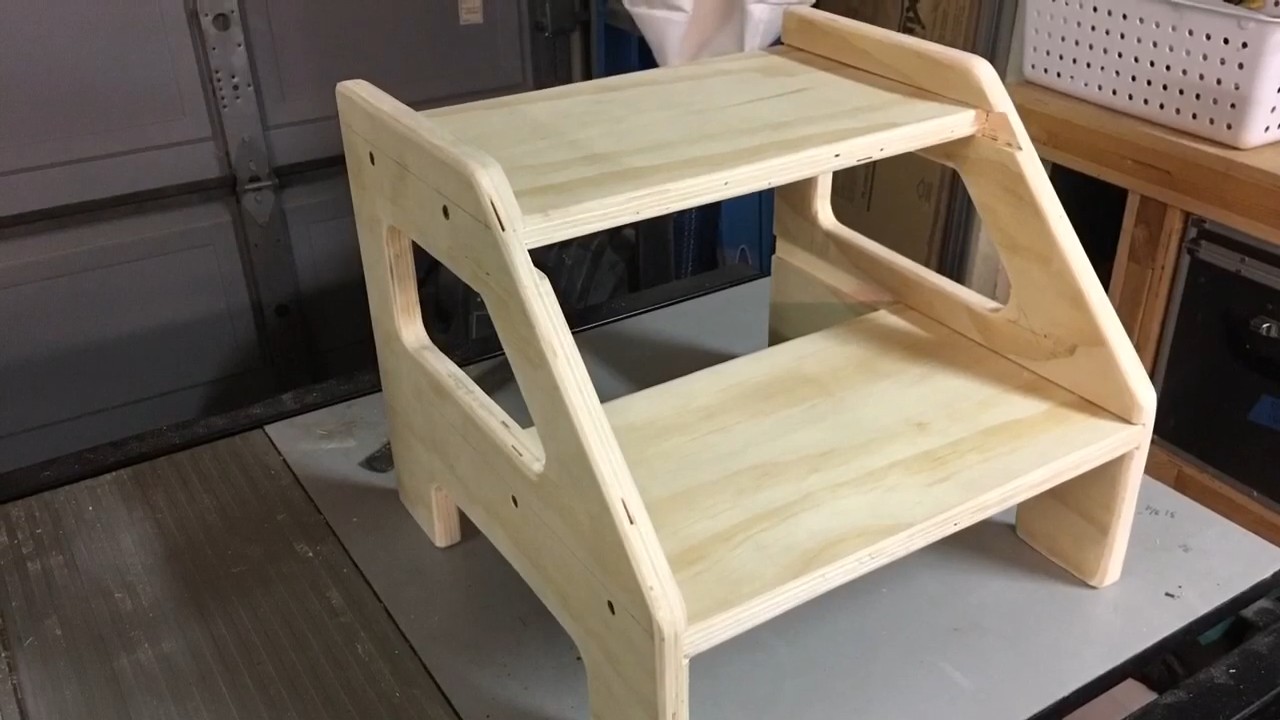
Assembling the Step Stool: The Frame
Now for the fun part – putting it all together!
1. Prepare the Sides: On the inside of each side piece (the 1×12 x 24″ pieces), mark the locations for the steps. The first step will be flush with the top of the side piece. The second step will be 8 inches down from the top of the side piece.
2. Attach the Top Step: Apply wood glue to the edges of one of the 1×12 x 12″ step pieces. Position it flush with the top of one of the side pieces, ensuring it’s square. Clamp it in place.
3. Secure with Screws: Pre-drill pilot holes through the side piece into the step. This prevents the wood from splitting. Use 1 1/4 inch wood screws to secure the step to the side piece. I usually use at least three screws per side for a strong hold.
4. Repeat for the Second Side: Repeat steps 2 and 3 to attach the top step to the other side piece. Make sure the step is level and aligned correctly.
5. Attach the Second Step: Apply wood glue to the edges of the second 1×12 x 12″ step piece. Position it 8 inches down from the top of the side piece, ensuring it’s square. Clamp it in place.
6. Secure with Screws: Pre-drill pilot holes through the side piece into the step. Use 1 1/4 inch wood screws to secure the step to the side piece. Again, use at least three screws per side.
7. Attach the Bottom Support: Apply wood glue to the bottom edge of the side pieces. Position the 1×4 x 24″ bottom support piece between the side pieces, flush with the bottom. Clamp it in place.
8. Secure with Screws: Pre-drill pilot holes through the side pieces into the bottom support. Use 2 inch wood screws to secure the bottom support to the side pieces. I recommend using at least four screws per side for maximum stability.
Reinforcing the Structure (Optional but Recommended)
For extra durability, especially if your kids are particularly energetic, consider adding corner braces.
1. Measure and Cut Braces: Cut four small triangular pieces of wood (you can use scrap wood) to act as corner braces. The exact size isn’t critical, but aim for about 3-4 inches on each side.
2. Attach Braces: Apply wood glue to the edges of the braces. Position them in the corners where the steps meet the sides, and where the bottom support meets the sides. Clamp them in place.
3. Secure with Screws: Pre-drill pilot holes and use 1 1/4 inch wood screws to secure the braces to the steps and sides.
Sanding and Preparing for Finishing
This is a crucial step for a smooth and professional finish. Don’t skip it!
1. Initial Sanding: Use 80-grit sandpaper to remove any rough edges, splinters, or imperfections. Pay special attention to the corners and edges.
2. Medium Sanding: Switch to 120-grit sandpaper to smooth out the surface further. Sand with the grain of the wood.
3. Fine Sanding: Finish with 220-grit sandpaper for a super smooth surface. This will ensure the paint or stain adheres evenly.
4. Dust Removal: Use a clean rag or a tack cloth to remove all the sanding dust. This is essential for a clean finish.
Finishing: Painting or Staining
Now for the fun part – adding color and personality!
1. Priming (Recommended): Apply a coat of primer to the entire step stool. This will help the paint or stain adhere better and provide a more even finish. Let the primer dry completely according to the manufacturer’s instructions.
2. Painting: If you’re painting, apply two or three thin coats of child-safe, non-toxic paint. Allow each coat to dry completely before applying the next. Lightly sand between coats with 220-grit sandpaper for an even smoother finish.
3. Staining: If you’re staining, apply the stain evenly with a brush or rag. Let it sit for a few minutes, then wipe off the excess with a clean rag. The longer you leave the stain on, the darker the color will be. Let the stain dry completely according to the manufacturer’s instructions.
4. Polyurethane (Optional): For extra protection and durability, apply a coat of polyurethane. This will protect the finish from scratches and wear. Let it dry completely according to the manufacturer’s instructions. You may want to apply multiple coats, sanding lightly between each coat.
Safety First: Adding Non-Slip Pads
To prevent slipping, especially on hard floors, add non-slip pads to the bottom of the step stool.
1. Clean the Bottom: Make sure the bottom of the step stool is clean and dry.
2. Attach Non-Slip Pads: Apply self-adhesive non-slip pads to the bottom corners of the step stool. You can also use rubber feet that screw into the bottom.
Customization Ideas
This is where you can really get creative!
* Personalize with Names: Paint your child’s name on the side of the step stool.
* Add Decorations: Use stencils or freehand paint to add fun designs, like stars, animals, or flowers.
* Choose Bright Colors: Use your child’s favorite colors to make the step stool extra special.
* Add a Handle: Attach a small handle to the top of the step stool for easy carrying.
Final Touches and Inspection
Before letting your little one use their new step stool, give it a final inspection.
1. Check for Sharp Edges: Make sure there are no sharp edges or splinters. Sand them down if necessary.
2. Test for Stability: Place the step stool on a level surface and test its stability. Make sure it doesn’t wobble or tip over easily.
3. Supervise Initial Use: Supervise your child the first few times they use the step stool to ensure they use it safely.
And there you
Conclusion
So, there you have it! Creating your own DIY Kids Step Stool is not just a fun project; it’s an investment in your child’s independence and safety. Forget those flimsy, mass-produced plastic stools that wobble and crack under pressure. This project empowers you to build a sturdy, customized step stool that perfectly suits your child’s needs and your home’s aesthetic.
Why is this a must-try? Because it’s more than just a step stool. It’s a tangible expression of your love and care. It’s a chance to teach your child about the value of handmade items and the satisfaction of creating something with their own hands (with your supervision, of course!). It’s a way to ensure their safety by building a stable and reliable platform for them to reach those tempting cookies on the top shelf or wash their hands at the sink.
But the best part? The possibilities are endless! Feel free to get creative with your design.
* Add a splash of color: Use vibrant paints or stains to match your child’s room or favorite cartoon character.
* Incorporate storage: Design a step stool with a hidden compartment for storing toys or books.
* Personalize it: Add your child’s name or initials with stencils or wood burning tools.
* Adjust the height: Tailor the height of the stool to perfectly suit your child’s reach and the height of your counters or sinks.
* Consider the materials: While wood is a classic choice, explore other options like reclaimed lumber for a rustic look or even durable plastic for outdoor use.
Don’t be intimidated if you’re not a seasoned woodworker. This project can be adapted to suit your skill level. Start with a simple design and gradually add complexity as you gain confidence. There are countless online resources and tutorials to guide you through every step of the process.
We wholeheartedly encourage you to embark on this rewarding DIY adventure. Imagine the pride on your child’s face as they use the step stool you built together. Imagine the peace of mind knowing that they have a safe and reliable platform to reach new heights.
So, gather your tools, unleash your creativity, and build a DIY Kids Step Stool that will be cherished for years to come. And most importantly, don’t forget to share your creations with us! We’d love to see your unique designs and hear about your experiences. Post photos of your finished step stool on social media using #DIYKidsStepStool and tag us so we can admire your handiwork and share it with our community. Let’s inspire others to create beautiful and functional pieces for their little ones!
Frequently Asked Questions (FAQ)
What type of wood is best for a DIY Kids Step Stool?
The best type of wood for a DIY kids step stool depends on your budget, desired aesthetic, and skill level. Pine is a popular choice because it’s affordable, readily available, and easy to work with. However, it’s a softwood and may be prone to dents and scratches. Hardwoods like maple, oak, or birch are more durable and resistant to wear and tear, but they are also more expensive and require more advanced woodworking skills. Plywood is another option that offers a good balance of affordability and strength. Consider using exterior-grade plywood if the stool will be used outdoors or in damp environments. Reclaimed wood is a great eco-friendly option that adds character and charm to your project. Ultimately, the best wood is the one that meets your specific needs and preferences.
Is it safe to let my child help build the step stool?
Involving your child in the building process can be a fun and educational experience, but safety should always be your top priority. Supervise your child closely at all times and ensure they are wearing appropriate safety gear, such as safety glasses and gloves. Choose age-appropriate tasks that they can safely handle, such as sanding, painting, or decorating. Avoid letting them use power tools or handle sharp objects. Explain the importance of following instructions and working carefully. By taking these precautions, you can create a safe and enjoyable learning experience for your child.
How do I make the step stool non-slip?
Preventing slips and falls is crucial for a kids step stool. There are several ways to make the stool non-slip. You can apply non-slip pads or strips to the top surface of the stool and the bottom of the legs. These pads are typically made of rubber or silicone and provide excellent traction. Another option is to apply a textured paint or coating to the top surface. This will create a rough surface that helps prevent slipping. You can also use a router to create grooves or channels in the top surface for added grip. For the legs, consider using rubber feet or caps to prevent the stool from sliding on smooth surfaces. Regularly inspect the non-slip surfaces and replace them as needed to maintain their effectiveness.
What tools do I need to build a DIY Kids Step Stool?
The tools you’ll need will depend on the complexity of your design and the materials you choose. However, some essential tools include:
* Measuring tape: For accurate measurements.
* Pencil: For marking cut lines.
* Saw: For cutting the wood to size (a hand saw, circular saw, or miter saw will work).
* Drill: For drilling pilot holes and driving screws.
* Screws or nails: For assembling the stool.
* Wood glue: For added strength and stability.
* Sandpaper: For smoothing rough edges and surfaces.
* Safety glasses: To protect your eyes from debris.
* Clamps: To hold the pieces together while the glue dries.
* Optional: Router, wood burner, paint, stain, varnish.
How much will it cost to build a DIY Kids Step Stool?
The cost of building a DIY kids step stool will vary depending on the materials you choose and the tools you already have. If you’re using inexpensive wood like pine and already own most of the tools, you can likely build a simple step stool for under $30. However, if you opt for more expensive hardwoods or need to purchase tools, the cost could be higher. Consider checking local lumber yards or hardware stores for sales and discounts on materials. You can also save money by using reclaimed wood or repurposing materials you already have on hand.
How do I ensure the step stool is sturdy and safe?
Building a sturdy and safe step stool requires careful planning and execution. Start by choosing high-quality materials and using strong joinery techniques. Ensure that all the pieces are cut accurately and fit together snugly. Use wood glue in addition to screws or nails to create a strong bond. Reinforce the corners and joints with brackets or gussets if necessary. Test the stool thoroughly before allowing your child to use it. Check for any wobbling or instability and address any issues immediately. Regularly inspect the stool for signs of wear and tear and make any necessary repairs.
Can I customize the design of the step stool?
Absolutely! Customization is one of the biggest advantages of building your own step stool. You can tailor the design to perfectly suit your child’s needs and your home’s aesthetic. Consider the height and width of the stool, the shape of the steps, and the overall style. You can add decorative elements like carvings, inlays, or painted designs. You can also incorporate storage compartments or other functional features. Let your creativity run wild and create a step stool that is both functional and beautiful.
How do I finish the step stool to protect the wood?
Finishing the step stool is essential for protecting the wood from moisture, scratches, and wear and tear. There are several options for finishing wood, including paint, stain, varnish, and polyurethane. Paint provides a durable and colorful finish that is easy to clean. Stain enhances the natural beauty of the wood and adds depth and character. Varnish and polyurethane provide a clear, protective coating that is resistant to scratches and water damage. Choose a finish that is appropriate for the type of wood you’re using and the intended use of the stool. Apply the finish according to the manufacturer’s instructions and allow it to dry completely before using the stool.

Leave a Comment