

DIY Rope Basket: Ever find yourself staring at a tangled mess of rope, wondering if it could be anything more than just…rope? I know I have! Well, prepare to be amazed because we’re about to embark on a fun and surprisingly simple journey to transform ordinary rope into a stylish and functional DIY rope basket.
Basket weaving, in general, has a rich history, dating back thousands of years across various cultures. From carrying food to storing precious belongings, baskets have always been essential tools. While traditional basketry often involves intricate techniques and natural materials like reeds and willow, this modern twist allows us to create something beautiful and practical using readily available rope.
Why do you need this DIY trick in your life? Because let’s face it, we all have clutter! Whether it’s organizing your craft supplies, corralling toys, or adding a touch of rustic charm to your living room, a DIY rope basket is the perfect solution. Plus, it’s incredibly satisfying to create something with your own hands. This project is not only budget-friendly but also a fantastic way to personalize your home décor. So, grab your rope, and let’s get crafting! I’m excited to show you how easy it is to create your very own stunning DIY rope basket that will add both style and organization to your space.
DIY Rope Basket: A Stylish and Functional Project
Hey there, fellow DIY enthusiasts! Today, I’m super excited to share a project that’s not only fun but also incredibly useful: a DIY rope basket. These baskets are perfect for adding a touch of rustic charm to any room while providing much-needed storage. You can use them for blankets, toys, plants, or just about anything else you can think of. Plus, they’re surprisingly easy to make! So, grab your supplies, and let’s get started!
Materials You’ll Need
Before we dive in, let’s gather everything we need. This will make the process smoother and prevent any frustrating mid-project supply runs.
* Rope: This is the star of the show! I recommend using cotton rope, as it’s soft, easy to work with, and looks fantastic. The thickness is up to you, but I find that a 1/4 inch to 1/2 inch rope works well for most basket sizes. You’ll need quite a bit, so estimate generously based on the size of the basket you want to create. For a medium-sized basket (around 12 inches in diameter), I usually use about 100-150 feet of rope.
* Hot Glue Gun and Glue Sticks: A good quality hot glue gun is essential for this project. Make sure you have plenty of glue sticks on hand, as you’ll be using quite a few.
* Scissors or Utility Knife: For cutting the rope. A sharp pair of scissors or a utility knife will do the trick.
* Measuring Tape or Ruler: To ensure your basket is the size you want.
* Optional: Leather scraps or fabric for handles: If you want to add handles to your basket, you’ll need some leather scraps or sturdy fabric.
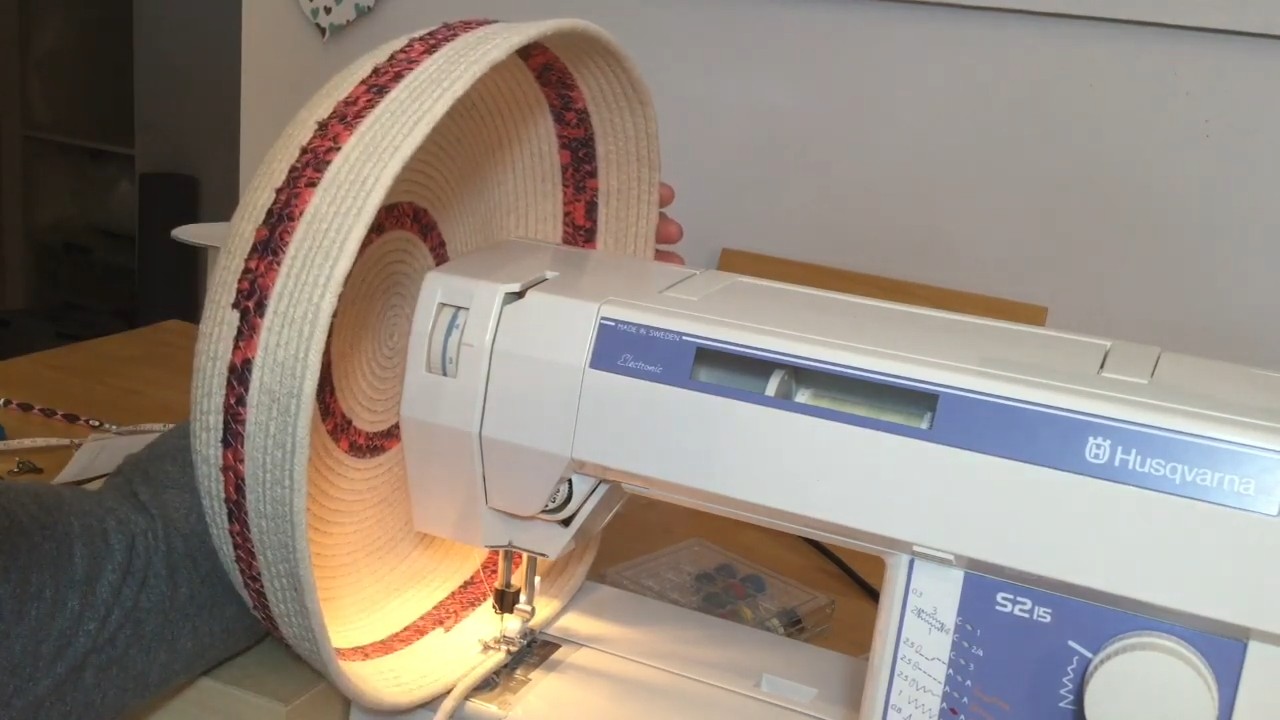
* Optional: Sewing machine and thread: If you choose to use fabric handles, a sewing machine will make the process easier, but you can also hand-sew them.
* Optional: Clamps or clips: These can be helpful for holding the rope in place while the glue dries, especially in the beginning.
* Optional: Embellishments: Feel free to get creative and add embellishments like beads, tassels, or paint to personalize your basket.
Preparing Your Workspace
Before we start gluing, let’s set up a comfortable and organized workspace. Cover your work surface with a protective layer, like a drop cloth or some newspaper, to prevent any glue mishaps. Make sure you have good lighting and plenty of room to move around. It’s also a good idea to have a trash can nearby for disposing of any scraps.
Creating the Base of the Basket
This is where the magic begins! We’ll start by creating the base of our basket, which will determine its overall size.
1. Start the Coil: Take the end of your rope and apply a small amount of hot glue to it. Then, carefully coil the rope around itself, pressing it firmly to the glued section. Hold it in place for a few seconds until the glue sets. This will form the very center of your basket base.
2. Continue Coiling and Gluing: Continue coiling the rope around the center, applying hot glue to the inside edge of the coil as you go. Press each new section of rope firmly against the previous one, ensuring a strong bond. Work slowly and methodically, taking your time to ensure that the coil remains flat and even.
3. Maintain a Flat Surface: As you coil, periodically check the base to make sure it’s staying flat. If it starts to buckle or warp, gently flatten it with your hands. You can also use clamps or clips to hold the rope in place while the glue dries.
4. Determine the Base Size: Keep coiling and gluing until the base reaches your desired size. Remember, the size of the base will determine the overall size of your basket. For a medium-sized basket, I usually make the base around 6-8 inches in diameter.
5. Secure the End: Once the base is the desired size, apply a generous amount of hot glue to the end of the rope and press it firmly against the last coil. Hold it in place until the glue sets completely. This will prevent the base from unraveling.
Building the Walls of the Basket
Now that we have our base, it’s time to start building the walls of the basket. This is where the basket will start to take shape.
1. Transition to Upward Coiling: To start building the walls, we need to transition from coiling the rope flat to coiling it upwards. To do this, instead of gluing the rope directly next to the previous coil, slightly angle it upwards. This will create a gentle curve that forms the wall of the basket.
2. Continue Coiling and Gluing Upwards: Continue coiling the rope, applying hot glue to the inside edge of the rope and pressing it firmly against the previous coil. Maintain the upward angle as you go, gradually building the walls of the basket.
3. Maintain the Shape: As you build the walls, pay attention to the shape of the basket. You can create a straight-sided basket, a slightly tapered basket, or even a basket that flares outwards. The angle at which you coil the rope will determine the shape of the basket.
4. Work in Sections: To make the process easier, I like to work in sections. Apply glue to a small section of the rope, press it into place, and then move on to the next section. This prevents the glue from drying too quickly and ensures a strong bond.
5. Use Clamps or Clips (Optional): If you’re having trouble maintaining the shape of the basket, you can use clamps or clips to hold the rope in place while the glue dries. This is especially helpful for larger baskets.
6. Check for Gaps: As you build the walls, periodically check for any gaps between the coils of rope. If you find any gaps, apply a small amount of hot glue to fill them in.
7. Continue Building: Keep coiling and gluing until the walls of the basket reach your desired height.
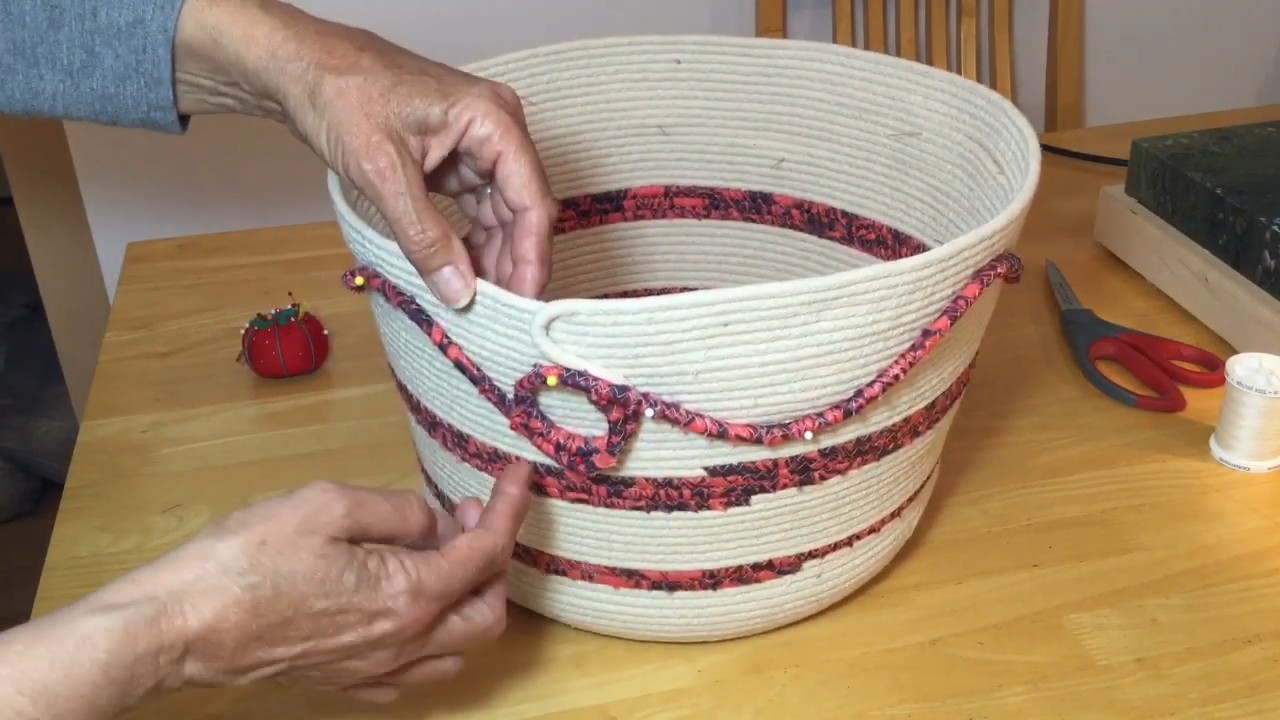
Adding Handles (Optional)
If you want to add handles to your basket, now is the time to do it. Handles make the basket easier to carry and add a nice decorative touch.
1. Choose Your Handle Material: You can use leather scraps, sturdy fabric, or even rope to create handles. I personally love the look of leather handles, but fabric handles are a great option if you’re looking for something more budget-friendly.
2. Cut the Handle Pieces: Cut two pieces of your chosen material to the desired length and width. The length will depend on how large you want the handles to be, and the width will depend on the thickness of your material. I usually make my handles around 6-8 inches long and 1-2 inches wide.
3. Prepare the Handle Edges: If you’re using fabric, fold over the edges of the handle pieces and sew them down to prevent fraying. If you’re using leather, you can leave the edges raw or burnish them for a more finished look.
4. Attach the Handles: Position the handles on opposite sides of the basket, near the top edge. Use hot glue to attach the handles to the basket, making sure to apply plenty of glue for a strong bond. If you’re using fabric handles, you can also sew them to the basket for added security.
5. Reinforce the Attachment: To reinforce the attachment, you can wrap a small piece of rope around the base of each handle and glue it in place. This will help to distribute the weight and prevent the handles from pulling away from the basket.
Finishing Touches
Now that our basket is complete, let’s add some finishing touches to make it extra special.
1. Trim Any Loose Ends: Carefully trim any loose ends of rope with your scissors or utility knife.
2. Inspect for Gaps: Give the basket a final inspection and fill in any remaining gaps with hot glue.
3. Add Embellishments (Optional): This is where you can really let your creativity shine! Add embellishments like beads, tassels, or paint to personalize your basket. You can glue beads along the top edge of the basket, attach tassels to the handles, or paint a design on the sides of the basket.
4. Let the Glue Dry Completely: Before using your basket, make sure that all the glue is completely dry. This will ensure that the basket is strong and durable.
Tips and Tricks for Success
Here are a few extra tips and tricks to help you create the perfect rope basket:
* Use a High-Temperature Glue Gun: A high-temperature glue gun will provide a stronger bond than a low-temperature glue gun.
* Work in a Well-Ventilated Area: Hot glue can release fumes, so it’s important to work in a well-ventilated area.
* Protect Your Fingers: Hot glue can burn, so be careful when handling
Conclusion
So, there you have it! Transforming ordinary rope into a stylish and functional basket is not only incredibly satisfying but also a fantastic way to add a personal touch to your home decor. This DIY rope basket project is more than just a craft; it’s an opportunity to unleash your creativity, reduce waste by repurposing materials, and create a unique piece that reflects your individual style.
Why is this a must-try? Because it’s simple, affordable, and yields stunning results. Forget those mass-produced, generic baskets you find in stores. With a little time and effort, you can craft a basket that perfectly matches your needs and aesthetic. Imagine the pride you’ll feel displaying your handmade creation, knowing that you brought it to life with your own two hands.
But the fun doesn’t stop there! Feel free to experiment with different types of rope. Consider using thicker rope for a more rustic look, or opt for colorful rope to add a vibrant pop to your space. You can also play around with the shape and size of your basket. Create a small, shallow basket for holding keys and mail by the entryway, or a larger, deeper basket for storing blankets or toys in the living room.
Another exciting variation is to incorporate embellishments. Add leather handles for a touch of sophistication, or weave in colorful yarn or fabric scraps for a bohemian vibe. You could even paint or stain your finished basket to match your existing decor. The possibilities are truly endless!
This DIY project is also a fantastic way to get the whole family involved. Kids will love helping to coil the rope and add decorative touches. It’s a great opportunity to teach them about crafting, resourcefulness, and the joy of creating something from scratch.
We are confident that once you try this DIY rope basket project, you’ll be hooked. It’s a rewarding and addictive craft that allows you to express your creativity and add a personal touch to your home.
So, what are you waiting for? Gather your materials, clear your workspace, and get ready to embark on a crafting adventure. We encourage you to try this DIY trick and share your experience with us. Post photos of your finished baskets on social media using #DIYRopeBasket and tag us so we can see your amazing creations! We can’t wait to see what you come up with! Let’s spread the crafting love and inspire others to create their own beautiful and functional rope baskets. This is more than just a basket; it’s a statement piece, a conversation starter, and a testament to your creativity. Happy crafting!
FAQ
What kind of rope is best for making a rope basket?
The best type of rope for a DIY rope basket depends on the look and feel you’re going for. Cotton rope is a popular choice because it’s soft, easy to work with, and readily available. It also takes dye well, so you can easily customize the color of your basket. Jute rope offers a more rustic and natural look, but it can be a bit rougher on the hands. Synthetic ropes like nylon or polypropylene are durable and water-resistant, making them a good option for baskets that will be used outdoors or in damp environments. However, they can be more difficult to glue and may not have the same aesthetic appeal as natural fibers. Ultimately, the best rope is the one that you like the look and feel of, and that fits your budget. Consider the intended use of the basket when making your decision.
What kind of glue should I use?
A strong adhesive is crucial for a durable rope basket. Hot glue is a popular choice because it sets quickly and provides a strong bond. However, it can be messy and may not be the most durable option for baskets that will be subjected to heavy use. Fabric glue is another good option, especially for cotton rope. It’s flexible and provides a strong, lasting bond. For synthetic ropes, a specialized adhesive designed for plastics may be necessary. Consider using a construction adhesive for a very durable and long-lasting bond, especially for larger baskets. Always test the glue on a small piece of rope before applying it to the entire basket to ensure that it adheres properly and doesn’t damage the rope.
How do I prevent the basket from unraveling?
Preventing your rope basket from unraveling is key to its longevity. The most important step is to ensure that the end of the rope is securely glued down. You can also reinforce the end by wrapping it with twine or yarn and securing it with glue. Another technique is to use a needle and thread to stitch the end of the rope together. For added security, consider applying a sealant or varnish to the finished basket. This will help to protect the rope from moisture and wear and tear, and will also help to prevent it from unraveling. Regularly inspect your basket for any loose ends and repair them promptly to prevent further unraveling.
Can I wash my rope basket?
Whether or not you can wash your rope basket depends on the type of rope and glue you used. Cotton rope baskets can usually be hand-washed with mild soap and water. However, it’s important to avoid soaking the basket for too long, as this can weaken the glue and cause the rope to unravel. Jute rope baskets should be spot-cleaned only, as they can shrink or become damaged if they get too wet. Synthetic rope baskets are generally more water-resistant and can be washed more easily. Always check the manufacturer’s instructions for the glue you used to ensure that it’s water-resistant. To dry your basket, reshape it and allow it to air dry completely. Avoid using a dryer, as this can damage the rope and glue.
How can I customize my rope basket?
There are endless ways to customize your rope basket to make it truly unique. As mentioned before, you can use different types of rope to create different textures and looks. You can also add embellishments such as leather handles, beads, buttons, or fabric scraps. Painting or staining your basket is another great way to customize it to match your decor. Consider using stencils to create patterns or designs on your basket. You can also weave in colorful yarn or twine to add pops of color and texture. Experiment with different shapes and sizes to create baskets that are tailored to your specific needs. The only limit is your imagination!
What if I run out of rope in the middle of the project?
Running out of rope mid-project doesn’t have to derail your crafting efforts. The key is to seamlessly join the new rope to the old rope. Start by overlapping the ends of the two ropes by a few inches. Apply a generous amount of glue to both ends and press them firmly together. Wrap the joined section with twine or yarn to reinforce the bond and conceal the seam. You can also use a needle and thread to stitch the two ropes together for added security. Make sure the join is as smooth as possible to avoid any bumps or unevenness in your finished basket. With a little care and attention, you can seamlessly add more rope and continue crafting your beautiful basket.
How do I make a rope basket with a lid?
Creating a rope basket with a lid adds an extra layer of functionality and style. To make the lid, you’ll essentially create a smaller, slightly shallower basket that fits snugly on top of the main basket. Start by measuring the diameter of the top of your basket. Then, create a coil of rope that is slightly larger than that measurement. Continue coiling and gluing the rope until you reach the desired size for the lid. To create a lip that will hold the lid in place, add a few more rows of rope, slightly angled inward. You can also add a handle or knob to the lid for easy lifting. Ensure the lid fits snugly but not too tightly on the basket.
How do I make a rope basket with handles?
Adding handles to your rope basket makes it easier to carry and adds a touch of style. There are several ways to attach handles. One option is to create rope handles by braiding or twisting strands of rope together. Secure the ends of the handles to the basket with glue and stitching. Another option is to use leather or metal handles. Attach the handles to the basket using rivets or screws. You can also create fabric handles by sewing together strips of sturdy fabric. Ensure the handles are securely attached and can support the weight of the basket when it’s full. Position the handles evenly on opposite sides of the basket for balanced carrying.

Leave a Comment