

DIY Teacher’s Day Card: Show your appreciation with a heartfelt, handmade creation! Let’s be honest, finding the perfect gift for your favorite teacher can be a real challenge. Store-bought cards often feel impersonal, and sometimes, the most meaningful gifts are the ones we create ourselves. That’s where the magic of DIY comes in!
The tradition of honoring teachers dates back centuries, with roots in ancient civilizations where mentors were revered for their wisdom and guidance. While the specific celebration of “Teacher’s Day” varies across cultures, the underlying sentiment remains the same: gratitude for the educators who shape our minds and futures. What better way to express that gratitude than with a unique, personalized DIY Teacher’s Day Card?
In this article, I’m going to share some easy and fun DIY card ideas that will not only save you money but also allow you to add a personal touch that your teacher will truly cherish. We’ll explore different techniques, from simple paper crafts to more elaborate designs, ensuring there’s something for every skill level. So, grab your scissors, glue, and a dash of creativity, and let’s get crafting a memorable DIY Teacher’s Day Card that will make your teacher’s day extra special!

DIY Teacher’s Day Card: A Heartfelt Handmade Gift
Okay, let’s get crafty! Teacher’s Day is just around the corner, and what better way to show your appreciation than with a personalized, handmade card? Forget the generic store-bought ones; we’re going to create something truly special that your teacher will cherish. This guide will walk you through creating a beautiful and unique card, step-by-step. I promise, even if you think you’re not “crafty,” you can totally do this!
Materials You’ll Need
Before we dive in, let’s gather our supplies. Having everything ready will make the process so much smoother. Here’s what you’ll need:
* Cardstock: Choose your teacher’s favorite color or a color that reflects the subject they teach. A heavier weight cardstock (around 80-100 lb) will give your card a more professional feel.
* Decorative Paper: Scrapbook paper, patterned paper, or even textured paper can add a lot of visual interest.
* Scissors: A good pair of scissors is essential for clean cuts.
* Glue Stick or Double-Sided Tape: I prefer glue sticks for less mess, but double-sided tape works great too.
* Ruler: For measuring and creating straight lines.
* Pencil: For sketching and marking measurements.
* Markers, Colored Pencils, or Crayons: For adding color and details.
* Embellishments (Optional): Think buttons, ribbons, glitter, stickers, small paper flowers, or anything else that sparks your creativity!
* Letter Stickers or Stencils (Optional): For creating a neat and professional-looking message.
* Cutting Mat (Optional): Protects your work surface.
* Craft Knife (Optional): For more intricate cuts (adult supervision recommended!).
* Washi Tape (Optional): Adds a decorative touch and can be used to secure embellishments.
Designing Your Card
This is where the fun begins! Think about your teacher and what makes them special. What subject do they teach? What are their hobbies? What are their favorite colors? Use these ideas to inspire your design. Here are a few ideas to get you started:
* Themed Card: If your teacher teaches science, you could create a card with a science theme, like beakers, atoms, or planets. For a math teacher, you could use geometric shapes or mathematical symbols.
* Floral Card: A classic and always appreciated design. You can use real pressed flowers or create paper flowers.
* Thank You Card: Focus on expressing your gratitude for your teacher’s hard work and dedication.
* Personalized Card: Incorporate something specific that relates to your teacher, like their favorite book, animal, or quote.
Step-by-Step Instructions
Alright, let’s get down to business! I’m going to guide you through creating a simple yet elegant card with a layered design. Feel free to adapt these steps to your own creative vision.
1. Prepare the Card Base: Take your cardstock and fold it in half to create the card base. Use a ruler to ensure a crisp, even fold. You can either fold it vertically (portrait style) or horizontally (landscape style). I’m going with portrait style for this example.
2. Cut the Decorative Paper: Choose a piece of decorative paper that complements your cardstock. Cut it slightly smaller than the front of your card. For example, if your card front is 5 inches by 7 inches, cut the decorative paper to 4.5 inches by 6.5 inches. This will create a nice border of the cardstock around the decorative paper.
3. Adhere the Decorative Paper: Apply glue stick or double-sided tape to the back of the decorative paper. Carefully center it on the front of your card and press firmly to secure it. Make sure there are no air bubbles or wrinkles.
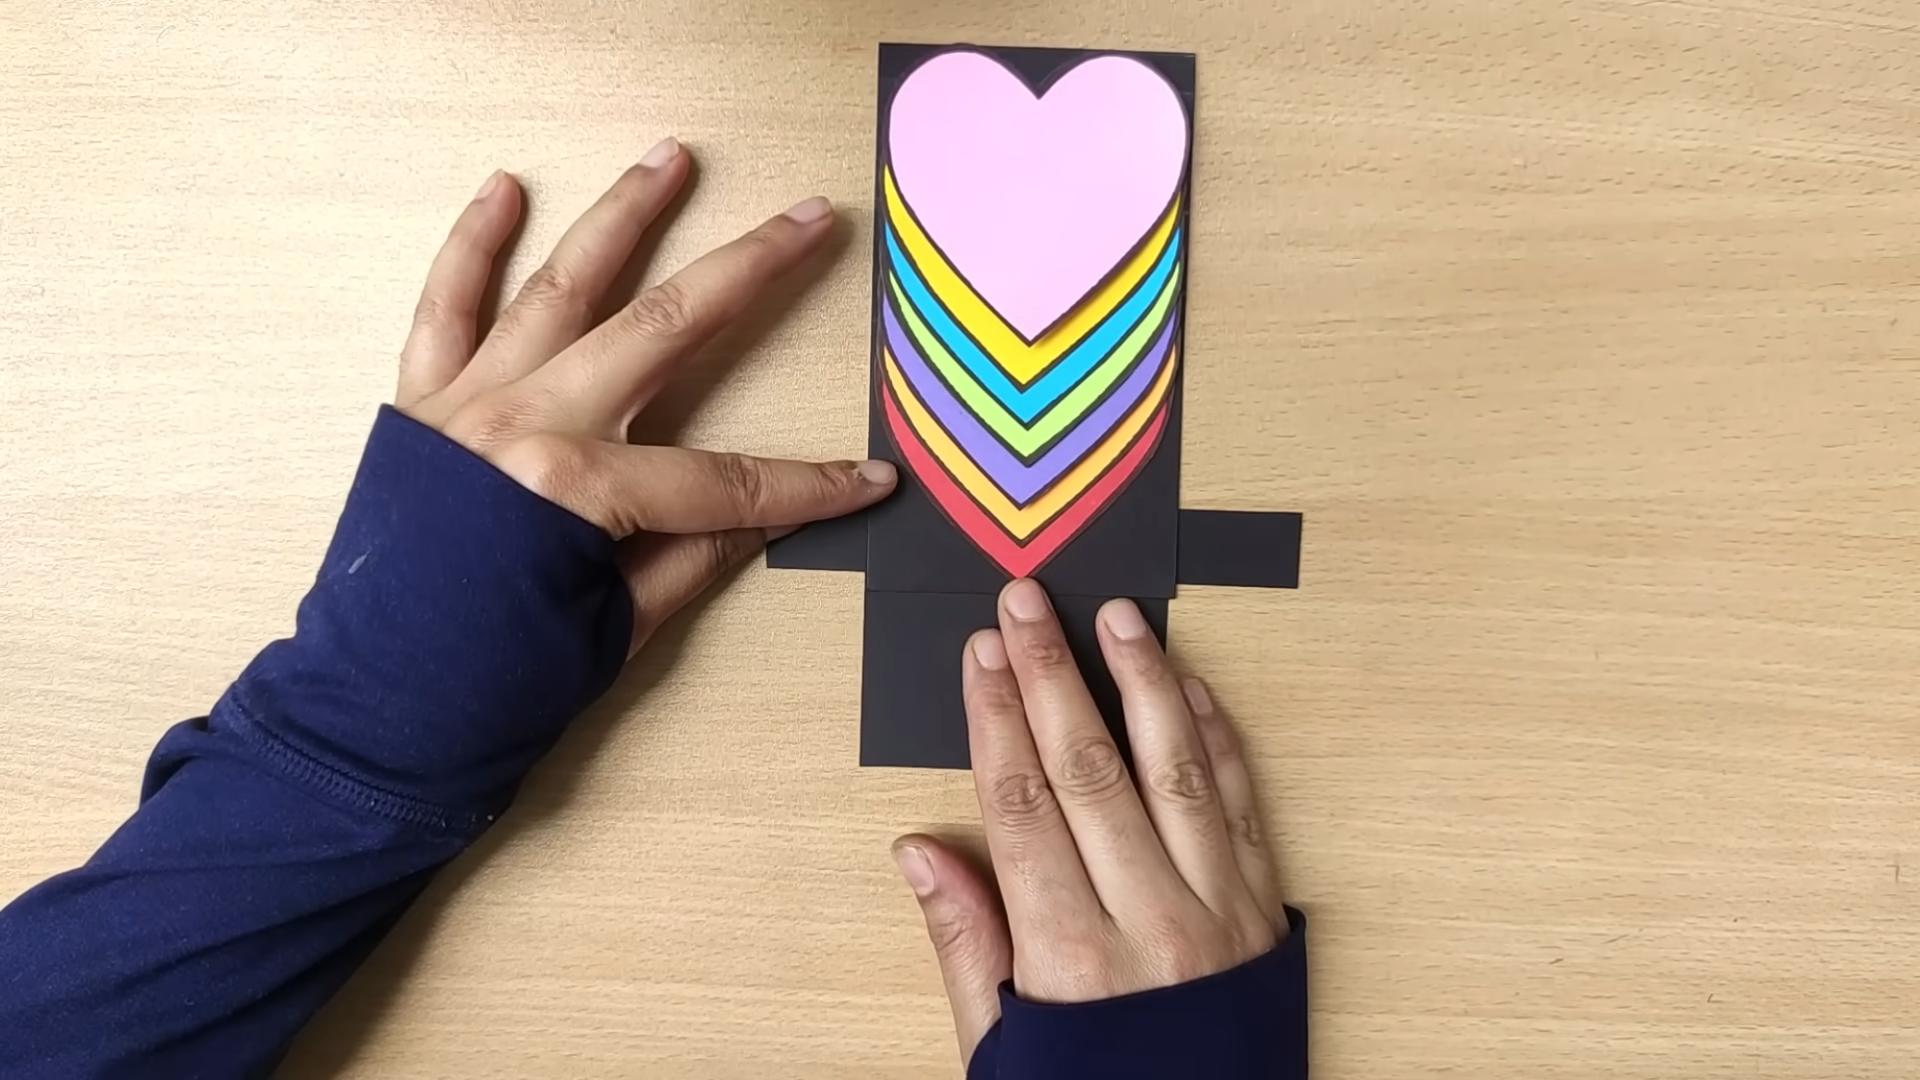
4. Create a Focal Point: Now, let’s add a focal point to your card. This could be a shape, a picture, or a message. I’m going to create a simple layered circle.
* Cut a Circle: Using a compass or a circular object as a template, cut a circle out of a different piece of decorative paper or cardstock. The size of the circle will depend on the size of your card, but I’m going for a circle that’s about 3 inches in diameter.
* Cut a Smaller Circle: Cut a smaller circle (about 2 inches in diameter) out of a contrasting color or pattern.
* Layer the Circles: Adhere the smaller circle to the center of the larger circle. This creates a layered effect that adds depth and visual interest.
5. Add a Message: Now it’s time to add your heartfelt message. You can write it directly onto the card, or you can create a separate tag or banner.
* Write Directly on the Card: Use a marker or colored pencil to write your message directly onto the card. You can write “Happy Teacher’s Day,” “Thank You,” or a more personalized message.
* Create a Tag or Banner: Cut a small rectangle or banner shape out of cardstock. Write your message on the tag or banner using letter stickers, stencils, or freehand lettering. Adhere the tag or banner to the card using glue or double-sided tape. I think a small banner would look really cute!
6. Embellish Your Card: This is where you can really let your creativity shine! Add embellishments to your card to make it even more special.
* Buttons: Glue buttons around the edges of the circle or along the bottom of the card.
* Ribbon: Tie a ribbon around the card or create a small bow and glue it to the corner.
* Glitter: Add a touch of sparkle with glitter. Be careful not to use too much, or it can get messy!
* Stickers: Use stickers to add fun and colorful accents to your card.
* Paper Flowers: Create small paper flowers and glue them to the card. You can find tutorials for making paper flowers online.
* Washi Tape: Use washi tape to create borders, patterns, or to secure embellishments.
7. Final Touches: Once you’ve added all your embellishments, take a step back and admire your creation. Make sure everything is securely attached and that there are no loose ends. If necessary, add a few more touches to balance the design.
Alternative Card Ideas and Techniques
Want to try something a little different? Here are a few more ideas to inspire you:
* Pop-Up Card: Create a card with a pop-up element that surprises and delights your teacher. There are tons of tutorials online for creating simple pop-up mechanisms.
* Accordion Card: Fold a long piece of cardstock into an accordion shape and decorate each panel with different messages and images.
* Shaker Card: Create a card with a clear window filled with glitter, sequins, or other small objects that shake around when the card is moved.
* Watercolor Card: Use watercolors to create a beautiful and artistic card. You can paint flowers, landscapes, or abstract designs.
* Quilled Card: Use quilling techniques to create intricate designs with strips of paper.
Writing Your Message
The message inside your card is just as important as the design. Take some time to think about what you want to say to your teacher. Here are a few ideas to get you started:
* Express Your Gratitude: Thank your teacher for their hard work, dedication, and patience.
* Share a Specific Example: Mention a specific lesson or activity that you enjoyed and learned from.
* Highlight Their Strengths: Compliment your teacher on their teaching style, their knowledge, or their ability to connect with students.
* Wish Them Well: Wish your teacher a happy Teacher’s Day and express your hopes for their future.
* Keep it Personal: Add a personal touch by mentioning something specific that you appreciate about your teacher.
Here are a few examples of messages you could write:
* “Dear [Teacher’s Name], Thank you so much for being such an amazing teacher. I’ve learned so much in your class, and I really appreciate your patience and dedication. Happy Teacher’s Day!”
* “Dear [Teacher’s Name], I wanted to thank you for making learning so much fun. I especially enjoyed the [Specific Lesson/Activity] we did in class. You’re the best! Happy Teacher’s Day!”
* “Dear [Teacher’s Name], You’re such an inspiring teacher. Your passion for [Subject] is contagious, and I’m so grateful to have you as my teacher. Happy Teacher’s Day!”
Tips for Success
* Plan Ahead: Don’t wait until the
Conclusion
Creating a heartfelt, personalized gift doesn’t have to break the bank or require advanced crafting skills. This DIY Teacher’s Day card project is a testament to that. It’s more than just a piece of paper; it’s a tangible expression of gratitude, a unique keepsake that your teacher will cherish for years to come. In a world saturated with mass-produced items, a handmade card stands out, conveying a level of care and thoughtfulness that simply cannot be replicated by store-bought alternatives.
Why is this DIY Teacher’s Day card a must-try? Because it allows you to infuse your personality and appreciation directly into the gift. You’re not just buying something; you’re creating something, pouring your time and effort into a gesture that speaks volumes. The act of crafting itself can be therapeutic and enjoyable, providing a welcome break from the digital world and fostering creativity. And the best part? It’s incredibly budget-friendly, utilizing materials you likely already have around the house.
But the beauty of this project lies in its adaptability. Feel free to experiment with different cardstock colors, patterns, and embellishments. Instead of traditional paper cutouts, consider using pressed flowers, fabric scraps, or even small, meaningful objects that relate to your teacher’s interests or subject matter. For example, if your teacher loves gardening, incorporate dried leaves or seeds into the design. If they’re a history buff, consider using vintage-looking paper or adding a historical quote.
You can also personalize the message inside the card to reflect specific moments or lessons that resonated with you. Instead of a generic “Thank you,” write about a particular time your teacher went above and beyond, or how their teaching inspired you. This level of personalization will make your card even more meaningful and memorable.
Furthermore, consider involving your children or siblings in the crafting process. This can be a fun and educational activity for the whole family, fostering creativity and teamwork while teaching children the importance of expressing gratitude. Imagine the joy on your teacher’s face when they receive a card crafted with love by multiple hands!
Don’t be afraid to get creative and think outside the box. The possibilities are endless! The most important thing is to let your personality shine through and create a card that truly reflects your appreciation for your teacher.
We wholeheartedly encourage you to try this DIY Teacher’s Day card project. It’s a simple yet powerful way to show your gratitude and create a lasting memory. Once you’ve created your masterpiece, we’d love to see it! Share your creations with us on social media using #DIYTeachersDayCard and inspire others to spread the love. Let’s flood the internet with heartfelt, handmade cards and make this Teacher’s Day the most special one yet! We are confident that this DIY Teacher’s Day card will be a hit.
Frequently Asked Questions (FAQ)
What kind of paper should I use for the card?
The best type of paper to use for your DIY Teacher’s Day card depends on the look and feel you’re going for. Cardstock is a popular choice because it’s sturdy and provides a good base for embellishments. However, you can also use construction paper, watercolor paper, or even recycled paper for a more eco-friendly option. If you’re planning on using wet media like paint or markers, watercolor paper or a thicker cardstock is recommended to prevent bleeding. Experiment with different textures and weights to find what works best for your design.
What if I’m not very artistic?
Don’t worry if you don’t consider yourself an artist! This DIY project is all about expressing your appreciation, not creating a perfect masterpiece. There are plenty of ways to create a beautiful card even if you’re not confident in your artistic abilities. Consider using stencils, stamps, or pre-made templates to create your design. You can also focus on simple, clean lines and a heartfelt message. Remember, the thought and effort you put into the card are what truly matter.
What are some alternative embellishments I can use?
The possibilities for embellishments are endless! Think beyond traditional glitter and stickers. Consider using:
* Pressed flowers or leaves
* Fabric scraps or ribbons
* Buttons or beads
* Washi tape
* Photographs
* Small, meaningful objects related to your teacher’s interests
Get creative and use what you have on hand! You can even repurpose old materials to create unique and eco-friendly embellishments.
How can I make the card more personalized?
Personalization is key to making your DIY Teacher’s Day card truly special. Here are some ideas:
* Write a specific message about a time your teacher made a difference in your life.
* Include a quote that reminds you of your teacher.
* Use colors or patterns that you know your teacher loves.
* Incorporate elements related to your teacher’s subject matter or hobbies.
* Add a personal touch, such as a drawing or a handwritten poem.
The more personal you make the card, the more meaningful it will be to your teacher.
Can I involve my children in making the card?
Absolutely! Involving your children in the crafting process is a wonderful way to teach them about gratitude and creativity. Let them help with simple tasks like cutting, gluing, and coloring. You can also encourage them to write their own messages or draw pictures for their teacher. This will make the card even more special and create a lasting memory for both your child and their teacher.
How can I make the card more durable?
If you want to ensure your card lasts for years to come, consider laminating it or using a thicker cardstock. You can also protect the embellishments by applying a clear sealant or varnish. Another option is to frame the card, turning it into a beautiful piece of art that your teacher can display in their classroom or home.
Where can I find inspiration for my card design?
If you’re feeling stuck for ideas, there are plenty of resources available online. Browse Pinterest, Instagram, and other social media platforms for inspiration. You can also check out crafting blogs and websites for tutorials and design ideas. Don’t be afraid to adapt existing designs to suit your own style and preferences.
What if I don’t have all the materials listed?
Don’t let a lack of specific materials stop you from creating your DIY Teacher’s Day card. Get creative and substitute with what you have on hand. For example, if you don’t have cardstock, you can use construction paper or even recycled cardboard. If you don’t have glitter, you can use paint or markers to add sparkle. The most important thing is to use your imagination and have fun!
How do I ensure my message is heartfelt and sincere?
The key to writing a heartfelt message is to be genuine and specific. Think about what you truly appreciate about your teacher and express it in your own words. Avoid generic phrases and focus on specific examples of how your teacher has made a positive impact on your life. Let your personality shine through and write from the heart.
What is the best way to present the card to my teacher?
The presentation of your DIY Teacher’s Day card is just as important as the card itself. Consider wrapping it in tissue paper or placing it in a decorative envelope. You can also attach a small gift, such as a flower or a piece of candy. The most important thing is to present the card with a smile and express your gratitude sincerely. A simple “Thank you” can go a long way.
Leave a Comment