

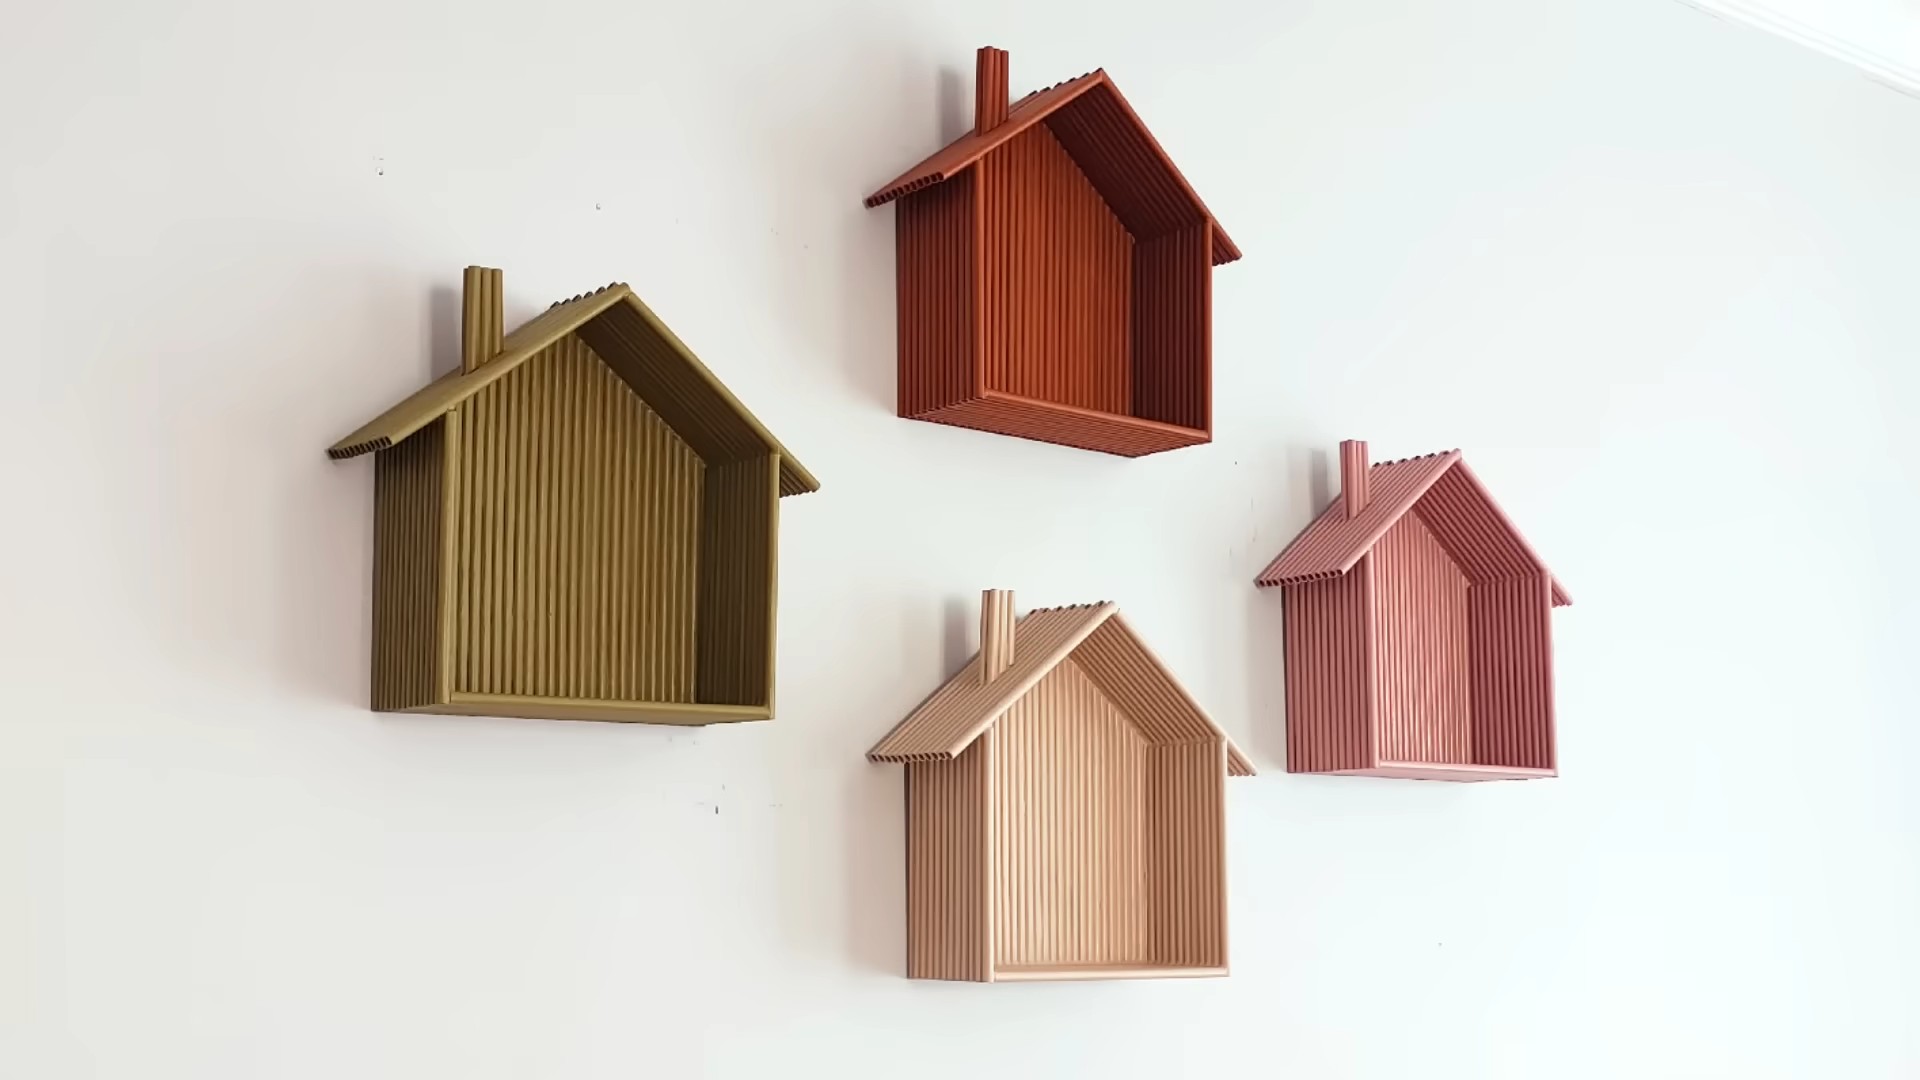
DIY Upcycled Wall Shelf: Transform Trash into Treasure!
Have you ever looked at a pile of discarded materials and thought, “There has to be a better use for this?” I know I have! That’s why I’m so excited to share this fantastic DIY project with you: creating a stunning DIY upcycled wall shelf. Forget those expensive store-bought shelves; we’re about to embark on a journey of resourcefulness and creativity, turning something old into something beautiful and functional.
Upcycling, the art of transforming waste materials into new products of higher value, has roots that stretch back centuries. Think of the “make do and mend” ethos of wartime eras, or the resourceful repurposing practiced by generations past. Today, upcycling is more relevant than ever, offering a sustainable way to reduce waste and express our individuality.
Why do you need this DIY upcycled wall shelf in your life? Simple! It’s a budget-friendly way to add storage and style to any room. Plus, it’s a fantastic conversation starter! Imagine the satisfaction of telling your guests that your chic wall shelf was once something destined for the landfill. It’s a win-win for your home and the planet. So, grab your tools, gather your materials, and let’s get crafting!
DIY Upcycled Wall Shelf: From Trash to Treasure!
Hey there, fellow DIY enthusiasts! Today, I’m super excited to share a project that’s not only budget-friendly but also incredibly satisfying: creating a stylish wall shelf from upcycled materials. We’re talking about giving something old a brand new life and adding a unique touch to your home decor. Get ready to transform something ordinary into a functional and beautiful piece!
Materials You’ll Need
Before we dive in, let’s gather our supplies. The beauty of this project is that you can adapt it to whatever you have on hand, but here’s a general list to get you started:
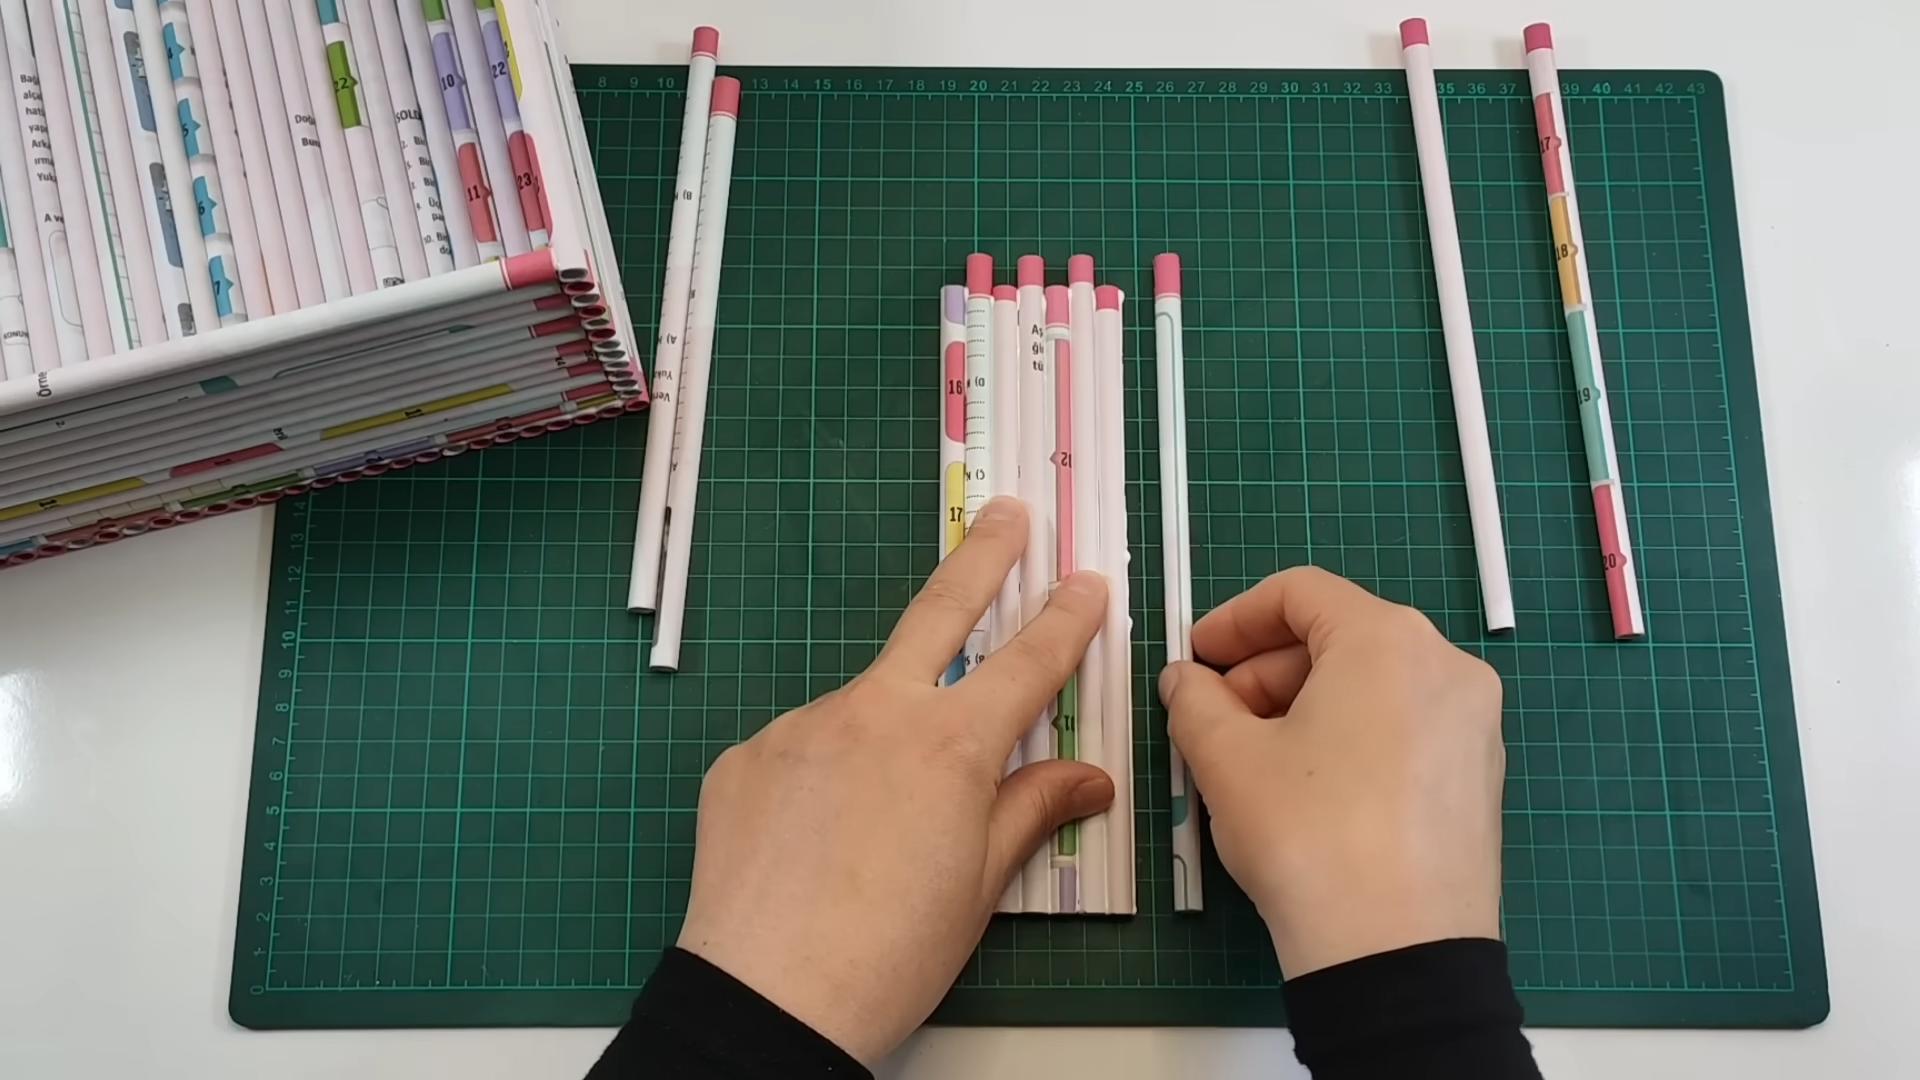
* Old Wooden Pallet or Scrap Wood: This will form the base of our shelf. Look for pallets that are heat-treated (HT) rather than chemically treated (MB) for safety. You can also use reclaimed lumber from old furniture or construction projects.
* Sandpaper (Various Grits): We’ll need coarse, medium, and fine grit sandpaper to smooth out the wood and prepare it for finishing. I usually start with 80-grit, move to 120-grit, and finish with 220-grit.
* Wood Stain or Paint: Choose a color that complements your existing decor. I love using water-based stains for their low odor and easy cleanup.
* Paintbrushes or Rags: For applying the stain or paint. Old t-shirts work great for applying stain!
* Wood Screws: To assemble the shelf components securely. I recommend screws that are long enough to penetrate both pieces of wood but not so long that they poke through.
* Drill with Drill Bits: For pre-drilling holes and driving in the screws. A countersinking drill bit is also handy for creating a flush screw head.
* Measuring Tape or Ruler: Accuracy is key for a professional-looking finish.
* Pencil: For marking measurements and cut lines.
* Saw (Hand Saw or Power Saw): To cut the wood to the desired size and shape. A circular saw or miter saw will make quick work of this, but a hand saw will do the trick too.
* Safety Glasses and Dust Mask: Safety first! Protect your eyes and lungs from dust and debris.
* Wood Glue (Optional): For extra strength and stability.
* Clamps (Optional): To hold the pieces together while the glue dries.
* Level: To ensure your shelf is perfectly straight when you hang it.
* Wall Anchors and Screws: To securely mount the shelf to the wall. Choose anchors that are appropriate for your wall type (drywall, plaster, brick, etc.).
* Varnish or Polyurethane (Optional): For added protection and durability.
Planning and Preparation
Before we start cutting and assembling, let’s plan out our shelf design. This will help us visualize the finished product and ensure we have enough materials.
1. Decide on the Size and Shape: How long and wide do you want your shelf to be? Do you want a simple rectangular shelf, or something more elaborate with decorative edges? Consider the space where you’ll be hanging the shelf and the items you plan to display on it. I usually sketch out a quick design on paper to help me visualize the final product.
2. Disassemble the Pallet (If Using): Carefully disassemble the pallet using a pry bar or hammer. Be careful not to damage the wood. Remove any nails or staples that are sticking out. Pallet wood can be rough, so take your time and be cautious.
3. Inspect the Wood: Check the wood for any signs of rot, insect damage, or excessive warping. Discard any pieces that are not suitable for use.
4. Cut the Wood to Size: Using your measurements and a saw, cut the wood into the desired pieces for the shelf base and any supporting brackets or sides. Remember to cut accurately for a clean and professional look. I always double-check my measurements before making any cuts.
Assembling the Shelf
Now comes the fun part – putting all the pieces together!
1. Sand the Wood: Using coarse-grit sandpaper, sand all the surfaces of the wood to remove any rough edges, splinters, or old finishes. Then, switch to medium-grit sandpaper to smooth out the surface further. Finally, use fine-grit sandpaper for a super-smooth finish. Remember to sand with the grain of the wood for the best results. Don’t forget to wear your dust mask!
2. Assemble the Shelf Base: If you’re using multiple pieces of wood for the shelf base, join them together using wood glue and screws. Apply a thin layer of glue to the edges of the wood and clamp the pieces together until the glue dries. Then, pre-drill holes and drive in the screws to secure the pieces.
3. Attach the Brackets or Sides: If you’re adding brackets or sides to your shelf, attach them to the base using wood glue and screws. Position the brackets or sides carefully and ensure they are aligned properly before securing them. Clamps can be helpful here to hold everything in place while the glue dries.
4. Countersink the Screws: Use a countersinking drill bit to create a small recess for the screw heads. This will allow the screw heads to sit flush with the surface of the wood, creating a cleaner look.
5. Fill Any Holes or Imperfections: If there are any holes or imperfections in the wood, fill them with wood filler. Let the filler dry completely and then sand it smooth.
Finishing Touches
Now that the shelf is assembled, it’s time to add the finishing touches that will make it truly shine.
1. Apply Stain or Paint: Choose your desired stain or paint color and apply it to the shelf using a paintbrush or rag. If you’re using stain, apply it in thin, even coats and wipe off any excess with a clean rag. If you’re using paint, apply multiple thin coats for a smooth, even finish. Let each coat dry completely before applying the next. I usually do two coats of stain or paint for optimal coverage.
2. Let it Dry Completely: Allow the stain or paint to dry completely according to the manufacturer’s instructions. This is crucial for a durable and long-lasting finish.
3. Apply a Protective Finish (Optional): For added protection and durability, apply a coat of varnish or polyurethane to the shelf. This will help protect the wood from scratches, moisture, and UV damage. Apply the finish in thin, even coats and let it dry completely.
4. Lightly Sand Between Coats (Optional): If you’re applying multiple coats of varnish or polyurethane, lightly sand the surface with fine-grit sandpaper between coats to remove any imperfections and create a smoother finish.
5. Clean Up: Once the finish is completely dry, clean up any drips or spills.
Mounting the Shelf
The final step is to mount your beautiful upcycled shelf to the wall!
1. Locate Wall Studs: Use a stud finder to locate the wall studs in the area where you want to hang the shelf. Mounting the shelf to the studs will provide the most secure support.
2. Mark the Mounting Holes: Hold the shelf against the wall and mark the location of the mounting holes. Use a level to ensure the shelf is perfectly straight.
3. Pre-Drill Holes: Pre-drill holes in the wall at the marked locations. If you’re mounting the shelf to drywall and can’t hit a stud, use wall anchors to provide extra support.
4. Attach the Shelf to the Wall: Align the shelf with the pre-drilled holes and drive in the screws to secure it to the wall. Make sure the screws are long enough to penetrate the wall studs or wall anchors.
5. Double-Check the Level: Once the shelf is mounted, double-check that it is level. If necessary, adjust the screws until the shelf is perfectly straight.
Enjoy Your Upcycled Creation!
And there you have it! A beautiful and functional wall shelf made from upcycled materials. Now you can proudly display your favorite books, plants, or decorative items on your one-of-a-kind creation. I hope you enjoyed this DIY project as much as I did. Happy crafting!
Conclusion
So, there you have it! Transforming discarded materials into a stylish and functional DIY upcycled wall shelf is not only incredibly rewarding but also a fantastic way to contribute to a more sustainable lifestyle. We’ve walked you through the process, highlighting the simplicity and adaptability of this project. Forget those generic, mass-produced shelves from big box stores. With a little creativity and elbow grease, you can craft a unique piece that reflects your personality and adds character to your home.
The beauty of this DIY project lies in its versatility. Feel free to experiment with different materials. Old wooden pallets, reclaimed barn wood, even sturdy cardboard boxes can be repurposed into stunning shelves. Consider painting your shelf a vibrant color to make a bold statement, or opt for a natural wood finish for a rustic, farmhouse aesthetic. You could even incorporate stencils or decoupage techniques to add intricate designs.
For a more modern look, try using metal pipes as shelf supports. This industrial-chic style is both trendy and functional. If you’re short on space, consider creating a floating shelf using hidden brackets. This minimalist design is perfect for small apartments or dorm rooms.
Don’t be afraid to personalize your DIY upcycled wall shelf to suit your specific needs and preferences. Need a spice rack in your kitchen? A bookshelf in your living room? A display shelf for your collectibles? This project can be easily adapted to accommodate any purpose.
Beyond the aesthetic appeal, this DIY project offers a sense of accomplishment. There’s something truly satisfying about transforming something old and unwanted into something beautiful and useful. Plus, you’ll be reducing waste and contributing to a more eco-friendly environment.
We strongly encourage you to give this DIY project a try. It’s a fun, affordable, and sustainable way to add style and functionality to your home. And most importantly, it’s a chance to unleash your creativity and express your unique personality.
Once you’ve completed your DIY upcycled wall shelf, we’d love to see your creations! Share your photos and experiences with us on social media using #DIYUpcycledShelf. We can’t wait to see what you come up with! Let’s inspire each other to embrace creativity and sustainability, one upcycled project at a time. Remember, the only limit is your imagination! So, gather your materials, put on your thinking cap, and get ready to transform trash into treasure. Happy crafting!
Frequently Asked Questions (FAQ)
What types of materials are best suited for creating a DIY upcycled wall shelf?
The beauty of this project is its adaptability! You can use a wide range of materials. Wood is a classic choice, offering durability and a rustic aesthetic. Consider reclaimed barn wood, old pallets (ensure they are heat-treated and safe), or even discarded furniture pieces. Sturdy cardboard boxes can also be used, especially for lightweight items, but reinforce them well. Metal pipes can be incorporated for an industrial look, serving as supports or even the shelf itself. Glass shelves can be created from repurposed windows or mirrors (handle with extreme care). Ultimately, the best material depends on the desired style, weight capacity, and your personal preference.
How do I ensure the shelf is sturdy and can hold the weight I need it to?
Safety is paramount! First, choose a material that’s strong enough for the intended load. Solid wood is generally the most reliable. For cardboard, reinforce it with multiple layers and strong adhesive. When attaching the shelf to the wall, use appropriate hardware. Wall anchors are essential for drywall, especially for heavier items. Ensure the screws are long enough to penetrate the wall stud for maximum support. Consider the weight distribution on the shelf. Avoid concentrating heavy items in one area. If you’re using brackets, choose heavy-duty ones and space them appropriately. Test the shelf’s stability before placing valuable items on it. Gently apply pressure to different areas to check for any wobbling or weakness. If you’re unsure, err on the side of caution and reinforce the shelf further.
What tools will I need for this DIY project?
The tools required will vary depending on the materials you choose. However, some essential tools include:
* A saw (hand saw, circular saw, or jigsaw) for cutting wood or other materials.
* A drill with various drill bits for creating pilot holes and attaching hardware.
* A screwdriver (or drill with screwdriver bits) for securing screws.
* A measuring tape for accurate measurements.
* A level to ensure the shelf is installed straight.
* Sandpaper for smoothing rough edges.
* A hammer for driving nails (if needed).
* Safety glasses to protect your eyes.
* Gloves to protect your hands.
* A pencil for marking measurements.
* A stud finder to locate wall studs for secure mounting.
Depending on your design, you might also need a paint brush, paint, stain, varnish, adhesive, or other specialized tools.
How can I customize the shelf to match my home decor?
Customization is where the fun begins! Paint is the easiest way to transform the look of your shelf. Choose a color that complements your existing decor or creates a bold contrast. Staining wood can enhance its natural beauty and add warmth to your space. Consider using stencils to add patterns or designs. Decoupage is another great option for adding intricate details using paper cutouts. You can also incorporate decorative hardware, such as unique knobs or pulls. The shape and size of the shelf can also be customized to fit your specific needs and space. Experiment with different materials and finishes to create a truly unique piece that reflects your personal style.
How do I properly mount the shelf to the wall?
Proper mounting is crucial for safety and stability. First, locate the wall studs using a stud finder. These are the strongest points for attaching the shelf. Mark the stud locations with a pencil. If you can’t attach directly to studs, use wall anchors. There are various types of wall anchors available, each with different weight capacities. Choose the appropriate anchors for the weight you plan to put on the shelf. Drill pilot holes into the wall at the marked locations. Attach the shelf brackets to the wall using screws. Ensure the brackets are level before tightening the screws. Place the shelf on the brackets and secure it with screws from underneath. Double-check that the shelf is level and stable before placing any items on it.
What if I don’t have any upcycled materials readily available?
Don’t worry! Upcycled materials are often easier to find than you think. Check with friends, family, and neighbors for any unwanted items they might be discarding. Visit local thrift stores, flea markets, and garage sales for hidden treasures. Construction sites often have scrap wood or other materials they’re willing to give away. Online marketplaces like Craigslist and Facebook Marketplace are also great resources for finding free or low-cost materials. Remember to always ask permission before taking anything from a construction site or private property. Even seemingly small items like old picture frames or decorative boxes can be repurposed into shelf components.
How can I make the shelf waterproof or water-resistant?
If you plan to use the shelf in a bathroom or other humid environment, it’s important to protect it from moisture. For wood shelves, apply a waterproof sealant or varnish. Several coats may be necessary for optimal protection. Consider using a marine-grade varnish for maximum water resistance. For cardboard shelves, avoid using them in humid environments altogether. If you must use them, seal them thoroughly with a waterproof paint or coating. You can also line the shelf with a waterproof material, such as plastic sheeting or vinyl. Regularly inspect the shelf for any signs of water damage and reapply sealant as needed.
Is this project suitable for beginners?
Absolutely! This DIY project can be adapted to suit all skill levels. If you’re a beginner, start with a simple design using easy-to-work-with materials like wood. Focus on mastering basic skills like measuring, cutting, and drilling. There are plenty of online tutorials and videos that can guide you through the process. Don’t be afraid to ask for help from friends or family members who have experience with DIY projects. As you gain confidence, you can gradually tackle more complex designs and materials. The most important thing is to have fun and be creative!


Leave a Comment