

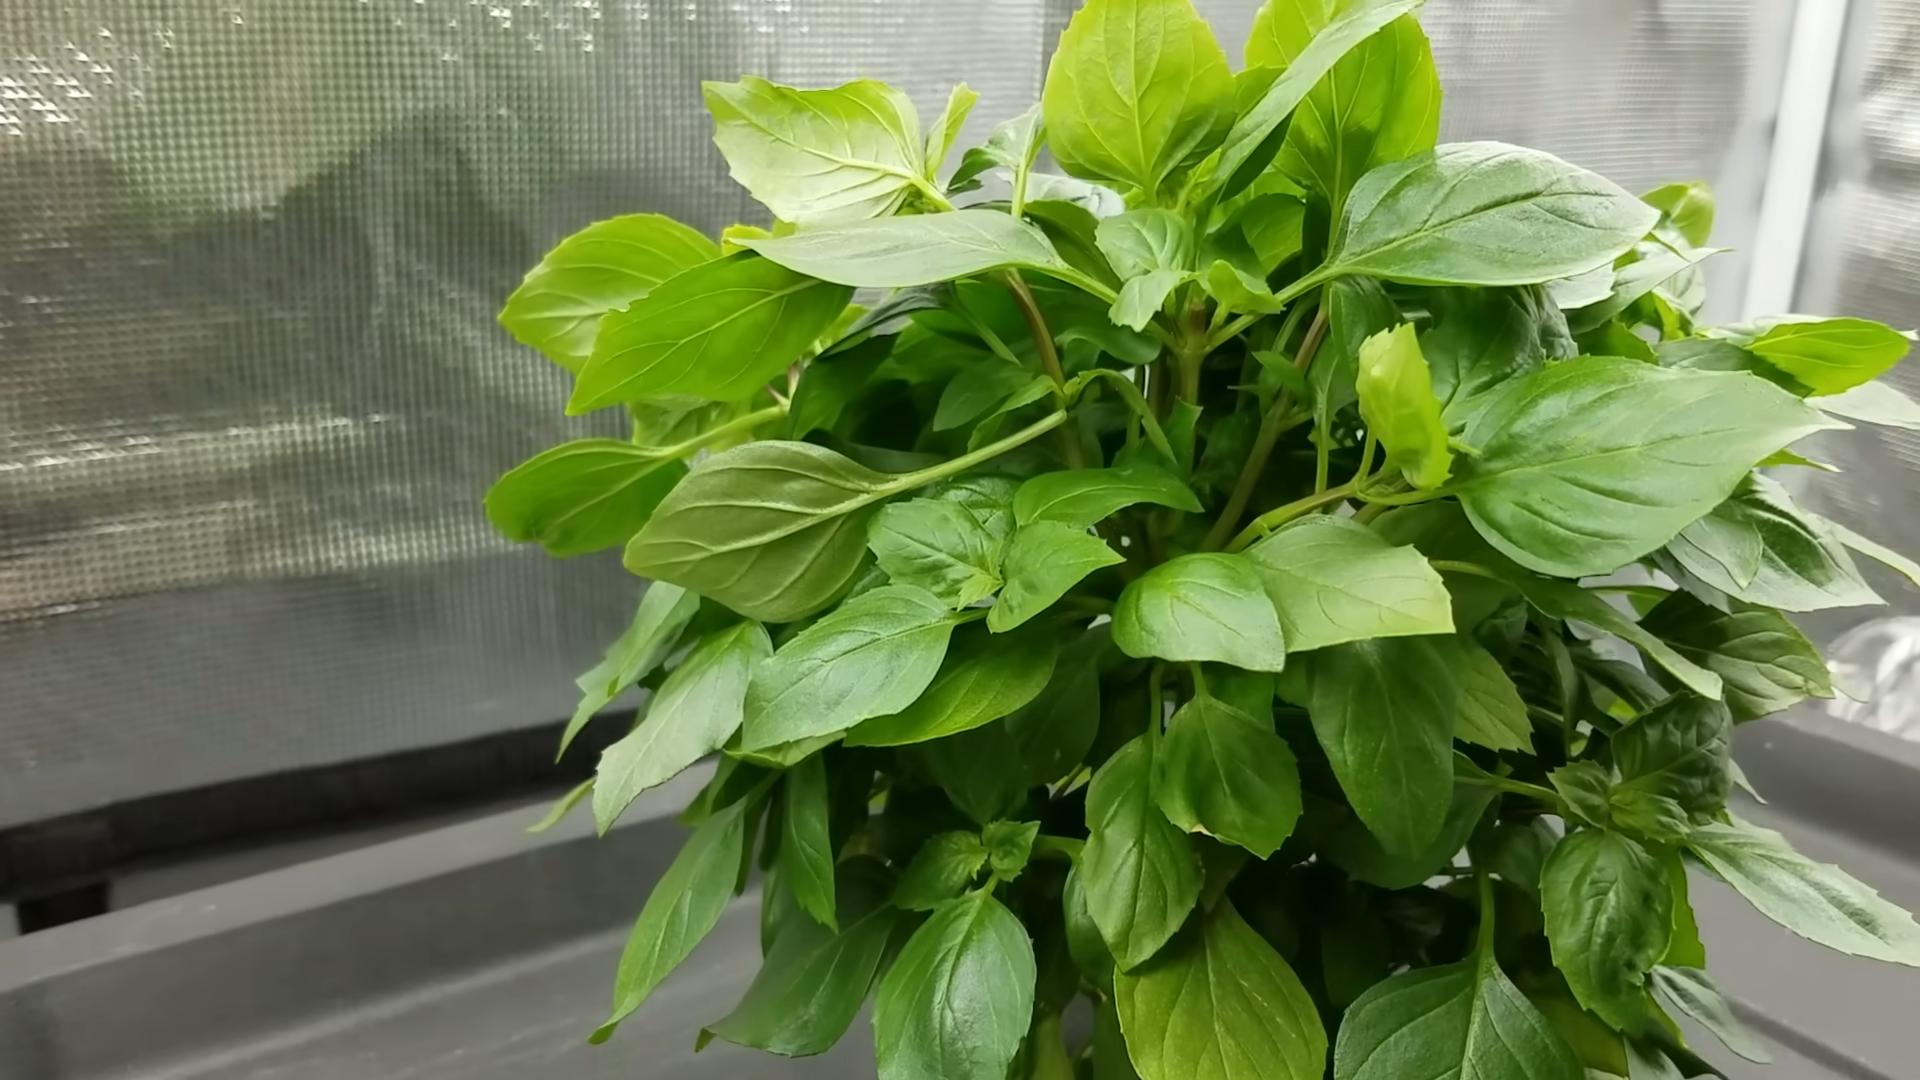
Grow Basil at Home and unlock a world of fresh, aromatic flavors right at your fingertips! Imagine stepping into your kitchen and snipping vibrant green basil leaves, bursting with sunshine and ready to elevate your next culinary creation. Forget those wilted, overpriced bunches from the grocery store. This isn’t just about having fresh herbs; it’s about connecting with nature, nurturing life, and experiencing the pure joy of homegrown goodness.
Basil, with its rich history stretching back to ancient civilizations, has been revered for centuries, not only for its culinary uses but also for its medicinal properties and symbolic significance. From the royal gardens of ancient Greece to the sun-drenched hills of Italy, basil has been a staple, adding its distinctive flavor to countless dishes. But you don’t need a sprawling estate to enjoy this incredible herb.
In today’s busy world, finding moments of peace and connection can be challenging. That’s where the magic of home gardening comes in. Learning how to grow basil at home is more than just a fun project; it’s a way to de-stress, reconnect with nature, and add a touch of freshness to your daily life. Plus, let’s be honest, who doesn’t want to impress their friends and family with their culinary skills, enhanced by the freshest basil imaginable? I’m here to share some simple, effective DIY tricks and hacks that will have you harvesting your own bountiful basil crop in no time, even if you have limited space or gardening experience. Let’s get started!

Grow Your Own Delicious Basil: A Beginner’s Guide
Hey there, fellow plant enthusiasts! I’m so excited to share my tried-and-true method for growing lush, fragrant basil right in your own home. Forget those sad, wilted bunches from the grocery store – fresh, homegrown basil is a game-changer for everything from pesto to pizza. And trust me, it’s easier than you think!
What You’ll Need
Before we dive in, let’s gather our supplies. Here’s a checklist to make sure you’re all set:
* **Basil Seeds:** Choose your favorite variety! Genovese is a classic for pesto, but lemon basil, Thai basil, and purple basil are also fantastic options.
* **Seed Starting Tray or Small Pots:** These will be your basil’s temporary homes.
* **Seed Starting Mix:** This is a light, airy soil specifically formulated for seedlings. Don’t use regular potting soil for starting seeds, as it can be too heavy.
* **Spray Bottle:** For gently watering your seedlings.
* **Grow Lights (Optional but Recommended):** Especially if you don’t have a sunny windowsill.
* **Potting Soil:** Once your seedlings are ready to transplant, you’ll need a good quality potting soil.
* **Larger Pots (4-6 inches in diameter):** These will be your basil plants’ permanent homes.
* **Watering Can or Hose:** For watering your mature plants.
* **Scissors or Pruning Shears:** For harvesting and pruning your basil.
* **Fertilizer (Optional):** A balanced liquid fertilizer can help your basil thrive.
Starting Your Basil Seeds
This is where the magic begins! We’re going to coax those tiny seeds into becoming vibrant basil plants.
1. **Prepare Your Seed Starting Tray or Pots:** Fill your seed starting tray or small pots with seed starting mix. Gently tap the tray or pots to settle the soil.
2. **Sow the Seeds:** Sprinkle a few basil seeds on top of the soil in each cell or pot. Basil seeds are tiny, so don’t overcrowd them. I usually aim for 2-3 seeds per cell.
3. **Cover the Seeds:** Lightly cover the seeds with a thin layer of seed starting mix. Basil seeds need light to germinate, so don’t bury them too deep.
4. **Water Gently:** Use your spray bottle to thoroughly moisten the soil. Be careful not to wash the seeds away. The soil should be damp but not soggy.
5. **Provide Warmth and Light:** Basil seeds germinate best in warm conditions (around 70-80°F). Place your seed starting tray or pots in a warm location, such as on top of your refrigerator or near a heat vent. If you don’t have a sunny windowsill, use grow lights. Position the grow lights a few inches above the soil surface and keep them on for 14-16 hours per day.
6. **Maintain Moisture:** Keep the soil consistently moist but not waterlogged. Check the soil daily and mist with your spray bottle as needed.
7. **Wait for Germination:** Basil seeds typically germinate within 5-10 days. Be patient! Once you see tiny green sprouts emerging, you’re on your way.
Caring for Your Basil Seedlings
Once your basil seeds have germinated, it’s time to nurture those little seedlings.
1. **Provide Adequate Light:** Seedlings need plenty of light to grow strong and healthy. If you’re using a windowsill, make sure it receives at least 6 hours of direct sunlight per day. If you’re using grow lights, keep them on for 14-16 hours per day.
2. **Water Regularly:** Water your seedlings when the top inch of soil feels dry to the touch. Use your spray bottle to gently water the soil, being careful not to overwater.
3. **Thin the Seedlings (If Necessary):** If you planted multiple seeds in each cell or pot, you’ll need to thin them out to give the strongest seedling room to grow. Use small scissors to snip off the weaker seedlings at the soil line.
4. **Fertilize (Optional):** Once your seedlings have developed their first set of true leaves (the leaves that look like basil leaves, not the initial seed leaves), you can start fertilizing them with a diluted liquid fertilizer. Follow the instructions on the fertilizer label.
Transplanting Your Basil Seedlings
When your basil seedlings are about 2-3 inches tall and have several sets of true leaves, they’re ready to be transplanted into larger pots.
1. **Prepare Your Pots:** Fill your larger pots (4-6 inches in diameter) with potting soil.
2. **Gently Remove the Seedlings:** Carefully remove the seedlings from their seed starting tray or pots. Be gentle to avoid damaging the roots. If the seedlings are in individual cells, you can gently squeeze the bottom of the cell to loosen the soil and then lift the seedling out. If the seedlings are in a pot, you may need to use a small trowel to carefully loosen the soil around the seedlings.
3. **Plant the Seedlings:** Make a small hole in the center of each pot and gently place the seedling in the hole. Make sure the top of the root ball is level with the soil surface.
4. **Fill in with Soil:** Fill in the hole with potting soil and gently pat the soil around the seedling.
5. **Water Thoroughly:** Water the newly transplanted seedlings thoroughly.
6. **Provide Sunlight:** Place the pots in a sunny location that receives at least 6 hours of direct sunlight per day.
Caring for Your Mature Basil Plants
Now that your basil plants are in their permanent homes, it’s time to provide them with the care they need to thrive.
1. **Water Regularly:** Basil plants need consistent moisture, but they don’t like to be waterlogged. Water your basil plants when the top inch of soil feels dry to the touch. Water deeply, until water drains out of the bottom of the pot.
2. **Fertilize Regularly (Optional):** Basil plants are heavy feeders, so fertilizing them regularly can help them grow strong and produce lots of leaves. Use a balanced liquid fertilizer every 2-3 weeks, following the instructions on the fertilizer label.
3. **Provide Sunlight:** Basil plants need at least 6 hours of direct sunlight per day. If you don’t have a sunny location indoors, you can use grow lights.
4. **Pinch Off Flower Buds:** Basil plants will eventually produce flower buds. Pinching off these flower buds will encourage the plant to produce more leaves. When you see a flower bud forming, simply pinch it off with your fingers.
5. **Prune Regularly:** Pruning your basil plants will encourage them to grow bushier and produce more leaves. When pruning, cut the stem just above a set of leaves. This will encourage the plant to branch out and produce more leaves.
6. **Watch Out for Pests:** Basil plants can be susceptible to pests such as aphids and spider mites. Check your plants regularly for signs of pests. If you find pests, you can try spraying them with insecticidal soap or neem oil.
Harvesting Your Basil
The best part! Harvesting your basil is easy and rewarding.
1. **Harvest Regularly:** The more you harvest your basil, the more it will grow. Harvest your basil by cutting the stems just above a set of leaves.
2. **Harvest in the Morning:** Harvest your basil in the morning, after the dew has dried but before the sun gets too hot. This is when the basil leaves will be at their most flavorful.
3. **Use Your Basil Fresh:** Fresh basil is best used immediately. You can also store fresh basil in the refrigerator for a few days. To store basil in the refrigerator, wrap the stems in a damp paper towel and place them in a plastic bag.
4. **Dry Your Basil:** If you have more basil than you can use fresh, you can dry it for later use. To dry basil, hang the stems upside down in a cool, dry place. You can also dry basil in a dehydrator or oven.
Troubleshooting
Even with the best care, sometimes things can go wrong. Here are a few common problems and how to fix them:
* **Yellowing Leaves:** This can be caused by overwatering, underwatering, or nutrient deficiencies. Make sure you’re watering your basil plants properly and fertilizing them regularly.
* **Leggy Growth:** This is usually caused by insufficient light. Make sure your basil plants are getting enough sunlight or grow light.
* **Pests:** As mentioned earlier, basil plants can be susceptible to pests. Check your plants regularly and treat any infestations promptly.
Enjoy Your Homegrown Basil!
That’s it! You’re now equipped with the knowledge to grow your own delicious basil at home. Enjoy the fresh, vibrant flavor in all your favorite dishes. Happy gardening!
Conclusion
So, there you have it! Growing basil at home, especially using our simple DIY propagation trick, isn’t just a fun project; it’s a gateway to fresher, more flavorful meals and a more sustainable lifestyle. Forget those sad, wilted bunches from the grocery store. Imagine plucking vibrant, fragrant basil leaves straight from your own windowsill whenever you need them. The difference in taste and aroma is truly remarkable.
This method is a must-try for several reasons. First, it’s incredibly cost-effective. Instead of constantly buying new basil plants or sprigs, you can create an endless supply from a single purchase or even a generous friend’s plant. Second, it’s environmentally friendly. You’re reducing your reliance on commercially grown basil, which often involves pesticides and long-distance transportation. Third, it’s incredibly rewarding. There’s something deeply satisfying about nurturing a plant from a cutting and watching it thrive.
But the benefits don’t stop there. You can experiment with different varieties of basil. Try growing Genovese basil for classic pesto, Thai basil for Asian-inspired dishes, or lemon basil for a citrusy twist. You can even get creative with your containers. Use repurposed jars, colorful pots, or even create a vertical garden to maximize space.
Consider adding a slow-release fertilizer to your potting mix for even more robust growth. Another variation is to experiment with different rooting mediums. While water propagation is simple and effective, you can also try rooting cuttings directly in soil or using a rooting hormone to speed up the process.
Don’t be afraid to experiment and find what works best for you. The beauty of this DIY trick is its simplicity and adaptability. It’s a project that anyone can undertake, regardless of their gardening experience.
We are confident that once you try this method, you’ll be hooked. The satisfaction of harvesting your own fresh basil is unparalleled. Plus, you’ll always have a ready supply of this versatile herb for all your culinary creations.
So, what are you waiting for? Grab some basil cuttings, follow our simple steps, and get ready to enjoy the taste of homegrown goodness. We encourage you to try this DIY trick and share your experiences with us! Post photos of your basil plants on social media using #HomegrownBasil and let us know how it went. We can’t wait to see your thriving basil gardens! Let us know if you have any questions or tips of your own. Happy growing!
Frequently Asked Questions (FAQ)
Q: How long does it take for basil cuttings to root in water?
A: Generally, you should see roots emerging from your basil cuttings within 7-14 days. However, this can vary depending on factors such as the variety of basil, the temperature, and the amount of light the cuttings receive. Warmer temperatures and bright, indirect light will typically encourage faster rooting. Be patient, and make sure to change the water every couple of days to keep it fresh and prevent bacterial growth. If you don’t see any roots after two weeks, it might be worth trying a fresh batch of cuttings.
Q: What kind of water should I use for rooting basil cuttings?
A: It’s best to use filtered or distilled water for rooting basil cuttings. Tap water can contain chlorine and other chemicals that can inhibit root growth. If you only have access to tap water, let it sit out in an open container for 24 hours to allow the chlorine to evaporate before using it.
Q: How much sunlight do basil cuttings need while they are rooting?
A: Basil cuttings need bright, indirect sunlight while they are rooting. Avoid placing them in direct sunlight, as this can scorch the leaves and prevent them from rooting properly. A spot near a window that receives morning sun or filtered light throughout the day is ideal.
Q: When should I transplant my rooted basil cuttings into soil?
A: You should transplant your rooted basil cuttings into soil once the roots are about 1-2 inches long. This usually takes about 2-3 weeks. Be gentle when transplanting them to avoid damaging the delicate roots.
Q: What kind of soil should I use for my basil plants?
A: Basil plants prefer well-draining soil that is rich in organic matter. A good potting mix for basil would be a blend of peat moss, perlite, and vermiculite. You can also add some compost or aged manure to the soil to provide extra nutrients.
Q: How often should I water my basil plants?
A: Basil plants need to be watered regularly, but they don’t like to sit in soggy soil. Water your basil plants when the top inch of soil feels dry to the touch. Be sure to water thoroughly, until water drains out of the bottom of the pot. Avoid overwatering, as this can lead to root rot.
Q: How do I prevent my basil plants from getting leggy?
A: To prevent your basil plants from getting leggy, you need to prune them regularly. Pinch off the top sets of leaves every few weeks to encourage bushier growth. This will also help to prevent the plant from flowering, which can reduce the flavor of the leaves.
Q: Can I grow basil indoors year-round?
A: Yes, you can grow basil indoors year-round, as long as you provide it with enough light and warmth. Place your basil plants near a sunny window or under a grow light. Keep the temperature between 65-80 degrees Fahrenheit.
Q: What are some common pests and diseases that affect basil plants?
A: Some common pests that affect basil plants include aphids, spider mites, and whiteflies. Common diseases include powdery mildew and root rot. Inspect your basil plants regularly for signs of pests or diseases, and take action promptly if you notice any problems. You can use insecticidal soap or neem oil to control pests, and fungicide to treat diseases. Ensure proper air circulation to prevent fungal diseases.
Q: Can I use fertilizer on my basil plants?
A: Yes, you can use fertilizer on your basil plants to promote healthy growth. Use a balanced fertilizer that is specifically formulated for herbs. Follow the instructions on the fertilizer package carefully, and avoid over-fertilizing, as this can burn the roots. A slow-release fertilizer incorporated into the soil at planting is also a good option.
Q: How do I harvest basil leaves?
A: To harvest basil leaves, simply pinch or cut them off the plant just above a leaf node (the point where leaves grow from the stem). This will encourage the plant to produce new growth. Avoid harvesting more than one-third of the plant at a time, as this can stress the plant.
Q: Can I dry or freeze basil leaves for later use?
A: Yes, you can dry or freeze basil leaves for later use. To dry basil leaves, spread them out on a baking sheet and dry them in a low oven (170 degrees Fahrenheit) for several hours, or until they are completely dry. You can also use a dehydrator. To freeze basil leaves, blanch them in boiling water for a few seconds, then plunge them into ice water. Drain the leaves and pat them dry, then freeze them in a single layer on a baking sheet. Once they are frozen, transfer them to a freezer bag or container.

Leave a Comment