

Grow blueberries from seeds? Absolutely! I know, I know, it sounds a bit intimidating, like a gardening myth whispered only among the most seasoned green thumbs. But trust me, while it requires a little patience and TLC, starting blueberries from seed is a surprisingly rewarding DIY project that anyone can tackle. Forget those expensive nursery plants – we’re going on a blueberry adventure from the very beginning!
Blueberries have a rich history, deeply intertwined with Native American cultures who not only cherished them for their delicious flavor but also recognized their potent medicinal properties. For centuries, these little blue gems have been a symbol of health and vitality. Now, you can cultivate your own piece of that history right in your backyard!
Why should you bother with this DIY trick? Well, for starters, it’s incredibly cost-effective. A packet of blueberry seeds is significantly cheaper than buying established plants. Plus, there’s an unparalleled satisfaction in nurturing a plant from its very first sprout. But more importantly, learning how to grow blueberries from seeds gives you complete control over the variety and ensures your plants are perfectly adapted to your local climate. So, ditch the store-bought berries and let’s embark on this exciting journey together. I’m here to guide you every step of the way!
Growing Blueberries From Seed: A Comprehensive DIY Guide
Okay, so you want to grow blueberries from seed? That’s awesome! It’s a bit of a journey, I won’t lie, but the reward of nurturing a blueberry bush from a tiny seed is incredibly satisfying. It’s definitely a long-term project, taking several years to get fruit, but think of the bragging rights! This guide will walk you through every step, from seed extraction to transplanting. Let’s get started!
Understanding the Challenge (and Why It’s Worth It!)
Growing blueberries from seed isn’t as straightforward as, say, growing tomatoes. Blueberries have specific needs, and the seeds require a period of stratification (cold treatment) to break dormancy. Plus, the seedlings are slow growers. But don’t let that scare you! With patience and the right techniques, you can absolutely do this. The biggest advantage? You can potentially create unique blueberry varieties!
Materials You’ll Need
Before we dive in, let’s gather our supplies. Here’s what you’ll need:
* Ripe Blueberries: Choose organic blueberries if possible, to avoid any unwanted chemicals. You’ll need a good handful.
* Distilled Water: Tap water can contain minerals that might inhibit germination.
* Small Bowls or Containers: For soaking and separating the seeds.
* Paper Towels: For drying the seeds.
* Fine Mesh Sieve or Cheesecloth: To help separate the seeds from the pulp.
* Seed Starting Trays or Small Pots: With drainage holes.
* Seed Starting Mix: An acidic mix is crucial. You can buy a pre-made mix specifically for acid-loving plants, or make your own (recipe below).
* Peat Moss: A key ingredient for an acidic soil mix.
* Perlite or Vermiculite: To improve drainage and aeration.
* Sand: Horticultural sand is best.
* Spray Bottle: For misting the seeds and seedlings.
* Refrigerator: For stratification.
* Plastic Bags or Containers: For stratification.
* Grow Lights (Optional): To supplement natural light, especially during winter.
* pH Meter or Soil Testing Kit: To monitor soil acidity.
* Blueberry Fertilizer: Formulated for acid-loving plants.
* Larger Pots: For transplanting as the seedlings grow.
* Patience: Seriously, you’ll need a lot of it!
Making Your Own Acidic Seed Starting Mix
Since blueberries thrive in acidic soil, it’s essential to start them in the right medium. Here’s a simple recipe for a DIY acidic seed starting mix:
* 1 part Peat Moss: Provides acidity and moisture retention.
* 1 part Perlite or Vermiculite: Improves drainage and aeration.
* 1/2 part Horticultural Sand: Adds weight and further improves drainage.
Mix these ingredients thoroughly in a large container. Moisten the mix before using it.
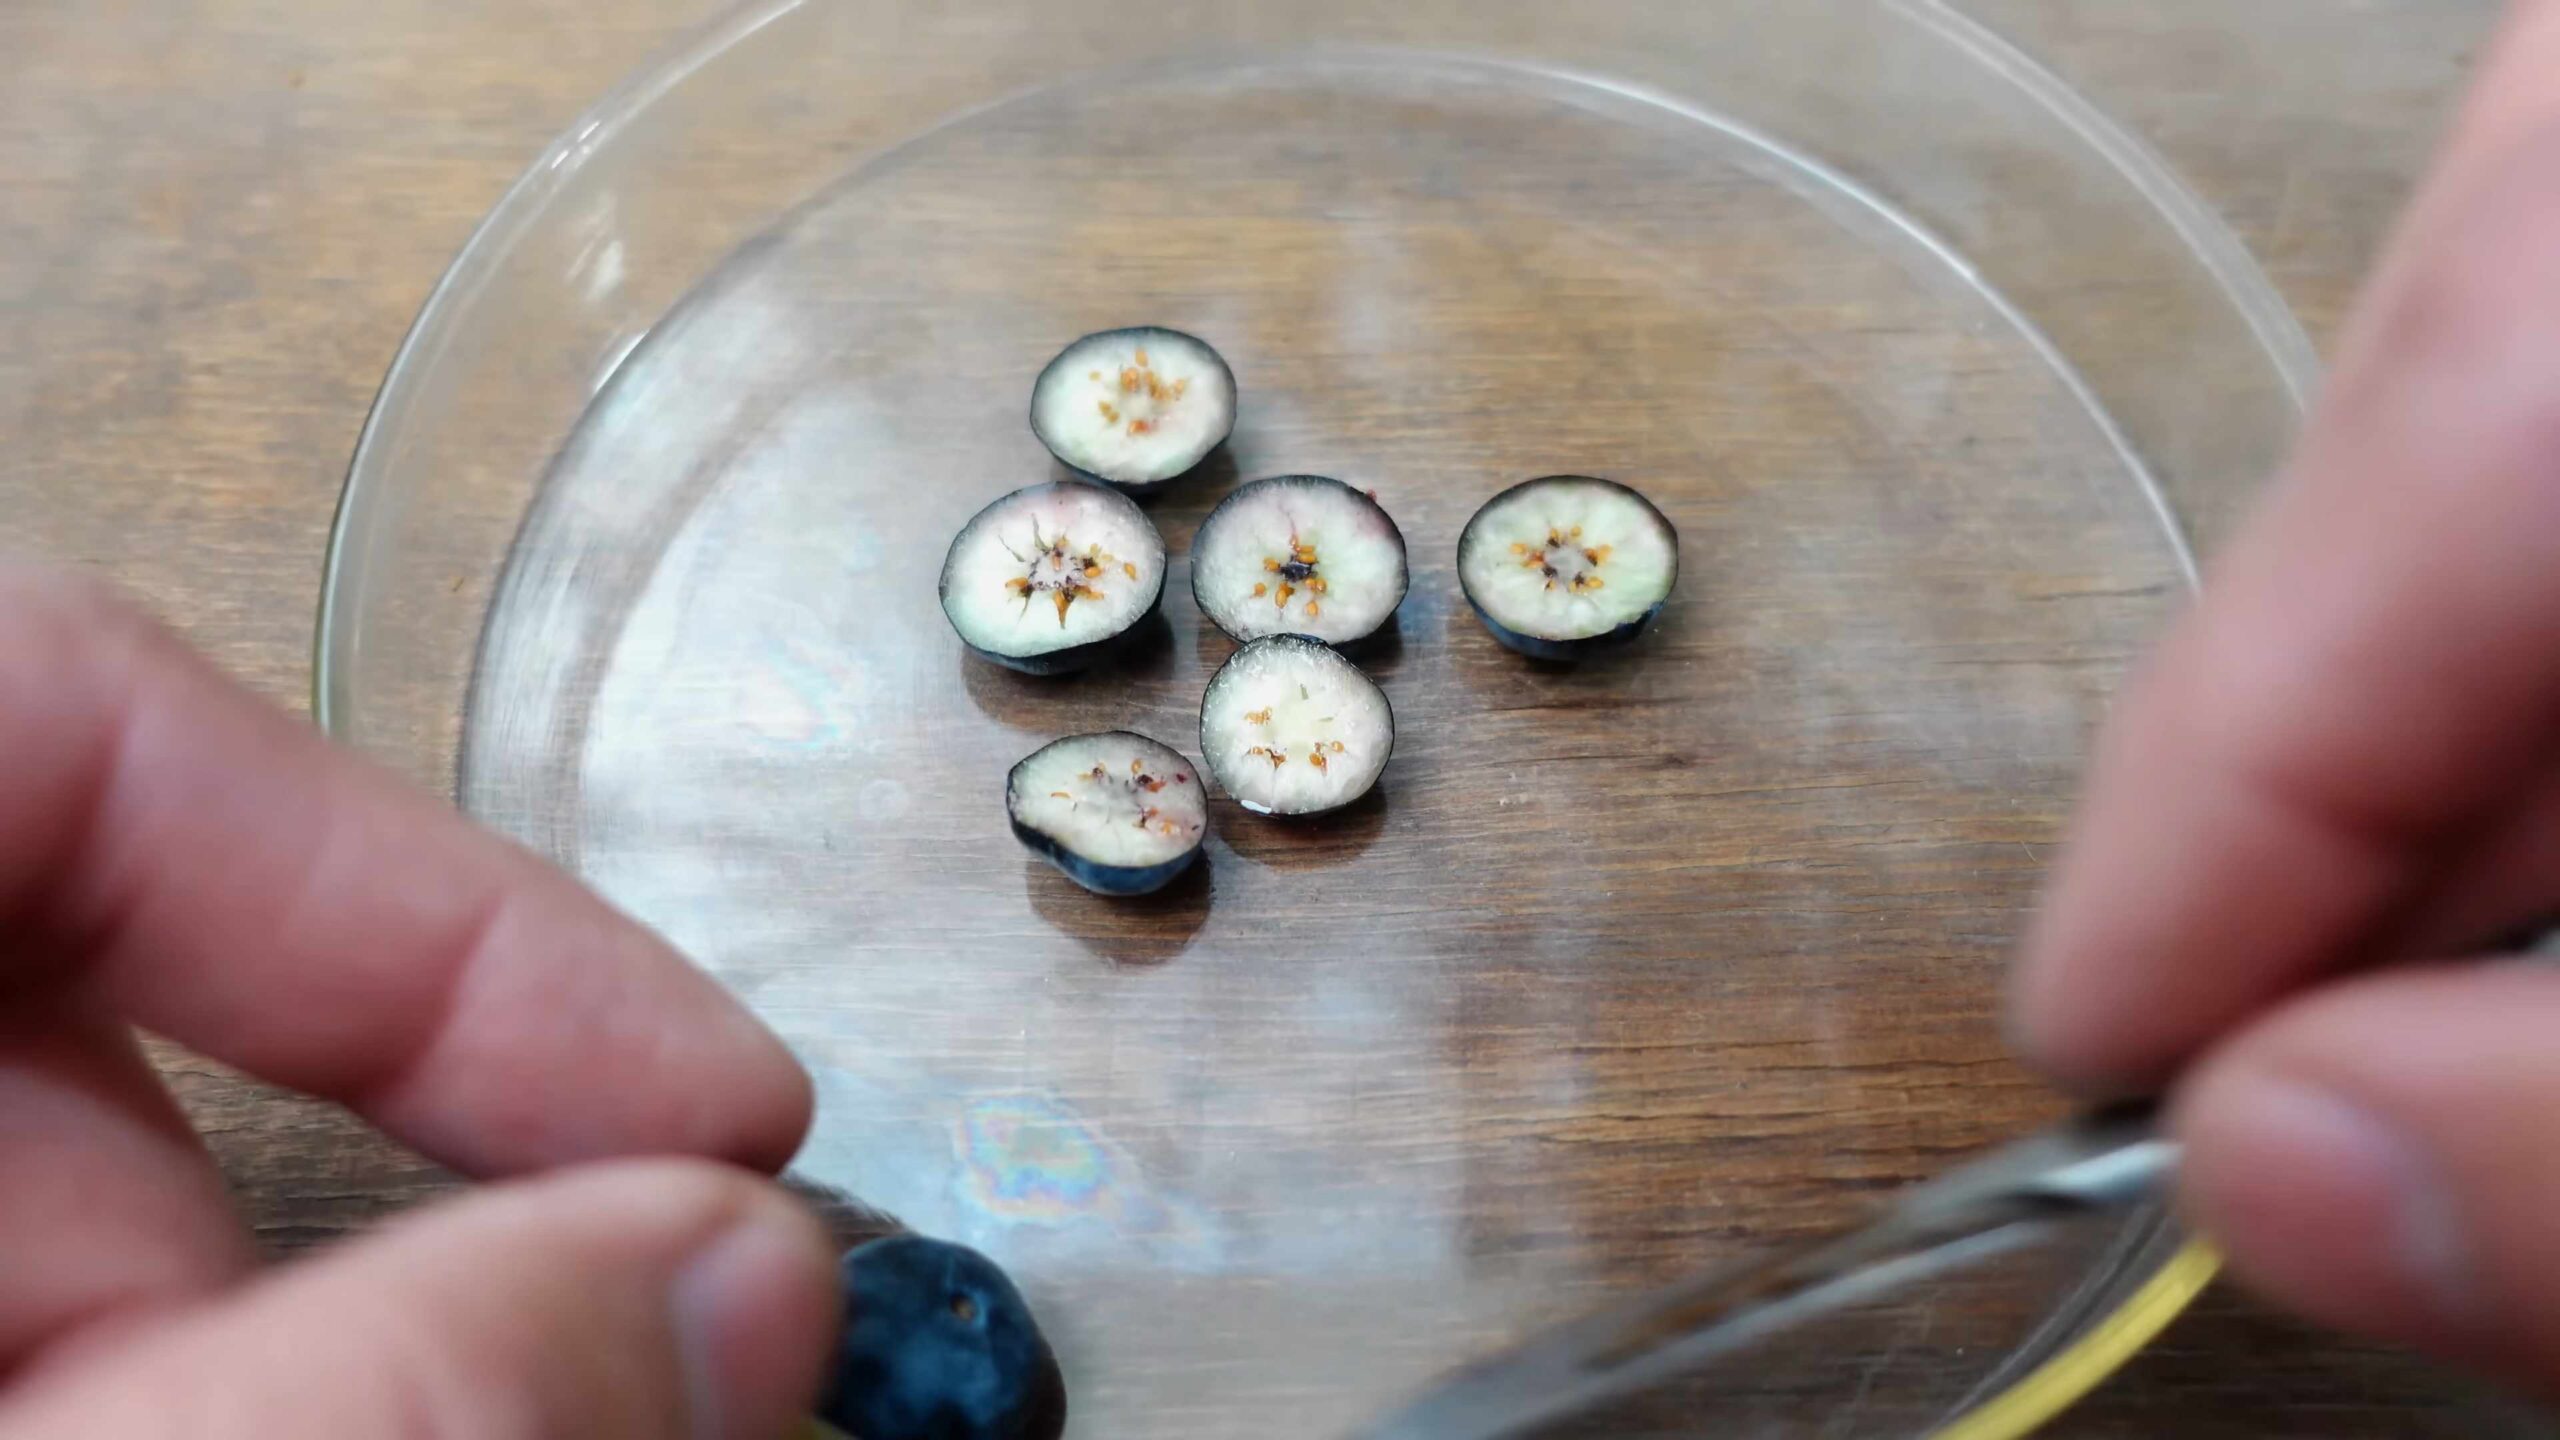
Extracting the Blueberry Seeds
This is probably the messiest part, but it’s also the first step to blueberry-growing success!
1. Macerate the Blueberries: Gently crush the blueberries in a bowl using your fingers or a spoon. You want to break them open and release the seeds from the pulp.
2. Add Water: Add a generous amount of distilled water to the crushed blueberries.
3. Separate the Seeds: Stir the mixture vigorously. The pulp will float to the top, while the heavier seeds will sink to the bottom.
4. Remove the Pulp: Carefully pour off the pulpy water, trying to keep the seeds in the bowl. You can also use a spoon to scoop out the pulp. Repeat this process several times until you have mostly seeds and clean water.
5. Strain the Seeds: Pour the remaining mixture through a fine-mesh sieve or cheesecloth. This will separate the seeds from any remaining pulp.
6. Rinse the Seeds: Rinse the seeds thoroughly under running distilled water to remove any last traces of pulp.
7. Dry the Seeds: Spread the seeds in a single layer on a paper towel. Allow them to air dry completely. This may take several days. Make sure they are completely dry before moving on to the next step.
Stratifying the Blueberry Seeds (Cold Treatment)
Blueberry seeds need a period of cold stratification to break dormancy and germinate properly. This mimics the natural winter conditions they would experience in the wild.
1. Prepare the Seeds: Place the dried seeds in a small plastic bag or container.
2. Add a Moist Medium: Slightly moisten a paper towel or some peat moss. You don’t want it soaking wet, just damp. Place the moistened medium in the bag or container with the seeds.
3. Seal the Bag or Container: Seal the bag or container tightly to prevent it from drying out.
4. Refrigerate: Place the bag or container in the refrigerator for 90-120 days. The ideal temperature is between 33°F and 41°F (0.5°C and 5°C).
5. Check Periodically: Check the seeds every few weeks to make sure the medium is still moist. If it’s drying out, lightly mist it with distilled water. Also, check for any signs of mold or fungus. If you see any, discard the affected seeds.
Sowing the Blueberry Seeds
After the stratification period, it’s time to sow the seeds!
1. Prepare the Seed Starting Trays or Pots: Fill your seed starting trays or small pots with the acidic seed starting mix you prepared earlier. Gently firm the soil.
2. Sow the Seeds: Sprinkle the blueberry seeds evenly over the surface of the soil. They are very small, so don’t sow them too thickly.
3. Cover the Seeds Lightly: Lightly cover the seeds with a very thin layer of seed starting mix or vermiculite. You want them to be just barely covered.
4. Water Gently: Gently mist the soil with a spray bottle to moisten it. Avoid overwatering, as this can cause the seeds to rot.
5. Provide Humidity: Cover the seed starting trays or pots with a clear plastic dome or plastic wrap to create a humid environment. This will help the seeds germinate.
6. Provide Light: Place the seed starting trays or pots in a warm location with bright, indirect light. If you don’t have enough natural light, you can use grow lights.
7. Maintain Moisture: Check the soil moisture regularly and mist with a spray bottle as needed to keep it consistently moist but not soggy.
Caring for Blueberry Seedlings
Germination can take anywhere from a few weeks to a few months, so be patient! Once the seedlings emerge, it’s crucial to provide them with the right care.
1. Remove the Humidity Dome: Once the seedlings start to emerge, gradually remove the humidity dome or plastic wrap over a period of a few days to acclimate them to the lower humidity levels.
2. Provide Adequate Light: Blueberry seedlings need plenty of light to grow. If you’re using grow lights, keep them on for 14-16 hours per day. If you’re using natural light, place the seedlings in a location that receives at least 6 hours of direct sunlight per day.
3. Water Carefully: Water the seedlings regularly, but avoid overwatering. Allow the soil to dry out slightly between waterings. Use distilled water or rainwater if possible.
4. Fertilize Sparingly: Once the seedlings have developed a few sets of true leaves, you can start fertilizing them with a diluted blueberry fertilizer. Follow the instructions on the fertilizer label carefully. Over-fertilizing can damage the seedlings.
5. Monitor pH: Regularly monitor the pH of the soil using a pH meter or soil testing kit. Blueberries prefer a soil pH between 4.5 and 5.5. If the pH is too high, you can lower it by adding sulfur or peat moss to the soil.
Transplanting Blueberry Seedlings
As the seedlings grow, they will need to be transplanted into larger pots.
1. Transplant When Ready: Transplant the seedlings when they are a few inches tall and have a well-developed root system.
2. Prepare Larger Pots: Fill larger pots with an acidic potting mix similar to the seed starting mix.
3. Carefully Remove Seedlings: Gently remove the seedlings from the seed starting trays or pots, being careful not to damage the roots.
4. Plant Seedlings: Plant the seedlings in the larger pots, making sure the top of the root ball is level with the soil surface.
5. Water Thoroughly: Water the transplanted seedlings thoroughly.
6. Provide Ongoing Care: Continue to provide the seedlings with adequate light, water, and fertilizer.

Conclusion
So, there you have it! Growing blueberries from seeds might seem like a daunting task, but the rewards – a thriving blueberry bush cultivated with your own hands, bursting with delicious, homegrown berries – are absolutely worth the effort. This DIY project isn’t just about saving money; it’s about connecting with nature, understanding the life cycle of a plant, and experiencing the immense satisfaction of nurturing something from its very beginning.
Think of the possibilities! Imagine rows of blueberry bushes, each a testament to your patience and dedication. Picture the pies, muffins, and jams you can create with your own organically grown blueberries. Envision sharing the bounty with friends and family, knowing you cultivated every single berry from a tiny seed.
This method of growing blueberries from seeds allows for a level of control and customization that you simply can’t achieve with store-bought plants. You can select specific varieties known for their disease resistance, flavor profiles, or adaptability to your local climate. You can even experiment with cross-pollination to create your own unique blueberry hybrids!
Don’t be afraid to experiment with variations. Try different soil mixes to see which one yields the best results. Play around with different light levels to optimize growth. Consider using a humidity dome to create a more favorable environment for germination. The beauty of this DIY project is that it’s a learning experience, and every experiment, successful or not, brings you closer to mastering the art of blueberry cultivation.
Ready to embark on your blueberry-growing adventure? We encourage you to give this DIY trick a try. It requires patience, yes, but the process is incredibly rewarding. Document your journey, take photos, and share your experiences with us in the comments below. We’d love to hear about your successes, your challenges, and any tips you discover along the way. Let’s build a community of blueberry enthusiasts, sharing our knowledge and celebrating the joy of growing our own food. Growing blueberries from seeds is more than just a gardening project; it’s an investment in your health, your well-being, and your connection to the natural world. So, grab your seeds, prepare your soil, and get ready to witness the magic of life unfold before your eyes. Happy growing!
Frequently Asked Questions (FAQ)
Q: How long does it take to grow blueberries from seeds?
A: Growing blueberries from seeds is a long-term project. Germination can take anywhere from a few weeks to several months. After germination, it can take several years (typically 3-5) for the blueberry plants to mature and produce a significant harvest. Patience is key!
Q: What kind of soil is best for growing blueberries from seeds?
A: Blueberries require acidic soil with a pH between 4.5 and 5.5. A mix of peat moss, perlite, and composted pine bark is a good starting point. You can also purchase commercially available blueberry potting mix. Regularly test the soil pH and adjust as needed using sulfur or other acidifying agents.
Q: How often should I water blueberry seedlings?
A: Keep the soil consistently moist, but not waterlogged. Water when the top inch of soil feels dry to the touch. Overwatering can lead to root rot, so ensure proper drainage. Use rainwater or distilled water if your tap water is alkaline.
Q: What kind of light do blueberry seedlings need?
A: Blueberry seedlings need bright, indirect light. Avoid direct sunlight, which can scorch the delicate leaves. A south-facing window with a sheer curtain or a grow light can provide adequate light. As the plants mature, they will need more direct sunlight.
Q: Do I need to stratify blueberry seeds before planting?
A: Yes, stratification is crucial for successful germination. Blueberry seeds have a hard outer coating that needs to be broken down before they can sprout. Stratification involves chilling the seeds in a moist environment for a period of time, typically 60-90 days. You can do this by placing the seeds in a damp paper towel inside a sealed plastic bag and refrigerating them.
Q: How do I transplant blueberry seedlings?
A: Once the seedlings have developed a few sets of true leaves, they can be transplanted into individual pots. Use the same acidic soil mix as before. Be gentle when handling the delicate roots. Gradually acclimate the seedlings to outdoor conditions before transplanting them into their final location in the garden.
Q: What are some common problems when growing blueberries from seeds?
A: Common problems include poor germination rates, fungal diseases, and pest infestations. Ensure proper soil drainage, provide adequate ventilation, and monitor the plants regularly for signs of disease or pests. Use organic pest control methods if necessary.
Q: Can I grow blueberries from seeds indoors permanently?
A: While you can start blueberries from seeds indoors, they will eventually need to be transplanted outdoors or into a very large container. Blueberries require a period of dormancy during the winter, which is difficult to replicate indoors. They also need ample sunlight and space to grow.
Q: What are some blueberry varieties that are good for growing from seeds?
A: While you won’t know the exact variety you’ll get from seeds (as they are hybrids), you can increase your chances of getting desirable traits by using seeds from known varieties. Some popular blueberry varieties include ‘Bluecrop,’ ‘Elliott,’ ‘Jersey,’ and ‘Chandler.’ Research which varieties are best suited to your local climate.
Q: How do I fertilize blueberry plants grown from seeds?
A: Use an acid-loving fertilizer specifically formulated for blueberries. Fertilize in the spring, after the plants have leafed out. Follow the instructions on the fertilizer package carefully. Avoid over-fertilizing, which can damage the plants.
Q: Is growing blueberries from seeds worth the effort?
A: Absolutely! While it requires patience and dedication, growing blueberries from seeds is a rewarding experience. You’ll gain a deeper understanding of plant life, save money on store-bought plants, and enjoy the satisfaction of harvesting your own delicious, homegrown blueberries. Plus, you’ll have the unique opportunity to cultivate a blueberry bush that is truly your own. The process of growing blueberries from seeds allows you to be more involved in every step of the plant’s life, from germination to harvest.

Leave a Comment