

Grow cabbage in plastic bottles? Absolutely! I know it sounds a little unconventional, but trust me, this DIY trick can revolutionize your small-space gardening game. Imagine harvesting plump, healthy cabbages from your balcony, patio, or even a sunny windowsill – all thanks to repurposed plastic bottles.
While container gardening itself has a long and rich history, dating back to ancient civilizations using terracotta pots, the modern twist of upcycling plastic bottles adds an eco-conscious element. We’re not just growing food; we’re reducing waste and giving new life to materials that would otherwise end up in landfills. It’s a win-win!
But why should you bother learning how to grow cabbage in plastic bottles? Well, for starters, it’s incredibly space-efficient. If you’re like me and dream of a bountiful garden but are limited by square footage, this method is a game-changer. Plus, it offers better control over soil conditions, protects your precious cabbage seedlings from pests and diseases, and adds a unique, eye-catching element to your outdoor (or indoor!) space. So, let’s dive in and discover how to transform those discarded bottles into thriving cabbage patches!
DIY Cabbage Patch: Growing Cabbage in Recycled Plastic Bottles
Hey there, fellow gardening enthusiasts! Are you short on space but still dreaming of fresh, homegrown cabbage? Or maybe you just want a fun and eco-friendly gardening project? Well, you’ve come to the right place! I’m going to walk you through how to grow beautiful, healthy cabbage right in recycled plastic bottles. It’s surprisingly easy, super rewarding, and a fantastic way to give those plastic bottles a new lease on life.
Why Grow Cabbage in Plastic Bottles?
Before we dive in, let’s talk about why this method is so awesome:
* Space-Saving: Perfect for balconies, patios, or small gardens. You can arrange the bottles vertically or horizontally, maximizing your growing area.
* Upcycling: Reduce waste and give plastic bottles a useful purpose. It’s a win-win for you and the environment!
* Pest Control: Elevated containers can help deter some ground-dwelling pests.
* Easy Monitoring: You can easily keep an eye on the soil moisture and plant health.
* Portability: Need to move your cabbage to a sunnier spot? No problem! Plastic bottles are lightweight and easy to relocate.
Materials You’ll Need
Alright, let’s gather our supplies. Here’s what you’ll need to get started:
* Plastic Bottles: The bigger, the better! Think 2-liter soda bottles, juice bottles, or even larger water bottles. Make sure they’re clean and free of any residue.
* Cabbage Seeds or Seedlings: Choose your favorite cabbage variety! I personally love growing ‘Golden Acre’ for its compact size and sweet flavor.
* Potting Mix: A good quality potting mix is essential for healthy cabbage growth. Avoid using garden soil, as it can be too heavy and compact in containers.
* Drill or Sharp Knife: For creating drainage holes in the bottles.
* Scissors or Utility Knife: For cutting the bottles.
* Watering Can or Hose: For watering your cabbage plants.
* Fertilizer (Optional): A balanced liquid fertilizer can help boost growth, especially during the early stages.
* Gloves (Optional): To keep your hands clean.
* Measuring Tape or Ruler: To ensure accurate cuts.
Preparing the Plastic Bottles
This is where the fun begins! We’re going to transform those ordinary plastic bottles into mini cabbage gardens.
1. Clean the Bottles: Thoroughly wash the plastic bottles with soap and water to remove any dirt, debris, or sticky residue. Rinse them well and let them dry completely. This is crucial to prevent any contamination that could harm your cabbage plants.
2. Cut the Bottles: There are a couple of ways you can cut the bottles, depending on how you want to arrange them:
* Vertical Arrangement: Cut off the top third of the bottle. You can discard the top or use it as a mini-greenhouse cover later on. The bottom two-thirds will be your planting container.
* Horizontal Arrangement: Cut a rectangular opening along one side of the bottle, leaving the ends intact. This creates a trough-like container. The size of the opening will depend on the size of your cabbage seedlings.
3. Drill Drainage Holes: This is super important! Cabbage needs well-draining soil to thrive. Use a drill or sharp knife to create several drainage holes in the bottom of each bottle. For vertical containers, aim for at least 4-5 holes. For horizontal containers, space the holes evenly along the bottom.
4. Optional: Paint or Decorate: If you want to add a personal touch, you can paint the bottles with outdoor-safe paint or decorate them with stickers or markers. This is a great way to make your cabbage garden even more visually appealing. Just make sure to avoid using paint that could leach harmful chemicals into the soil.
Planting Your Cabbage
Now for the exciting part – planting your cabbage!
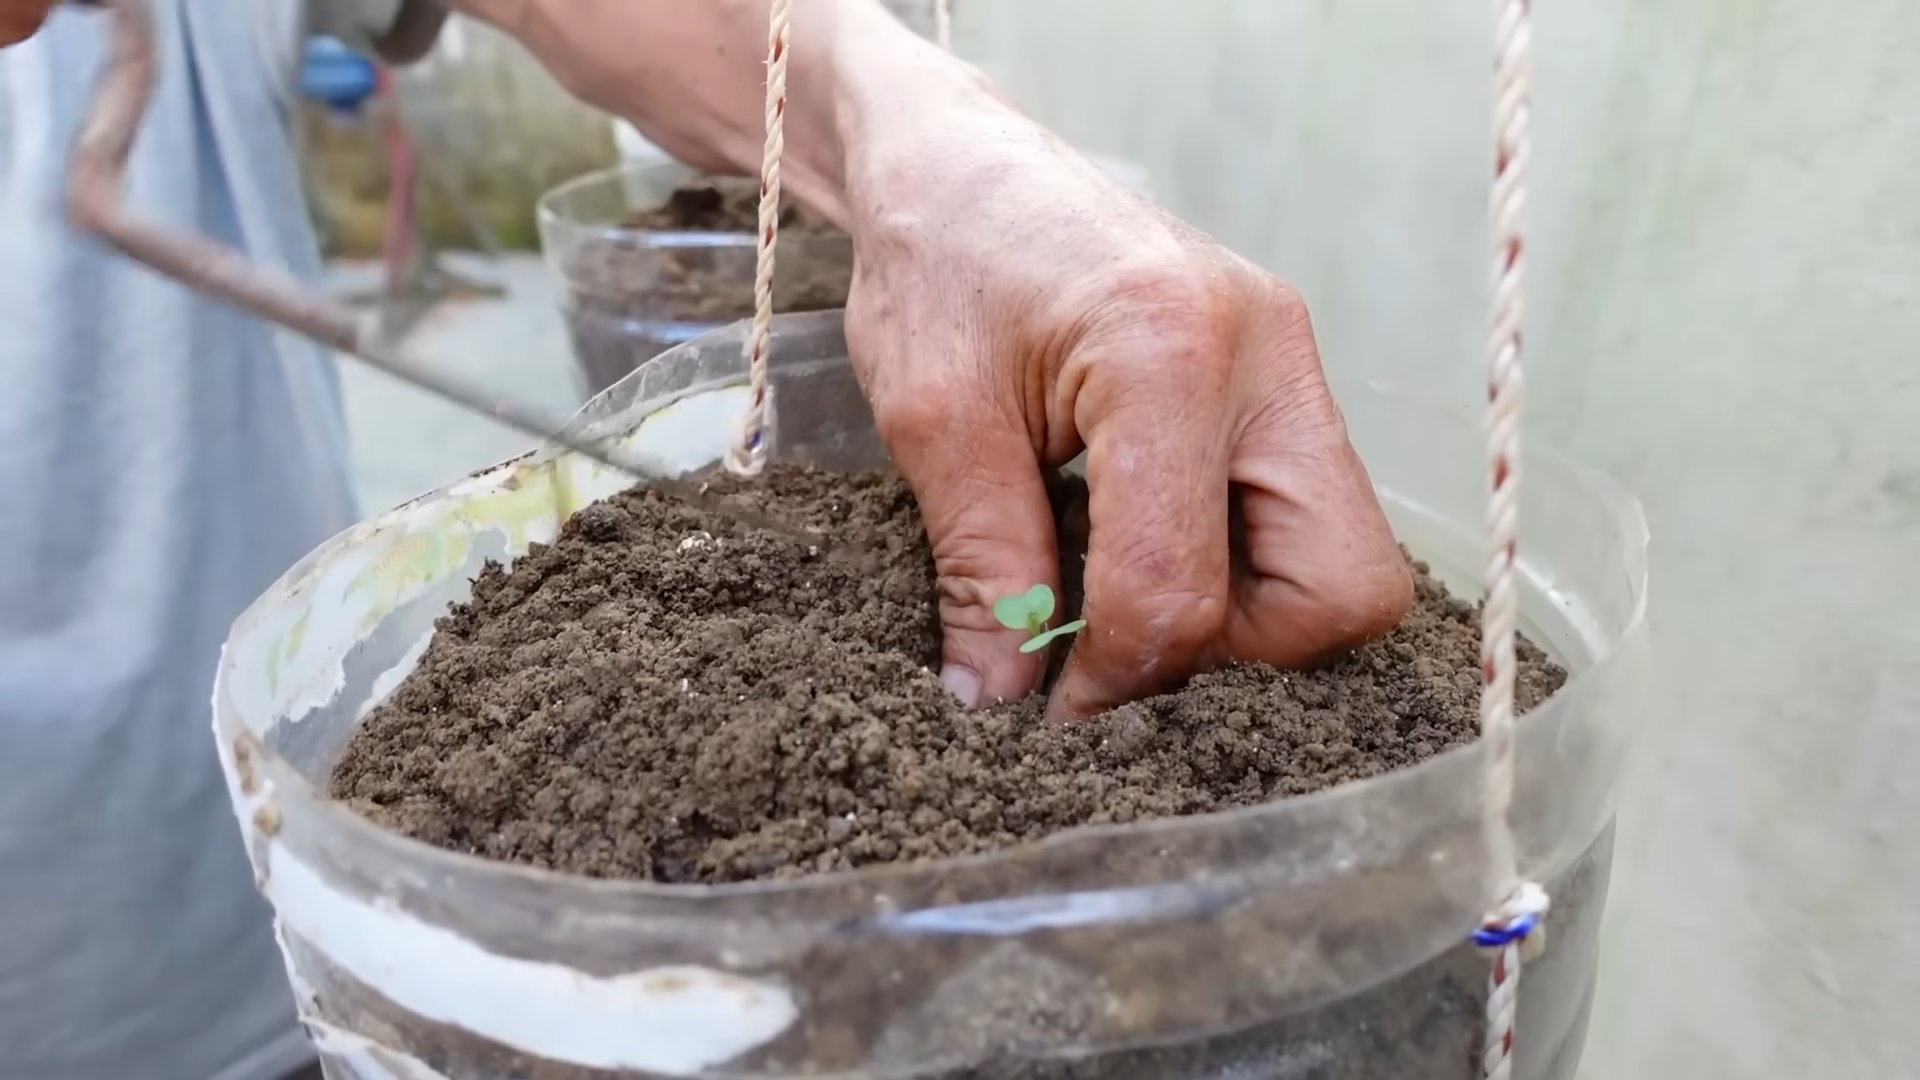
1. Fill the Bottles with Potting Mix: Carefully fill each prepared bottle with high-quality potting mix, leaving about an inch of space at the top. Gently pat down the soil to remove any air pockets.
2. Sowing Seeds (If Starting from Seed): If you’re starting from seed, sow 2-3 seeds per bottle, about ½ inch deep. Cover the seeds with a thin layer of potting mix and gently water them. Keep the soil consistently moist until the seeds germinate, which usually takes about 7-14 days. Once the seedlings emerge, thin them to one strong seedling per bottle.
3. Transplanting Seedlings (If Using Seedlings): If you’re using seedlings, gently remove them from their nursery pots. Loosen the roots slightly and place one seedling in the center of each bottle. Make sure the top of the root ball is level with the surrounding soil. Fill in any gaps with potting mix and gently water the seedlings.
4. Water Thoroughly: After planting, water the cabbage plants thoroughly until water drains out of the drainage holes. This helps settle the soil and ensures the roots are well-hydrated.
Caring for Your Cabbage Plants
Cabbage is relatively easy to care for, but here are a few tips to ensure your plants thrive:
1. Sunlight: Cabbage needs at least 6 hours of sunlight per day. Place your plastic bottle cabbage garden in a sunny location where it will receive plenty of light. If you don’t have enough natural sunlight, you can supplement with grow lights.
2. Watering: Water your cabbage plants regularly, especially during hot, dry weather. The soil should be consistently moist but not waterlogged. Check the soil moisture by sticking your finger into the soil. If the top inch feels dry, it’s time to water.
3. Fertilizing: Cabbage is a heavy feeder, so it benefits from regular fertilization. Use a balanced liquid fertilizer, diluted according to the package instructions, every 2-3 weeks. You can also add compost or other organic matter to the soil to provide additional nutrients.
4. Pest Control: Keep an eye out for common cabbage pests, such as cabbage worms, aphids, and slugs. You can handpick pests off the plants, use insecticidal soap, or apply Bacillus thuringiensis (Bt), a natural bacterium that is effective against cabbage worms.
5. Weed Control: Remove any weeds that may sprout in the bottles. Weeds compete with cabbage plants for nutrients and water.
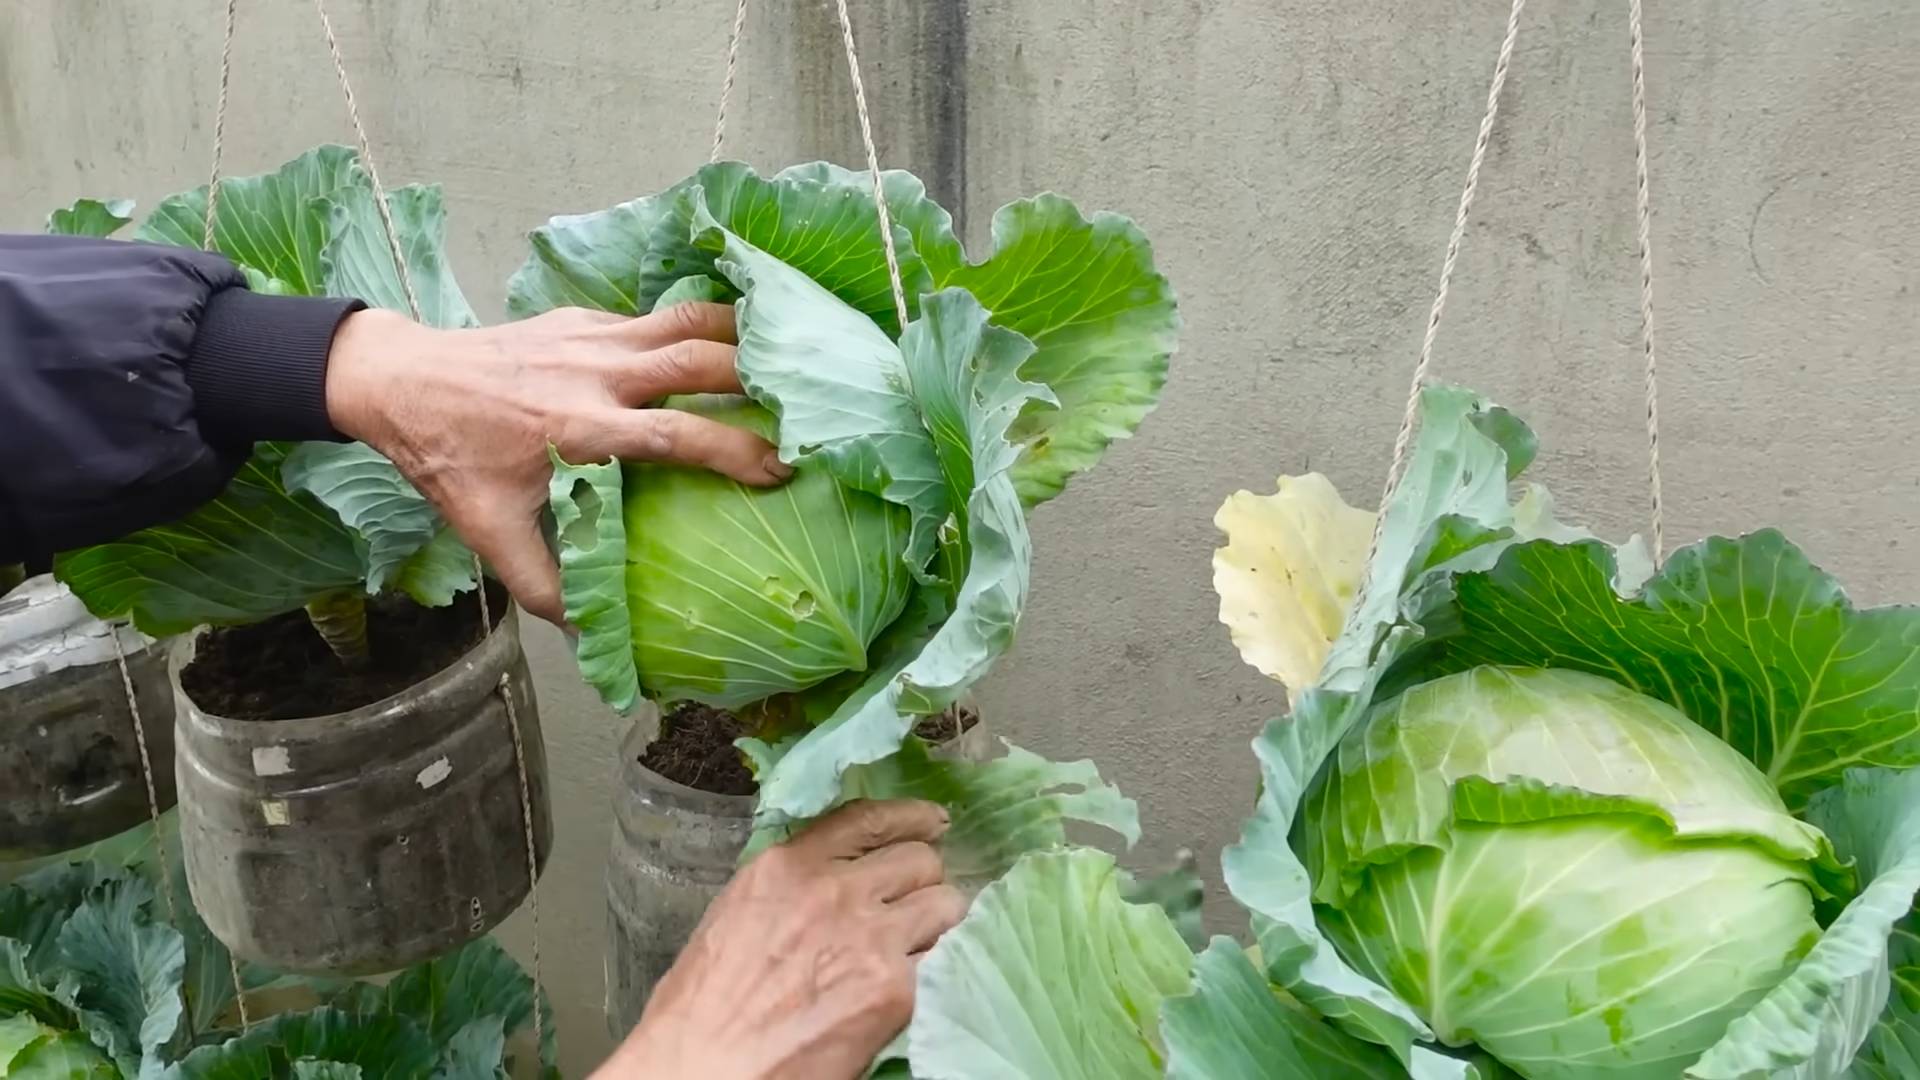
6. Support (Optional): As your cabbage heads grow larger, they may become top-heavy and tip over the bottles. You can provide support by staking the plants or using a tomato cage.
Harvesting Your Cabbage
The moment you’ve been waiting for – harvesting your homegrown cabbage!
1. Harvest Time: Cabbage is typically ready to harvest in 60-100 days, depending on the variety. The heads should be firm and compact.
2. Harvesting Technique: Use a sharp knife to cut the cabbage head from the stem, leaving a few outer leaves intact.
3. Storage: Store harvested cabbage in the refrigerator for up to 2 weeks.
Troubleshooting
Even with the best care, you might encounter a few challenges along the way. Here are some common problems and how to address them:
* Yellowing Leaves: This could be a sign of overwatering, underwatering, or nutrient deficiency. Check the soil moisture and adjust your watering schedule accordingly. Fertilize the plants with a balanced fertilizer.
* Stunted Growth: This could be due to insufficient sunlight, poor soil, or pest infestation. Ensure the plants are receiving enough sunlight and fertilize them regularly. Check for pests and take appropriate action.
* Bolting: Bolting occurs when cabbage plants prematurely produce a flower stalk. This is usually caused by stress, such as extreme heat or drought. Provide adequate water and shade during hot weather.
* Root Rot: Root rot is caused by overwatering and poor drainage. Ensure the bottles have adequate drainage holes and avoid overwatering.
Creative Variations
Want to take your plastic bottle cabbage garden to the next level? Here are a few creative variations to try:
* Vertical Garden Wall: Create a vertical garden wall by attaching the plastic bottles to a fence or wall. This is a great way to maximize space and add a touch of greenery to your outdoor area.
* Hanging Baskets: Turn the plastic bottles into hanging baskets by attaching ropes or chains to the sides. This is a fun and unique way to display your cabbage plants.
* Self-Watering Containers: Create self-watering containers by adding a water reservoir to the bottom of the bottles. This will help keep the soil consistently moist and reduce the need for frequent watering.
Final Thoughts
Growing cabbage in plastic bottles is a fun, rewarding, and eco-friendly gardening project that anyone can do. With a little bit of effort and creativity, you can transform recycled plastic bottles into a
Conclusion
So, there you have it! Growing cabbage in plastic bottles might seem unconventional, but it’s a game-changer for urban gardeners, those with limited space, or anyone looking for a more controlled and efficient way to cultivate this nutritious vegetable. This DIY trick isn’t just about saving space; it’s about optimizing your growing conditions, protecting your plants from pests, and ultimately, enjoying a more bountiful harvest.
Think about it: no more battling slugs and snails munching on your precious cabbage leaves. No more worrying about soil-borne diseases wiping out your entire crop. The plastic bottle acts as a mini-greenhouse, providing a warmer, more sheltered environment that encourages faster and healthier growth, especially in cooler climates or during the shoulder seasons. Plus, the portability of the bottles means you can easily move your cabbage plants to chase the sun or protect them from unexpected frost.
But the beauty of this method lies in its adaptability. Feel free to experiment with different sizes of plastic bottles to accommodate various cabbage varieties. Try using bottles with darker plastic to provide extra warmth, or clear bottles to maximize sunlight exposure. You can even create a tiered system by stacking bottles on top of each other, creating a vertical garden that’s both functional and visually appealing. Consider adding a layer of mulch to the top of the soil in each bottle to help retain moisture and suppress weeds.
Don’t be afraid to get creative with your watering techniques, either. While regular watering is essential, you can also try bottom watering by placing the bottles in a tray of water and allowing the soil to absorb moisture from below. This can help prevent overwatering and reduce the risk of fungal diseases.
The key takeaway here is that growing cabbage in plastic bottles is a simple, effective, and sustainable way to enjoy fresh, homegrown vegetables, even if you don’t have a traditional garden. It’s a fantastic project for beginners and experienced gardeners alike, and it’s a great way to recycle those plastic bottles that would otherwise end up in the landfill.
We strongly encourage you to give this DIY trick a try. It’s a rewarding experience to nurture your own cabbage plants from seed to harvest, and the satisfaction of enjoying a delicious, homegrown meal is unparalleled. Once you’ve tried it, we’d love to hear about your experience! Share your photos, tips, and tricks in the comments below. Let’s build a community of bottle-cabbage growers and inspire others to embrace this innovative and sustainable gardening method. Let us know what worked for you, what challenges you faced, and any variations you tried. Together, we can unlock the full potential of this simple yet powerful technique and make fresh, homegrown cabbage accessible to everyone. So, grab those plastic bottles, get your hands dirty, and start growing your own delicious cabbage today! You’ll be amazed at what you can achieve with a little ingenuity and a few recycled materials. This method is a testament to the power of sustainable gardening and the endless possibilities of DIY innovation.
FAQ
Can I grow any type of cabbage in plastic bottles?
Yes, you can grow most cabbage varieties in plastic bottles, but consider the size of the mature cabbage head when choosing your bottle size. Smaller varieties like bok choy or smaller green cabbages are ideal for smaller bottles (2-3 liters), while larger varieties might require larger bottles (5 liters or more). Ensure the bottle is tall enough to accommodate the root system and the developing head. You might need to transplant seedlings from smaller bottles to larger ones as they grow.
What kind of soil should I use?
Use a well-draining potting mix that’s rich in organic matter. A mix of compost, peat moss (or coconut coir), and perlite or vermiculite works well. Avoid using garden soil, as it can be too heavy and may not drain properly in a confined space like a plastic bottle. The soil should be slightly acidic to neutral (pH 6.0-7.0) for optimal cabbage growth. You can amend the soil with slow-release fertilizer or compost tea to provide essential nutrients.
How often should I water my cabbage plants in plastic bottles?
Water regularly, keeping the soil consistently moist but not waterlogged. Check the soil moisture level daily by sticking your finger into the soil. If the top inch feels dry, it’s time to water. The frequency of watering will depend on the weather conditions, the size of the bottle, and the type of soil you’re using. In hot, sunny weather, you may need to water daily, while in cooler, cloudy weather, you may only need to water every few days. Ensure the bottle has drainage holes to prevent water from accumulating at the bottom.
How much sunlight do cabbage plants need?
Cabbage plants need at least 6 hours of direct sunlight per day to thrive. Place your plastic bottle gardens in a sunny location where they will receive ample sunlight. If you live in a particularly hot climate, you may need to provide some afternoon shade to prevent the plants from overheating. You can also use grow lights to supplement natural sunlight, especially during the winter months or in areas with limited sunlight.
How do I protect my cabbage plants from pests and diseases?
Growing cabbage in plastic bottles can help reduce the risk of pest infestations and diseases, but it’s still important to take precautions. Inspect your plants regularly for signs of pests like aphids, cabbage worms, or slugs. You can handpick pests off the plants or use organic pest control methods like insecticidal soap or neem oil. Ensure good air circulation around the plants to prevent fungal diseases. Avoid overwatering, as this can create a favorable environment for fungal growth. If you notice any signs of disease, remove the affected leaves or plants immediately to prevent the spread of the disease.
Can I fertilize my cabbage plants in plastic bottles?
Yes, fertilizing your cabbage plants is essential for healthy growth and a good harvest. Use a balanced fertilizer that’s specifically formulated for vegetables. You can use a slow-release fertilizer at planting time or apply a liquid fertilizer every few weeks during the growing season. Follow the instructions on the fertilizer label carefully to avoid over-fertilizing, which can damage the plants. Compost tea is also a great way to provide essential nutrients to your cabbage plants.
How do I know when my cabbage is ready to harvest?
Cabbage is typically ready to harvest when the head is firm and compact. The size of the head will vary depending on the variety, but it should feel solid when you squeeze it gently. You can also check the maturity date on the seed packet or plant label as a general guideline. To harvest, simply cut the cabbage head off the plant at the base, leaving a few outer leaves intact.
What are some variations I can try with this method?
There are many variations you can try with this method to customize it to your specific needs and preferences. You can experiment with different types of plastic bottles, such as water bottles, soda bottles, or milk jugs. You can also try using different types of soil or adding different amendments to the soil. Consider using self-watering bottles by inverting a smaller bottle filled with water into the soil. You can also try growing other vegetables in plastic bottles, such as lettuce, spinach, or herbs. Get creative and see what works best for you!
Is growing cabbage in plastic bottles environmentally friendly?
Yes, growing cabbage in plastic bottles is an environmentally friendly way to garden. It’s a great way to recycle plastic bottles that would otherwise end up in the landfill. It also reduces the need for pesticides and herbicides, as the plastic bottles provide a barrier against pests and diseases. Additionally, growing your own cabbage reduces your carbon footprint by eliminating the need to transport vegetables from the farm to the store.


Leave a Comment