

Grow Chili Peppers Indoors and spice up your life, literally! Have you ever craved that fiery kick in the middle of winter, only to be disappointed by bland, store-bought peppers? I have! That’s why I’m so excited to share these simple, yet effective DIY tricks to cultivate your own vibrant chili pepper garden right inside your home.
The history of chili peppers is rich and fascinating, dating back over 6,000 years in South America. They weren’t just a food source; they held cultural significance, used in rituals and even as medicine. Now, you can bring a piece of that history into your own home!
But why should you bother learning how to grow chili peppers indoors? Well, for starters, you gain complete control over the growing environment, ensuring a consistent supply of fresh, flavorful peppers year-round. No more relying on questionable supermarket produce! Plus, it’s incredibly rewarding to nurture a plant from seed to harvest, adding a touch of green to your living space and a dash of heat to your culinary creations. In this article, I’ll guide you through everything from choosing the right varieties to troubleshooting common problems, so you can enjoy a bountiful harvest of homegrown chili peppers, no matter the season.
Growing Chili Peppers Indoors: A Spicy DIY Adventure!
Hey there, fellow chili enthusiasts! Ever dreamt of having a constant supply of fiery peppers right in your kitchen? Well, you’re in the right place! I’m going to walk you through everything you need to know to successfully grow chili peppers indoors. It’s easier than you think, and the rewards are oh-so-spicy!
Choosing Your Chili Pepper Variety
Before we dive into the nitty-gritty, let’s talk peppers! Not all chili peppers are created equal, and some are better suited for indoor growing than others. Here’s what I recommend:
* Consider size: Compact varieties like Thai peppers, habaneros, jalapenos, and some ornamental peppers are ideal for indoor spaces. They won’t outgrow your available space as quickly as larger varieties.
* Think about heat level: Do you prefer a mild kick or a scorching inferno? Choose varieties that match your spice tolerance. Jalapenos are a good starting point for beginners, while habaneros and Scotch bonnets pack a serious punch.
* Check for disease resistance: Look for varieties that are known to be resistant to common pepper diseases, especially if you’re new to growing. This will save you a lot of headaches down the road.
* My personal favorites: I’ve had great success with Thai peppers (prolific and spicy!), jalapenos (versatile and easy to grow), and habaneros (for when I’m feeling brave!).
Gathering Your Supplies
Okay, now that you’ve picked your pepper, let’s gather the necessary supplies. Here’s a checklist:
* Seeds: Purchase high-quality chili pepper seeds from a reputable source.
* Seed starting tray or small pots: These will be used to germinate your seeds.
* Seed starting mix: This is a light, sterile soil mix that’s perfect for seedlings.
* Larger pots (at least 5 gallons): These will be the permanent homes for your pepper plants.
* Potting mix: Choose a well-draining potting mix specifically formulated for vegetables.
* Grow lights: Essential for providing adequate light, especially during the winter months. LED grow lights are energy-efficient and work great.
* Fertilizer: A balanced fertilizer formulated for tomatoes or peppers will provide the necessary nutrients.
* Watering can or spray bottle: For watering your plants.
* Small fan: To provide air circulation and prevent fungal diseases.
* Optional: Heat mat (for faster germination), humidity dome (for maintaining moisture), pH meter (for testing soil pH).
Starting Your Seeds
This is where the magic begins! Starting your seeds indoors gives you a head start on the growing season.
1. Prepare your seed starting tray or pots: Fill your seed starting tray or small pots with seed starting mix. Moisten the mix thoroughly.
2. Sow the seeds: Plant the seeds about ¼ inch deep. I usually plant 2-3 seeds per cell or pot to increase the chances of germination.
3. Cover and water: Gently cover the seeds with more seed starting mix and water lightly.
4. Provide warmth and humidity: Place the tray or pots on a heat mat (optional) and cover with a humidity dome (optional). This will help to maintain a warm and humid environment, which is ideal for germination.
5. Place under grow lights: Position your grow lights about 2-4 inches above the tray or pots.
6. Monitor and water: Keep the seed starting mix consistently moist, but not soggy. Check daily and water as needed.
7. Wait for germination: Chili pepper seeds can take anywhere from 7 to 21 days to germinate, depending on the variety and conditions. Be patient!
8. Remove humidity dome: Once the seedlings emerge, remove the humidity dome to prevent fungal diseases.
9. Thin the seedlings: Once the seedlings have their first true leaves (the second set of leaves), thin them to one seedling per cell or pot. Choose the strongest and healthiest seedling and snip off the others at the soil line.
Transplanting Your Seedlings
Once your seedlings have grown a few inches tall and have a strong root system, it’s time to transplant them into larger pots.
1. Prepare your larger pots: Fill your larger pots (at least 5 gallons) with well-draining potting mix.
2. Carefully remove the seedlings: Gently remove the seedlings from their seed starting tray or pots. Be careful not to damage the roots.
3. Plant the seedlings: Dig a hole in the potting mix large enough to accommodate the root ball. Place the seedling in the hole and gently backfill with potting mix.
4. Water thoroughly: Water the seedlings thoroughly after transplanting.
5. Place under grow lights: Return the pots under the grow lights.
Caring for Your Chili Pepper Plants
Now that your chili pepper plants are in their permanent homes, it’s time to provide them with the care they need to thrive.
* Light: Chili peppers need at least 6-8 hours of direct light per day. If you’re growing them indoors, you’ll need to supplement with grow lights. I recommend using LED grow lights, as they are energy-efficient and provide the full spectrum of light that plants need. Position the grow lights about 6-12 inches above the plants.
* Watering: Water your chili pepper plants regularly, but don’t overwater. Allow the top inch of soil to dry out between waterings. Overwatering can lead to root rot.
* Fertilizing: Fertilize your chili pepper plants every 2-3 weeks with a balanced fertilizer formulated for tomatoes or peppers. Follow the instructions on the fertilizer label.
* Temperature: Chili peppers prefer warm temperatures, between 70-85°F (21-29°C). Avoid exposing them to temperatures below 60°F (15°C).
* Humidity: Chili peppers prefer moderate humidity levels. If the air in your home is dry, you can increase the humidity by using a humidifier or by placing a tray of water near the plants.
* Air circulation: Good air circulation is important for preventing fungal diseases. Use a small fan to provide gentle air movement around the plants.
* Pruning: Pruning can help to improve air circulation and encourage bushier growth. Remove any yellowing or dead leaves. You can also pinch off the tips of the branches to encourage more branching.
* Pollination: Chili peppers are self-pollinating, but they may need a little help indoors. You can hand-pollinate the flowers by gently shaking the plants or by using a small paintbrush to transfer pollen from one flower to another.
* Pest control: Keep an eye out for pests such as aphids, spider mites, and whiteflies. If you find any pests, you can treat them with insecticidal soap or neem oil.
Harvesting Your Chili Peppers
The moment you’ve been waiting for! Harvesting your own homegrown chili peppers is incredibly satisfying.
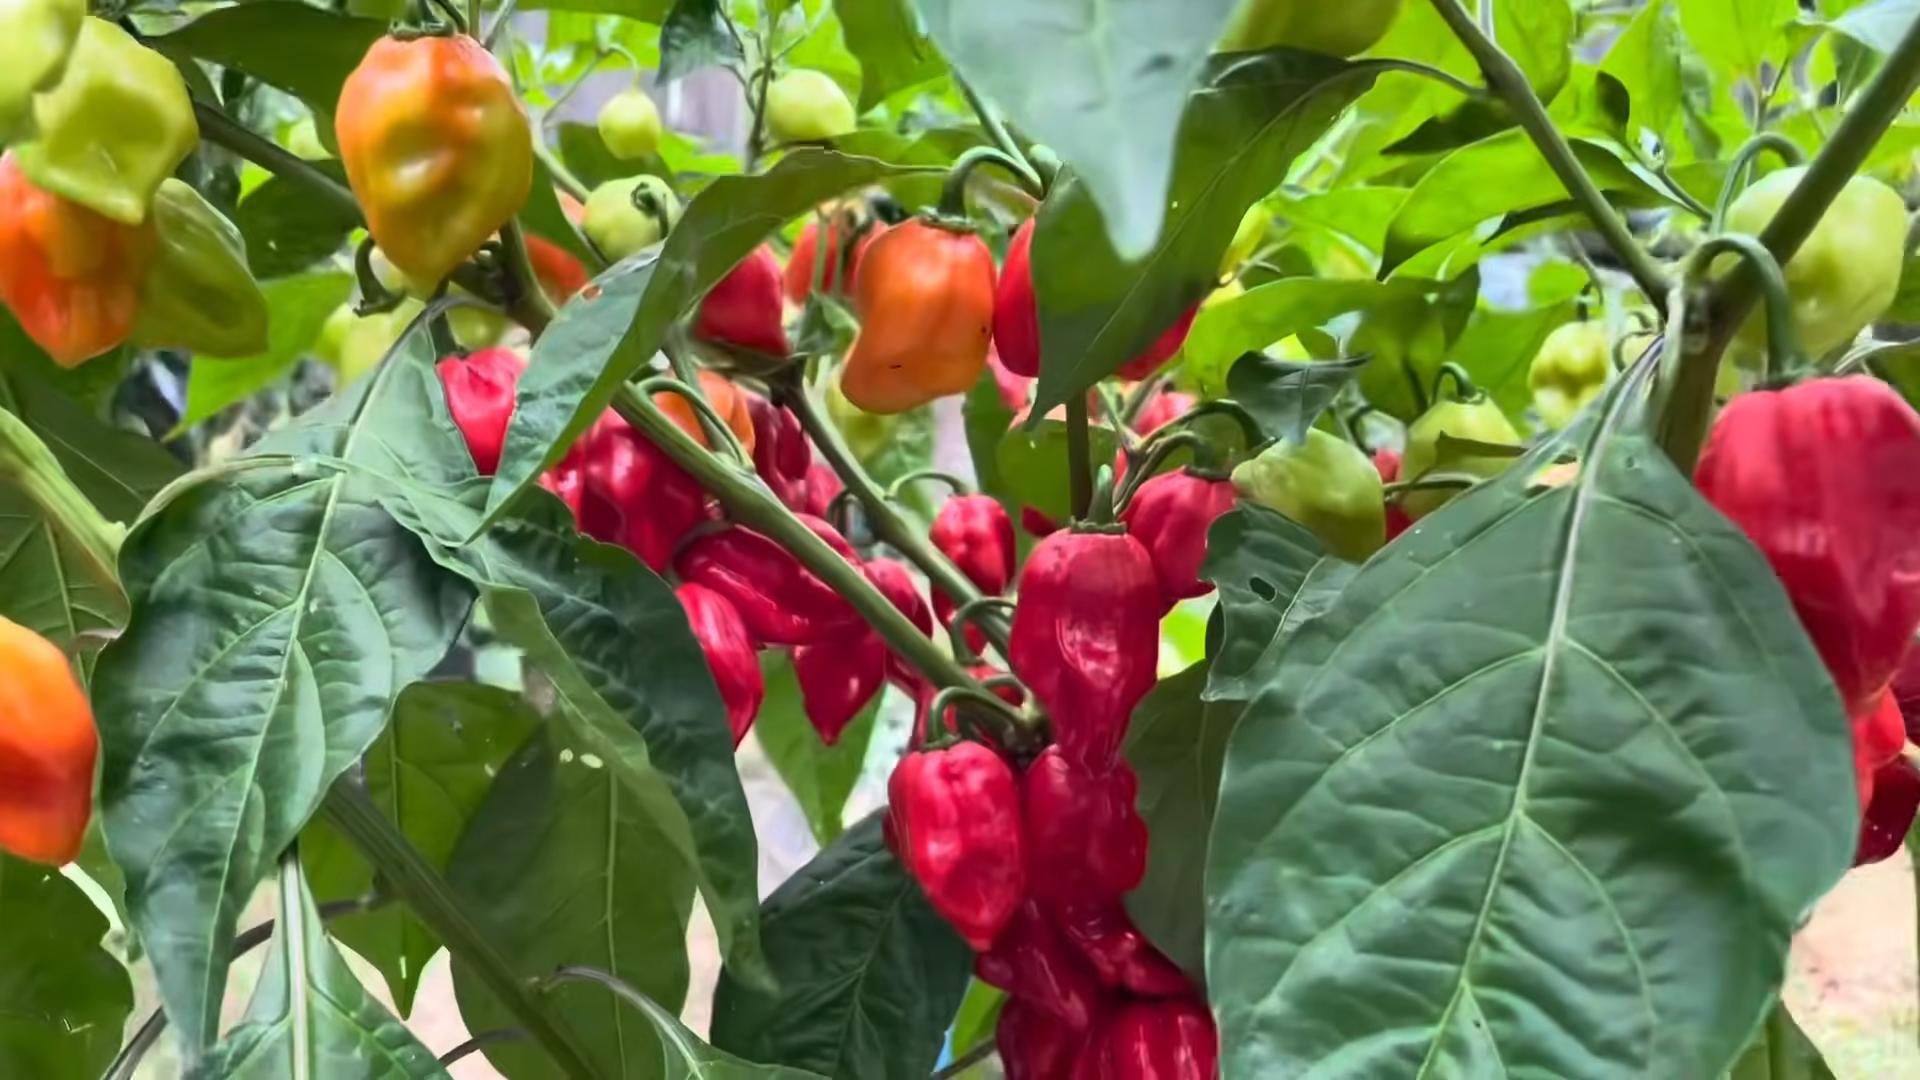
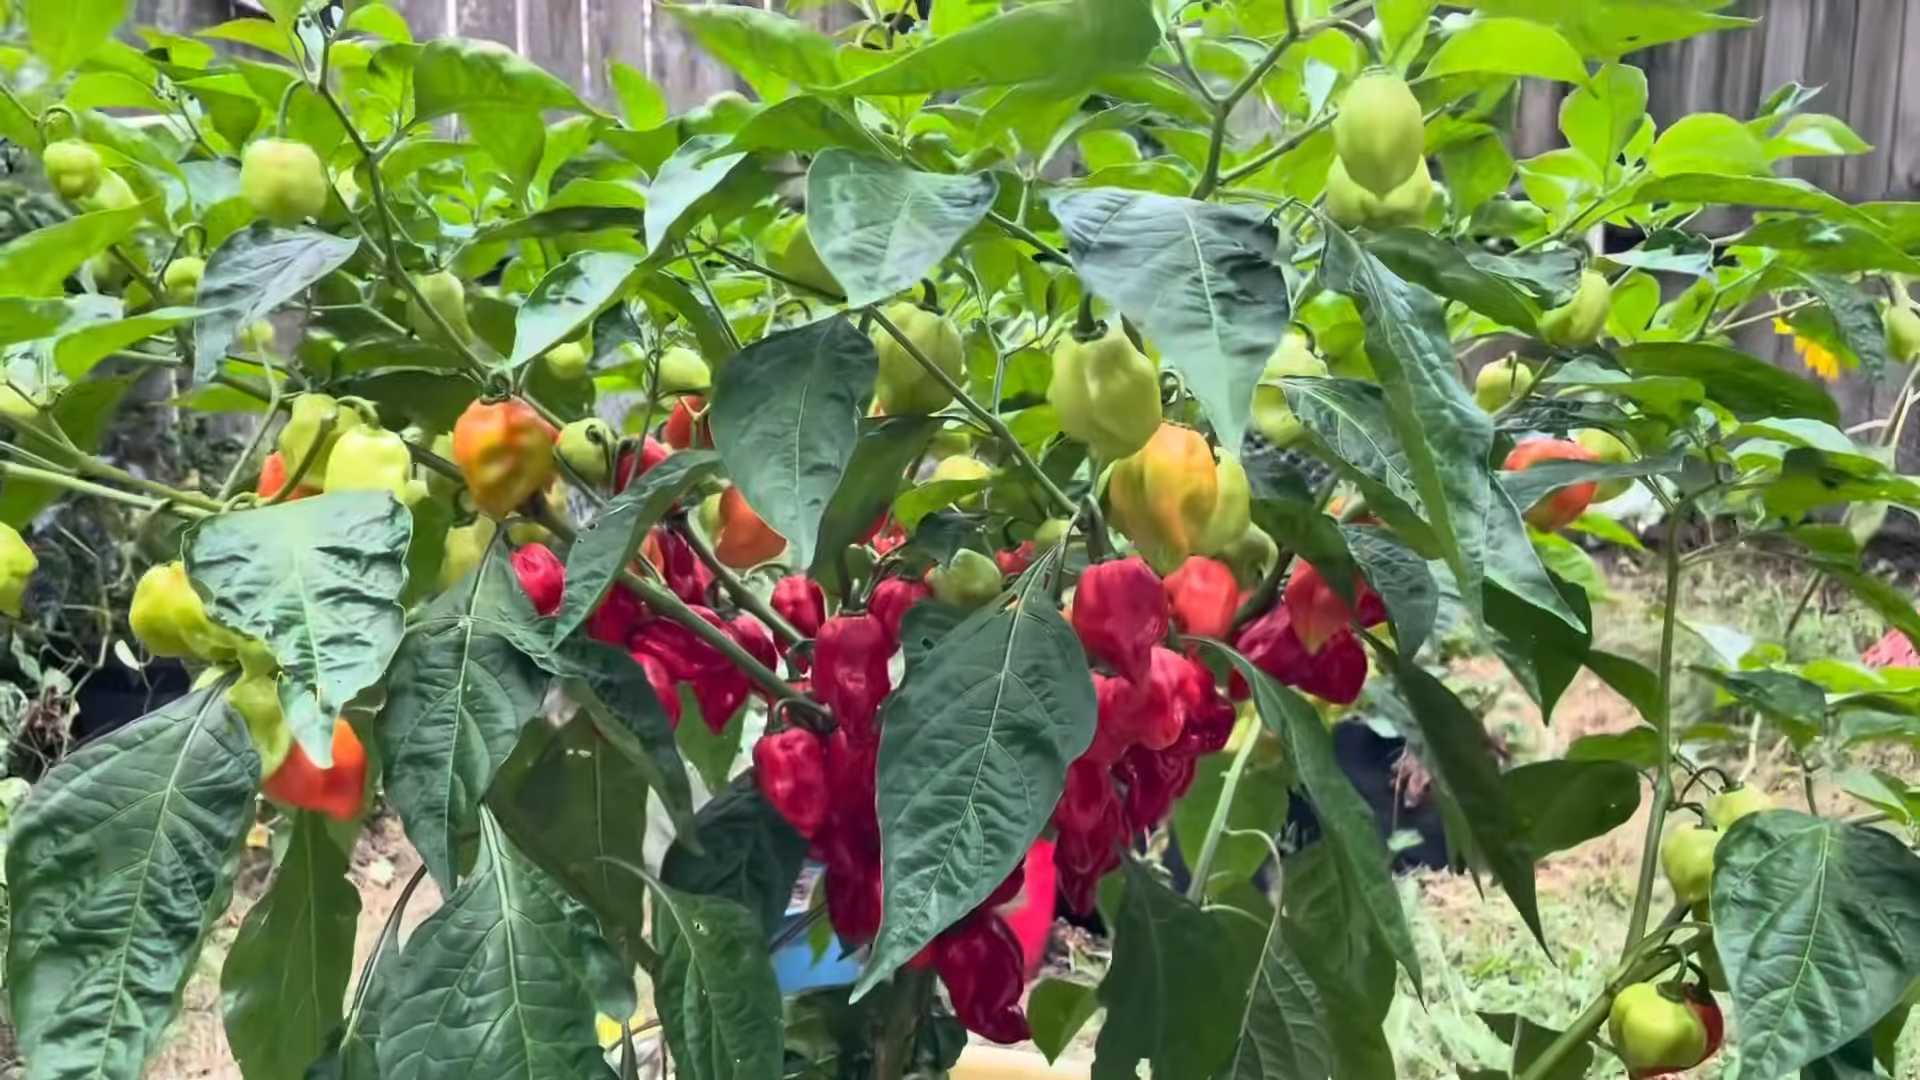
* When to harvest: Chili peppers are typically ready to harvest when they have reached their mature color and size. The color will vary depending on the variety. For example, jalapenos are typically harvested when they are dark green, while habaneros are harvested when they are orange or red.
* How to harvest: Use a sharp knife or scissors to cut the peppers from the plant. Be careful not to damage the plant.
* Enjoy your harvest: Use your fresh chili peppers in your favorite recipes, or dry them for later use.
Troubleshooting
Even with the best care, you may encounter some problems along the way. Here are some common issues and how to address them:
* Yellowing leaves: This can be caused by overwatering, underwatering, nutrient deficiencies, or pests. Check the soil moisture and adjust your watering accordingly. Fertilize the plants if necessary. Inspect the plants for pests and treat them if found.
* Leaf drop: This can be caused by temperature stress, overwatering, or underwatering. Make sure the plants are not exposed to extreme temperatures. Adjust your watering accordingly.
* Lack of fruit: This can be caused by insufficient light, poor pollination, or nutrient deficiencies. Make sure the plants are getting enough light. Hand-pollinate the flowers if necessary. Fertilize the plants if necessary.
* Pests: Common pests include aphids, spider mites, and whiteflies. Treat them with insecticidal soap or neem oil.
* Fungal diseases: Fungal diseases can be caused by high humidity and poor air circulation. Provide good air circulation and avoid overwatering.
Enjoying Your Spicy Harvest!
Growing chili peppers indoors is a rewarding experience. With a little care and attention, you can enjoy a constant supply of fresh, spicy peppers all year round. So go ahead, give it a
Conclusion
So, there you have it! Growing chili peppers indoors is not only achievable but also incredibly rewarding. Imagine the satisfaction of plucking fresh, fiery peppers from your own indoor garden, ready to spice up your meals whenever you desire. This DIY trick transforms your living space into a miniature farm, offering a continuous supply of fresh ingredients and a delightful connection to nature, even in the heart of the city.
Why is this a must-try? Because it empowers you to control the entire growing process, from seed to harvest. You dictate the environment, ensuring optimal conditions for your chili peppers to thrive. No more relying on store-bought peppers that may lack the vibrancy and flavor of homegrown varieties. Plus, it’s a fantastic way to reduce your carbon footprint by minimizing your reliance on commercially grown produce.
But the beauty of growing chili peppers indoors lies in its adaptability. Feel free to experiment with different varieties! From the mild poblano to the scorching habanero, the possibilities are endless. Consider using different types of growing mediums, such as coco coir or perlite, to see which works best for your setup. You can also explore hydroponic systems for an even more efficient and controlled growing environment.
Don’t be afraid to get creative with your lighting! While a sunny windowsill can work, supplemental grow lights can significantly boost your pepper production, especially during the darker months. LED grow lights are energy-efficient and provide the specific wavelengths of light that chili peppers need to flourish.
And speaking of flourishing, remember to pay attention to your plants’ needs. Regular watering, proper fertilization, and diligent pest control are crucial for success. Keep an eye out for common pests like aphids and spider mites, and take action promptly to prevent infestations.
Ultimately, growing chili peppers indoors is a journey of discovery. It’s about learning, experimenting, and adapting to the unique needs of your plants. It’s about connecting with nature and enjoying the fruits (or rather, peppers) of your labor.
We wholeheartedly encourage you to give this DIY trick a try. It’s easier than you might think, and the rewards are well worth the effort. Once you’ve harvested your first batch of homegrown chili peppers, you’ll be hooked!
And most importantly, we want to hear about your experience! Share your tips, tricks, and triumphs in the comments below. Let us know which varieties you’re growing, what challenges you’ve faced, and what delicious recipes you’ve created with your homegrown peppers. Together, we can build a community of indoor chili pepper enthusiasts and inspire others to embark on this exciting journey. So, get your seeds ready, prepare your growing space, and get ready to experience the joy of growing chili peppers indoors!
Frequently Asked Questions (FAQ)
What are the best chili pepper varieties to grow indoors?
The best chili pepper varieties to grow indoors are typically those that are compact and don’t require excessive space. Some excellent choices include:
* **Thai Chili Peppers:** These are small, prolific producers that pack a punch of heat. They are relatively easy to grow indoors and are perfect for adding spice to Asian dishes.
* **Jalapeño Peppers:** A classic choice for their moderate heat and versatility. They are relatively easy to grow and produce a good yield.
* **Serrano Peppers:** Similar to jalapeños but with a bit more heat. They are also a good option for indoor growing.
* **Poblano Peppers:** Milder than jalapeños, poblanos are great for stuffing or roasting. They are larger plants, so ensure you have adequate space.
* **Habanero Peppers:** For those who crave intense heat, habaneros can be grown indoors, but they require more attention and a longer growing season.
* **Ornamental Peppers:** These peppers are grown for their colorful fruits and compact size. They are less about heat and more about aesthetics, making them a great addition to any indoor garden.
How much light do chili peppers need indoors?
Chili peppers require a significant amount of light to thrive and produce peppers. Ideally, they need at least 6-8 hours of direct sunlight per day. If you don’t have a sunny windowsill, you’ll need to supplement with grow lights.
* **Natural Sunlight:** Place your chili pepper plants in the sunniest spot in your home, preferably a south-facing window.
* **Grow Lights:** If natural light is insufficient, use LED grow lights. Full-spectrum LED lights are ideal, as they provide the entire range of light that plants need for photosynthesis. Position the lights a few inches above the plants and adjust as they grow.
* **Light Duration:** Keep the grow lights on for 14-16 hours per day to mimic the long days of summer.
What type of soil is best for growing chili peppers indoors?
The best type of soil for growing chili peppers indoors is a well-draining potting mix. Avoid using garden soil, as it can be too heavy and may contain pests or diseases.
* **Potting Mix:** Choose a high-quality potting mix that is specifically formulated for container gardening.
* **Drainage:** Ensure the potting mix drains well to prevent root rot. You can improve drainage by adding perlite or vermiculite to the mix.
* **pH Level:** Chili peppers prefer a slightly acidic to neutral pH level (around 6.0-7.0).
How often should I water my indoor chili pepper plants?
Water your chili pepper plants when the top inch of soil feels dry to the touch. Avoid overwatering, as this can lead to root rot.
* **Watering Frequency:** Water deeply until water drains out of the bottom of the pot. Allow the soil to dry out slightly between waterings.
* **Water Quality:** Use room-temperature water. Avoid using cold water, as it can shock the plants.
* **Humidity:** Chili peppers prefer moderate humidity levels. If the air in your home is dry, you can increase humidity by misting the plants regularly or using a humidifier.
What kind of fertilizer do chili peppers need?
Chili peppers need a balanced fertilizer that contains nitrogen, phosphorus, and potassium (NPK).
* **Fertilizer Type:** Use a fertilizer that is specifically formulated for vegetables or flowering plants.
* **Fertilizer Ratio:** A fertilizer with an NPK ratio of 5-10-5 or 10-10-10 is a good choice.
* **Fertilizing Frequency:** Fertilize your chili pepper plants every 2-3 weeks during the growing season. Follow the instructions on the fertilizer label.
How do I pollinate chili pepper flowers indoors?
Chili peppers are self-pollinating, but they may need a little help indoors, where there are no bees or wind to assist.
* **Hand Pollination:** Use a small paintbrush or cotton swab to gently transfer pollen from one flower to another.
* **Shaking:** Gently shake the plants to help release pollen.
* **Fan:** Use a small fan to circulate air around the plants, which can also help with pollination.
How do I deal with pests on my indoor chili pepper plants?
Indoor chili pepper plants can be susceptible to pests such as aphids, spider mites, and whiteflies.
* **Prevention:** Inspect your plants regularly for signs of pests.
* **Treatment:** If you find pests, you can try washing them off with a strong stream of water. You can also use insecticidal soap or neem oil to control pests.
* **Isolation:** Isolate infested plants to prevent the spread of pests to other plants.
How long does it take for chili peppers to grow indoors?
The time it takes for chili peppers to grow indoors depends on the variety and growing conditions.
* **Germination:** Seeds typically germinate in 7-14 days.
* **Flowering:** Plants typically start to flower in 2-3 months.
* **Fruiting:** It can take another 1-2 months for the peppers to ripen after flowering.
* **Overall:** Expect a total growing time of 4-6 months from seed to harvest.
Can I grow chili peppers indoors year-round?
Yes, you can grow chili peppers indoors year-round, provided you provide them with adequate light, water, and nutrients.
* **Consistent Environment:** Maintain a consistent temperature and humidity level.
* **Supplemental Lighting:** Use grow lights to supplement natural light during the winter months.
* **Dormancy:** Some chili pepper plants may go dormant during the winter. If this happens, reduce watering and fertilization until new growth appears in the spring.
Leave a Comment