

Grow Ginger at Home – ever dreamt of harvesting your own spicy, aromatic ginger straight from your backyard (or even your windowsill)? I know I have! There’s something incredibly satisfying about nurturing a plant from rhizome to harvest, especially when it’s something as versatile and delicious as ginger.
Ginger has a rich history, dating back thousands of years. Originating in South Asia, it quickly spread across the globe, becoming a staple in traditional medicine and cuisines worldwide. Cultures have long revered ginger for its medicinal properties, using it to soothe digestive issues, reduce inflammation, and even combat the common cold. Think of all those times your grandma offered you ginger ale when you weren’t feeling well – she was onto something!
But why should you bother learning to grow ginger at home? Well, for starters, store-bought ginger can sometimes be a bit lackluster. Growing your own allows you to enjoy fresher, more flavorful ginger whenever you need it. Plus, it’s a fantastic way to reduce your carbon footprint and connect with nature. Imagine the satisfaction of adding your homegrown ginger to your favorite stir-fry, tea, or even a homemade gingerbread cookie! I’m going to show you some simple DIY tricks and hacks that will have you harvesting your own ginger in no time, even if you don’t have a green thumb. Let’s get started!
Grow Your Own Ginger: A Simple DIY Guide
Hey there, fellow plant enthusiasts! Ever thought about growing your own ginger? It’s surprisingly easy and rewarding, and you’ll have fresh ginger right at your fingertips whenever you need it. Plus, it’s a fun project that even beginners can tackle. Let’s dive in!
What You’ll Need
Before we get started, let’s gather our supplies. Here’s what you’ll need to grow your own ginger:
* Ginger Rhizome: Look for a plump, healthy-looking ginger rhizome (the “root” part) at your local grocery store or nursery. Choose one with visible “eyes” or buds – these are where the new shoots will sprout from. Organic ginger is often recommended as it’s less likely to be treated with growth inhibitors.
* Potting Mix: Use a well-draining potting mix. A mix designed for vegetables or herbs works great. Avoid heavy garden soil, as it can compact and hinder growth.
* Pot: Choose a wide, shallow pot. Ginger roots grow horizontally, so a wide pot is better than a deep one. Aim for a pot that’s at least 12 inches wide and 6-8 inches deep. Make sure it has drainage holes!
* Watering Can: For gentle watering.
* Spray Bottle (Optional): For misting the soil.
* Warm Location: Ginger thrives in warm temperatures.
* Patience: Growing ginger takes time, so be patient and enjoy the process!
Preparing the Ginger Rhizome
This is a crucial step to give your ginger the best start.
1. Soaking (Optional but Recommended): I like to soak my ginger rhizome in lukewarm water for 12-24 hours before planting. This helps to rehydrate it and encourage sprouting. It’s not absolutely necessary, but I’ve found it speeds up the germination process.
2. Cutting (If Necessary): If your ginger rhizome is large, you can cut it into smaller pieces, ensuring each piece has at least one or two “eyes” or buds. Let the cut pieces air dry for a day or two to allow the cut surfaces to callous over. This helps prevent rot. I usually use a clean knife to do this.
3. Choosing the Right Piece: If you’re not cutting the rhizome, inspect it carefully. Look for the most promising “eyes” – the ones that look like they’re just about to sprout. These are the areas where the new ginger shoots will emerge.
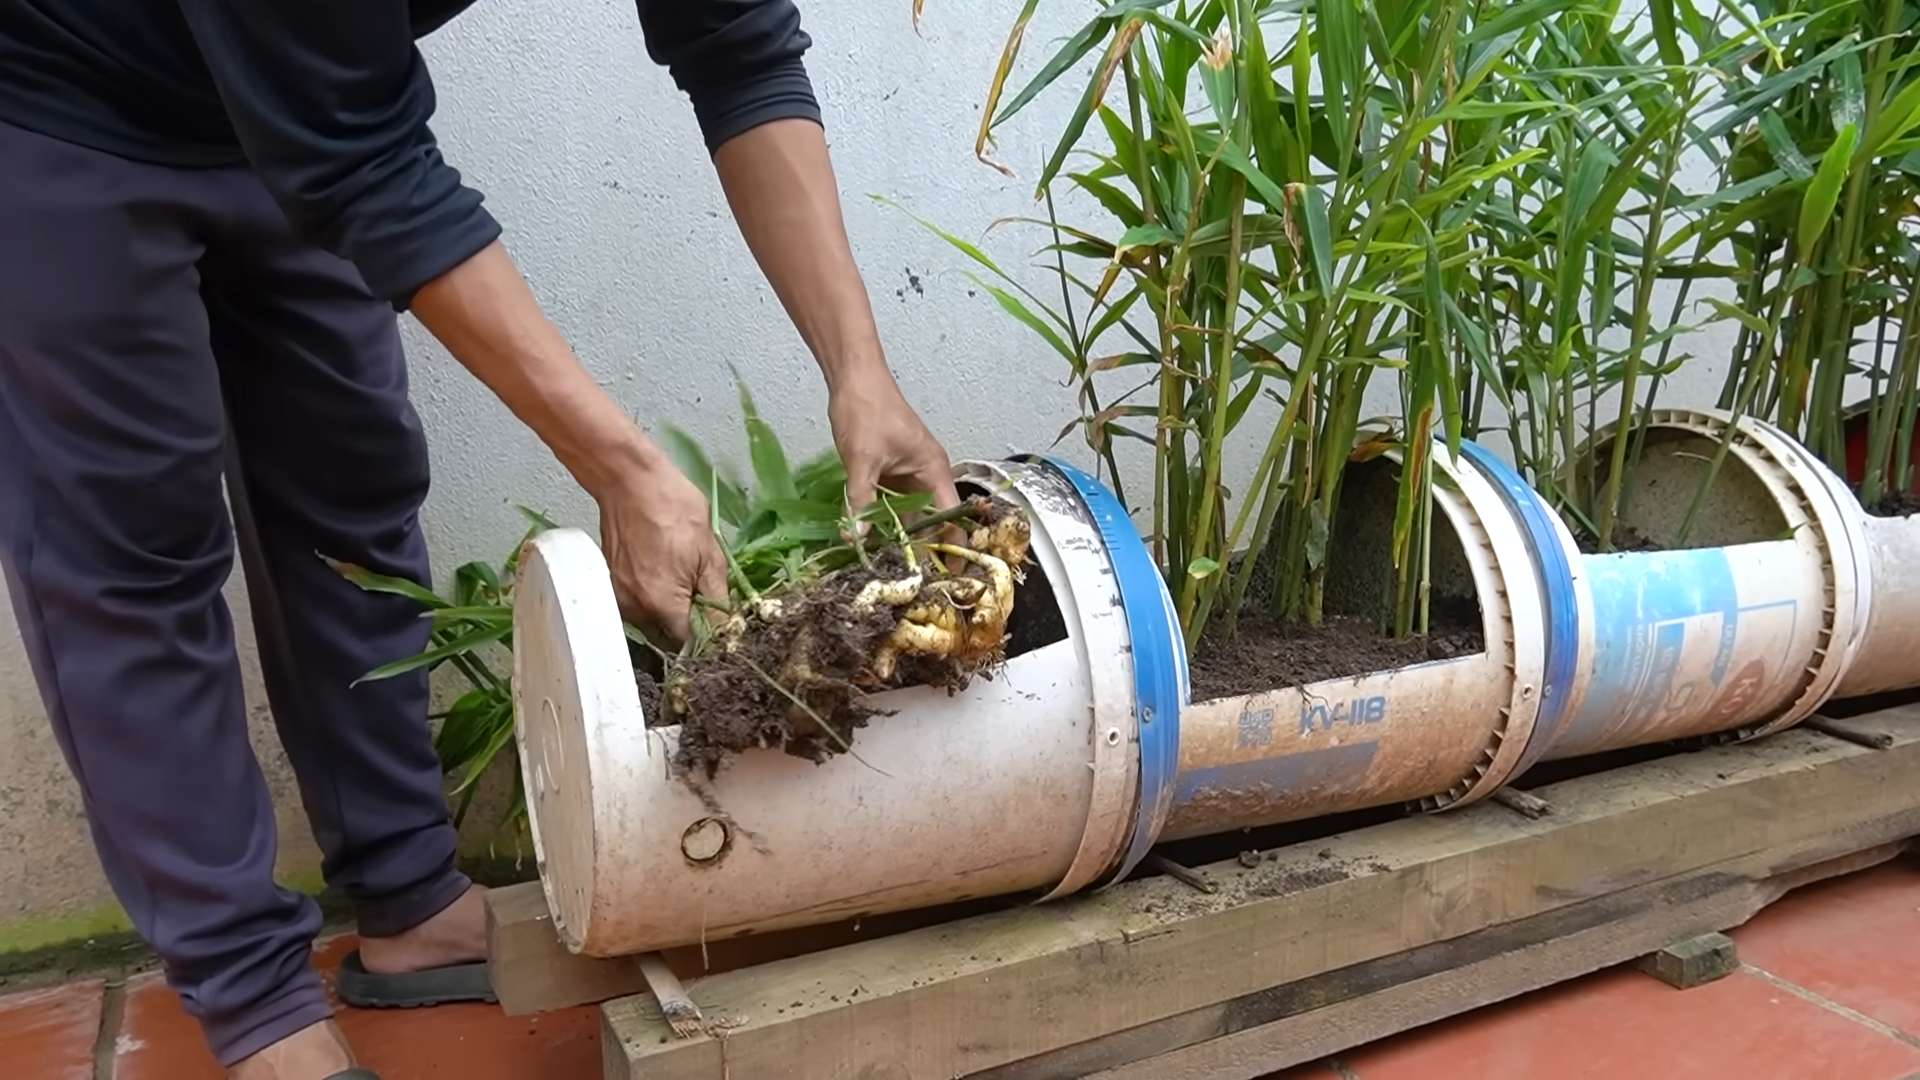
Planting Your Ginger
Now for the fun part – getting your ginger in the soil!
1. Fill the Pot: Fill your pot with the well-draining potting mix, leaving about an inch or two of space at the top.
2. Plant the Rhizome: Place the ginger rhizome on top of the soil, with the “eyes” or buds facing upwards.
3. Cover Lightly: Cover the rhizome with about 1-2 inches of potting mix. Don’t bury it too deep, as this can hinder sprouting.
4. Water Gently: Water the soil gently until it’s moist but not soggy. Avoid overwatering, as this can lead to rot. I like to use a watering can with a gentle rose head to avoid disturbing the soil.
Caring for Your Ginger Plant
Proper care is essential for healthy ginger growth.
1. Location, Location, Location: Place your pot in a warm location with indirect sunlight. Ginger thrives in temperatures between 65°F and 80°F (18°C and 27°C). Avoid direct sunlight, as it can scorch the leaves. An east-facing window is often ideal.
2. Watering: Keep the soil consistently moist, but not soggy. Water when the top inch of soil feels dry to the touch. Overwatering can lead to root rot, so be careful. I usually check the soil moisture every few days.
3. Humidity: Ginger loves humidity. If you live in a dry climate, you can increase humidity by misting the leaves with a spray bottle regularly. You can also place the pot on a tray filled with pebbles and water, ensuring the bottom of the pot doesn’t sit directly in the water.
4. Fertilizing: Feed your ginger plant with a balanced liquid fertilizer every 2-3 weeks during the growing season (spring and summer). Follow the instructions on the fertilizer label. I usually dilute the fertilizer to half strength to avoid burning the roots.
5. Monitoring for Pests and Diseases: Keep an eye out for pests like aphids or spider mites. If you spot any, treat them with an insecticidal soap or neem oil. Root rot can be a problem if the soil is too wet, so ensure good drainage and avoid overwatering.
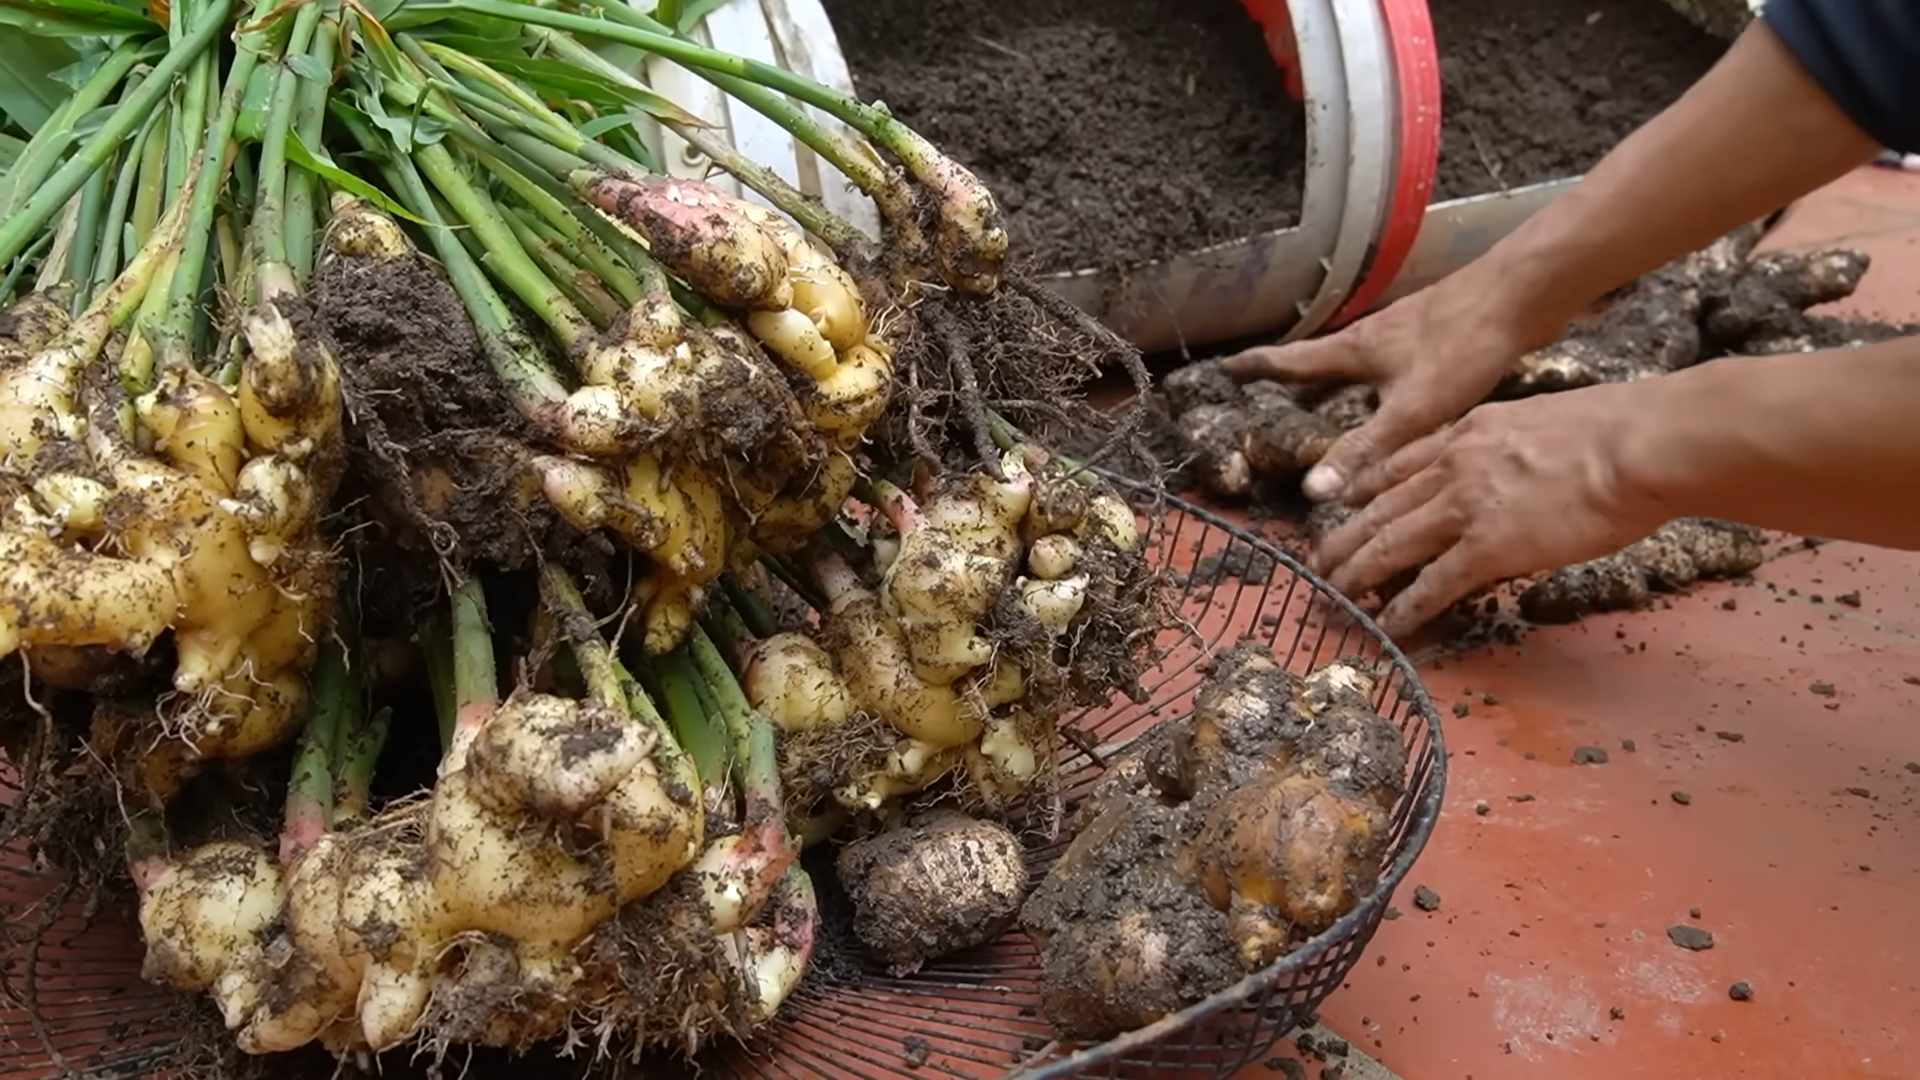
Harvesting Your Ginger
The best part – reaping the rewards of your hard work!
1. When to Harvest: You can start harvesting ginger about 8-10 months after planting. The leaves will start to turn yellow and die back when the ginger is ready to harvest.
2. Harvesting Process: Gently dig around the plant to expose the rhizomes. You can harvest the entire plant or just a portion of the rhizomes, leaving the rest to continue growing. I usually use a small trowel to carefully loosen the soil around the ginger.
3. Storing Your Ginger: Freshly harvested ginger can be stored in the refrigerator for several weeks. You can also freeze it for longer storage. To freeze, peel and chop the ginger, then place it in a freezer bag or container.
Troubleshooting
Even with the best care, you might encounter some challenges. Here are a few common issues and how to address them:
* Yellowing Leaves: This could be a sign of overwatering, underwatering, or nutrient deficiency. Check the soil moisture and adjust your watering accordingly. If the soil is dry, water more frequently. If it’s soggy, allow it to dry out before watering again. You may also need to fertilize the plant.
* No Sprouting: If your ginger rhizome hasn’t sprouted after a few weeks, it could be due to several factors. The rhizome might be old or damaged, the soil might be too cold, or you might be overwatering. Ensure the rhizome is healthy, the soil is warm, and you’re not overwatering.
* Root Rot: This is usually caused by overwatering. The roots will turn brown and mushy. To prevent root rot, ensure good drainage and avoid overwatering. If you suspect root rot, you can try repotting the plant in fresh, well-draining soil.
Extra Tips and Tricks
Here are a few extra tips to help you succeed with growing ginger at home:
* Start with Healthy Rhizomes: Choosing a healthy ginger rhizome is crucial for success. Look for plump, firm rhizomes with visible “eyes” or buds.
* Use Well-Draining Soil: Ginger needs well-draining soil to thrive. Avoid heavy garden soil, as it can compact and hinder growth.
* Provide Warmth and Humidity: Ginger loves warmth and humidity. Place your pot in a warm location and mist the leaves regularly to increase humidity.
* Be Patient: Growing ginger takes time, so be patient and enjoy the process. It can take several months for the rhizomes to mature.
* Experiment: Don’t be afraid to experiment with different growing conditions to see what works best for you. Every environment is different, so what works for one person might not work for another.
Growing your own ginger is a rewarding experience. With a little patience and care, you can enjoy fresh, homegrown ginger whenever you need it. Happy gardening!
Conclusion
So, there you have it! Growing ginger at home is not only surprisingly simple, but it’s also incredibly rewarding. Imagine the satisfaction of snipping off a piece of fresh, vibrant ginger root whenever a recipe calls for it, knowing you nurtured it from a humble rhizome. Forget those sad, shriveled pieces of ginger languishing in the produce aisle – with this DIY trick, you’ll have a constant supply of potent, flavorful ginger right at your fingertips.
This isn’t just about convenience; it’s about experiencing the joy of gardening, even on a small scale. It’s about connecting with your food and understanding where it comes from. And let’s be honest, it’s also about impressing your friends and family with your newfound green thumb!
Why is this a must-try? Because it’s economical, sustainable, and delivers a superior product. Store-bought ginger can sometimes lack the intense flavor of freshly grown ginger. By growing your own, you control the quality and ensure you’re getting the most vibrant, aromatic ginger possible. Plus, you’re reducing your carbon footprint by eliminating the need for transportation and packaging.
But the best part? The possibilities are endless! Once you’ve mastered the basics, you can experiment with different varieties of ginger. Try growing the spicier Chinese ginger or the milder, more floral Hawaiian ginger. You can also explore different growing mediums, from traditional potting soil to hydroponic systems. Consider adding companion plants like turmeric or galangal to create a mini-ginger garden.
And don’t limit yourself to just using the root! The ginger leaves are also edible and can be used to add a subtle ginger flavor to salads, teas, and stir-fries. The young shoots are also delicious and can be pickled or added to soups.
We encourage you to embrace this simple yet transformative DIY project. Start small, be patient, and don’t be afraid to experiment. The rewards are well worth the effort.
Ready to embark on your ginger-growing adventure? We’re confident that you’ll be amazed at how easy and fulfilling it is. And most importantly, we want to hear about your experience! Share your tips, tricks, and photos with us in the comments below. Let’s create a community of home-grown ginger enthusiasts! Let us know what growing methods worked best for you, what challenges you faced, and what delicious dishes you created with your homegrown ginger. Your insights will help others succeed and inspire them to try this rewarding DIY trick. So, get your hands dirty and start growing ginger at home today! You won’t regret it.
Frequently Asked Questions (FAQ)
1. What kind of ginger should I use to start growing?
The best ginger to use for propagation is fresh, plump ginger root from the grocery store. Look for pieces that are firm, with tight skin and visible “eyes” (small buds). Organic ginger is often recommended, as it’s less likely to have been treated with growth inhibitors. Avoid ginger that is shriveled, moldy, or has soft spots. The healthier the ginger root you start with, the better your chances of success.
2. How long does it take to grow ginger at home?
Growing ginger takes time and patience. You can expect to see sprouts emerging from the soil within a few weeks, but it typically takes 8-10 months for the ginger root to mature enough for harvesting. However, you can start harvesting small pieces of ginger after about 4 months if you need them. The longer you let it grow, the larger and more flavorful the rhizomes will become.
3. What are the ideal growing conditions for ginger?
Ginger thrives in warm, humid environments with partial shade. It needs well-draining soil that is rich in organic matter. The ideal temperature range is between 65°F and 90°F (18°C and 32°C). Avoid exposing your ginger plant to direct sunlight, as this can scorch the leaves. If you live in a cooler climate, you can grow ginger indoors in a pot near a sunny window, but make sure to provide adequate humidity.
4. How often should I water my ginger plant?
Ginger needs consistent moisture, but it’s important not to overwater it. Water thoroughly when the top inch of soil feels dry to the touch. Ensure that the pot has good drainage to prevent root rot. During the warmer months, you may need to water more frequently. In the winter, when the plant is dormant, you can reduce watering.
5. What kind of soil is best for growing ginger?
Ginger prefers well-draining soil that is rich in organic matter. A good potting mix for ginger would be a combination of potting soil, compost, and perlite or vermiculite. This will provide the necessary nutrients and drainage for healthy growth. You can also add some aged manure or bone meal to the soil to boost its fertility.
6. How do I harvest ginger?
To harvest ginger, gently dig around the plant and lift the rhizomes from the soil. You can harvest the entire plant or just take a few pieces as needed. If you only need a small amount of ginger, carefully cut off a piece of the rhizome and replant the remaining portion. After harvesting, wash the ginger root thoroughly and store it in a cool, dry place.
7. Can I grow ginger indoors?
Yes, you can definitely grow ginger indoors, especially if you live in a climate with cold winters. Choose a pot that is at least 12 inches deep and wide to allow for root growth. Place the pot near a sunny window that receives indirect sunlight. Maintain a warm and humid environment by misting the plant regularly or using a humidifier.
8. What are some common problems when growing ginger and how do I fix them?
Some common problems when growing ginger include root rot, pests, and nutrient deficiencies. Root rot can be prevented by ensuring good drainage and avoiding overwatering. Pests such as aphids and spider mites can be controlled with insecticidal soap or neem oil. Nutrient deficiencies can be addressed by fertilizing the plant with a balanced organic fertilizer. Yellowing leaves can indicate overwatering, underwatering, or a lack of nutrients.
9. How do I store my harvested ginger?
Freshly harvested ginger can be stored in the refrigerator for several weeks. Wrap it in a paper towel and place it in a plastic bag to prevent it from drying out. You can also freeze ginger for longer storage. Peel the ginger and chop it into small pieces or grate it before freezing. Store the frozen ginger in an airtight container or freezer bag.
10. Can I grow ginger in containers?
Absolutely! Growing ginger in containers is a great option, especially if you have limited space or live in a cooler climate. Choose a container that is at least 12 inches deep and wide to allow for adequate root growth. Make sure the container has drainage holes to prevent waterlogging. Use a well-draining potting mix and place the container in a location that receives partial shade.
11. What fertilizer should I use for growing ginger?
Ginger benefits from regular fertilization, especially during the growing season. Use a balanced organic fertilizer with a ratio of 10-10-10 or 5-5-5. You can also use compost tea or fish emulsion to provide essential nutrients. Avoid over-fertilizing, as this can burn the roots.
12. Can I grow ginger from store-bought ground ginger?
No, you cannot grow ginger from store-bought ground ginger. Ground ginger is processed and dried, which destroys its ability to sprout. You need to use fresh ginger root with visible “eyes” to propagate new plants.
13. Is growing ginger at home worth it?
Yes, growing ginger at home is definitely worth it! Not only is it a fun and rewarding experience, but it also provides you with a constant supply of fresh, flavorful ginger. Homegrown ginger is often more potent and aromatic than store-bought ginger. Plus, you’ll have the satisfaction of knowing that you grew it yourself!

Leave a Comment