

Grow Sponge Gourd at Home? Absolutely! Imagine stepping into your backyard and harvesting fresh, vibrant sponge gourds, ready to be transformed into delicious meals or even natural bath sponges. It’s easier than you might think, and this DIY guide is your ticket to a thriving sponge gourd patch, even if you’re a beginner gardener.
The sponge gourd, also known as luffa, has a fascinating history. Originating in Asia and Africa, it’s been cultivated for centuries, not just for its culinary uses but also for its incredible fibrous skeleton. Historically, these gourds were used for everything from scrubbing tools to insulation, showcasing their versatility and importance in various cultures. I find it amazing how something so natural can be so useful!
Why should you learn to grow sponge gourd at home? Well, beyond the satisfaction of growing your own food, you’ll have access to a sustainable source of natural sponges, reducing your reliance on synthetic alternatives. Plus, sponge gourds are packed with nutrients and add a unique flavor to your dishes. In this article, I’ll share my favorite tips and tricks, from seed starting to harvesting, ensuring you have a bountiful crop. Let’s get our hands dirty and create a flourishing sponge gourd garden together!
Grow Your Own Loofah Sponges: A Beginner’s Guide to Cultivating Sponge Gourds at Home
Hey there, fellow gardening enthusiasts! Ever wondered where those amazing exfoliating loofah sponges come from? Well, I’m here to tell you that you can grow your own right in your backyard! It’s a surprisingly rewarding and relatively easy process. I’m going to walk you through everything you need to know to cultivate your own sponge gourds, from seed to scrub.
Choosing the Right Sponge Gourd Variety
First things first, let’s talk about varieties. There are a few different types of sponge gourds, but the most common and the one you’ll likely find seeds for is *Luffa aegyptiaca*, also known as the smooth loofah. *Luffa acutangula*, the angled loofah, is also an option, but it tends to be a bit smaller and more ridged. For the best sponge, I recommend sticking with *Luffa aegyptiaca*.
Getting Started: From Seed to Seedling
Okay, so you’ve got your seeds. Now what? You can either direct sow them into the ground or start them indoors. I prefer starting them indoors because it gives them a head start, especially if you live in a region with a shorter growing season.
Here’s how to start your sponge gourd seeds indoors:
* Soaking the Seeds: Before planting, soak your sponge gourd seeds in warm water for 24-48 hours. This helps to soften the hard outer shell and encourages germination. I usually put them in a small bowl on my kitchen counter.
* Choosing Your Seed Starting Mix: Use a good quality seed starting mix. This is important because it’s sterile and provides the right nutrients for young seedlings. Don’t use garden soil, as it can contain diseases and pests.
* Planting the Seeds: Fill small pots or seed trays with your seed starting mix. Make a small hole about 1 inch deep and place one seed in each hole. Cover the seeds lightly with the mix and gently water them.
* Creating a Warm and Humid Environment: Sponge gourd seeds need warmth and humidity to germinate. You can use a heat mat under your seed trays to keep the soil warm. Cover the trays with a plastic dome or plastic wrap to create a humid environment.
* Providing Light: Once the seeds germinate (usually within 7-14 days), remove the plastic cover and place the seedlings under grow lights or in a sunny window. They need at least 6-8 hours of sunlight per day.
* Watering Carefully: Keep the soil consistently moist, but not waterlogged. Water from the bottom to avoid damping off, a fungal disease that can kill young seedlings.
Preparing Your Garden Bed
Sponge gourds are vigorous growers and need plenty of space and sunshine. Choose a location in your garden that gets at least 6-8 hours of direct sunlight per day. The soil should be well-draining and rich in organic matter.
Here’s how to prepare your garden bed:
* Choosing the Right Location: Select a spot that receives ample sunlight and has good air circulation. Avoid areas that are prone to waterlogging.
* Soil Preparation: Amend the soil with plenty of compost or well-rotted manure. This will improve drainage and provide essential nutrients for your sponge gourds. I usually dig in a generous amount of compost a few weeks before planting.
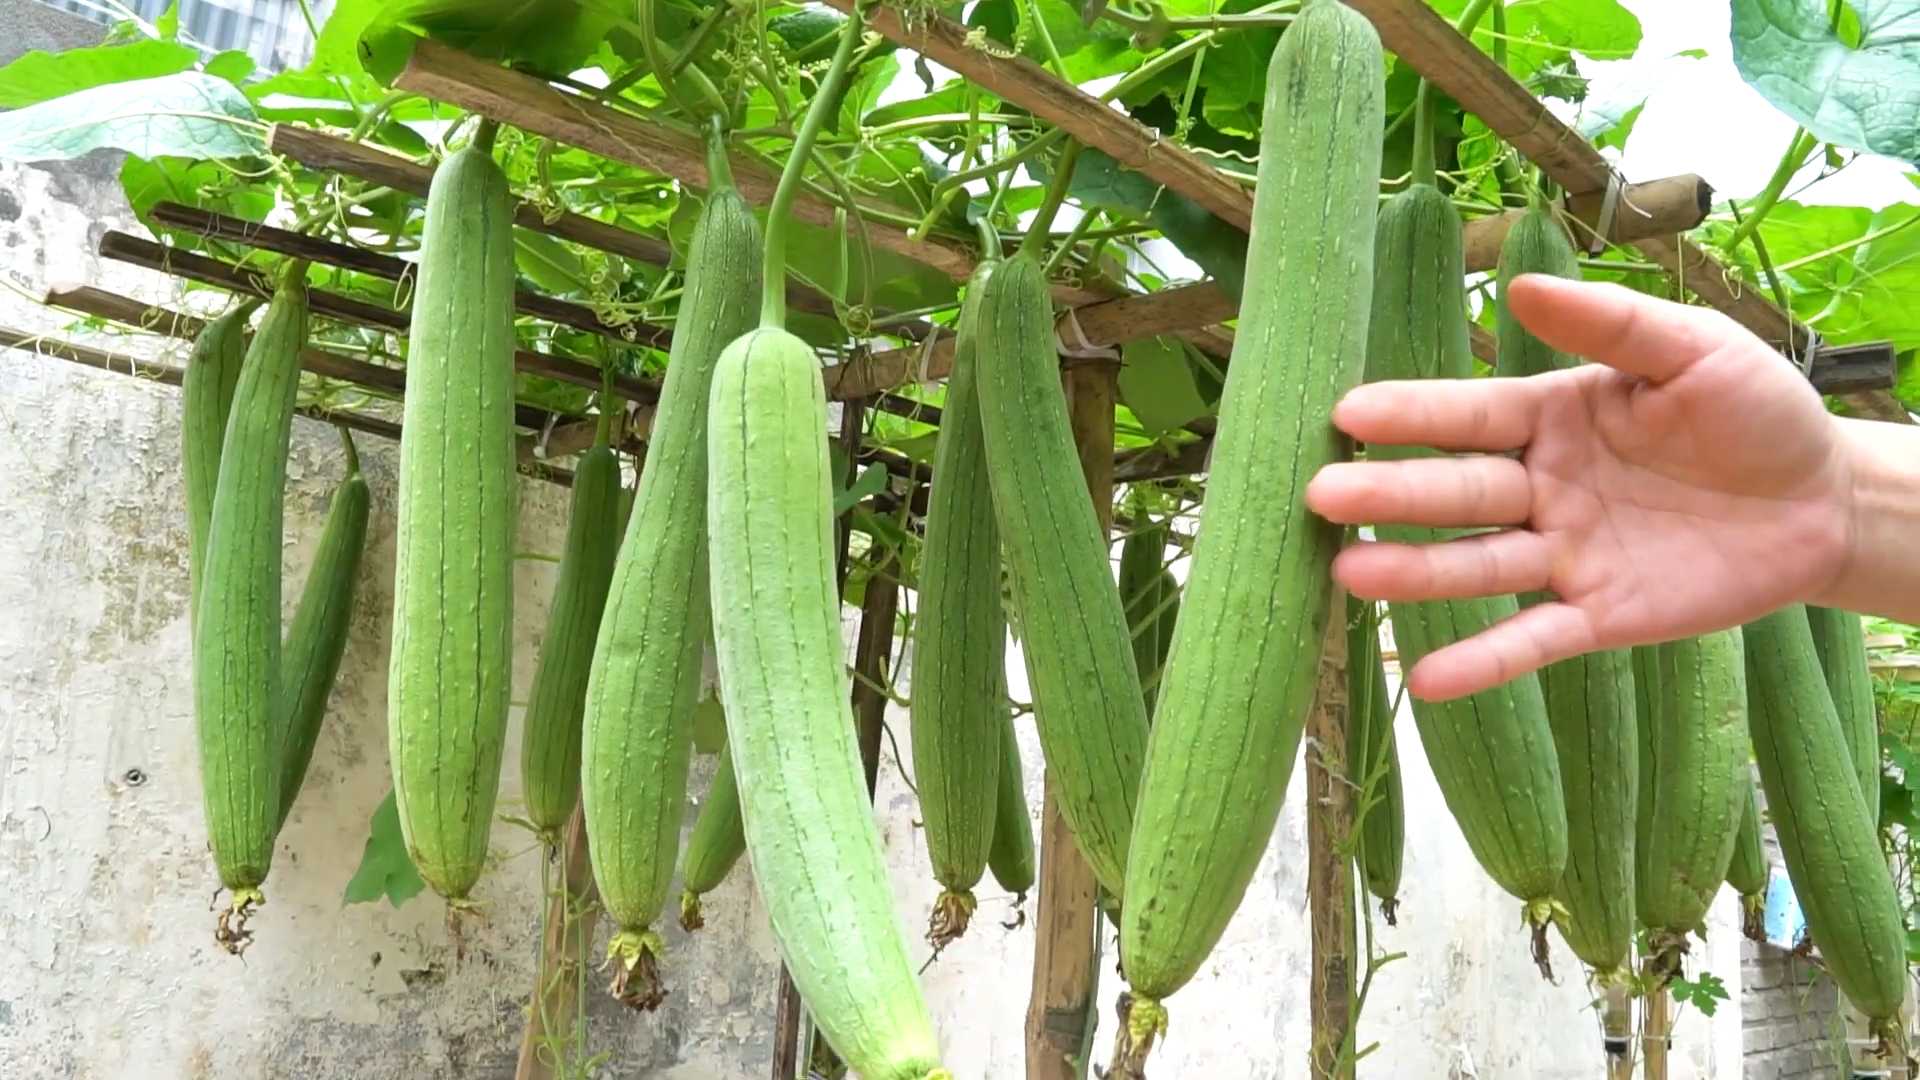
* Building a Strong Trellis: Sponge gourds are vines and need a strong trellis to climb on. You can use a fence, an arbor, or build your own trellis using wood or metal. Make sure the trellis is sturdy enough to support the weight of the mature vines and gourds. I’ve found that a trellis at least 6 feet tall works best.
* Spacing: Space your sponge gourd plants at least 2-3 feet apart. This will give them enough room to grow and prevent overcrowding.
Transplanting Your Seedlings
Once your seedlings have developed a few sets of true leaves and the weather has warmed up (after the last frost), it’s time to transplant them into your garden.
Here’s how to transplant your sponge gourd seedlings:
* Hardening Off: Before transplanting, you need to harden off your seedlings. This means gradually exposing them to outdoor conditions over a period of 7-10 days. Start by placing them outside for a few hours each day, gradually increasing the amount of time they spend outdoors.
* Transplanting: Dig a hole that is slightly larger than the root ball of your seedling. Gently remove the seedling from its pot and place it in the hole. Backfill with soil and gently water.
* Mulching: Apply a layer of mulch around your sponge gourd plants. This will help to retain moisture, suppress weeds, and regulate soil temperature. I like to use straw or wood chips.
Caring for Your Sponge Gourds
Sponge gourds are relatively easy to care for, but they do need regular watering, fertilizing, and pruning.
Here’s how to care for your sponge gourds:
* Watering: Water your sponge gourd plants regularly, especially during dry periods. They need consistent moisture to thrive. Aim for deep watering a couple of times a week, rather than frequent shallow watering.
* Fertilizing: Fertilize your sponge gourd plants every 2-3 weeks with a balanced fertilizer. You can also use compost tea or fish emulsion.
* Pruning: Prune your sponge gourd vines to encourage branching and fruit production. Remove any dead or yellowing leaves. You can also pinch off the tips of the vines to encourage them to produce more side shoots.
* Pollination: Sponge gourds have separate male and female flowers. The female flowers have a small gourd-like structure at the base. If you’re not seeing any gourds developing, you may need to hand-pollinate the flowers. To do this, use a small paintbrush to transfer pollen from the male flowers to the female flowers. I usually do this in the morning when the flowers are open.
* Pest and Disease Control: Keep an eye out for pests and diseases. Common pests include squash bugs, aphids, and cucumber beetles. You can control these pests with insecticidal soap or neem oil. Common diseases include powdery mildew and downy mildew. You can prevent these diseases by providing good air circulation and avoiding overhead watering.
Harvesting Your Sponge Gourds
The best part! Harvesting your own loofah sponges is so rewarding. You’ll know your sponge gourds are ready to harvest when they turn yellow or brown and the skin becomes dry and brittle.
Here’s how to harvest your sponge gourds:
* Cutting the Gourds: Use a sharp knife or pruning shears to cut the gourds from the vine. Leave a few inches of stem attached to the gourd.
* Drying the Gourds: Allow the gourds to dry completely. This can take several weeks, depending on the weather. You can dry them outdoors in a sunny, well-ventilated area, or indoors in a warm, dry place. I usually hang them in my garage.
* Removing the Skin: Once the gourds are completely dry, the skin will be easy to remove. You can either peel it off by hand or soak the gourds in water for a few hours to soften the skin. I find that soaking them makes the process much easier.
* Cleaning the Sponges: After removing the skin, you’ll need to clean the sponges. Rinse them thoroughly with water to remove any seeds or debris. You can also soak them in a solution of water and bleach to disinfect them.
* Drying the Sponges Again: Allow the sponges to dry completely before using them. You can dry them outdoors in the sun or indoors in a warm, dry place.
Using Your Homegrown Loofah Sponges
Now that you’ve harvested and cleaned your sponge gourds, it’s time to put them to use! Loofah sponges are great for exfoliating your skin, scrubbing dishes, and even cleaning your car.
Here are some ways to use your homegrown loofah sponges:
* Exfoliating Your Skin: Use your loofah sponge in the shower or bath to exfoliate your skin. This will help to remove dead skin cells and leave your skin feeling smooth and refreshed.
* Scrubbing Dishes: Use your loofah sponge to scrub dishes. It’s a natural and effective way to clean your dishes without using harsh chemicals.
* Cleaning Your Car: Use your loofah sponge to clean your car. It’s gentle enough to use on your car’s paint, but strong enough to remove dirt and grime.
* Making Soap: You can even embed pieces of loofah into homemade soap bars for an exfoliating treat!
Growing your own loofah sponges is a fun and rewarding experience. With a little bit of effort, you can have a sustainable supply of natural sponges for all your cleaning and exfoliating needs. Happy gardening!

Conclusion
So, there you have it! Growing sponge gourd at home is not only achievable but also incredibly rewarding. Ditch the store-bought options and embrace the satisfaction of harvesting your own fresh, organic sponge gourds. This DIY trick, focusing on proper soil preparation, strategic trellising, and consistent watering, unlocks the potential for a bountiful harvest right in your backyard.
Why is this a must-try? Because it’s more than just growing a vegetable; it’s about connecting with nature, reducing your carbon footprint, and enjoying the unparalleled flavor of homegrown produce. Imagine the pride you’ll feel serving a dish featuring sponge gourd you nurtured from seed to table. Plus, you’ll know exactly what went into your food, avoiding any unwanted pesticides or chemicals.
But the adventure doesn’t stop there! Feel free to experiment with different varieties of sponge gourd. Some are smoother, some are more ribbed, and their flavors can vary slightly. You can also try companion planting. Marigolds, for example, are known to deter pests and can add a splash of color to your garden. Consider adding a layer of mulch around your plants to help retain moisture and suppress weeds. Another variation is to try growing them in containers if you have limited space. Just ensure the container is large enough to accommodate the vigorous root system of the sponge gourd.
Don’t be intimidated if you’re a beginner gardener. This guide provides a solid foundation, and the sponge gourd is surprisingly resilient. The key is to pay attention to your plants, observe their needs, and adjust your approach accordingly. Remember, gardening is a learning process, and every season brings new opportunities to refine your skills.
We wholeheartedly encourage you to give this DIY trick a try. The taste of success, both literally and figuratively, is well worth the effort. Once you’ve harvested your first sponge gourd, we’d love to hear about your experience! Share your photos, tips, and challenges in the comments below. Let’s build a community of home gardeners passionate about growing their own food and enjoying the simple pleasures of nature. Let us know if you have found success with this **sponge gourd** growing method. Your insights could inspire others to embark on their own gardening journey. Happy growing!
Frequently Asked Questions (FAQ)
What kind of soil is best for growing sponge gourd?
Sponge gourds thrive in well-drained, fertile soil that is rich in organic matter. A slightly acidic to neutral pH (around 6.0 to 7.0) is ideal. Before planting, amend your soil with compost, well-rotted manure, or other organic amendments to improve its structure, drainage, and nutrient content. If your soil is heavy clay, consider adding sand or perlite to improve drainage. A good starting mix would be equal parts garden soil, compost, and peat moss or coco coir. You can also purchase a high-quality potting mix specifically formulated for vegetables. Remember to test your soil pH before planting and adjust accordingly if necessary.
How much sunlight does sponge gourd need?
Sponge gourds require at least 6-8 hours of direct sunlight per day to thrive. Choose a planting location that receives ample sunlight throughout the day. If you live in a particularly hot climate, some afternoon shade may be beneficial to prevent the plants from overheating. Insufficient sunlight can lead to stunted growth, reduced flowering, and smaller fruit. Observe your garden throughout the day to ensure your sponge gourd plants are receiving enough sunlight.
How often should I water my sponge gourd plants?
Sponge gourds need consistent watering, especially during hot, dry weather. Water deeply and regularly, aiming to keep the soil consistently moist but not waterlogged. The frequency of watering will depend on your climate, soil type, and the size of your plants. As a general rule, water when the top inch of soil feels dry to the touch. Avoid overhead watering, as this can promote fungal diseases. Instead, water at the base of the plants, using a soaker hose or drip irrigation system. During periods of heavy rainfall, you may need to reduce watering frequency.
How do I trellis sponge gourd?
Trellising is essential for growing sponge gourd, as it allows the vines to climb and provides support for the heavy fruits. There are several trellising options available, including:
* **Arbors:** A sturdy arbor provides ample space for the vines to climb and creates a beautiful focal point in your garden.
* **Fences:** A strong fence can serve as a trellis for sponge gourd vines.
* **DIY Trellises:** You can build your own trellis using materials such as bamboo poles, wooden stakes, or wire mesh.
Regardless of the type of trellis you choose, make sure it is strong enough to support the weight of the mature vines and fruits. Train the vines to climb the trellis by gently guiding them and tying them to the structure as needed.
When is the best time to harvest sponge gourd?
Sponge gourds are typically ready to harvest about 2-3 months after planting. The ideal time to harvest is when the fruit is still young and tender, before the skin becomes tough and the seeds mature. The size of the fruit at harvest will depend on the variety, but generally, you should harvest when the fruit is about 12-18 inches long. To harvest, use a sharp knife or pruning shears to cut the fruit from the vine, leaving a short stem attached.
How do I deal with pests and diseases?
Sponge gourds can be susceptible to various pests and diseases, including squash bugs, squash vine borers, powdery mildew, and downy mildew. To prevent pest and disease problems, practice good garden hygiene, such as removing plant debris and weeds. Inspect your plants regularly for signs of pests or diseases and take action promptly.
* **Pests:** Handpick pests such as squash bugs and squash vine borers. You can also use insecticidal soap or neem oil to control pests.
* **Diseases:** Ensure good air circulation around your plants to prevent fungal diseases. If powdery mildew or downy mildew appears, treat with a fungicide.
Consider companion planting with herbs like basil or rosemary, which can help deter pests.
Can I grow sponge gourd in containers?
Yes, you can grow sponge gourd in containers, but you will need a large container (at least 20 gallons) to accommodate the plant’s extensive root system. Choose a container with good drainage holes and fill it with a high-quality potting mix. Provide a trellis or other support for the vines to climb. Water and fertilize regularly, as container-grown plants tend to dry out and deplete nutrients more quickly than those grown in the ground.
How do I save seeds from my sponge gourd?
To save seeds from your sponge gourd, allow the fruit to mature fully on the vine until it turns brown and dries out. Cut open the fruit and remove the seeds. Wash the seeds thoroughly and spread them out on a paper towel to dry completely. Once the seeds are dry, store them in an airtight container in a cool, dark, and dry place. Properly stored seeds can remain viable for several years.
What are some ways to use sponge gourd in cooking?
Sponge gourd is a versatile vegetable that can be used in a variety of dishes. It has a mild, slightly sweet flavor and a spongy texture. Some popular ways to use sponge gourd include:
* **Stir-fries:** Add sliced sponge gourd to stir-fries with other vegetables and protein.
* **Soups and stews:** Use sponge gourd as an ingredient in soups and stews.
* **Curries:** Sponge gourd is a common ingredient in Indian curries.
* **Fritters:** Grate sponge gourd and mix it with flour, spices, and herbs to make fritters.
* **Pickles:** Sponge gourd can be pickled for a tangy and flavorful condiment.


Leave a Comment