

Grow tomatoes year round? Imagine plucking juicy, sun-ripened tomatoes from your own garden, even when the snow is falling outside! It sounds like a dream, right? Well, it doesn’t have to be! For centuries, humans have sought ways to extend the growing season, from ancient Roman greenhouses to modern-day hydroponics. The desire to cultivate our own food, regardless of the weather, is deeply ingrained in our history.
But let’s be honest, most of us don’t have the space or budget for a fancy greenhouse. That’s where these amazing DIY tricks and hacks come in! I’m going to show you simple, affordable ways to grow tomatoes year round, right in your own home. Whether you’re a seasoned gardener or a complete beginner, these tips will empower you to enjoy fresh, flavorful tomatoes whenever you crave them. Say goodbye to bland, store-bought tomatoes and hello to homegrown goodness, all year long!
Why do you need these tricks? Because who wants to wait for summer to enjoy a delicious Caprese salad? Plus, growing your own food is incredibly rewarding, reduces your carbon footprint, and ensures you know exactly what’s going into your meals. Let’s get started and transform your home into a tomato-growing oasis!

Growing Tomatoes Indoors Year-Round: My DIY Guide
Okay, tomato lovers, listen up! Craving that juicy, sun-ripened flavor in the dead of winter? I’m here to tell you it’s totally possible to grow tomatoes indoors, year-round! It takes a little planning and effort, but trust me, the reward of fresh, homegrown tomatoes when everyone else is stuck with the bland grocery store variety is SO worth it. I’ve been doing this for a few years now, and I’m excited to share my secrets with you.
Choosing the Right Tomato Variety
First things first, not all tomato varieties are created equal when it comes to indoor growing. You’ll want to choose determinate or dwarf varieties, as they stay smaller and are better suited for container gardening. Indeterminate varieties, which grow tall and vine-like, can be a real challenge indoors.
Here are some of my favorite varieties for indoor growing:
* Tiny Tim: These are super compact and produce adorable, bite-sized tomatoes. Perfect for small spaces!
* Roma: A classic paste tomato, great for sauces and canning (even if you’re just canning a small batch!).
* Patio: As the name suggests, these are bred for container growing and produce a good yield.
* Micro Tom: The smallest tomato variety available! Ideal for really limited spaces.
* Bush Early Girl: A reliable and early-producing variety, even indoors.
Gathering Your Supplies
Before we dive into the planting process, let’s make sure you have everything you need. Here’s a checklist:
* Tomato seeds: Choose your desired variety (or varieties!).
* Seed starting tray or small pots: For starting your seeds indoors.
* Seed starting mix: A light and airy mix specifically designed for seedlings.
* Larger pots (5-10 gallon): For transplanting your seedlings into their final growing containers.
* Potting mix: A good quality potting mix that drains well. Avoid using garden soil, as it can compact and not provide adequate drainage.
* Grow lights: This is crucial for indoor tomato growing. You’ll need a full-spectrum LED grow light.
* Timer: To automate your grow light schedule.
* Fertilizer: A balanced fertilizer specifically formulated for tomatoes.
* Watering can or spray bottle: For watering your plants.
* Small fan: To provide air circulation and prevent fungal diseases.
* Stakes or tomato cages: To support your plants as they grow.
* Optional: Heat mat: To speed up germination.
Starting Your Tomato Seeds
This is where the magic begins! Starting your seeds indoors gives you a head start on the growing season and allows you to control the environment.
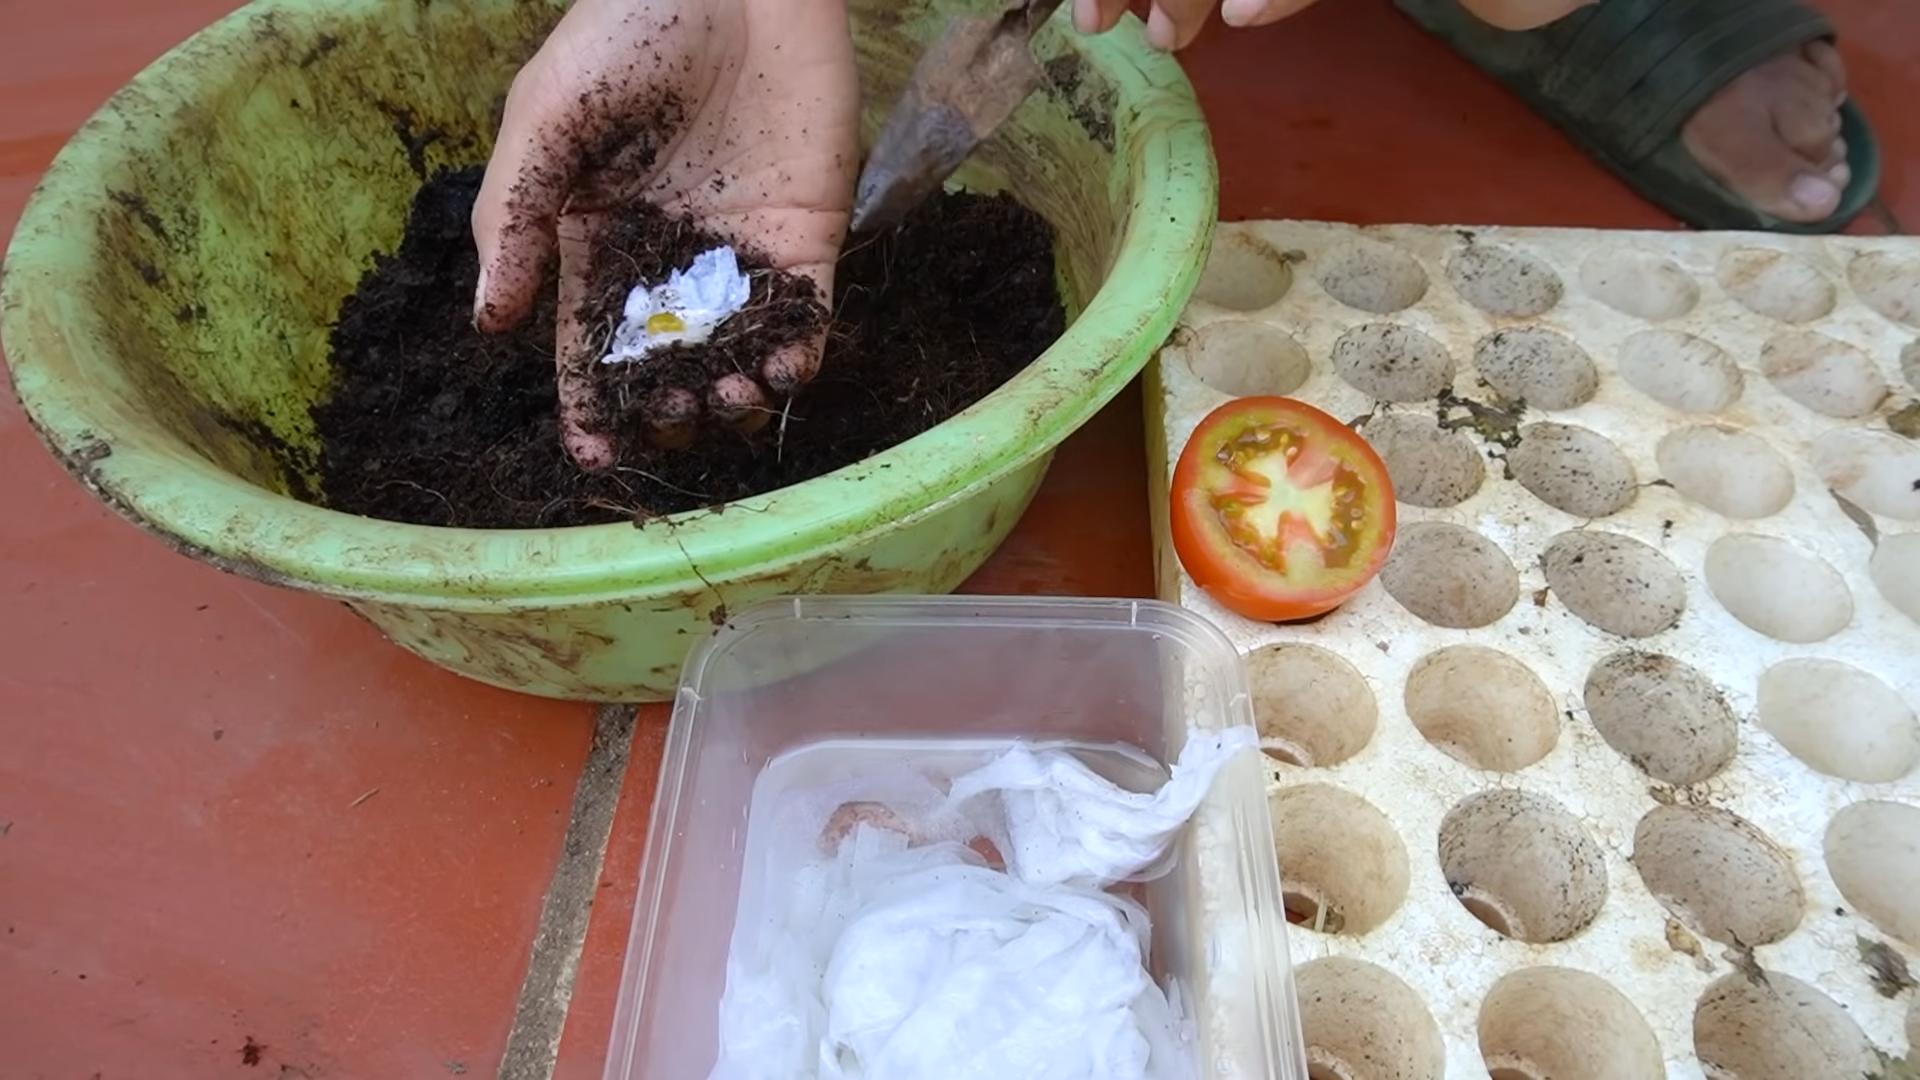
1. Prepare your seed starting tray or pots: Fill your chosen container with seed starting mix. Moisten the mix thoroughly, but don’t let it get soggy.
2. Sow your seeds: Make a small indentation in the soil (about 1/4 inch deep) and place 2-3 seeds in each indentation. Cover the seeds lightly with soil.
3. Water gently: Use a spray bottle to mist the soil surface.
4. Provide warmth: Place your seed starting tray or pots in a warm location. A heat mat can help speed up germination. The ideal temperature is around 70-75°F (21-24°C).
5. Cover with a humidity dome (optional): This helps to retain moisture and create a humid environment for germination. If you don’t have a humidity dome, you can cover the tray with plastic wrap.
6. Wait for germination: Tomato seeds typically germinate in 5-10 days. Keep the soil consistently moist, but not waterlogged.
7. Remove the humidity dome or plastic wrap: Once the seedlings emerge, remove the cover to allow for air circulation.
8. Provide light: Place the seedlings under your grow lights. Position the lights a few inches above the seedlings and adjust as they grow. Set your timer for 14-16 hours of light per day.
Transplanting Your Seedlings
Once your seedlings have developed their first set of true leaves (the leaves that look like miniature tomato leaves, not the initial seed leaves), it’s time to transplant them into larger pots.
1. Prepare your larger pots: Fill your 5-10 gallon pots with potting mix.
2. Carefully remove the seedlings from the seed starting tray or pots: Gently loosen the soil around the seedlings and lift them out, being careful not to damage the roots.
3. Plant the seedlings: Make a hole in the potting mix large enough to accommodate the root ball. Place the seedling in the hole and gently backfill with soil. You can bury the stem up to the first set of leaves, as tomatoes will develop roots along the buried stem.
4. Water thoroughly: Water the newly transplanted seedlings well.
5. Place under grow lights: Return the seedlings to their location under the grow lights.
Caring for Your Indoor Tomato Plants
Now comes the ongoing care to ensure your tomato plants thrive indoors.
1. Watering: Water your tomato plants regularly, allowing the soil to dry out slightly between waterings. Avoid overwatering, as this can lead to root rot. Check the soil moisture by sticking your finger into the soil about an inch deep. If it feels dry, it’s time to water.
2. Fertilizing: Feed your tomato plants with a balanced tomato fertilizer every 2-3 weeks. Follow the instructions on the fertilizer package.
3. Pruning: Prune your tomato plants regularly to remove suckers (the small shoots that grow between the main stem and the branches). This will help to improve air circulation and encourage fruit production.
4. Pollination: Since you’re growing indoors, you’ll need to hand-pollinate your tomato flowers. You can do this by gently shaking the plants or using a small paintbrush to transfer pollen from one flower to another. I like to use an electric toothbrush (without the brush head!) and gently touch the back of each flower to vibrate the pollen loose.
5. Air circulation: Provide good air circulation around your plants by using a small fan. This will help to prevent fungal diseases.
6. Support: As your tomato plants grow, they will need support. Use stakes or tomato cages to keep them upright.
7. Pest control: Keep an eye out for pests, such as aphids, whiteflies, and spider mites. If you find any pests, treat them with an insecticidal soap or neem oil.
Harvesting Your Tomatoes
The best part! Your tomatoes are ready to harvest when they are fully colored and slightly soft to the touch. Gently twist the tomato off the vine. Enjoy your homegrown tomatoes in salads, sandwiches, sauces, or just eat them straight off the vine!
Troubleshooting
Even with the best care, you might encounter some challenges along the way. Here are a few common problems and how to address them:
* Yellowing leaves: This can be caused by overwatering, underwatering, nutrient deficiencies, or pests. Check the soil moisture, fertilize your plants, and inspect them for pests.
* Blossom end rot: This is caused by a calcium deficiency. Make sure your potting mix contains calcium and water your plants consistently.
* Fungal diseases: These can be prevented by providing good air circulation and avoiding overwatering. If you see signs of fungal disease, treat your plants with a fungicide.
* Lack of fruit: This can be caused by poor pollination, insufficient light, or nutrient deficiencies. Hand-pollinate your flowers, provide adequate light, and fertilize your plants.
Growing tomatoes indoors year-round is a rewarding experience. With a little patience and effort, you can enjoy fresh, homegrown tomatoes even in the middle of winter. Happy gardening!
Conclusion
So, there you have it! Growing tomatoes year-round might seem like a gardener’s pipe dream, but with this simple DIY trick, it’s absolutely within reach. We’ve walked you through the process, highlighting the key steps and providing insights to ensure your success. But why is this method a must-try?
Firstly, imagine the sheer joy of biting into a sun-ripened, juicy tomato in the dead of winter. No more bland, store-bought substitutes lacking that vibrant, fresh flavor. You’ll have access to homegrown goodness whenever you crave it, adding a burst of summer to your winter meals.
Secondly, this DIY approach is incredibly cost-effective. Instead of relying on expensive greenhouse setups or commercially grown tomatoes, you’re leveraging readily available resources and a bit of ingenuity. The initial investment in supplies is minimal, and the long-term savings are significant. Plus, you’re reducing your carbon footprint by growing your own food locally.
Thirdly, this method offers unparalleled control over the growing environment. You can tailor the conditions to perfectly suit your tomato plants’ needs, ensuring optimal growth and fruit production. This level of control is simply not possible with outdoor gardening, where you’re at the mercy of the weather.
But the benefits don’t stop there. This DIY trick is also a fantastic learning experience. You’ll gain a deeper understanding of plant physiology, environmental factors, and the intricacies of the growing process. It’s a rewarding and educational hobby that can be enjoyed by gardeners of all skill levels.
Ready to take your tomato growing to the next level?
Don’t be afraid to experiment with different tomato varieties. While cherry tomatoes and other smaller varieties tend to thrive indoors, you can certainly try your hand at larger beefsteak tomatoes with a bit of extra care and attention. Consider using grow lights with different spectrums to optimize growth at various stages. You can also explore different hydroponic systems for a more advanced and efficient growing setup.
Another variation to consider is incorporating companion planting. Basil, for example, is known to improve the flavor of tomatoes and deter pests. Planting basil alongside your tomato plants can create a mutually beneficial relationship, enhancing the overall health and productivity of your indoor garden.
We encourage you to embrace this DIY trick and embark on your year-round tomato growing adventure. The rewards are well worth the effort. Imagine the satisfaction of harvesting your own delicious tomatoes, knowing that you nurtured them from seed to fruit, regardless of the season.
So, grab your supplies, follow our guide, and get ready to enjoy a bountiful harvest of homegrown tomatoes all year long. And most importantly, don’t forget to share your experiences with us! We’d love to hear about your successes, challenges, and any variations you’ve tried. Share your photos and stories on social media using #YearRoundTomatoes and inspire others to join the movement. Let’s create a community of passionate gardeners who are defying the seasons and enjoying the taste of summer all year round! This is the best way to grow tomatoes year round.
Frequently Asked Questions (FAQ)
What type of tomatoes are best for year-round indoor growing?
Smaller varieties like cherry tomatoes, grape tomatoes, and Roma tomatoes tend to be the most successful for indoor growing. They mature faster, require less space, and are generally more adaptable to the controlled environment. However, with proper care and attention, you can also try growing larger varieties like beefsteak tomatoes. Just be prepared to provide them with adequate support and potentially more intense lighting.
How much light do my indoor tomato plants need?
Tomato plants require a significant amount of light to thrive and produce fruit. Ideally, they need at least 6-8 hours of direct sunlight per day. If you don’t have access to a sunny window, you’ll need to supplement with grow lights. LED grow lights are a great option as they are energy-efficient and provide the full spectrum of light that tomato plants need. Look for grow lights specifically designed for vegetable gardening. Position the lights close enough to the plants (usually 6-12 inches) to provide adequate illumination without burning the leaves.
What is the ideal temperature for growing tomatoes indoors?
Tomato plants thrive in temperatures between 70-80°F (21-27°C) during the day and 60-70°F (15-21°C) at night. Avoid exposing your plants to extreme temperature fluctuations, as this can stress them and hinder their growth. If your home tends to get cold at night, consider using a small space heater to maintain a consistent temperature.
How often should I water my indoor tomato plants?
The watering frequency will depend on several factors, including the size of your pot, the type of soil you’re using, and the humidity level in your home. As a general rule, water your tomato plants when the top inch of soil feels dry to the touch. Avoid overwatering, as this can lead to root rot. Ensure that your pots have adequate drainage to prevent water from pooling at the bottom.
What type of fertilizer should I use for my indoor tomato plants?
Tomato plants are heavy feeders and require regular fertilization to produce a bountiful harvest. Use a balanced fertilizer specifically formulated for tomatoes, following the instructions on the label. Look for a fertilizer with a higher phosphorus content (the middle number) to promote flowering and fruit development. You can also supplement with organic fertilizers like compost tea or fish emulsion.
How do I pollinate my indoor tomato plants?
Since there are no bees or other pollinators indoors, you’ll need to manually pollinate your tomato plants. This is a simple process that can be done by gently shaking the plants or using a small paintbrush to transfer pollen from one flower to another. You can also use an electric toothbrush to vibrate the flowers, which helps to release the pollen. Pollinate your plants every few days, especially when they are actively flowering.
How do I deal with pests and diseases on my indoor tomato plants?
Indoor tomato plants are less susceptible to pests and diseases than outdoor plants, but they can still be affected. Regularly inspect your plants for signs of infestation or disease, such as aphids, whiteflies, or powdery mildew. If you spot any problems, take action immediately. You can use insecticidal soap or neem oil to control pests, and copper fungicide to treat fungal diseases. Ensure good air circulation around your plants to prevent the buildup of humidity, which can promote disease.
Can I grow tomatoes from seed indoors?
Yes, you can absolutely start tomato plants from seed indoors. This is a great way to get a head start on the growing season and have a wider selection of varieties to choose from. Start your seeds in a seed-starting mix about 6-8 weeks before you plan to transplant them into larger pots. Provide them with plenty of light and keep the soil moist but not soggy. Once the seedlings have developed a few sets of true leaves, they can be transplanted into larger containers.
How long does it take to grow tomatoes indoors?
The time it takes to grow tomatoes indoors will vary depending on the variety, the growing conditions, and your level of care. Generally, it takes about 60-85 days from transplanting to harvest. Cherry tomatoes tend to mature faster than larger varieties. Be patient and consistent with your care, and you’ll be rewarded with a delicious harvest of homegrown tomatoes.
What are some common problems when growing tomatoes indoors and how can I fix them?
Some common problems include blossom end rot (caused by calcium deficiency), yellowing leaves (caused by nutrient deficiencies or overwatering), and leggy growth (caused by insufficient light). To prevent blossom end rot, ensure that your soil is rich in calcium and that you’re watering consistently. To address yellowing leaves, fertilize your plants with a balanced fertilizer. To prevent leggy growth, provide your plants with plenty of light.

Leave a Comment