

Growing Kiwi Vines might seem like an exotic endeavor reserved for seasoned gardeners, but trust me, with a few clever tricks and a dash of DIY spirit, you can cultivate these fuzzy fruits right in your own backyard! Forget those expensive supermarket kiwis – imagine plucking your own sun-ripened beauties straight from the vine.
The kiwi, originally known as the Chinese gooseberry, has a fascinating history. Cultivated in New Zealand, it was rebranded and popularized, becoming a global sensation. But you don’t need a sprawling orchard in New Zealand to enjoy this delicious fruit.
Many people shy away from growing kiwis because they believe it’s too complicated or requires specialized knowledge. That’s where this DIY guide comes in! I’m going to share simple, effective techniques that will demystify the process and empower you to successfully grow your own kiwi vines. From selecting the right varieties for your climate to building a sturdy support structure, I’ll walk you through every step.
Why bother with the effort? Because there’s nothing quite like the satisfaction of harvesting your own food, knowing exactly where it came from and how it was grown. Plus, fresh, homegrown kiwis taste infinitely better than anything you can buy in a store. So, let’s get started and unlock the secrets to successfully growing kiwi vines at home!
Growing Your Own Kiwi Vines: A DIY Guide
Okay, so you want to grow your own kiwis? Awesome! It’s a bit of a commitment, but trust me, the reward of plucking your own fuzzy, tangy fruit straight from the vine is totally worth it. This guide will walk you through everything you need to know, from choosing the right variety to dealing with pesky pests. Let’s get started!
Choosing the Right Kiwi Variety
Before you even think about digging a hole, you need to pick the right kiwi variety for your climate. Kiwis are generally hardy to USDA zones 7-9, but there are some cold-hardy varieties that can survive in zone 6.
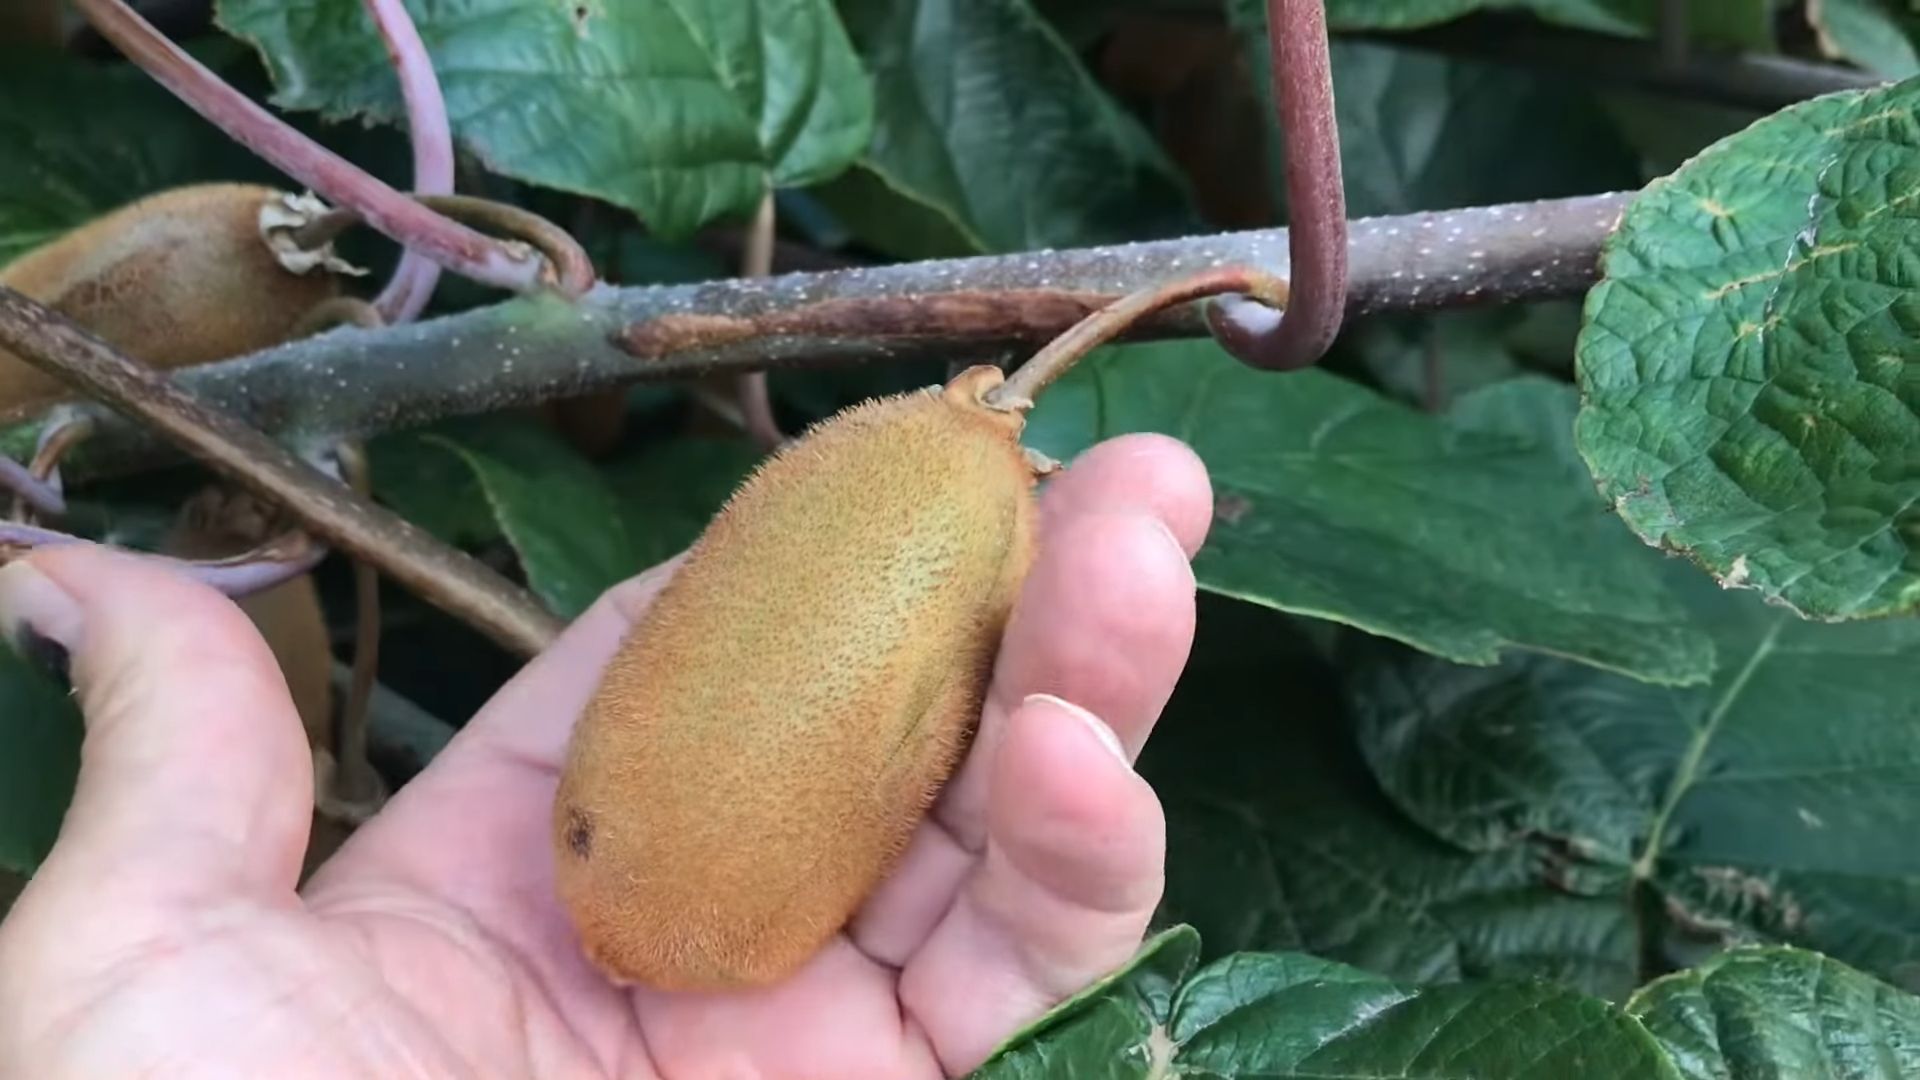
* Hardy Kiwi (Actinidia arguta): These are the most cold-hardy, tolerating temperatures down to -25°F! The fruit is smaller than the fuzzy kiwi you find in stores, but the skin is smooth and edible, making them a perfect snack right off the vine. Popular varieties include ‘Issai’ (self-fertile, but produces more with a male pollinator), ‘Anna’, and ‘Ken’s Red’.
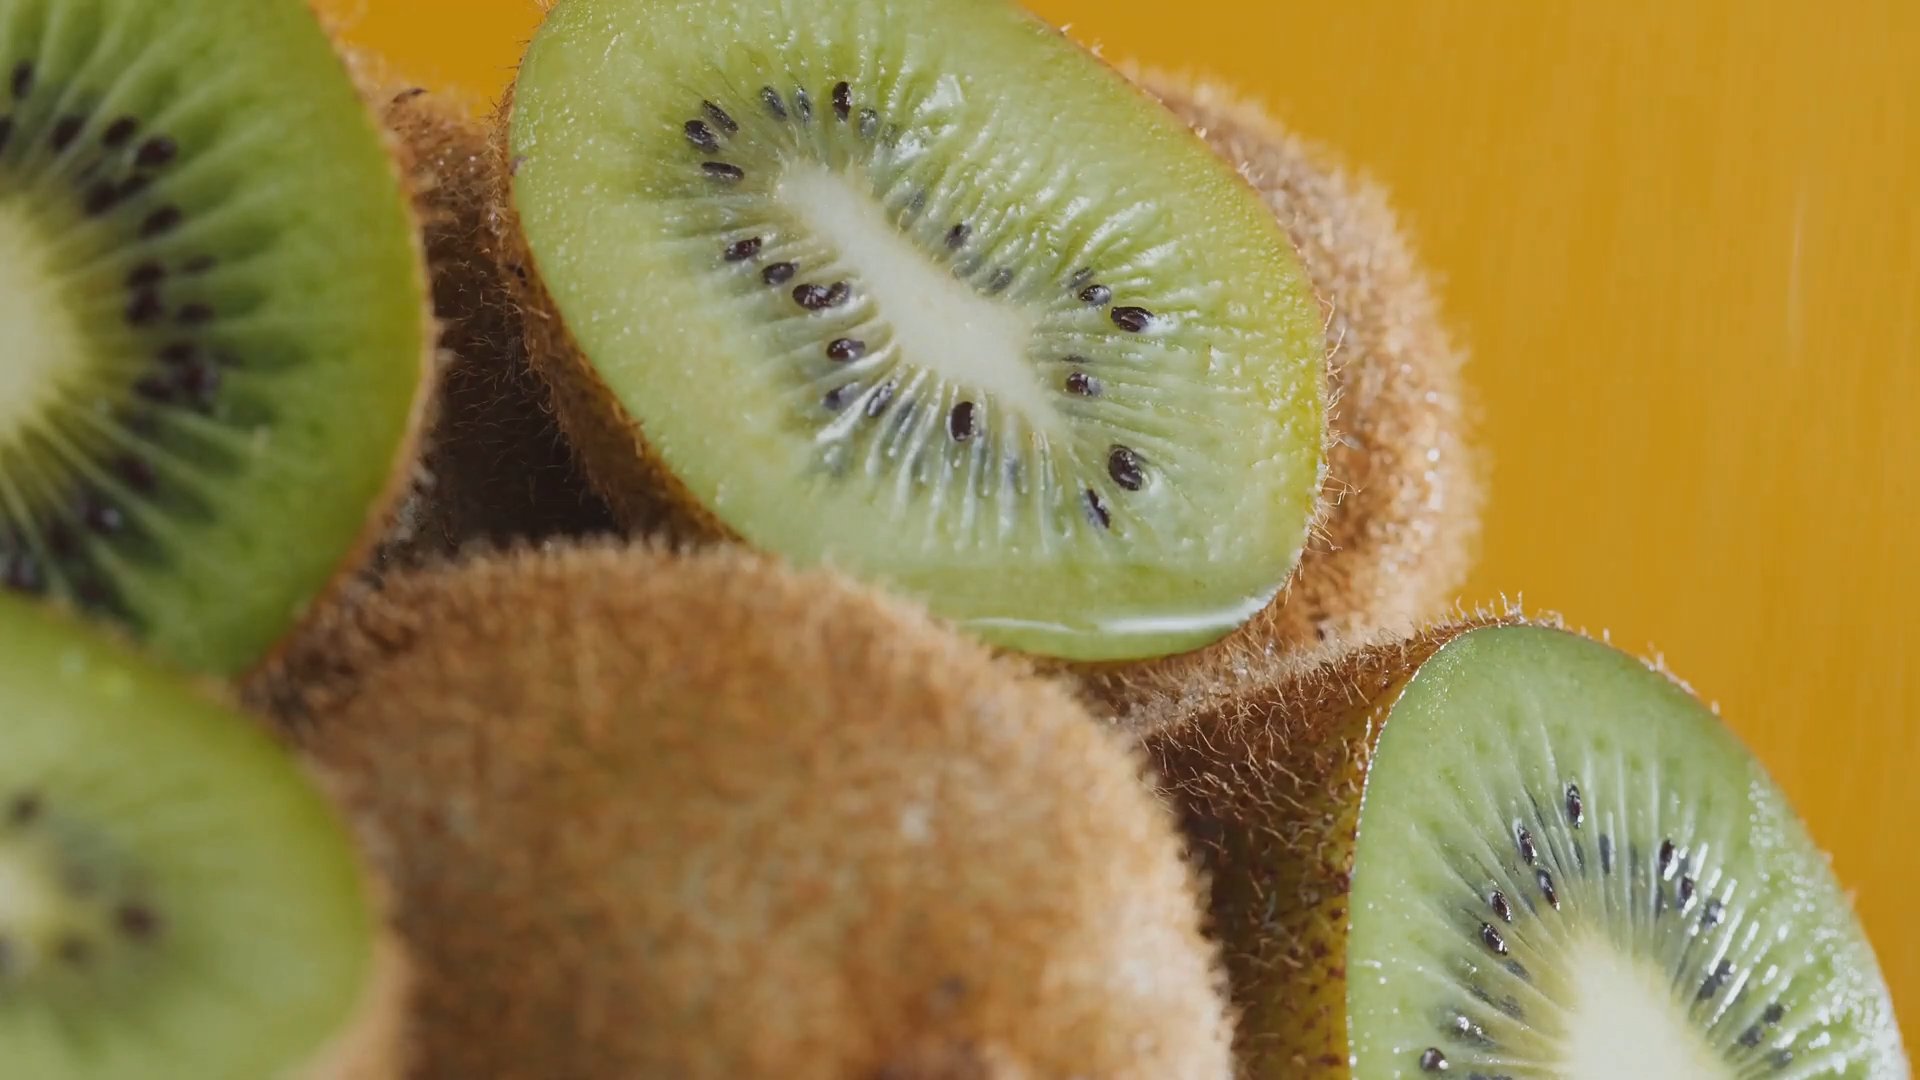
* Fuzzy Kiwi (Actinidia deliciosa): This is the classic kiwi you’re used to seeing in the grocery store. They’re less cold-hardy than hardy kiwis, needing protection from temperatures below 10°F. ‘Hayward’ is the most common variety, but you’ll need a male pollinator like ‘Matua’ to get fruit.
* Golden Kiwi (Actinidia chinensis): These kiwis have a smoother, bronze-colored skin and yellow flesh. They’re less common and generally less cold-hardy than fuzzy kiwis.
Important Considerations:
* Chill Hours: Kiwis need a certain number of chill hours (hours below 45°F) to properly set fruit. Make sure the variety you choose meets the chill hour requirements for your area.
* Pollination: Most kiwi varieties are dioecious, meaning they have separate male and female plants. You’ll need at least one male plant for every 6-8 female plants to ensure good fruit production. Some hardy kiwi varieties like ‘Issai’ are self-fertile, but even they benefit from having a male pollinator nearby.
* Space: Kiwi vines are vigorous growers and need plenty of space. They can easily reach 20-30 feet in length, so plan accordingly.
Preparing the Planting Site
Kiwis need a sunny spot with well-drained soil. They don’t like wet feet, so avoid planting them in areas that tend to stay soggy.
1. Choose a Location: Select a site that receives at least 6-8 hours of sunlight per day. Morning sun is especially important to dry the leaves and prevent fungal diseases.
2. Soil Testing: It’s always a good idea to test your soil before planting. Kiwis prefer slightly acidic soil with a pH between 6.0 and 6.5. You can purchase a soil testing kit at your local garden center or send a sample to your local extension office.
3. Soil Amendment: Amend the soil with plenty of organic matter, such as compost, well-rotted manure, or peat moss. This will improve drainage, fertility, and water retention. Dig in the organic matter to a depth of at least 12 inches.
4. Spacing: Space kiwi vines 10-15 feet apart for hardy kiwis and 15-20 feet apart for fuzzy kiwis.
5. Support System: Kiwis are climbing vines and need a strong support system. A T-bar trellis is a popular choice, but you can also use an arbor, fence, or even a sturdy pergola. Make sure the support system is strong enough to handle the weight of the mature vines and fruit.
Planting Your Kiwi Vines
Now for the fun part! Planting your kiwi vines is relatively straightforward.
1. Dig the Hole: Dig a hole that is twice as wide as the root ball and just as deep.
2. Remove the Plant from the Container: Gently remove the kiwi vine from its container, being careful not to damage the roots. If the roots are circling the pot, gently loosen them before planting.
3. Plant the Vine: Place the kiwi vine in the hole, making sure the top of the root ball is level with the surrounding soil.
4. Backfill the Hole: Backfill the hole with the amended soil, gently tamping it down to remove any air pockets.
5. Water Thoroughly: Water the newly planted kiwi vine thoroughly.
6. Mulch: Apply a layer of mulch around the base of the vine to help retain moisture, suppress weeds, and regulate soil temperature. Use organic mulch such as wood chips, straw, or shredded bark. Keep the mulch a few inches away from the trunk of the vine to prevent rot.
7. Protect from Pests: Young kiwi vines are susceptible to damage from rabbits and deer. Protect them with a wire mesh cage or netting.
Training and Pruning Your Kiwi Vines
Training and pruning are essential for getting your kiwi vines to produce fruit.
Training
1. Establish a Leader: Choose the strongest shoot and train it to grow vertically up the support system. This will be your main leader.
2. Lateral Branches: As the leader grows, select several lateral branches to train horizontally along the trellis wires. These will be your fruiting arms.
3. Tie the Vines: Use soft twine or plant ties to secure the vines to the support system. Be careful not to tie them too tightly, as this can damage the stems.
Pruning
Kiwis fruit on one-year-old wood, so pruning is essential for maintaining fruit production.
1. Dormant Pruning (Late Winter/Early Spring): This is the most important pruning. Remove any dead, damaged, or diseased wood. Thin out the fruiting arms, leaving only the strongest and healthiest ones. Shorten the fruiting arms to 8-12 buds. Remove any suckers that are growing from the base of the vine.
2. Summer Pruning (Late Summer): This pruning is done to control the growth of the vines and improve air circulation. Trim back any long, trailing shoots that are not producing fruit. Remove any leaves that are shading the fruit.
Important Pruning Tips:
* Use sharp pruning shears: This will help prevent the spread of disease.
* Make clean cuts: Cut at a 45-degree angle, just above a bud.
* Don’t over-prune: Over-pruning can reduce fruit production.
* Remove male flowers on female vines: If you have a female vine that is producing male flowers, remove them to encourage fruit production.
Watering and Fertilizing
Kiwis need consistent watering, especially during dry periods.
1. Watering: Water deeply and regularly, especially during the first year after planting. Established kiwi vines need about 1-2 inches of water per week. Use a soaker hose or drip irrigation to water the vines at the base. Avoid overhead watering, as this can promote fungal diseases.
2. Fertilizing: Fertilize kiwi vines in the spring with a balanced fertilizer, such as 10-10-10. Follow the instructions on the fertilizer label. You can also amend the soil with compost or well-rotted manure. Avoid over-fertilizing, as this can lead to excessive vegetative growth and reduced fruit production.
Pest and Disease Control
Kiwis are relatively pest-resistant, but they can be susceptible to certain pests and diseases.
1. Pests: Common kiwi pests include spider mites, scale, and Japanese beetles. Control these pests with insecticidal soap, horticultural oil, or neem oil.
2. Diseases: Kiwis are susceptible to fungal diseases such as botrytis and phytophthora root rot. Prevent these diseases by providing good air circulation, avoiding overhead watering, and planting in well-drained soil. Treat fungal diseases with a fungicide.
Organic Pest and Disease Control:
* Neem Oil: A natural insecticide and fungicide that can be used to control a wide range of pests and diseases.
* Insecticidal Soap: Effective against soft-bodied insects like aphids and spider mites.
* Copper Fungicide: A broad-spectrum fungicide that can be used to control fungal diseases.
* Bacillus thuringiensis (Bt): A biological insecticide that is effective against caterpillars.
Harvesting Your Kiwis
Harvesting is the most rewarding part of growing kiwis!
1. Harvest Time: Kiwis typically ripen in the fall, usually from late October to November.
2. Determining Ripeness: Kiwis are ready to harvest when they soften slightly to the touch. You can also test for ripeness by cutting one open and checking the color of the seeds. The seeds should
Conclusion
So, there you have it – a comprehensive guide to successfully growing kiwi vines right in your own backyard! This isn’t just about adding another plant to your garden; it’s about embarking on a rewarding journey that culminates in a bountiful harvest of delicious, tangy kiwis. Forget the expensive supermarket prices and often lackluster quality; with a little patience and dedication, you can enjoy fresh, organically grown kiwis whenever you desire.
This DIY trick for growing kiwi vines is a must-try for several compelling reasons. First and foremost, it offers unparalleled control over the growing process. You dictate the soil composition, the watering schedule, and the pest control methods, ensuring that your kiwis are grown in the healthiest and most sustainable way possible. Secondly, it’s incredibly cost-effective in the long run. While there’s an initial investment in the vines and supporting structure, the ongoing costs are minimal compared to consistently purchasing kiwis from the store. And finally, there’s the sheer satisfaction of nurturing a plant from its early stages to full maturity, witnessing its growth, and ultimately reaping the fruits (literally!) of your labor.
But don’t stop there! Experiment with different kiwi varieties to find your personal favorite. Consider adding companion plants to your kiwi vines to attract pollinators and deter pests naturally. You could even explore different training methods to optimize fruit production and create a visually stunning display in your garden. For example, the T-bar trellis system is excellent for maximizing sunlight exposure, while the pergola method can create a beautiful shaded area while supporting your vines.
Remember, growing kiwi vines is a marathon, not a sprint. It requires patience, observation, and a willingness to learn and adapt. But the rewards are well worth the effort. Imagine the joy of sharing your homegrown kiwis with friends and family, knowing that you cultivated them with your own hands.
We wholeheartedly encourage you to give this DIY trick a try. Start small, be patient, and don’t be afraid to experiment. And most importantly, share your experience with us! We’d love to hear about your successes, your challenges, and any tips or tricks you discover along the way. Post pictures of your kiwi vines, share your favorite kiwi recipes, and let’s create a community of kiwi-growing enthusiasts! Your insights could inspire others to embark on this fulfilling journey and enjoy the delicious rewards of homegrown kiwis. So, grab your gardening gloves, choose your kiwi variety, and get ready to experience the joy of growing your own kiwis!
FAQ
What are the best kiwi varieties to grow for beginners?
Choosing the right kiwi variety is crucial for success, especially for beginners. ‘Hayward’ is a popular choice for its reliable fruit production and excellent flavor. It’s a female variety, so you’ll need a male pollinator like ‘Matua’ or ‘Tomuri’ to ensure fruit set. ‘Anna’ is a self-fertile variety, meaning it doesn’t require a separate male pollinator, making it a great option for smaller gardens or those who want a simpler setup. ‘Issai’ is another self-fertile variety known for its early fruiting and smaller fruit size. Consider your local climate and growing conditions when making your selection. Some varieties are more cold-hardy than others, so research which ones are best suited for your region.
How much space do kiwi vines need?
Kiwi vines are vigorous growers and require ample space to thrive. Each vine can easily spread 15-20 feet or more, so plan accordingly. Ensure you have a sturdy trellis or support structure that can accommodate their growth. The spacing between vines will depend on the variety and the training method you choose. Generally, allow at least 10-15 feet between vines. Consider the mature size of the vines when planning your garden layout to avoid overcrowding and ensure adequate sunlight exposure for each plant.
How long does it take for kiwi vines to produce fruit?
Patience is key when growing kiwi vines. It typically takes 3-5 years for kiwi vines to start producing fruit. The exact timeframe will depend on the variety, growing conditions, and the age of the vine when you planted it. Proper care, including regular watering, fertilization, and pruning, can help accelerate fruit production. Be patient and persistent, and you’ll eventually be rewarded with a bountiful harvest of delicious kiwis.
What are the common pests and diseases that affect kiwi vines?
While kiwi vines are relatively pest-resistant, they can be susceptible to certain pests and diseases. Common pests include spider mites, scale insects, and nematodes. Diseases like root rot and fungal infections can also affect kiwi vines, especially in poorly drained soil. Regularly inspect your vines for any signs of pests or diseases and take appropriate action. Organic pest control methods, such as introducing beneficial insects or using insecticidal soap, can be effective in managing pests. Ensure proper drainage to prevent root rot and fungal infections.
How do I prune kiwi vines?
Pruning is essential for maintaining the health and productivity of kiwi vines. Pruning helps to control the size and shape of the vines, improve air circulation, and promote fruit production. The best time to prune kiwi vines is during the dormant season, typically in late winter or early spring. Remove any dead, damaged, or diseased wood. Thin out the vines to allow for better sunlight penetration. Focus on maintaining a strong framework of main branches and fruiting spurs. Consult a pruning guide specific to kiwi vines for detailed instructions and techniques.
What kind of soil is best for growing kiwi vines?
Kiwi vines thrive in well-drained, fertile soil with a slightly acidic pH (6.0-6.5). Amend heavy clay soils with organic matter, such as compost or well-rotted manure, to improve drainage and aeration. Avoid planting kiwi vines in areas with standing water or poorly drained soil, as this can lead to root rot. Conduct a soil test to determine the pH and nutrient levels and amend the soil accordingly. Adding a layer of mulch around the base of the vines can help retain moisture, suppress weeds, and regulate soil temperature.
How often should I water kiwi vines?
Kiwi vines require consistent moisture, especially during the growing season. Water deeply and regularly, especially during dry spells. Avoid overwatering, as this can lead to root rot. The frequency of watering will depend on the climate, soil type, and the age of the vines. Check the soil moisture regularly and water when the top inch or two feels dry. Mulching around the base of the vines can help retain moisture and reduce the need for frequent watering.
Do kiwi vines need fertilizer?
Kiwi vines benefit from regular fertilization to support their vigorous growth and fruit production. Apply a balanced fertilizer in early spring, just before the growing season begins. Choose a fertilizer that is specifically formulated for fruit trees or vines. Follow the instructions on the fertilizer label for application rates. Avoid over-fertilizing, as this can lead to excessive vegetative growth and reduced fruit production. You can also amend the soil with compost or other organic matter to provide a slow-release source of nutrients.

Leave a Comment