

Growing Okra at Home can seem daunting, but trust me, it’s more rewarding than you might think! Imagine stepping into your backyard and harvesting fresh, vibrant okra pods, ready to be transformed into delicious gumbos, crispy fries, or flavorful stews. Forget those bland, overpriced vegetables from the grocery store – with a little know-how, you can cultivate your own okra bounty right in your own backyard.
Okra, also known as “lady’s fingers,” has a rich history, tracing back to ancient Ethiopia and Egypt. It then spread throughout North Africa, the Middle East, and eventually made its way to the Americas with the transatlantic slave trade. For generations, okra has been a staple in Southern cuisine and beyond, celebrated for its unique flavor and nutritional benefits.
But why should you bother with growing okra at home? Well, for starters, it’s incredibly satisfying to nurture a plant from seed to harvest. Plus, homegrown okra tastes significantly better than store-bought varieties. More importantly, knowing exactly where your food comes from gives you peace of mind. In this article, I’m going to share some easy DIY tricks and hacks that will help you master the art of growing okra at home, even if you’re a complete beginner. Get ready to unleash your inner gardener and enjoy the delicious rewards!
Growing Okra at Home: A Beginner’s Guide to Bountiful Harvests
Hey there, fellow gardening enthusiasts! I’m so excited to share my experiences and tips on growing okra right in your own backyard. Okra, also known as “lady’s fingers,” is a warm-season vegetable that’s not only delicious but also packed with nutrients. Plus, the beautiful flowers are a real treat for the eyes! This guide will walk you through everything you need to know, from seed to harvest, to ensure you have a thriving okra patch.
Choosing the Right Okra Variety
Before we dive into the nitty-gritty, let’s talk about okra varieties. There are tons of options out there, each with its own unique characteristics. Here are a few popular choices:
* Clemson Spineless: This is a classic and widely grown variety. It produces dark green, ribbed pods that are tender and flavorful. It’s also relatively spineless, making harvesting a breeze.
* Burgundy: If you’re looking for something a little different, Burgundy okra boasts beautiful red pods that add a pop of color to your garden. The flavor is similar to Clemson Spineless.
* Emerald: As the name suggests, Emerald okra produces smooth, emerald-green pods. It’s known for its excellent flavor and tenderness.
* Dwarf Green Long Pod: Perfect for smaller gardens or containers, this variety produces compact plants with long, slender pods.
Consider your climate, garden space, and personal preferences when choosing a variety. I personally love Clemson Spineless because it’s reliable and easy to grow.
Preparing Your Garden for Okra
Okra thrives in warm weather and needs plenty of sunshine. So, selecting the right location and preparing the soil are crucial for success.
* Sunlight: Okra needs at least 6-8 hours of direct sunlight per day. Choose a spot in your garden that gets plenty of sun throughout the day.
* Soil: Okra prefers well-drained soil that’s rich in organic matter. Amend your soil with compost or well-rotted manure to improve its fertility and drainage.
* Soil pH: Okra grows best in soil with a pH between 6.0 and 7.0. You can test your soil pH using a soil testing kit and amend it accordingly.
* Spacing: Give your okra plants plenty of room to grow. Space them about 12-18 inches apart in rows that are 3-4 feet apart.
Planting Okra Seeds
Okra is typically grown from seed, and the best time to plant is after the last frost when the soil has warmed up to at least 65°F (18°C).
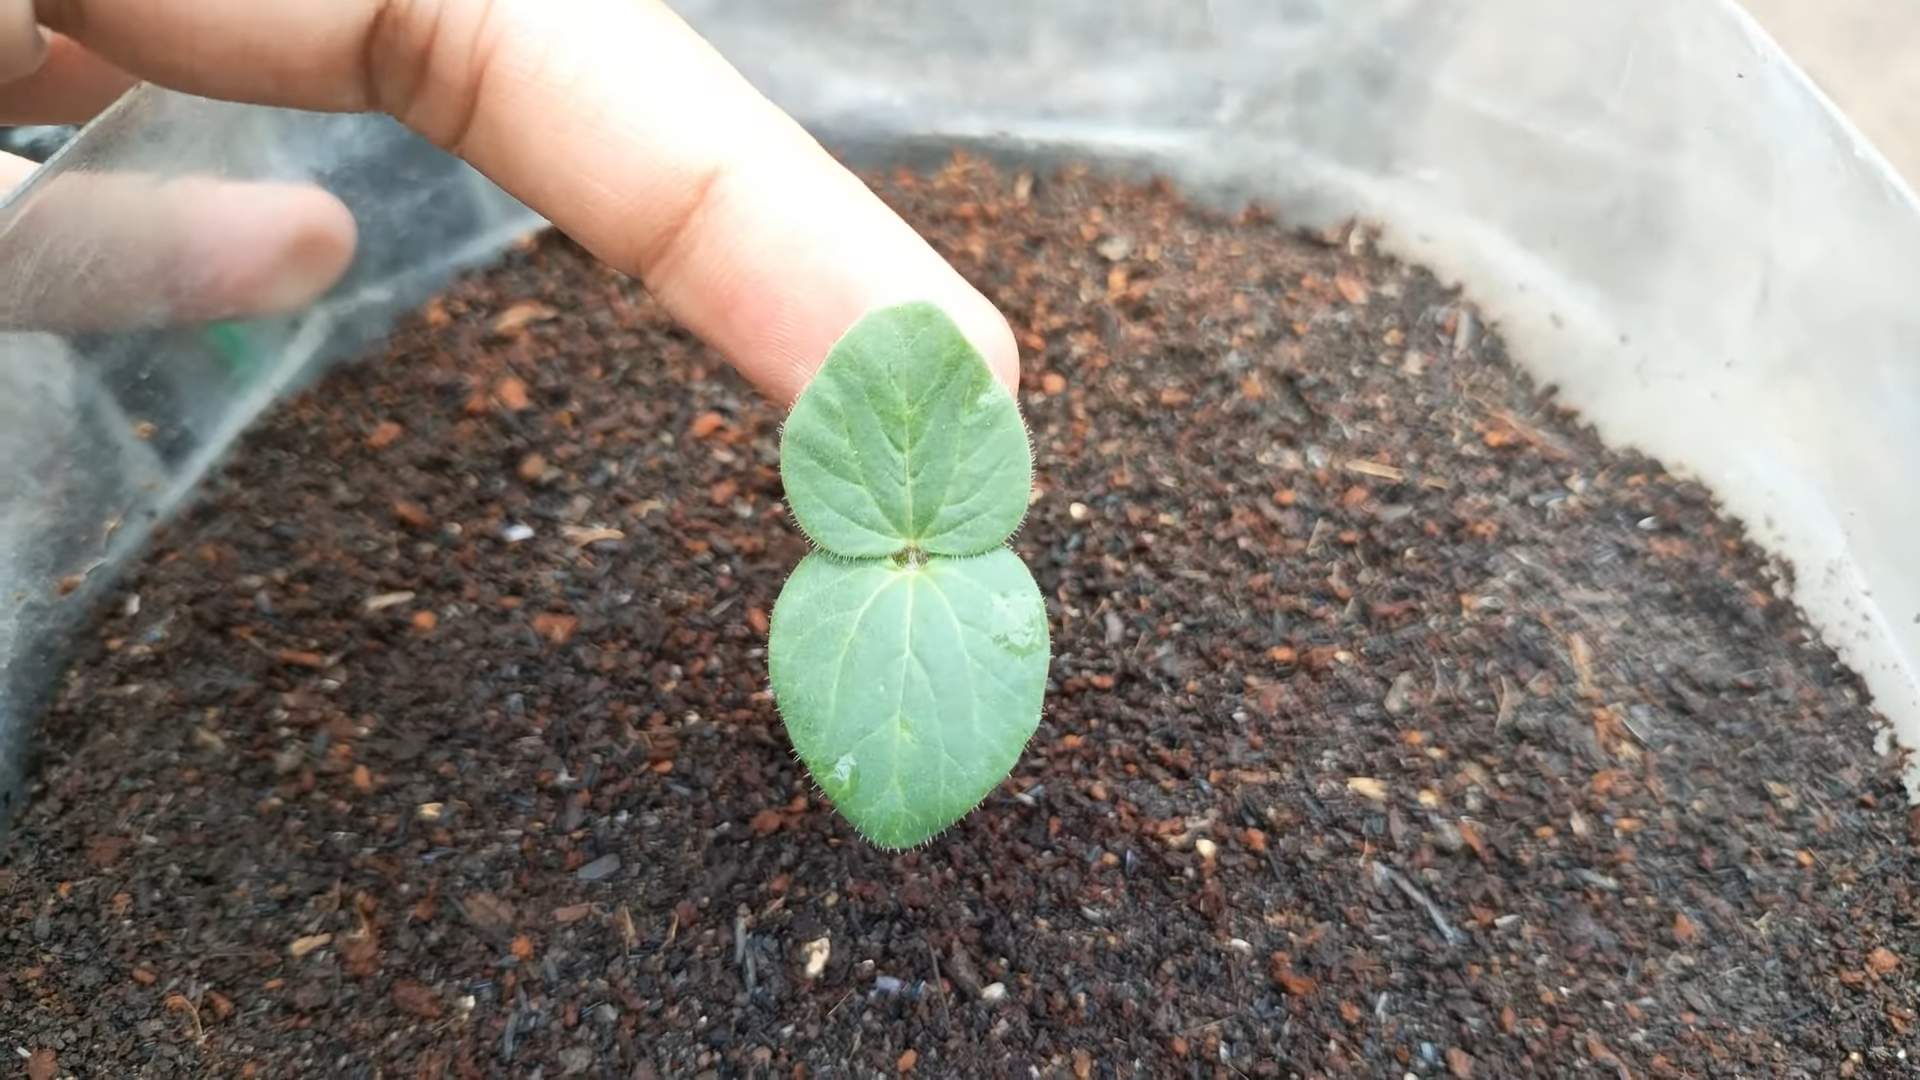
1. Soaking the Seeds: To improve germination, soak the okra seeds in warm water for 12-24 hours before planting. This helps soften the seed coat and encourages sprouting.
2. Direct Sowing: Okra doesn’t transplant well, so it’s best to sow the seeds directly into the garden.
3. Planting Depth: Plant the seeds about 1/2 inch deep.
4. Spacing: As mentioned earlier, space the seeds 12-18 inches apart.
5. Watering: Water the soil thoroughly after planting. Keep the soil consistently moist until the seeds germinate, which usually takes about 7-14 days.
Caring for Your Okra Plants
Once your okra plants have sprouted, it’s important to provide them with the care they need to thrive.
* Watering: Okra needs consistent watering, especially during hot, dry weather. Water deeply and regularly, aiming for about 1 inch of water per week. Avoid overhead watering, as this can promote fungal diseases.
* Fertilizing: Okra is a heavy feeder, so it benefits from regular fertilization. Apply a balanced fertilizer (e.g., 10-10-10) every 4-6 weeks. You can also side-dress your plants with compost or well-rotted manure.
* Weeding: Keep your okra patch free of weeds, as they can compete with your plants for nutrients and water. Hand-pull weeds regularly or use a hoe to cultivate the soil.
* Mulching: Apply a layer of mulch around your okra plants to help retain moisture, suppress weeds, and regulate soil temperature. Organic mulches like straw, hay, or wood chips are excellent choices.
* Pruning: While not essential, pruning can help improve air circulation and encourage bushier growth. Remove any yellowing or damaged leaves, as well as any suckers (small shoots that grow from the base of the plant).
Dealing with Pests and Diseases
Okra is generally a hardy plant, but it can be susceptible to certain pests and diseases. Here are a few common problems and how to deal with them:
* Aphids: These tiny insects can suck the sap from okra leaves, causing them to curl and distort. You can control aphids by spraying them with a strong stream of water, insecticidal soap, or neem oil.
* Flea Beetles: These small, jumping beetles can chew holes in okra leaves. You can control flea beetles by using row covers, applying diatomaceous earth, or spraying with insecticidal soap.
* Corn Earworms: These caterpillars can bore into okra pods, causing damage and making them unmarketable. You can control corn earworms by hand-picking them off the plants, using Bacillus thuringiensis (Bt), or spraying with insecticidal soap.
* Fusarium Wilt: This fungal disease can cause okra plants to wilt and die. To prevent Fusarium wilt, plant resistant varieties, practice crop rotation, and avoid overwatering.
* Root-Knot Nematodes: These microscopic worms can attack okra roots, causing galls and stunting growth. To control root-knot nematodes, plant resistant varieties, practice crop rotation, and amend your soil with organic matter.
Regularly inspect your okra plants for signs of pests and diseases and take action promptly to prevent them from spreading.
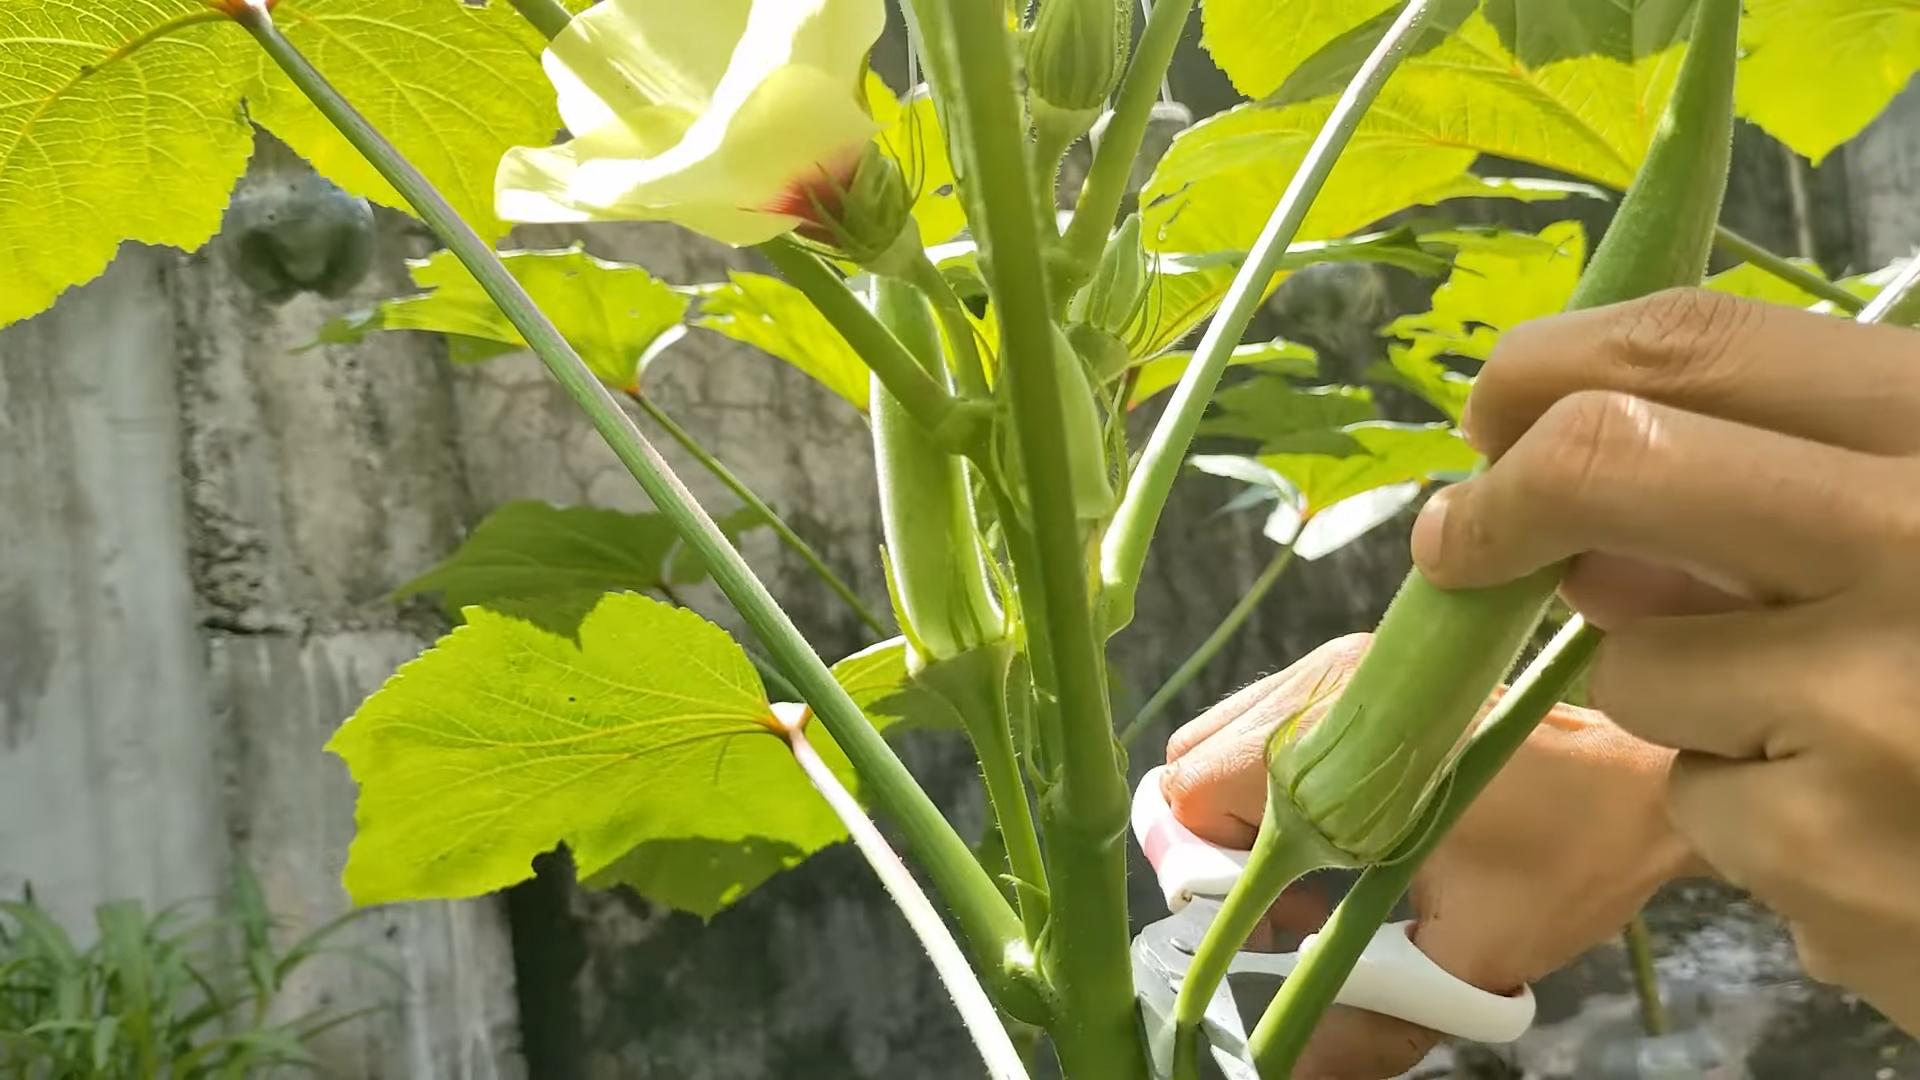
Harvesting Okra
Okra pods are typically ready to harvest about 50-65 days after planting. The key is to harvest them when they’re young and tender, usually when they’re 2-4 inches long.
1. Timing: Harvest okra pods every 1-2 days, as they can become tough and fibrous if left on the plant too long.
2. Tools: Use a sharp knife or pruning shears to cut the pods from the plant.
3. Handling: Wear gloves when harvesting okra, as the pods can be prickly and irritating to the skin.
4. Storage: Store okra pods in the refrigerator for up to a week. You can also freeze them for longer storage.
Important Note: Okra plants continue to produce pods throughout the growing season, so keep harvesting regularly to encourage more growth.
Enjoying Your Okra Harvest
Now for the best part – enjoying the fruits (or rather, vegetables) of your labor! Okra is incredibly versatile and can be used in a variety of dishes.
* Fried Okra: A classic Southern dish, fried okra is crispy, golden brown, and utterly delicious.
* Okra Gumbo: Okra is a key ingredient in gumbo, a flavorful stew that’s popular in Louisiana.
* Roasted Okra: Roasting okra brings out its natural sweetness and creates a slightly caramelized flavor.
* Pickled Okra: Pickled okra is a tangy and crunchy treat that’s perfect as a snack or side dish.
* Okra Soup: Okra can be added to soups and stews to thicken them and add a unique flavor.
Don’t be afraid to experiment with different recipes and find your favorite ways to enjoy your homegrown okra.
Saving Okra Seeds
If you want to save seeds from your okra plants for next year, here’s how:
1. Selection: Choose healthy, vigorous plants with desirable traits.
2. Allowing to Mature: Allow a few pods to mature on the plant until they dry and turn brown.
3. Harvesting: Harvest the dried pods and remove the seeds.
4. Drying: Spread the seeds out on a tray and allow them to dry completely.
5. Storage: Store the dried seeds in an airtight container in a cool, dry place.
By saving your own seeds, you can ensure that you have a supply of okra seeds for years to come.
Troubleshooting Common Okra Problems
Even with the best care, you might encounter some challenges when growing okra. Here are a few common problems and how to troubleshoot them:
* Poor Germination: If your okra seeds aren’t germinating, make sure the soil is warm enough and that you’re keeping it consistently moist. You can also try scarifying the seeds (gently scratching the seed coat) to improve germination.
* Yellowing Leaves: Yellowing leaves can be
Conclusion
So, there you have it! Growing okra at home is not only achievable, but it’s also incredibly rewarding. From the vibrant blooms to the crisp, delicious pods, every stage of the process offers a unique connection to your food. We’ve walked through the essential steps, from selecting the right variety and preparing your soil to nurturing your plants and harvesting your bounty.
But why is this DIY trick a must-try? Beyond the satisfaction of cultivating your own food, growing okra at home offers several compelling advantages. First and foremost, you gain complete control over the growing process. You can ensure your okra is free from harmful pesticides and herbicides, resulting in a healthier and more flavorful product. Store-bought okra often suffers from bruising and a lack of freshness, but homegrown okra can be harvested at its peak ripeness, guaranteeing optimal taste and texture.
Furthermore, growing okra can be a surprisingly economical endeavor. Once you’ve invested in seeds and basic gardening supplies, the ongoing costs are minimal. You’ll be amazed at how much okra a single plant can produce, providing you with a steady supply throughout the growing season. Plus, the process itself is incredibly therapeutic. Spending time in the garden, tending to your plants, can be a wonderful way to de-stress and connect with nature.
Don’t be afraid to experiment with different varieties of okra. Clemson Spineless is a classic choice, known for its smooth pods and reliable yields. Burgundy okra adds a splash of color to your garden with its beautiful red pods, while Emerald okra offers a more compact growth habit, making it ideal for smaller spaces. You can also try different planting techniques, such as succession planting, to extend your harvest season.
Consider companion planting to enhance your okra’s growth and deter pests. Basil, marigolds, and nasturtiums are all excellent choices. They attract beneficial insects and help to keep harmful pests at bay. You can also add compost tea or other organic fertilizers to boost your okra’s growth and improve its overall health.
Growing okra at home is more than just a gardening project; it’s an opportunity to connect with nature, nourish your body, and experience the satisfaction of cultivating your own food. It’s a chance to learn new skills, experiment with different techniques, and create a thriving garden that provides you with fresh, delicious okra all season long.
We encourage you to give this DIY trick a try. Start small, be patient, and don’t be afraid to make mistakes. Gardening is a learning process, and every season brings new challenges and opportunities. And most importantly, share your experience with us! We’d love to hear about your successes, your challenges, and any tips or tricks you’ve discovered along the way. Share your photos, your stories, and your questions in the comments below. Let’s create a community of okra growers who support and inspire each other. So, grab your seeds, get your hands dirty, and start growing your own delicious okra today! You won’t regret it.
Frequently Asked Questions (FAQ)
What is the best time to plant okra seeds?
The ideal time to plant okra seeds is when the soil temperature has consistently reached at least 65°F (18°C). This typically occurs in late spring or early summer, after the last frost. Planting too early in cold soil can lead to poor germination and stunted growth. In warmer climates, you may be able to plant okra seeds earlier in the spring or even in late summer for a fall harvest. Check your local weather forecasts and planting guides to determine the best time to plant okra in your specific region.
How much sunlight does okra need?
Okra thrives in full sunlight, requiring at least 6-8 hours of direct sunlight per day. Insufficient sunlight can result in leggy plants with reduced yields. Choose a planting location that receives ample sunlight throughout the day. If you’re growing okra in containers, make sure to place them in a sunny spot. If you live in a particularly hot climate, some afternoon shade may be beneficial to prevent the plants from overheating.
What type of soil is best for growing okra?
Okra prefers well-drained, fertile soil with a slightly acidic to neutral pH (6.0-7.0). Amend heavy clay soil with compost, aged manure, or other organic matter to improve drainage and aeration. Sandy soil can be improved by adding compost or peat moss to increase its water-holding capacity. Before planting, incorporate a balanced fertilizer into the soil to provide essential nutrients for healthy growth. Regular soil testing can help you determine the specific nutrient needs of your soil.
How often should I water my okra plants?
Okra plants need consistent moisture, especially during hot, dry weather. Water deeply and regularly, aiming to keep the soil consistently moist but not waterlogged. Avoid overhead watering, as this can promote fungal diseases. Instead, water at the base of the plants, using a soaker hose or drip irrigation system. Mulching around the plants can help to retain moisture and suppress weeds. Check the soil moisture regularly and adjust your watering schedule accordingly.
How do I harvest okra pods?
Okra pods are typically ready to harvest 50-65 days after planting. Harvest the pods when they are young and tender, typically 2-4 inches long. Use a sharp knife or pruning shears to cut the pods from the plant, leaving a short stem attached. Harvest okra pods frequently, every 1-2 days, to encourage continued production. Overripe okra pods become tough and fibrous. Wear gloves when harvesting okra, as the pods can be prickly and irritating to the skin.
What are some common pests and diseases that affect okra?
Okra can be susceptible to various pests and diseases, including aphids, flea beetles, corn earworms, and fungal diseases like powdery mildew and verticillium wilt. Regularly inspect your plants for signs of pests or diseases. Use organic pest control methods, such as insecticidal soap or neem oil, to control aphids and flea beetles. Handpick corn earworms from the plants. To prevent fungal diseases, ensure good air circulation around the plants, avoid overhead watering, and apply a fungicide if necessary. Crop rotation can also help to prevent soilborne diseases.
Can I grow okra in containers?
Yes, okra can be successfully grown in containers, but you’ll need to choose a large container, at least 10-12 inches in diameter, to accommodate the plant’s root system. Use a well-draining potting mix and provide regular watering and fertilization. Place the container in a sunny location that receives at least 6-8 hours of direct sunlight per day. Container-grown okra may require more frequent watering and fertilization than okra grown in the ground.
How can I extend the okra harvest season?
To extend the okra harvest season, consider succession planting. Plant a new batch of okra seeds every 2-3 weeks to ensure a continuous supply of pods. You can also try planting different varieties of okra with varying maturity dates. Additionally, proper care and maintenance, including regular watering, fertilization, and pest control, can help to prolong the harvest season. In warmer climates, you may be able to overwinter okra plants by providing protection from frost and cold temperatures.

Leave a Comment